Contact me

Thursday, September 29, 2016

September Cardmakng - Handmade Paper Cast featured on these arty cards

 I created the handmade paper casts using white paper pulp and my own moulds which I made using hot glue.  I love the texture of them and so after finding a little collection of them I decided to feature them as the quick card for this cardmaking session!
I chose appropriate cardstock and trimmed the pieces to 4" x 5.25" and embossed them with an appropriate embossing folder.  I used a bit of double sided tape to adhere my paper cast to the layer and another little piece to adhere my greeting to the paper cast and then used my sewing machine with white thread and stitched all the way around capturing the greeting in the process!  I love adding stitching to my cards!!  To finish off the cards, we simply glued this stitched element to a coordinating card front.  I like the little greetings which help show off as much of the paper cast as possible!!

UPDATE:

A few more Christmas ones!!


And a few more that were included in the kits from last week's class!  Love the simplicity of these cards!!

Therese

September Cardmaking - Faux doodling cards with collage buttons

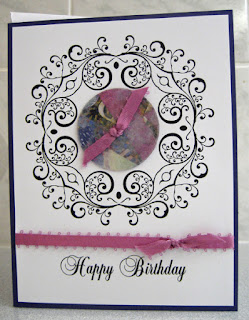
 These cards all feature collage buttons - you can see all the buttons I created  here.  in the past I have doodled around my collage buttons like on these cards but being a little short on time I decided that I would search the internet for a few digital images I could use instead.  Not sure that I saved any time but I did come up with a few circular frames that I could use!!  The first one I downloaded from Open Clipart.  I did modify the original just a bit by cutting and pasting a flourish to replace a more graphic element that was positioned on the outside border.  The flourish works better for what I was looking for.  The secong one is a doily combined with a circular rope frame which I got from CLKER.  I laid out my designs in Corel Draw by first sizing the graphics to accommodate the 1.5" collage buttons, added greetings and printed them on white cardstock.  Once the buttons were created I chose card fronts and ribbon that coordinated.  I used a large eyed needle to thread the ribbon through the cardstock and tied a double knot to keep the button in place.  I added a length of ribbon between the greeting and the focal element adhering the ends to the back of the layer using double sided tape.  Next, this whole element was glued to a coordinating card front.  I tied another short length of ribbon to the piece on the front using a single knot to add texture and interest.  I am happy with these cards though I would have preferred to use my own doodled designs.  I will be doodling more of these circular frames and will scan them before I use them so I can laser print them for future cardmaking.  I will get a few more made as these are very similar in colour!!

UPDATE:

Here are a few more of the cards I made up from the kits from last week's class!!  Love those buttons!!

Therese

September Cardmaking - a card featuring a die cut leaf

 My first card for September's cardmaking class.  I started by choosing this cool paper for my background.  I love it for fall cards!!  I am very near the last piece of this one!! Next, I die cut the leaves from some coordinating pieces of cardstock (4" x 2.75"). It was a little tricky as this leaf (TH) is on a large die (Tattered Leaves) along with several others so I drew guidelines in pencil on the foam to help me position the cardstock correctly every time!  I decided to create my greetings on vellum so printed a bunch in coordinating colours.  I started by gluing my background to my card front.  I had a variety of coordinating colours.  Next, I slipped the greeting (4.25" x 3/4") through my die cut leaf and lined up the greeting where I wanted it to be and stapled it in place.  I trimmed away the vellum end sticking out from behind the die cut.  I added 3D foam tape to the back of the die cut and mounted it on my card front.  I flagged the end of the vellum greeting and stapled it again.  On the left hand card I could not add a staple because the throat of my stapler was not deep enough so I just used a small piece of double sided tape on the back of the vellum just below the words.  It worked perfectly and does not show on the front.  So two different options for this card kit and after class we discussed maybe using a landscape layout so I will consider that for my left over kits.

Update:


Here are a few more I made up since class last week.  We had talked at the end of the class that maybe a bit of sponging would look nice on the edges of the leaf so I gave that a try.  I also added glitter faux stitching on the one leaf die cut on the left hand side.  I did manage to find quite a few layouts that worked with the elements in this kit.  I like to change things up a bit when I am making multiples of any card.
Therese

Pink & black little or big girl cards!

I had these two label elements on the back side of my desk.  I found them in the process of cleaning up before I started on my cardmaking kits for this week.  I had created backgrounds for them originally but they were too busy so I went looking for something a  little more subtle.  I found a piece of hand decorated paper and a piece of embossed pink handmade paper which worked really well and glued them to pink card fronts.  I watercoloured the punched images (dragonfly - stamped - no credit, hearts by Torico), layered them onto the black punchies and then glued these to the center of my serendipity labels.  For the left hand card, I attached the label using silver brads and layered pink and black cardstock strips below my stamped greeting (SU).  For the right hand card, I used the slot punch on each end of the label, ran a strip of black cardstock through the holes and machine stitched all the way around the handmade paper background capturing the ends in the process.  I added a laser printed punchie greeting (Window Punch SU) layered onto a black Modern Label (SU) punchie to finish off my card.   Really happy with how these turned out - one of a kind!!

Therese

Quick and easy birdie birthday card!

I love these little birds!   One of the pieces I found on the back side of my desk this week and decided to make a card with it.  I cut the 4" x 4" piece of bird decorative paper in two and glued the small strip at the top of a blue card and the large piece to the bottom edge leaving an even margin.  I layered the laser printed greeting onto a piece of red and they a piece of yellow cardstock.  I added faux stitching in red with a fine tip marker to the greeting!!
This one was pretty quick and easy!  Nice to have a few designs that you can do up quickly!

Therese

Trees and a loon features on this birthday card!

This card is similar to this one as I made the background from a strip of decorative paper which I cut into two pieces and taped together on the back to give me a piece that was 4" x 5.25".  I stitched on a piece of brown fabric to cover the joint and then stitched on a piece of coordinating rick rack to the left of that.  I layered the laser transparency greeting over the background, stitched all the way around capturing both ends in the process thereby securing it to the background.  I watercoloured the laser printed loon image (CLKER), layered it onto dark blue, added some double sided tape to the back and then tucked it behind the greeting before adhering it to this layer.  Lastly, I glued this whole element to a dark brown card front.  I really like how all the elements complement each other on this card!  Another to add to the stash.

Therese

Card with a quilted background and a crocus!

Another card that came from supplies sitting on the far side of my desk!
The crocus (Blackberry Jelly) image was what I found so I went looking in my stash of backgrounds and found this quilted one whose colours were good so I embossed it with the Lattice embossing folder (SU).  I watercoloured the image, layered it onto yellow cardstock and glued it to my background with double sided tape.  I found the greeting - laser printed transparency - in my greeting stash, laid it on my layer so that the H of the greeting was in the crook of the crocus, folded the right hand side of it to the back of the background and then machine stitched all the way around the edge capturing the folded right side of the greeting in the process.  I glued this whole layer to a yellow card front.  The greeting is free on the left hand side but there is enough pressure from the stitching to keep the whole greeting nice and snug to the card front.  Worked our pretty well!

Therese

Birds and a kite - a great kids card!

When I was preparing for my card class this week I found a few supplies sitting on the far side of my desk which I thought would be worth translating into cards if at all possible.  The birds paper was a long strip which I cut down to two pieces 2" x 5.25" and then set them side by side and taped them across the back to create a background.  It did require that I add something over where they joined so I went looking for items that coordinated.  I found the roll of green mesh at the thrift store a few weeks ago.  It is about a half inch wide and I have no idea what it's original use was but it worked perfectly for this card.  I cut two lengths and glued the ends to the back of the decorative paper.  I added a length of large red rick rack in between which actually covers the joint.  Again I adhered the ends to the back of the paper using double sided tape.  Next, I stitched on the laser printed greeting with my sewing machine and white thread.  I glued this whole layer to a kraft card front.  I created a 3D embellishment by gluing a punched image of a kite (Birds Cards) which I watercoloured to a red scallop circle punchie (SU).  I pierced each scallop to echo the stitching and mounted it with 3D foam tape on my card front overlapping the greeting and the green mesh.  Pretty happy with how this one turned out!!

Therese