Contact me

Thursday, September 29, 2016

September Cardmakng - Handmade Paper Cast featured on these arty cards

 I created the handmade paper casts using white paper pulp and my own moulds which I made using hot glue.  I love the texture of them and so after finding a little collection of them I decided to feature them as the quick card for this cardmaking session!
I chose appropriate cardstock and trimmed the pieces to 4" x 5.25" and embossed them with an appropriate embossing folder.  I used a bit of double sided tape to adhere my paper cast to the layer and another little piece to adhere my greeting to the paper cast and then used my sewing machine with white thread and stitched all the way around capturing the greeting in the process!  I love adding stitching to my cards!!  To finish off the cards, we simply glued this stitched element to a coordinating card front.  I like the little greetings which help show off as much of the paper cast as possible!!

UPDATE:

A few more Christmas ones!!


And a few more that were included in the kits from last week's class!  Love the simplicity of these cards!!

Therese

September Cardmaking - Faux doodling cards with collage buttons

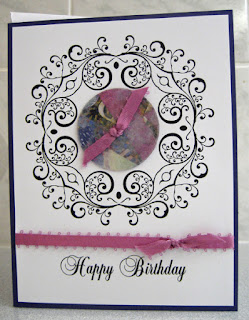
 These cards all feature collage buttons - you can see all the buttons I created  here.  in the past I have doodled around my collage buttons like on these cards but being a little short on time I decided that I would search the internet for a few digital images I could use instead.  Not sure that I saved any time but I did come up with a few circular frames that I could use!!  The first one I downloaded from Open Clipart.  I did modify the original just a bit by cutting and pasting a flourish to replace a more graphic element that was positioned on the outside border.  The flourish works better for what I was looking for.  The secong one is a doily combined with a circular rope frame which I got from CLKER.  I laid out my designs in Corel Draw by first sizing the graphics to accommodate the 1.5" collage buttons, added greetings and printed them on white cardstock.  Once the buttons were created I chose card fronts and ribbon that coordinated.  I used a large eyed needle to thread the ribbon through the cardstock and tied a double knot to keep the button in place.  I added a length of ribbon between the greeting and the focal element adhering the ends to the back of the layer using double sided tape.  Next, this whole element was glued to a coordinating card front.  I tied another short length of ribbon to the piece on the front using a single knot to add texture and interest.  I am happy with these cards though I would have preferred to use my own doodled designs.  I will be doodling more of these circular frames and will scan them before I use them so I can laser print them for future cardmaking.  I will get a few more made as these are very similar in colour!!

UPDATE:

Here are a few more of the cards I made up from the kits from last week's class!!  Love those buttons!!

Therese

September Cardmaking - a card featuring a die cut leaf

 My first card for September's cardmaking class.  I started by choosing this cool paper for my background.  I love it for fall cards!!  I am very near the last piece of this one!! Next, I die cut the leaves from some coordinating pieces of cardstock (4" x 2.75"). It was a little tricky as this leaf (TH) is on a large die (Tattered Leaves) along with several others so I drew guidelines in pencil on the foam to help me position the cardstock correctly every time!  I decided to create my greetings on vellum so printed a bunch in coordinating colours.  I started by gluing my background to my card front.  I had a variety of coordinating colours.  Next, I slipped the greeting (4.25" x 3/4") through my die cut leaf and lined up the greeting where I wanted it to be and stapled it in place.  I trimmed away the vellum end sticking out from behind the die cut.  I added 3D foam tape to the back of the die cut and mounted it on my card front.  I flagged the end of the vellum greeting and stapled it again.  On the left hand card I could not add a staple because the throat of my stapler was not deep enough so I just used a small piece of double sided tape on the back of the vellum just below the words.  It worked perfectly and does not show on the front.  So two different options for this card kit and after class we discussed maybe using a landscape layout so I will consider that for my left over kits.

Update:


Here are a few more I made up since class last week.  We had talked at the end of the class that maybe a bit of sponging would look nice on the edges of the leaf so I gave that a try.  I also added glitter faux stitching on the one leaf die cut on the left hand side.  I did manage to find quite a few layouts that worked with the elements in this kit.  I like to change things up a bit when I am making multiples of any card.
Therese

Pink & black little or big girl cards!

I had these two label elements on the back side of my desk.  I found them in the process of cleaning up before I started on my cardmaking kits for this week.  I had created backgrounds for them originally but they were too busy so I went looking for something a  little more subtle.  I found a piece of hand decorated paper and a piece of embossed pink handmade paper which worked really well and glued them to pink card fronts.  I watercoloured the punched images (dragonfly - stamped - no credit, hearts by Torico), layered them onto the black punchies and then glued these to the center of my serendipity labels.  For the left hand card, I attached the label using silver brads and layered pink and black cardstock strips below my stamped greeting (SU).  For the right hand card, I used the slot punch on each end of the label, ran a strip of black cardstock through the holes and machine stitched all the way around the handmade paper background capturing the ends in the process.  I added a laser printed punchie greeting (Window Punch SU) layered onto a black Modern Label (SU) punchie to finish off my card.   Really happy with how these turned out - one of a kind!!

Therese

Quick and easy birdie birthday card!

I love these little birds!   One of the pieces I found on the back side of my desk this week and decided to make a card with it.  I cut the 4" x 4" piece of bird decorative paper in two and glued the small strip at the top of a blue card and the large piece to the bottom edge leaving an even margin.  I layered the laser printed greeting onto a piece of red and they a piece of yellow cardstock.  I added faux stitching in red with a fine tip marker to the greeting!!
This one was pretty quick and easy!  Nice to have a few designs that you can do up quickly!

Therese

Trees and a loon features on this birthday card!

This card is similar to this one as I made the background from a strip of decorative paper which I cut into two pieces and taped together on the back to give me a piece that was 4" x 5.25".  I stitched on a piece of brown fabric to cover the joint and then stitched on a piece of coordinating rick rack to the left of that.  I layered the laser transparency greeting over the background, stitched all the way around capturing both ends in the process thereby securing it to the background.  I watercoloured the laser printed loon image (CLKER), layered it onto dark blue, added some double sided tape to the back and then tucked it behind the greeting before adhering it to this layer.  Lastly, I glued this whole element to a dark brown card front.  I really like how all the elements complement each other on this card!  Another to add to the stash.

Therese

Card with a quilted background and a crocus!

Another card that came from supplies sitting on the far side of my desk!
The crocus (Blackberry Jelly) image was what I found so I went looking in my stash of backgrounds and found this quilted one whose colours were good so I embossed it with the Lattice embossing folder (SU).  I watercoloured the image, layered it onto yellow cardstock and glued it to my background with double sided tape.  I found the greeting - laser printed transparency - in my greeting stash, laid it on my layer so that the H of the greeting was in the crook of the crocus, folded the right hand side of it to the back of the background and then machine stitched all the way around the edge capturing the folded right side of the greeting in the process.  I glued this whole layer to a yellow card front.  The greeting is free on the left hand side but there is enough pressure from the stitching to keep the whole greeting nice and snug to the card front.  Worked our pretty well!

Therese

Birds and a kite - a great kids card!

When I was preparing for my card class this week I found a few supplies sitting on the far side of my desk which I thought would be worth translating into cards if at all possible.  The birds paper was a long strip which I cut down to two pieces 2" x 5.25" and then set them side by side and taped them across the back to create a background.  It did require that I add something over where they joined so I went looking for items that coordinated.  I found the roll of green mesh at the thrift store a few weeks ago.  It is about a half inch wide and I have no idea what it's original use was but it worked perfectly for this card.  I cut two lengths and glued the ends to the back of the decorative paper.  I added a length of large red rick rack in between which actually covers the joint.  Again I adhered the ends to the back of the paper using double sided tape.  Next, I stitched on the laser printed greeting with my sewing machine and white thread.  I glued this whole layer to a kraft card front.  I created a 3D embellishment by gluing a punched image of a kite (Birds Cards) which I watercoloured to a red scallop circle punchie (SU).  I pierced each scallop to echo the stitching and mounted it with 3D foam tape on my card front overlapping the greeting and the green mesh.  Pretty happy with how this one turned out!!

Therese

Monday, September 26, 2016

Collage buttons for cards!

 I made a batch of collage buttons for a set of cards for my cardmaking class this week.  It is always fun to make these!!  I used serendipity paper, gift wrap, hand decorated paper, fabric paper, foil, decorative paper from an envelope and several colour washed stamped images.  You can check out the instructions by clicking this link, or Clicking Tutorials on my top bar and scrolling down to click the Collage Button Tutorial. I will be posting the cards later this week and will see about adding a link to that post here once they are up!

Therese

Sunday, September 25, 2016

Sweet girl's birthday card

Our youngest granddaughter is one!!  How fast a year goes by!  We were fortunate to have the chance to visit with her this summer - she is a sweet happy little girl who is content to entertain herself as long as she is included in the group.
This card is a bit larger than the standard card.  I used white cardstock and stamped the edge with a handmade stamp that has little circles on it in light green ink.  I added the plaid bordered decorative piece and then overlaid the coordinating decorative ribbon on the left hand side gluing the ends to the inside of the card.  The cute little image is one I received in a swap so keeping with the green and pink colour scheme (my favorite) I watercoloured the cute little bugs.  I created a layer using pink & green cardstock, added my image, punched the bottom with a scallop punch (SU) and then I punched little holes in each scallop.  I mounted the image over the ribbon on my card front using double sided tape.  I added a length of vintage seam binding in green to the birthday greeting tag and mounted it below the image using 3D foam tape.  The very last thing I did was add some pearly dimensional paint to their wings which I will leave to dry overnight.  We will be seeing her again later this year and look forward to seeing her walk and being her fun little self.

Therese

Wednesday, September 21, 2016

Sympathy card

My uncle passed away last week.  He had just recently had his 90th birthday.  I made this sympathy card for his family.
I started with a light blue cardstock which coordinated with my image - a off cut from an invite I had in my stash bucket on my desk that I thought was perfect in colouring for this occasion.  I stamped a circle background stamp all the way around the edges on the front using Versamark ink which was exactly what I was looking for in intensity.  I added a large rectangle of darker blue which I embossed with a floral embossing folder (Darice) and then I added a length of coordinating green ribbon across it and glued both ends to the inside of the card.  The ribbon  slides into a slit on the spine of the card which I cut with my slot punch (SU) - works perfectly every time.    I adhered my image over the ribbon using 3D foam tape on the right hand side and double sided tape on the left to accommodate the thickness of the embossed layer.  I punched out a laser printed greeting, layered it onto a Modern Label punchie in a coordinating green and mounted it to the front of my card using double sided tape.  Very happy with how it worked out and I hope it will be a comfort for those who are grieving.

Therese

Tuesday, September 13, 2016

"Some bunny cares" fabric postcards

I created these fabric postcards the other day from a thrift store find that had bunny lace and these two little embroidered bunnies!  I ironed the fabric and discovered that because the pieces were rounded these little guys would need to have additions in the corners to create a 4" x 6"postcard.  I added triangles of yellow that coordinate with the bows around their necks and then cut them to size leaving a half inch on each long side so I could fold them over to the back and adhere them in place using fusible hem tape.  When I cut the backs I left them a half inch longer on each short end so I could fold them over to the fronts and thereby creating finished edges all the way around my postcards.   I added some batting between the two and fused my edges down.  This worked very well for finishing them off nicely.  I stitched all the way around the edge as well to get all the layers nicely connected.  I added a line for the to and from and then stitched in some grass with green embroidery thread.  I had been experimenting with fabric labels for my next project so I had two of these little "some bunny cares" labels so I applied them to the bottom of the postcards.  I will be sending these as RAKs when I feel inclined to.

Therese

Monday, September 12, 2016

A large fabric collage created from small strips of scrap fabric


I created this fabric collage background fabric piece the other day by simply sewing small strips of fabric that coordinate loosely onto a substrate fabric.  It is 6" wide which will be just perfect for making fabric postcards for swap I have coming up later this year.  The pieces on the right hand side were tightly woven before being sewn down.  The darker middle section was much more loosely woven before being stitched into place.  It was fun to play with these small pieces of fabric which I found at a thrift store a while back.  Once I have made projects with this piece I will come back and them them here.  

Therese

Saturday, September 10, 2016

Large birthday card with a layered flower embellishment


A card for my oldest daughter who is having a significant birthday this weekend!!!  
She loves autumn colours so I chose a piece of scrapbooking paper that reflected those colours with attitude.  I added a strip of brown grosgrain and a length of lace using double sided tape and tucked the ends to the back.  I created the coordinating embellishment using a large yellowish silk flower, a smaller brown one, a green sequin and held them all together with a dark brown brad.  I glued the decorative layer to a large deep red card front and adhered the embellishment over the ribbon using 3D foam tape.  I punched out the laser printed greeting using the Decorative Label punch (SU) and punched another in dark brown.  I cut the brown one in half lengthwise and mounted both halves to the back of the punchie using double sided tape.  I mounted the greeting to my card front using 3D foam tape!! 
They will all be here for the day tomorrow!!!  It will be a wonderful day of celebration!!

Therese

Tutorial - laser toner resist & watercolour cards


I made laser toner resist cards a while back and this time I decided to take a few photos and prepare a tutorial to show the process of making them.  I used free digital images from CLKER for these cards as well and created my layouts in Corel Draw.  I created backgrounds and layouts with the images - 4 per 8.5" x 11" and laser printed them onto white cardstock.  I trimmed them apart to 4.25" x 5.5".


Here is what you are going to need:
quarter sheet laser printed images/backgrounds
watercolours
water
a large round brush
and a waterproof work surface
Wet your watercolours so they are really juicy. Choose an image/background.  I chose this hexagonal background for my first one.  I started by adding several splotches of yellow, added several blue splotches and where they mixed it created some green areas. I ran blue all the way around the edges to make sure that there would be colour to the edge all the way around. Keep adding colour until you are happy with how they look.  Don't mix too much - we don't want mud brown.  That is it!!!  Set this one aside and create another one.

For this one I tried adding plastic wrap over the wet paint to get a cool pattern but because the cardstock is very absorbent I was not able to get much of a pattern.


This one is a floral background. In this case I was a little more careful.  I painted all the centers yellow first, then I added colour to the petals and finally I painted the background green.  I found the large paintbrush worked well and helped me resist being really finicky with my application of colour.
So a different brush and a different colour palette resulted in a bit of a different look for these cards!!
It it worth your while to make a few while you are at it.  I would advise having a few blank images/backgrounds on hand for last minute cards!!

Once they are dry they may need to be pressed to flatten them.  You may also consider wiping the surface with a dry cloth to remove any watercolour that remains on the laser toner which will make it pop a little more.  Once they are pressed flat, it is time to make cards with them!!  Trimmed to 4" x 5.25" they are perfect for the front of an A2 sized card. They can be embellished with greetings, ribbon, bling - whatever you are inspired to add.
Have fun and leave me a link in the comments with your creations so I can go take a look!!

Therese

Laser toner resist/watercolour cards with layered greetings


Another set of laser toner resist cards!!

For these ones I used all over backgrounds from CLKER which I watercoloured with bright colours. Really like how they worked out!!

Once they were dry, I trimmed them to 4' x 5.25" and glued them to black card fronts.   I added a 1/4" strip of black cardstock and black & white punchie greeting to finish them off !!
You can check out the other ones here and here. Just another option for this quick and easy technique.  Give it a try and leave me a comment with a link to what you created!!

Therese

Thursday, September 08, 2016

A couple larger fabric collage heart cards


These fabric collage hearts were a bit bigger than the others I made so they did not work well for A2 sized cards which I what I usually make.  So I dug into my envelope stash and found a couple envelopes that were just a bit larger and created my cards to fit in them.
For my first card, I created a white card which fit in the envelope I had chosen. I created a background by adhering a strip of green cardstock to a piece of blue cardstock, trimmed it to fit on my card front and embossed it with the Swiss Dot embossing folder.  I had to put it through twice so I was careful the second time to position my top plate so it lined up with the last row of dots so the end of the folder would not crush what I had embossed the first time.  Worked perfectly!!  After auditioning my fabric collage heart I felt that the background needed a bit of something so I went digging in my lace stash and found this one that worked well.  I cut off the length I needed, applied a very thin layer of glue on the embossed green strip and positioned the lace over it.  I folded the ends to the back and adhered them with double sided tape.  I added my heart and machine stitched it in place using coordinating thread.  I added a handmade paper heart punchie which I tied on with pink embroidery thread.  I added a layered greeting below my heart and glued this embellished layer to my white card front.  After a bit I thought maybe the handmade paper heart needed a "bit of something" so I outlined it with dimensional pearl fabric paint and added a few dots as well.  To keep the thread ends out of the paint while it dried I positioned the card upside down on a shelf and held it in place with a little weight. Perfect!  The paint dried perfectly and the thread remained clean.
For my second card, I created a navy card to fit in my envelope then cut a yellow and green layer each a bit smaller than the other.  I embossed the green one with a heart embossing folder, added my fabric collage heart and machine stitched it in place.  I embellished it with a large brad which I coloured with a Sharpie marker to make it the right colour and then slipped four short pieces of soft tulle between the tangs on the back of the brad before inserting it in a hole which I made with awl so it would be big enough.  Really like how that worked out!!  I colourwashed a punched laser printed greeting with watercolour to coordinate, highlighted the edges with a black permanent marker and adhered it below the heart using 3D foam tape.
I am really liking these cards! They are artsy and unique!!  You can check out the others I have made here and here.

Therese

Wednesday, September 07, 2016

Another batch of laser toner resist cards


Another batch of laser toner resit cards!!  I have reused some of the images I really liked from the first set and added a few new ones.  Several of these required a bit more detail in the colouring with the watercolour - the butterflies and the flowers.  The other two I was able to apply colour to highlight the greeting which worked out really well.
Pretty happy with these cards!!

Therese


Tuesday, September 06, 2016

Quick and easy - laser toner resist cards

I have been pondering ways of creating quick & easy cards and here is the first technique I worked out - laser toner resist!!  All of these cards use black toner from a laser printer as the resist along with waterbased colouring mediums.  All of the images are from CLKER.  I created the digital files using Corel Draw but any layout or word processing software could be used for laying them out and then printed them on 8.5" x 11" white cardstock.  I cut them into quarter sheets and then added colour!!  These first three have been coloured using SU watercolour pencils.  For the first one I applied the colour to a silicone craft sheet, spritzed it with water and placed my quarter sheet with the image facing down in the wet paint.  Worked out perfectly!  I wanted the words in the pink area.  I did add a bit of watercolour with the crayons to certain areas - outside edges, some greenery and a few flowers and then spread the colour with a wet paintbrush.
For the two butterflies I applied the crayons to the areas I wanted a specific colour and then spread the paint with a wet paintbrush.  I added the blue on the outside edges by colouring on my craft sheet with the crayon and then picking up the colour with a wet foam brush.  It gives a bit of a different look.   Really happy with how these turned out.  The fun is that these can be painted any colour!!  So, next time I print them out I can make cards that look different by choosing different colours and/or colouring mediums.  FUN!!
There is one missing from this set - it was printed in gray and I was not happy with the result of that one so it has been added to the serendipity stash bin.  I like the contrast of black with the colour much better and in some cases, it was beneficial to wipe them a bit after they are dry to remove any colour that remained on the laser printing.  These buckled a bit with the amount of water I had applied so I let them dry and pressed them under weight to flatten them. You could dry them more quickly with a heat gun and then press them.  To make the cards I trimmed the images to 4" x 5.25" and adhered them to a coordinating card front.


 For this set of cards I used one of the grungy CLKER backgrounds and added images and greetings. I did have to use images or fonts filled with white if I did not want the background to show through - for example, the rose and Happy Birthday.  The heart was transparent and the background shows through.

For these ones I used watercolour from a kids set and a foam brush, randomly adding strokes of colour that worked together until I was happy with the look of the piece.  I did add colour to the flower, the heart and the Happy Birthday afterwards with a smaller paintbrush to get them to stand out more.
 For this set I used Distress Ink pads applied directly to my silicone craft sheet, spritzed with water and then laid the cardstock into the puddle of paint with the image facing down.  I kept sopping up paint until I was happy with how it looked.   I really liked this process and it was possible to choose to place certain colours in specific areas.  I really wanted the top of the thank you card to be lighter and it turned out just like I wanted it to!!

UPDATE:  I have made a few more of these cards since this posting and have created a tutorial as well.  You can find the other cards here and here.   The tutorial is here or you can CLICK Tutorials above and scroll the the bottom of the list and click the link.

So this has been a fun experiment!!  I found it was relatively easy to create some artsy cards using white cardstock, some free digital images, my laser printer and some easily available colouring mediums.  The kids sets of watercolours are on sale at this time of the year and will provide colour for hundreds of cards.
I challenge you to give it a try and let me know how it works out for you!!  Leave me a comment with a link to your creations and I will go and check them out!!

Therese

A few more fabric collage cards


A few more cards that I made with the fabric collages I created a while back.  The collages were created by machine stitching together coordinating fabric scraps and then free hand cutting hearts from them.  
For the first card, I adhered two kraft cardstock strips to a piece of embossed (Swiss Dots) navy cardstock.  I added a layer of scallop edged kraft tulle (SU) adhering the ends to the back with double sided tape.  I positioned my fabric collage heart and machine stitched it in place using coordinating thread.  I added a scalloped heart punchie button which I tied on with kraft coloured embroidery thread knotted twice to keep the button in place.  I colour washed a laser printed greeting and mounted it to this layer using two tiny black brads.  This embellished layer was then adhered to a dark red card front to complete my card.  
For my second card, I stitched my fabric collage heart to an ivory layer and added a paper button tied on with black thread.  I used my stamping jig to stamp on the greeting (SU) in black in exactly the right place.  I layered this onto navy cardstock and machine stitched them together using navy thread.  This embellished layer was then adhered to a dark red card front.  
You can check out the other cards I made with my fabric collage hearts here.   

Therese