Contact me

Tuesday, November 30, 2021

My angel tree topper all spruced up


I spent the afternoon sprucing up my angel tree topper.  It is a vintage tree topper for sure.  My good friend Lorraine crocheted it for me over forty years ago and has been the only tree topper we have had ever since.  She had stiffened the body, wings and halo with sugar water over a cone form.  Over the years they had discoloured and I wanted to redo it.  Removing the sugar water and redoing it seemed like a very daunting task and therefore the process kept being put off.  Last year when we took it down after the holidays I decided to give it a coat of paint which was much less daunting.  Needless to say she has spent the better part of a year near the family room fire place and today with a bit of time on my hands - my Christmas cards have been mailed - I thought I would see what I could do.  I took the pieces apart as they had been simply hand stitched to each other.  The halo, the wings and the head part were seperated from the body where they were stitched.  I did make a few notes about where they had been stitched together so I could replicate the process once they were painted.  I chose a warm white acrylic paint and applied it with a stiff brush so it would get in between the stitches and in the insides of the openings.  I covered all the areas even though they were not all discoloured to ensure that she had a nice even colouring - inside and outside of the skirt, the wings and the halo.  The head and bodice had not been starched and was still in really good condition.  Only four little spots which I painted over using the end of a toothpick.   I painted the halo in gold but that did not work as well as I would have liked so I added some yellow paint and then a thin layer of silver gleams which was the best I could hope for.  After all the pieces were dry I stitched her back together.  She is looking so much better.  I decided to make her a little muff because with only the ends of the pink pipe cleaners twisted together did not really do hands all that well.  I dug through my fabric stash and found a piece that was the right colour.  I trimmed a small piece and stitched it together to created a tube.  After turning it inside out I folded the bottom edge up into the opening and then placed the muff over "her hands" and then used the end of a large needle to stuff the top edge into the top opening covering the ends of the pipe cleaners. That was much better.  I am auditioning a gold star sequin held in place with a head pin to see how I like it.  It might be replaced with a silver one or might just be removed instead.  We shall see!!  I expect she has another 40 years to go so at some point she will be gracing someone else's tree but that will be fine when the time comes.  Therese 


Monday, November 29, 2021

Slow Stitching - cat squares - Q2, Row 6 - 1 to 5


 I have finished another set of slow stitched cats!!  It has been a while since I posted these ones.  Seems I might have missed blogging row 5 - will have to check on that.  
I tried a few new stitches and arrangement of them on these squares.  I like to change things up a bit when I am doing my stitching.  For the first one, I added red crosses on the edges of the first one and then added a green stitch across the middle then filled in the space with orange running stitch.  For the second I added blue crosses on the edge and yellow stitches across the middle of them.  I filled in with yellow stab stitches.   For the third one, I did wonky orange stab stitches in several sizes all around the edge, added a double row of running stitchin orange around the cat  and then filled in with purple running stitch.  I also added white french knots to the dots.  For the fourth one, I ran a double row of running stitches in yellow around the edge, added triangles in yellow outside of that row and then added blue triangles inside with one french knot in the middle.  Finished off the edge with wonky orange stab stitches in between the tops of the triangles.  For the fifth one, I added long stab stitches all the way around in green a bit apart and then added short stab stitches in between.  Added a row of  triangles all the way around in blue running stitch.  It continues to be a fun project and I have started on the next row.  Therese

Monday, November 22, 2021

Fabric gift wrapping

I have decided to embrace fabric gift wrap this year.  My daughter and I discussed fabric gift bags a while back and she managed to stiffen several yards of fabric with white glue in order to be able to make gift bags out of them.  That worked quite well but was a bit time consuming.  I did a bit of research this week and decide to try Furoshiki  - a Japanese technique of gift wrapping which uses just squares of fabric tied with two knots.  They are a gift in themselves as they are completely reuseable.  I decided to delve in my stash of fancy fabrics and see how many I could get done in a day.  I managed several different ones and six of the red ones.  They range from about 36" square to about 15" square.  Online, they indicated that 12" x 12" was a mini, 15" x 15" was small, 24" x 24" was medium and 36" x 36" was large.  


I used what I had for fabric and made them about 34" square.  The pink is the smallest and was ready made in my stash - a dyed hankerchief.  The purple and orange are a bit see through so may have to have another one layered below them but that is easy enough to do.  I really like the shimmery one which I used to tie up a gift in the first photo.  It is very quick and easy to use these fabric wraps and they look elegant!!  I have a few more to finish but I should have what I need to wrap my gifts for the box that I am sending off soon.  I will be able to make up a few more if I need for closer to Christmas.  It was a full day in the sewing room but I am very happy with my progress and will be augmenting my stash of wraps over the next year or so so I can liquidate the bit of gift wrap and curling ribbon I have on hand.    

UPDATE:


I have made up a few more fabric gift wraps from a few of the other pieces of fancy fabric I found in my stash earlier.  They range from 36" to 24".  The floral one on the left is actually a square scarf  that was ready to go!!   This supply should be enough for this holiday season and into the new year!!

Therese

Sunday, November 21, 2021

Christmas tree ornaments from felted wool which can be used to diffuse essential oils


I made some little Christmas tree ornaments to include in my Christmas cards for friends I don't see during the year due to how far apart we live.  I started with little green felted wool triangles.  I just recently read that wool is a very good diffuser for essential oils so these will be ornament/diffusers.  Some with artificial trees are using them to diffuse pine essential oils to give the scent of a real tree.  I decided to decorate up the front leaving the back to be used for diffusing.  I dug out some small green fabric scraps and cut little strips for all of my little trees.  I hand cut little brown trunks from felted wool and little circles for my stars from yellow orange cotton.  I stitched the little strips down the middle of my tree using my sewing machine and green thread incorporating my little trunk on the way down.  I turned my tree and then stitched back up to the top.  I created a hanger of heavy weight crochet thread in deep yellow which I stitched through the top of tree and tied a knot.  I used a tine tipped brown permanent marker to draw a star on my little circles and then hand stitched them in place at the top of my trees using coordinating thread.   It was fun to create these and they are flat enough to be easily be mailed inside my cards.  I am well on my way getting ready for Christmas.  My parcel is ready to go and will be mailed tomorrow.  All my Christmas cards are done and I have written my newsletter which I will include to friends and family.   I created fabric gift wraps this past week to and the post will show up tomorrow.  They make very nice looking gifts for under the tree!!!  Therese


Saturday, November 20, 2021

Christmas cards with french greetings and a more religous theme

After a persusal of my Christmas card stash I realized that I had added greetings to most of them and I did not have any french ones!!  I wanted to have few with a more religious them and french greetings.  I was fortunate to find these images and die cuts in my stash so I was able to make up what I needed. 

The first one features a great image of Santa and baby Jesus from Melonheadz which I have often used.  I watercoloured the image, layered it with black and then mounted it to a card with a handmade paper background layered with a red strip and black brad on a red card front.   

My second card features a gold embossed Mary and Jesus image which I bought a few years ago with my Mom in mind.  She likes her Christmas cards with nativity scenes on them.  I added the french greeting (SU), a gold brad with blue thread and finished it off with paper piercing all the way around using my pattern tracing wheel.   I added a blue handmade paper background to a light gray card and then mounted my Mary & Jesus image to it.  

My third card features a nativity die cut from Taylored Impressions to which I added a gold ribbon and a gold embossed greeting.  I layered these onto a sparkly music sheet background overlaid onto a kraft card.  I added a gold sequin to the star over the stable.  Done!!  

Glad to have a few more of the cards I will need for this year!!  Therese


Friday, November 19, 2021

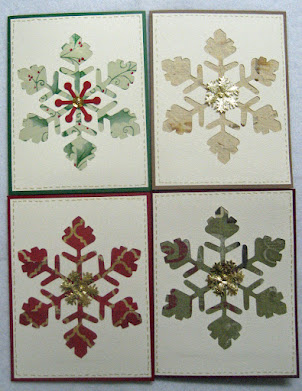
Snowflake Christmas cards with fun backgrounds and embellishments

I created these using white quarter sheets from which I had cut large snowflakes (SU) a while back for other Christmas cards which featured the snowflake.  These have been sitting for a while and having been inspired by some cards on Splitcoast Stampers   which have been backing openings with cardstock strips I thought I would give it a try.  I took blue strips from my stash and adhered them together with regular tape on the back and then embossed them with a snowflake embossing folder (CB).  I trimmed it to size and adhered it to the back of my quarter sheet  and then added snowflake die cuts in the center with a blue sequin and a silver brad.  I trimmed the quarter sheet down just a bit and then added a faux stitching border using  a silver marker.  I added the greeting on the first one afterwards, but having added a thread to the second one I added it before gluing the snowflake layer to by blue card.  They worked out exactly like I imagined they would!!!

I had a stack of ivory ones that I wanted to put to good use so I decided to experiment with warm toned backgrounds to see if that would work as well.  I found scraps of these papers in my stash and thought they would work well as they had glittered elelements - reindeer on the brown and sleighs on the red.  I found those papers difficult to use as background for other images but they worked quite well for adding sparkle to these snow flakes.  I added paper piercing to the brown one and faux stitching with a gold marker for other.  To finish off the cards I added gold fabric snowflakes with gold brads to the centers before adhering these large elements to my card fronts.  Got quite a few cards made with these backgrounds.  


A few more cards using this concept with a wide variety of backgrounds.  It was fun to pick through my stash of Christmas backgrounds and find those that worked well.  You can see that I added die cut snowflakes to the center of some and the others got gold fabric snowflakes.   They all got a border treatment - paper piercing or gold faux stitching.  This process did speed up the process of getting more cards made faster!!  The stash of snowflake openings is gone!!  That was worth doing!!  Therese
 

Birthday card featuring a little wintery bear, some sparkly stars and a dotted background

Another card for another grandson!  I started with a blue card and added the dotted background (SU).  I colour printed the cute little bear image (Pixabay) and trimmed it.  I added a dotted border around the edge using a black fine tipped marker.  I had stars left over from the other card I made for my other grandson and they coordinated perfectly with this image!!  I added the stars to the image with silver brads and I then mounted my focal element to my card front using 3D foam tape.  I found the little greeting in my stash.  I trimmed it down, flagged the end and then mounted it just below the star secured with a small piece of double sided tape.  Therese
 

Thursday, November 18, 2021

Christmas cards with a gold embossed tree and a layered snow man


 For my first card, I trimmed this gold embossed tree image which I found in my stash.  I adhered it to my dark yellow handmade paper background using two dark brown brads to which I had tied short lengths of gold cording.  It still needed a bit of something so I added wavy lines of faux stitching with a gold marker.  That was better.  I adhered this large element to dark brown card to finish it off.  My second card features a white piece of card with a snowman hole in it.  These have been around for a while and I believe I borrowed the Sizzix die from a friend.  The snowmans have been used and I was left with the openings in a quarter sheet of white cardstock.  I have used several of these over the years but was never able to make them really look like snowmen.  So I found the die on line to see what it originally looked like and decided to replicate it.   I traced the outline with a pencil on vellum and the hand drew the pieces in.  I started with the hat by cutting a shallow curve on a piece of black cardstock.  I added a green ribbon where it needed to be on the back of the opening and adhered the black cardstock which instantly created the hat.  Next, I traced the vellum image of the scarf over a scrap of red cardstock and then cut it out on the embossed line.  Secured that behind the opening.  Next, I cut little bumps in the edge of two scraps of brown cardstock and adhered them on each side for the arms in the same way.  That worked out really well.  I added white handmade paper behind that and suddenly I had a snowman!!!!  I added two tiny black brads for the eyes and three little black circle punchies below the scarf to finish him off.  He still needed a bit of a nose so I simply added a little dot of pink with watercolour which worked well.  A bit tedious but a really nice snowman card!!  I have quite a few more of these cut outs so will consider adding them to my next year's cardmaking for next Christmas.  I always like to take a bit more time in the early months of the year to make my Christmas cards so they will work in there very nicely.  Therese

Wednesday, November 17, 2021

Cards for Seniors - a few Christmas cards


 A scrapbook store in the city collects Christmas cards for seniors at this time of year so I thought I should get some ready.  I made a few by reusing some commercial cards and then refurbished a few handmade cards which I have received over the years.  I will be adding several of the cards I made last week as well which will make well over two dozen cards which I will be donating to them.  I am so happy to see that these beautiful cards will have another chance to bless others this Christmas season.  
Therese

Christmas cards featuring beautiful card fronts

gd


I made up a few large Christmas cards for my sister.  I decided to reuse some of the beautiful card fronts I have in my stash.  These are very shimmery and glittery.  I trimmed them down a bit, added some embellishments - punched borders, glitter, paper piercing and a few embossed lines and then mounted them to coordinating card fronts to finish them off.   Therese


Christmas cards featuring a Santa and a red, white and gold theme

I found these three Santa images (CLKER) in my stash and decided to combine them with some red, white and gold handmade paper to make my next set of cards.  I trimmed the backgrounds from a large sheet (8.5" x 11) and cut three red cards that coordinated.  For the first card I added a flagged strip of red cardstock to the handmade paper and added a black brad before adhering it to my card.  I layered the Santa with black cardstock and then adhered it to my card front.  

For the second card I added layered gold and red ribbons to my handmade paper background then secured one end with a black brad before adhering it to my card front.  Again, I layered the Santa with black cardstock and adhered it to my card.  

For the last card I added a length of red gros grain ribbon to my background before adhering it to my card.  I layered the Santa with black and then gold cardstock.  I added four rows of paper piercing to the gold layer before securing this layer to my card.    A few more to add to the stash!!  Therese
 

All occasion cards featuring a butterfly and floral wreath (Melonheadz - digitals) and layered backgrounds

What a cute little butterfly!!  I watercoloured it to coordinate with my soft pastel and glittery background.  After it was dry, I added silver shimmer watercolour all over it to make it sparkle.  My background is adhered to a light pink card and then I added three coordinating paper strips in pink shimmer, green embossed and pearly blue - all with flagged ends.  I ran my pattern tracing wheel over the four sides of my image to add some texture with paper piercing and then mounted it over the strips uisng 3d foam tape.  

For my second card, I started with a white card and trimmed my background paper to leave a small margin.  I bordered a dark pink strip of cardstock with two strips of the same blue and then punched the lower one with a lacy border punch (MS).  I added a length of white lacy ribbon over the dark pink strip before adhering this element to my card front.  I watercoloured the floral wreath to coordinate with my card and added a faux stitched border with a black marker.  I layered on another piece of dark pink cardstock and mounted it to my card with 3D foam tape.    Therese


Tuesday, November 16, 2021

A small pink and green quilt


I made another small quilt (34" x45") last week using a pink, green and yellow panel which used to be a table runner.  I added the four green triangles (used to be placemats) to the odd shaped piece to make it a rectangle.  I found the hydrangea fabric in my stash but did not have quite enough to make a strip on each side to get the length I needed so I added two little pieces of green in the centers which worked quite well.  I used a thin cotton batting and a nice coordinating cotton on the back.  I added quilting lines in the green line and the brown line in the pattern and in the ditch of the center seam.  I found the dark pink in my stash and had enough to make the binding.  I did the one fold binding again but did not get the corners quite right - they are rounded instead of square.  I will have to print the directions and put them in my quilting box.  I added lines of wavy decorative stitching to the binding and the green triangles.  This is my favorite colour combination and I am really happy with how it worked out.  I am enjoying playing with panels and pieces.  I have several others in my future quilting box which will appear as time permits!!
Therese


Birthday card with bookmark featuring a stack of cups on a collaged background

A fun card for a friend who is celebrating her birthday right after Christmas.  I usually forget to send a card because with the Christmas rush I am distracted and then after Christmas I have missed it!!  This year I made myself  a note to send her birthday card with my Christmas card  - too easy!! I started with a large brown card and added a colour washed background onto which I collaged all sorts of fun elements - coffee themed vellum, washi tape, and decorative papers.  After I was finished I stamped a collage stamp all over to help unify the look of it.  I adhered this large background to my card and then watercoloured the stack of cups (Beyond the Fringe Crafts) to coordinate with the background and added clear glitter with a gel pen to the steam.  Then I decided to make it into a bookmark so I ran four lines of paper piercing on the four edges using my pattern tracing wheel, layered it onto brown cardstock and added an eyelet and some yarn to finish it off.  I used two very small pieces of double sided foam tape to keep it in place until she removes it.  I am so glad to have a card to send to her this year!!  

Therese


Baby quilt in pinks and greens

Another quilt ready to go - a small baby quilt from a panel (34" x 43.5")!!  This one was fun and took a little less time because the center portion is a panel that my daughter gave me a while back.  I trimmed a cotton batting to the size I wanted the quilt and then laid the panel in the center and stitched the panel into place using wavy lines - three vertically and five horizontally.  Next, I trimmed my green and pink plaid backing wide enough to allow it to overlap the batting on the front on both sides all the way to the panel.  I folded over the edges and pinned them over the panel and stitched the seams to secure all the layers together.  Next, I folded the top and bottom into each other so I could finish up the seams from the front and pinned them into place.  I stitched all the way around with a wavy decorative stitch and added some next to the straight seams I used for construction.  That finished the quilt quite nicely and then I added some lines of stitching in the dark pink border on each of the squares on the panel which effectively quilted all the layers together.  Really happy with how it worked out!!      Therese
 

All occasion cards featruing pink flower photos, decorative paper backgrounds and embellishments

Two more cards!! The first one has a white card base with beautiful pink background paper.  I die cut the filigree elements from shimmery green cardstock and added to my card on the outsides of two green strips.  The pink rose photo was trimmed from a photo calendar created by my sister and layered with a torn piece of vellum which has been embellished with paper piercing done with my pattern tracing wheel.  It fits very neatly in the space between my green embellishments to finish this card off very nicely.  

The bottom card has a light pink card base and a coordinating decorative paper background that features lines and circles.  I added two lengths of lace using double side tape to it along with a strip of green cardstock before adhering it to my card.  The pink rose photo was trimmed from a photo calendar page my sister created.  I trimmed a piece of pink paper leaving some cardstock on the right hand side where I punched some slots and then wove in some coordinating green ribbon.  I added an embossed line with my score tool and then added this large focal element to my card at a bit of a angle.  Therese


Monday, November 15, 2021

Christmas cards with stencilling


 I checked my Christmas cards stash and found I was a bit short of what I used last year so I decided to make up what  needed using supplies from my stash.  These stencilled images have been hanging around a LONG time and I decided to just see what I could do with them.  For the first one, I used a light green card that coordinated with the background paper I found in my stash. I added a green ribbon to it before adhering it to my card front.  I used my pattern tracing wheel to add four rows of paper piercing to the front of my image after tearing the edges roughly.  I used 3D foam tape to adhere the wreath to my card front.  For my second card, I used dark yellow handmade paper for my background.  I added a length of ivory gros grain ribbon, tucked it behind and secured it with three tiny brads before adding it to an ivory card base.  I tore the edges on my tree image and used my pattern tracing wheel to add four lines of paper piercing on each edge.  I adhered the tree to my card front using 3D foam tape.  I was glad to be able to incorporate these images into my cards this year!!  Therese

Christmas cards for the grand children


 I am getting ready for Christmas!!  Will have a parcel to send shortly and so getting the items I need ready.  This week I made Chrsitmas cards for the grand children.  So fun to reuse cards that have arrived over the years that are so cute!!  For the first four it was as easy as trimming the used card and applying the image to a new large card that fit in a large envelope from my stash.  For the other two I added some embellishments in order for the cards to work in the large format - some flags on the right hand side of Santa and some green mesh ribbon and a heart added to where I trimmed the card to seperate the greeting from the rest to add the height I needed for the other.  It feels good to have a few things falling into place!!  Therese

All occasion cards featuring cute owl and bee images (digital) and fun backgrounds

These two images are so fun - a little owl and a cute bee!!  They are digitals from Melonheadz. Check out all her fun images on her site.  

For my first card, I watercoloured my little owl and gave it a faux stitched border using a black marker.  I trimmed a piece of pink paper a bit oversized and punched the top and bottom with an arched border punch.  I added two pieces of gray washi tape next to the decorative border and then added my little owl image using 3D foam tape.  I added a strip of shimmery pink paper over my gray floral background (SU) which was adhered to a large gray card and then adhered my large focal element over the pink strip.   

For my second card I started with a black card and added the elegant embossed paper.  I watercoloured my little bee, added a faux stitched border with a black marker and then layered it with red cardstock.  I added a strip of embossed yellow cardstock to my card and then added my focal element with 3D foam tape.  

These are so cute and appropriate for almost anyone for many different occasions.            Therese


Sunday, November 14, 2021

All occasion cards featuring bird photos and paper pieced backgrounds

Another couple cards for my sister from her stash.  For the first one I stamped and clear embossed a feather on the black card in two opposing corners.  I used the same stamp with red ink on red paper to create custom paper for my background.  I trimmed the paper to fit on my card in the two other corners and then added my blackbird photo layered with black in the center of the card.  To finish off it off nicely I added three little black circle punchies in black just below the photo.  The photos are from photo calendars which my other sister produces every year from her photography of that year.  

The next card has a paper pieced background to which I added a brown strip and then three coordinating brads at the top.  After adhering my background to my brown card I added the photo of a Wilson Snipe with two coordinating strips of blue cardstock adhered to the back at the top and bottom using 3D foam tape.  

Therese


Saturday, November 13, 2021

Large all occasion cards featuring paper pieced backgrounds with fun aphabet paper and cute images from Melonheadz

A couple more cards for my sister from her stash.  The first one started with a large brown card to which I added strips of cardstock.  The alphabet strips were cut from a 12" x 12".  I embossed the red and pink ones and the green one was textured cardstock.  I simply glued them to the front of the card and trimmed them to the edges on both sides.  The cute little dog with a kite is one from Melonheadz which I really like.  I watercoloured it, layered it with two red and one green strip and then added to my card front using 3D foam tape.  

My second one started with a green card to which I adhered a coordinating background (SU).  I created the flagged strip using a length of the alphabet paper layered onto a strip of green cardstock.  I flagged the end and adhered it to my card front.  The daisy image was watercoloured and then I punched the corners with little slits in which I tied yellow crochet thread tying the ends off on the upper left corner.  

Love these happy images!!

Therse


Friday, November 12, 2021

All occasion cards featuring bird photos and ribbon

A few more large cards for my sister who left a stash of paper here a few years ago.  I have been making cards for her off and on over the past few years and I am redoubling my effort to make the supplies into cards for her.  She has a stash of large envelopes so I am simply making the cards for her.  Lately I have been making all occasion cards in order for them to be flexible enough for any occasion that might arise for her.  These two feature dark cards with decorative paper backgrounds.  I added a brown ribbon to the first one before I adhered it to my card.  The second one has an added layered cardstock strip - black over green - with a white brad on the left hand side.  The photos are both from photo calendars which one of my other sisters makes up every year that feature her photography from the past year.  I have layered the photos with coordinating layer of paper and then added them to the card using 3D foam tape.  I did add a folded piece of green mesh tape to the first one for a bit more texture and colour.    Therese 


Thursday, November 11, 2021

Large all occasion cards featuring flowers (digital), lace and fiber

A few more cards for my sister.  I saw her last week and she requested cards appropriate for her daycare so I found some fun images at Melonheadz that would work.  I sized them in CorelDraw and laser printed them before trimming them to size.  

For my first card I created my card base with heavy weight paper in an orange plaid pattern.  I added the green embossed vellum.  It is a nice effect that the flowers are highlighted by the lighter colour behind.  I watercoloured my image - a pail full of flowers, layered it with orange cardstock and then added a layer of green textured paper leaving it long on the bottom.  I trimmed it with a small scallop border punch and then added a length of white lace ribbon before adhering it to my card front.  

For my next card I chose a tulip image (Melonheadz) to watercolour and then layered it with brown cardstock again leaving extra at the bottom where I tied a length of blue fiber.  I created a brown card and added a red background.  To echo the blue in the vase I created a layered cardstock accent which I embossed with large dots (SU) before adhering it to my card.  I added my focal element to my card using 3D foam tape.  
I love the Melonheadz images and have used many of them quite often in my card making over the years.  

Wednesday, November 10, 2021

Large cards for my Card Exchange partners for November - quilted background with photos

Wanting to strech my creative muscles I challenged myself to a new background technique for my November Card Exchange cards.  I found this one on Splitcoast Stampers and it is called  Disappearing Nine Patch. I increased the size of the squares to allow for my large card size.  I created 3 nine patches with coordinating scraps gluing the squares to scrap bond paper.  Once they were dry I trimmed them each into four new squares and arranged them to create my backgrounds.  I use regular tape on the back to hold them together and stamped them with a zig zag stamp with dark blue ink.  That was fun!!!  I added white borders on the top and bottom then realized that I had failed to trim my card to the proper size before creating my background which now left me with a background that was too tall.  Not wanting to undo too much I simply trimmed out a section in the middle and glued the two pieces together and added a green mesh ribbon across the joint before adding the background to my dark blue card.  I chose this photo of leaves trimmed from my sister's photo calendar for my focal element.  I added four rows of paper piercing to it, then layered it onto a green yellow cardstoc and then added an embellished font greeting to the bottom to finish off my card.  
 

I chose a yellow card base for this card and found that my background fit just nicely on it with only a slight bit of trimming to straighten my uneven edges.  Not sure I will be trying the quilting technique with fabric as I was not able to get my corners to match using paper.  I added a length of green mesh ribbon acorss the middle before adhering it to my card base.  I trimmed my photo from my sister's photo calendar page, added four rows of paper piercing with my pattern tracing wheel and then layered it with coordinating purple cardstock.  I adhered it to my card using 3D foam tape and then embellished a laser printed greeting (Desert Diva) with cardstock and paper piercing and added to my card.  It was fun to stamp the stitching on to my background.  These will be off to my partners in next week's mail.
Therese

Monday, November 08, 2021

Fall coloured quilt

I finished this fall coloured quilt yesterday.  It measures 34" x 45".  The center section - six 12 x12" long cabin squares - was a thrift store find earlier this year.  I added the border around it three weeks ago using scraps dark on the light side and light on the darker side.  Yesterday I went looking for enough fabric to make another border to make the quilt large enough.  I found this swirly leaf fabric which was almost enough - I stitched the fabric to the two sides and then measured to make sure there was enough and I was missing a few inches so I dug out my scraps and found a couple that worked and added them to the ends of my strips on the top and bottom.  I did horizontal quilting to attach my batting (polyester) to my top and then vertical stiching when I was attaching my back to the batting/front.  It worked quite well and I managed to have enough of my green backing to self bind.  I did two rows of stitching on the binding as it was quite wide.  I have a few ideas on the back burner for the next quilt so we shall see what rises to the top next weekend.  Therese

Friday, November 05, 2021

A card with a wizard, ciphered message and some blingy stars

I have made this card for one of my grandsons.  I created a cipher for him with the key so he can decipher the message I put on his card.  I also made an extra copy so he will be able to share with a friend and they can pass secret messages between themselves.  I started with a large envelope and made a brown card to fit inside.  I created the ciper first and then decided on using a wizard as the main element.  I found one online at PNGPLAY that fit the bill perfectly!!  I added a scroll behind him and to which I added the coded message.  I colour printed it and then fussy cut it.  I trimmed a lettered background onto my card and then added the wizard and message.  It needed a bit of bling so I found some clear plastic star die cuts in my stash which I coated with glitter glue which was not as blingy as I needed so I added some green and blue glitter.  That was much better.  They were shedding quite a bit so I sprayed them with a clear finish before mounting them to my background with silver brads.  I then mounted this large element to my card front.  Therese
 

Thursday, November 04, 2021

Fall birthday cards featuring bare trees, sponging, plaid ribbon and stamped collage backgrounds

I am working on my family cards for November.  We are having such beautiful fall weather I am still in fall mode.  I started with two large orange cards which fit in large envelopes from my stash.  I created two collage/serendipity backgrounds for them and embossed them with copper leaves after they were dry.  I have finally been able to create a sponged focal element I am happy with.  I copper embossed the "Lovely as a Tree" (SU) onto ivory cardstock and then used some of my torn paper masks to create a sponged area over them with Ochre permanent ink.  I have seen some much brighter ones but this will do for my first good result.  I added the little birthday greeting (SU) in brown, punched slots in each end and added a piece of orange plaid ribbon which I embellished with yellow ink to help it coordinate better with my elements.  I added four rows of paper piercing to each edge using my pattern tracing wheel.  I used double sided tape to secure my ends to the back of my backgrond and 3D foam tape to secure my focal element in place.  I added punched leaf borders to the bottom. The dark brown offsets the background quite nicely.  I adhered my large backgrounds to my orange cards to finish off my cards.    Therese
 

Wednesday, November 03, 2021

A set of cards for a gift featuring photos with punched borders over decorative paper


 A set of cards for a friend!!  These feature photos from one of my sister's photo calendars.  She is a photographer and makes several different photo calendars every year.  They make the best focal elements for cards!!  I made all these cards using the same sketch - cardstock base, decorative paper, punched borders in a coordinating colour adhered to the photo.  They make great little notecards for sending an unlifting message to a friend, for sending messages of thanks or even for a birthday!!  
Therese