Tuesday, March 21, 2023

Quilting - casserole carrier in pinks and browns

I combined this fun lacy heart cotton fabric with a warmer tone that is on its way to being brown.  It is the standard carrier I have been making with a 24" backer, 22" inner fabric and batting.  The batting is one I made up from scraps of batting that I got from my Mom.  I sandwiched the pieces between two pieces of scrap fabric and then stitched them together.  It worked really well and made some hefty battings!!  I was maybe to generous with layers of batting but that will work really well in keeping the casseroles warm!!  The handle is about 1.25" wide doubled over and the loops are about 6" long and .5" wide.  There are a lot of patterns for this design of carrier on line.  You can check out the first one I made here. I used the same QAYG - no binding method that I have been using for my potholders and it works really well.    Therese


Monday, March 20, 2023

Quilting - two sets of potholders

I worked on these this weekend.  I had them cut out and ready with all the pieces that I needed so they did not take too long to sew up.  I found the country images fabric in my stash and pieced the bottom ones from a 5" square I found in my precuts along with some coordinating fabrics all the way around.   They were both backed with green cotton so it was nice and easy to do them both up at the same time.  I stitched around the images on the country ones and around the square for the bottom ones to keep all the fabrics together!!!  Two more sets to add to the stash!!  Therese


Thursday, March 16, 2023

Quilting - denim pouches - a few more!!


 I managed to make a few more denim pouches.  I combined some denim pieces and added embellishments to highlight where they join - simply lace on one, fabric and lace on another.  I did a decorative stitch on the one with light striped denim.  I really like the decorative additions on the ends of of the zippers which makes a nice little accent to these pouches.  I used the scraps of denim I had on hand and so they are not all the same size but that works as well because they are not all going to be used for the same thing!!!  Therese

Wednesday, March 15, 2023

Quilting - potholders from black cherry and pink fabric


 I made this set of potholders from the two pieces leftover black cherry fabric.  I paired with a black and white floral fabric which was the best match from my stash.  I added a pink stripe across the black cherry fabric and then used the QAYG - no binding potholders technique which I have been using a lot for my many projects!!  They coordinate with the black cherry casserole carrier.  All cotton fabric and cotton flannel batting which makes the best potholders!!!  Therese

Tuesday, March 14, 2023

Quilting - denim zippered pouches for pens & pencils, art supplies, make up, cords or make up!!!


I worked on denim pouches this week.  I used scraps of denim that were being discarded from the fabric sale because they were two small for much of anything.  I added the scraps leftover from the denim journal covers as well.  I dug through my zipper stash and found a few that were the right length  -7" to 8".  I added a piece of fabric to each end of the zipper to allow the zipper to not be in the side seam at all.  Gives a bit of an accent as well.  I cut a piece of denim about 8.5" x 10" or so and then added the zipper between the two cut sides which creates a loop.  I decided to have the zipper on the front side instead of the top.  I covered the side seams with bias tape to make the inside of the pouch neater.  Check out the photos below - the back side of the pouch and then the pouch turned inside out - you can see the blue bias tape on the two side seams.  I remember as a student making our own "pencil cases" for school out of denim. They are great surfaces for embellishing with blue ball point pen!!!!  These pouches will certainly fill the need for carrying pencils, pens, crayons, etc but can be used for phones, , electronic cords, art supplies, make up, etc as well.  Will have these on the merchandize table for Gramma Link Africa later this year.    Therese


Monday, March 13, 2023

Quilting - pink and black cherries casserole carrier - reversible


I brought home a casserole carrier from our fabric sale sorting session that only needed a bit of velcro.  I usually wash all the fabric I bring home so in the washer and dryer it went with everything else.  Bummer! The black cherry fabric shrunk and now the lining was too big and was bulging!!!  I decided that I needed to fix it so I unravelled the seams and gave it an upgrade to this wonderful pink fabric!!  I added a strip of pink to the black cherry fabric to make it large enough and a different batting because the one it came with was not the right size and somewhat insufficient for the task of keeping a dish hot or cold.  I used the same QAYG - no binding method I have been using for my potholders which works really well.  Black Cherry was 22" square, pink was 24" square, handle 23" long (3.5 wide - folded in a half inch and then in half and stitched down both sides),  6.5" loops (1.5" wide folded in quarter in and then in half and stitched on the one side).   As you can see from the photos it can be used with either side facing out.  Therese


Sunday, March 12, 2023

Quilting - denim bookmarks

I have made up some denim book marks using scraps leftover from other projects.  I cut strips 1.5" wide from the scraps I had available and then stitched two back to back with the "good" side out which on some of these is the worn, distressed and textured side.  I cut a few individuals and then stitched the remaining ones into a long strip from which I cut lengths of 6" - 8" depending on where the closest overlap was.  I then stitched on both sides of where I cut the bookmarks and then used my crop a dile to make holes at the top.  I will be finishing all the holes with stitching using variegated thread.  That will be a good slow stitching project for the next few weeks.  I am leaving them without other decoration and will be promoting them as DIY art projects where the recipient can add their own embellishments or art to make them their own.  It could be in the way of stitching, gel or ball point pen, markers, acrylic paint, Inktense watercolour, etc.  A fun project!! 
I am linking to Kathy's Quilts - Slow Sunday Stitching!!    Check out the inspiration that these talented creators provide as they share the links to their recent projects!!!    Enjoy!!!!    Therese


Saturday, March 11, 2023

Quilting - Fabric Gift Wrap with sparkly fabric!!


 I have come to appreciate fabric gift wrap (furoshiki) and acquired this jersey knit fabric that was so very sparkly that I could not resist making some gift wrap with it.  It is a bit heavier than the fabric I have used in the past but does tie a decent knot.  I managed to make over eight wraps with the yardage I had in several different sizes.  The smallest is 15" square and the largest is 38" square with most being about 23" square.  These wraps do not need any other embellishments and use knots to secure the contents therefore store flat in very little room and   Check out below the very many ways you can tie these wraps below.    I usually use the Kakushi Tsutsumi technique for wrapping my gifts.  Therese


Wednesday, March 08, 2023

Quilting - bright and cheery jar openers from fabric and shelf liner


 I have made a few more of these jar openers!!  I made a few a while back and you can check them out here.   I cut the shelf liner (6" square) and the fabric (8.5" square) and then combined them in the same way that I make up the pot holders.  You can check out the tutorial for QAYG - No binding Pot holders.  I really like how well these came together.  I had to use paper between the shelf liner and the foot of my sewing machine when I was sewing the X on the center of my openers.  This X helps keep the layers together when you use the jar opener.    A few hours of sewing that was very productive.   Therese

Sunday, March 05, 2023

Quilting - aprons and coordinating potholders for the Gramma Link Africa fundraiser

I worked on these two aprons with coordinating potholders today!!  I've had the fabric for a while and since have found some navy fabric to coordinate with it so I could make the potholders.  

The aprons are adjustable with a long tie that goes through casings in the armholes which forms a loop that goes over your head and then ties around your waist.  I found the pattern and instructions on Instructables. This site is great and has a LOT of tutorials on a WIDE variety of subjects - cooking, outside projects, crafting, etc!! There is a search feature so go and check them out!!!  

The potholders were made with some of the same Budweiser fabric and scraps of navy blue and red.  I used the same GAYG technique that I have been using for some time.  Check it out here on You Tube.  So a few more projects ready to for the sale in June.  It was a very good day of sewing and I am happy to be finished these two.  I have enough scraps to make a few more potholders so I will cut those out this week and maybe get them stitched up next week.   Nice to have small projects in the wings when you have a bit of time to sew!!!  Therese


Slow Stitching - little fabric embellishments for handmade cards - stitching and Inktense watercolour

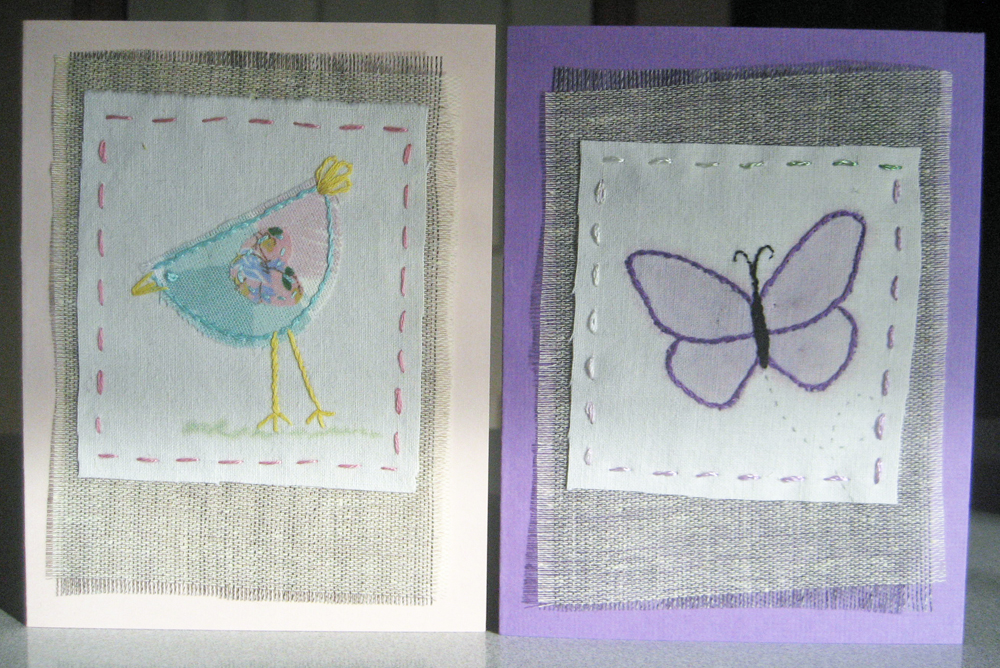
I have been working on some fabric embellishments for adding to my handmade cards over the last few weeks.  I made this flower one a while back.  I found ivory squares in my stash of precuts and have been working on finding elements I can stitch to or on them so they can be featured on my cards.  I have cut a few shapes and the little bird above is one of them.  It is pretty much a half a circle but once it is stitched in place and a beak, tail feathers, legs and a heart wing have been added it looks very much like a little bird.  I have stitched all of these to horsehair interfacing that has been trimmed and then raveled a bit to add texture.  I have added a square of iron on interfacing on the back to keep them all square.  I stitched my elements onto the front of my coordinating card fronts so they can be removed by the recipient and included in a small project.  

The butterfly was stitched and then coloured with  Inktense watercolours.  

The two above were stitched with little cup shapes which I turned into some fun flowers with some stitching.  They were stitched to the interfacing with coordinating thread. 


The two above were traced from die cuts (CB - star   SX- flower) and were coloured with Inktense 
watercolours after they were stitched!!!  I am learning a bit more about how to control the
bleeding on these though the bleed through on these have not been detrimental to the designs. 
I am happy with how these turned out and I have a few more in the works so will have something
to stitch when I go to Knit and Stitch at the library tomorrow.  

I am joining Kathy at Kathy's Quilts for her Slow Sunday Stitching.  There is always some
great projects for inspiration in this group of stitchers!!  Check them out!!!  

I have also finished off my cats though I did come up with a much faster way of getting 
them done because it was becoming a challenge to stitch any more of these.
You can check them out here

I showed you the hand stitching on my jean journal covers a few weeks ago. 
You can check out the fronts here.  

Therese


All occasion cards with woven strips layered over a decorative paper background and heart and butterfly embellishments


 I continued the theme of  layering woven paper strips over decorative papers for these cards I made for my exchange partners!!  For the orange card I pieced the decorative paper by flanking the middle section with two strips of a different paper.  I dug scraps from my stash and wove them with distance in between so the background paper would show nicely.  I really like how well that worked out.  I used a die cut heart collage (Calico Collage) element and layered it onto a brown circle die cut (Nestibilities) and then onto a dark red scalloped circle (Nestibilities).  I paper pierced each scallop and then mounted this focal element to my card with 3D foam tape after I added my layered background to my large ivory card.  
The blue card followed the same path - large decorative background, woven strips layered over it and glued to a large green card.  I found the stamped butterfly image in my stash (SU).  I layered it onto a light blue, used a border punch on the bottom edge and then added a red fiber onto which I looped a short piece.  I layered this onto a dark blue rectangle of cardstock.  I mounted this focal element to my card using 3D foam tape.   These are off to my partners in the exchange in the next few days!!  Therese

Saturday, March 04, 2023

All occasion card with a woven paper embellishment over a decorative paper with a watercoloured cabin

Another of my March cards!!  I added woven paper strips over a decorative paper background - really like the look.  I left about a quarter of an inch between the strips to allow the background paper to show through.  I watercoloured this cabin image (public domain vector images), ran my pattern tracing wheel on all four edges and then layered it onto a piece of dark green paper like the background.  I watercoloured the white dots so they would recede and provide a better border for my cabin image.  I trimmed the bottom with scallop decorative scissors and then added a line with a brown gel pen.  I added my cabin with 3D foam tape to the front of my card after I added my multilayered background.  

Therese
 

Friday, March 03, 2023

All occasion card featuring a woven paper strip embellishment over a decorative paper background with a little watercoloured puffin

Working on cards for the month of March and decided to try something different for the backgrounds.   I chose a variety of strips from my stash and wove them with a bit of gap in between.  That left enough space to feature another decorative paper which works really well.  I modified the decorative paper with brown watercolour to get it to coordinate and contrast better with the weaving.  I adhered the weaving to the decorative paper and then added this large layer to my large green card.  I added a watercoloured puffin  (CLKER) with an orange decorative paper layer.  This orange layer was also modified with watercolour to tone down its contrast.  The white dots were too strong - they look much better with a bit of orange!!  


Therese
 

Monday, February 27, 2023

Slow Stitching - a little stitched flower to embellishing a handmade card

Over the weekend I worked on getting some small  slow stitching projects to take to Slow Stitching today and after a couple false starts I came up with some small fabric pieces I can use to embellish my handmade cards.  The little off white/ivory squares of fabric were found in my stash of precuts and I managed to come up with a few images that would work well in the space.  I traced them with my gray pigment marker and then embroidered the image with two strands of embroidery thread.  I did the flower center in yellow with a few French knots and then the flower in blue and the stem and leaves in green.  I pressed it really well and used my Inktense Watercolours to paint the inside of the shapes.  I only had a little run through the edge of the flower near the stem.  The leaves worked out really well.  I added a bit of watercolour around the image to soften the contrast of the composition.   I cut a piece of horse hair interfacing to  3.5" x 4.75" and stitched my little fabric piece to it with  green thread.  The horse hair is a bit maleable so I added some stabilizer behind it to keep it square.  I will have to figure out to attach it to my card front.  It would be fun if the person receiving the card could remove it and add it to a project.  I will figure out something.  Lots of fun and many options for subject matter!!  Therese

Saturday, February 25, 2023

Quilting - the last of the cat squares embellished with fabric strips

I worked several days this week on this project in hopes of getting them all done and being able to clean up the scraps and put everything away.  They are all done!! It was a fun project and I am really happy with how they all turned out and now I will have to brainstorm a way to highlight them in a quilt. 

Therese


Friday, February 24, 2023

Denim journal covers made by upcycling jeans and their pockets


I am late getting these up on the blog because I gave them up before I was finished getting all the photos I needed for blogging.  I managed to get them back and have now taken my photos.  I made the journal covers to hold composition books which are available locally and makes these journal covers reusable!!!  It was fun to upcycle jeans into these covers by just piecing around the pockets to get enough fabric to wrap around the composition books.  I added hand stitching on at least one seam on each cover in a different colour just for fun!!  The pockets make a great place to keep pens or head phones and add a lot of texture and detail to the covers.  Will keep an eye out for jeans for giveaway so I can make a few more!!  Therese


Quilting - finishing the cats without hand stitching

I have so many cats yet to slow stitch and I am no longer looking forward to doing them so I have decided to finish them off in a different way.   I spent some time today working on them.  I have found some small pieces of coordinating fabrics and will add them to the borders of the cats as strips.  I lined them up and then stitched the one side. I pressed the fabric over, trimmed it off at about 1" and then folded the edge under and pressed again.  I stitched that side down with white thread.  It works quite well and I like the way they look - a bit like stained glass.  There were a few that were tricky because they had several small sides that had to be done before the longer ones.  I eventually figured it out!! I am about half done the remaining cats so one more sewing sessions should finish them off and I can put them into the quilt pile and find some bright fabrics to add to them to make a quilt top.  It was a fun day of sewing and I am really happy they will soon be ready to be incorporated into a quilt!!!  Therese


Large birthday card with a fast car, embossed flags and shiny gears

This card is for the other grandson - brother of the other.  I started with a large black card and added a striped blue background.  I trimmed two long flags and embossed them with gears (TH-Sizzix) and Diamond Plate (CB).  I die cut three gears (TH-Sizzix) from silver cardstock and mounted them over the flags.  I colour printed the car (CLKER) after I added the font greeting. I ran  my pattern tracing wheel on all four sides to add some paper piercing texture.  I tied on a thin cording between the greeting and the car then mounted it to my card using 3D foam tape.    Therese
 

Thursday, February 23, 2023

Pet bowl mats made from animal fabric and some pieced side bars


 I have been sewing for our Gramma Link Africa fundraising effort.  These are two pet bowl mats I made with some pet fabric I found in my stash and some pieced fabric in coordinating browns.  It was fun to put together and piece the side bars.  I made these like I have been doing the pot holders - GAYG - No binding.  I put cotton batting inside and a sturdy fabric on the back to make these durable and washable.  Therese