I started with a paper doll template from The Enchanted Gallery which I printed on white cardstock. I rough cut all the pieces, glued them to thin chipboard (back of a writing pad) and then cut them out properly. I chose to use the articulated arms and was happy I did when I was dressing her. I printed another set, cut them out and glued them on the back so she would be the same colour on the front as the back. I used a push pin to make holes and assembled my doll using black mini brads.
I downloaded a page of clipart from Aisling.net and printed one of the faces large enough to fit on the head. I had originally started with a moveable head but when I was getting ready to glue on the face I decided to remove the brad and glued the head to the body and the face to the head. I drew a bodice on her torso, coloured it in and added some sparkle. I drew her some stockings as well and coloured them in. I had taken a picture of her with just her undies but alas my camera did not have a memory card in it at the time, so, no picture!! I coloured the rest of her in with a mix of chalk and pencil crayon and drew her some boots which I glued in place.
The hat was on a victorian woman I downloaded from the Vintage Feed Sacks blog. I isolated the hat and sized it to fit on my doll. I coloured it, added some bling and then traced it onto cardstock and cut another one which I glued to the back of her hat just at the top which makes it removable!!

I sewed a straight black skirt for her. The selvage was all fringed so I used that instead of hemming it and created a cool metal embellishment to highlight the waist. I sewed on the embellishment and then ran a basting stitch from each side to the back leaving ends which I used to tie up the skirt once it was on her. Keeps everything nicely in place and gives a bit of a bustle look in the back. I added more metal embellishments - a few I sewed on, the others I added to the waist embellishment. I took the photo before adding the final embellishments.
It was fun digging through my stash to create embellishments. The waist one was created using an old earring back in the middle with a double heart stud earring attached in the center. I used modified shepherd hooks on either side.
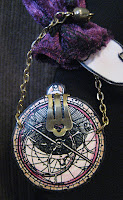
I created a purse for her using a graphic I downloaded from Arthur's clip art.of an Astrolab. I isolated one of the circles, printed two of them, added colour and sandwiched a piece of chipboard between them. I added a black fiber ring all the way around to cover the chipboard's edge. I punched a hole in the top section and inserted my hardware (back of a clip on earring) and held it in place on the front using a glue dot. I love that it has a heart on it!! I punched a hole on each side and added a length of chain with jump rings.
It was fun to be dressing up a paper doll and creating metal embellishments from odds and ends I have saved from other projects!
Therese


