Showing posts with label scraps. Show all posts

Wednesday, April 29, 2020

Slow Stitching - sky, trees and ground fabric collage for my houses


I have been working on my fabric collage which will be the background onto which I will be hand stitching my little houses.  I did some research on fabric collages in hopes of finding a way to finish the edges of my fabric pieces in order for them to be solid and secure so this base would be strong enough to hold the houses once this piece is incorporated into a quilt.  I did not want to use fusible webbing because generally it creates stiffness and would make the handstitching of the houses more difficult.  I found this video tutorial called Edge Colouring Applique from Fourth and Sixth Designs which is a technique they developed to finish off their applique designs for their Full Bloom Block of Month quilt in 2014.  It was exactly what I was looking for!!!!!  I started with my brown strip.  I simply used this method to join my scraps to each other.  I had trouble with my tension when I used reverse and so it is a little wonky but I did not want to start over so I have decided to use as it is.  Its wonkiness will add to the texture of the background.  I did the green layer next and this time I chose to stitch all my scraps to each other using a single line of  straight stitch before I used this technique to "colour" the edges of my scraps.  This worked better.  I also changed sewing machines and used my Bernina 830 which worked much better.  The tension was good in both forward and reverse and gave me a good result with this technique.  I am really happy with how the green layer worked out.  As you can see the blue layer is a single piece of fabric which perfectly simulated a sky which is what I was looking for!!!! 

Check the images below for a close up of the stitching which I used to secure the edges of my pieces.  I simply laid my scraps over each other and the back and forth stitching of the technique securely attaches them to each other and also blends in the line of straight stitching I used to create the green collage.  This technique is a bit like free motion stitching and requires developing a rhythm to get it to go well.  Free motion stitching is also a technique they recommend for this "edge colouring" but I was not ready for a steep learning curve so I used this one that uses regular straight stitch instead. 


 Here is a portion of the finished piece with the three layers of the fabric collage attached in the same way as the scraps pieces were attached for the brown and green strips.  The blue is the sky, the green is the landscape/horizon line and the brown strip is the dirt/road in the foreground.  I expect this will not be used literally in that the houses will likely overlap all three layers.  They have yet to be invented.  That is work for another day. 
The first photo below is the finished fabric collage and then the bottom one has the bottom edge straightened in that it would be best to have the houses all sitting straight to the edge of the collage and perpendicular to it as well.  I would prefer not to have my houses looking like their are off kilter. 

So I will be working up pieces of houses next and will get back to slow stitching when they are ready to go.  I will be doing slow stitching in the day or evening for the summer to allow me to get a morning walk in every day.  Therese


Monday, January 27, 2020

Slow stitching - snippet roll with stitching


I have started stitching my snippet roll!! I will be using a variety of thread colours and you can see above the pattern my stitching makes on the back of the strip.  My stitching pattern is an enclosed Z.  I start at the tip (mid point) and stitch up the side and down the other of the square, then across and down the other side and up to the other side to the mid point which is where I need to be to start the next square.  Works very well!!  


This is my whole strip with my little squares all pinned into place.  With all the prep done I will simply be stitching until I get to the other end.  If this one will get any other stitching or embellishment will be determined if I am inspired in the process of stitching it. 
I expect I will make snippet rolls with the other cushion covers as well but anticipate I will invent a new process for them!! No ideas at the moment but I have some time while I am in the process of stitching this one!!       Therese

Saturday, January 25, 2020

Slow stitching - new project - snippet roll with scraps


I have started by new slow stitching project - a snippet roll!!  I am using the cushion covers which I removed as a base for this project.  There were two that are falling apart so those have been relegated to the scrap pile but the other four are worn but usable so I did some research to see what I might use them for.  Because they are worn I do not want to put them into a quilt.  I decided on a snippet roll!!  There are a wide variety of them on line and I decided to make one that could be used as ribbon to wrap a gift.  I cut one of the cushion covers into 2" strips which works well because the quilted square are 4" finished.  I managed 8 sixteen inch strips and used my sewing machine to sew them end to end.   That gave me 132 inches!!  Overnight I decided to have finished edges so I used a bias tape maker for a two inch strip and ironed my strip to have the two edges meet in the middle as you can see above which is 1" wide.  Next, I cut over 250 little 3/4" squares in coordinating colours from my fabric scraps and separated them into darks, mediums, colours and lights.  I started from one end and pinned my squares to the back side (unfinished) of my strip going from dark to light and starting over again.  I will need to sort out how I am going to do my stitching!!        Therese

Monday, December 09, 2019

Slow Stitching - Bookmark #2

Here is my second book mark finished!!  I finished the same way I finished the first one so they resemble each other.  I tried different stitching on each of the flowers and changed up how I stitched the stems. 

Therese

Friday, November 15, 2019

Slow Stitching - first yellow square

Here is my first square in my Slow Stitching project!!  I started with stitching down the strip on the left.  I did running stitch in the center to keep in place and added blanket stitch on one side and cross stitches on the other.  Next I added the blue square using small stitches all the way around and longer stitches to create a flower in the center.  I added the green triangle and did running stitch in both directions on it.  The little portion of a pansy on the upper right was stitched down with running and seed stitches.  It has been positioned away from the edge to allow a quarter seam allowance when it is incorporated into a project.  The other scrap was stitched down with running stitch and finally I created the heart shaped element.  I started by drawing a shape using a pencil because I noticed that I am not easily able to make straight lines with my stitching and I did want my heart to look like a heart once I was done.  I started by stitching the end of my little fabric strip to my fabric in the dip of my heart.  I used green floss to couch my strip onto the line that I had draw which worked quite well.  To finish it off I cut my strip and stitched down the end over the end where I started.  I think it will be sturdy enough to stay in place.  I made a real effort to not pull my stitches too tightly in order to not shrink my fabric square.  Once it was ironed it still measured 4" square!!!  I have backed this square with some white fabric because the yellow was so thin I was not sure it would be able to carry the weight of the stitching.  I am learning as I go!!  So far so good!!!  Therese

Saturday, April 27, 2019

Baby card featuring a cute little horse digital, strips of decorative paper and a vellum greeting


Needing some baby cards for my stash so I went digging through some card kits from previous classes to see if I had any that could easily be made up.  No luck but I was able to convert this one into a baby card by simply changing the image to this cute little horse one (Melonheadz) which I had in my image stash and adding a vellum greeting also from my greetings stash!!
So I added a strip of double sided tape across the yellow layer and adhered the ends of my paper strips to it.  I embossed the navy strip, adhered it over the ends and trimmed it to the edges to finish that nicely.  I trimmed the ends of the strips in a diagonal pattern and adhered this large element to the navy card front.  I watercoloured the laser printed image and layered it onto a green rectangle and had enough spare to trim the bottom with scallop decorative scissors.  I used a push pin to pierce each scallop which adds a nice touch of texture.  I used a small piece of double sided tape to adhere the vellum greeting to my card before mounting my layered image using 3D foam tape.  You can see the other cards I made with these kits here.  They were part of my March Cardmaking class.                   Therese

Tuesday, December 12, 2017

Wonky tree and snowman on kids Christmas cards

I was making up a few Christmas for my grand children and in the final few I decided to combine the wonky tree and the snowman I had used on previous versions of this card. 
I used blue decorative paper for the background and ripped a strip off the bottom which formed a snowbank.  I added texture to the two navy strips on each one and mounted them on the left and right hand side.  For three of them I tucked the trees under the strip and later realized that I could just have placed the tree on the card and then mounted the navy strip which would have been easier!!  You can check my tutorial for the snowman here.   I added the snowmen to the cards using 3D foam tape and then added iridescent glitter glue to the trees and navy strips to add a bit of texture and glitter!!  I am sure the kids will enjoy them!!

Therese

Wednesday, November 29, 2017

November Card Class - wonky tree


I have used this design in one of my previous classes and with a few leftover "trees" I decided to incorporate it into this class.  I love how unique the trees are because of the randomness of the little triangles which allows everyone to put their own spin on their cards.  The background (light blue floral paper with snowflakes stamped on it) is torn across the bottom creating a snowbank by revealing the white of the card front.  I glued it even with the top of the card.  The torn edged dark blue rectangles were glued in place after that.  To build the tree, I glued the brown trunk onto the snow bank and then glued triangles in place over the trunk until it was tall enough.  I added a yellow punchie star at the top using 3D foam tape.  I layered the laser printed font greeting punchie (SU Word Window) over a red label punchie (SU Decorative Label) and mounted it to my card front using 3D foam tape.

This card uses a different background - a hand decorated piece of paper with light blue/aqua paint on it.  I used a single layer for the greeting and chose to glue my layer just a little off of the top of the card.

A fun card for this Christmas season.  I counted my cards today and I will be short around twenty so I will see about getting some of these cards kits made up after my second class on Monday.

Therese

Tuesday, October 24, 2017

Christmas Card Class #1 - A wonky tree Christmas card


For our first card for this class I decided to use some supplies I found in my stash - navy rectangles with one torn edge.  I decided to use them to frame a space in which I am featuring a wonky tree.  I have seen several of these over the years and I decided to do some searching on my favorite website for some inspiration - Splitcoast Stampers!!  Always the very best place to get some good ideas!!
I started with a white card as I would be using it to simulate a snowbank.  
Next, I dug through my stash of decorative papers and found several that would nicely simulate a blue or night sky.  I trimmed out rectangles that were about 4" x 5 1/4".  They did not have to be precise but I needed them large enough so the navy strips would cover their sides.  I tore a wavy strip off the bottom edge which once glued to the white card front would create my snowbank.  I glued the sky paper to the front of the white card lining up the top edge of the paper with the top of the card.  When I placed the navy strips over the decorative paper they seems too flat so I decided to embellish them with embossing.  I chose to do it by hand so as to not ruin the beautiful torn edges on these pieces.  Before gluing the strips into place I realized that I would have to make sure that there was enough room for my wonky tree in the space between them.  
So, I dug out my stash of Christmas papers and cut all sorts of triangles - not necessarily the same size or even from side to side.  It was quite easy to trim them by hand with a large pair of scissors that easily spanned the lengths I needed.  I started putting them in piles that somewhat coordinated and balanced the greens, reds and blues. With a bit of experimenting I figured I needed 4-5 triangles to make my tree tall enough for this card.  I dug through my brown scrap bin and found some small pieces of brown cardstock to create trunks for my wonky trees.  After trying out one of my trees on my card front I realized that I needed a star as well so I dug out some yellow cardstock and punched a few stars.  
With all the pieces I needed I auditioned one of my trees in the space between my navy strips and it was perfect.  Some others will require trimming.  So I glued down my trunk and then adhered four triangles to create my tree and finished it off with a little yellow star!  I am pretty happy with how this card worked out.  Next, I found some little round greetings in my stash so I layered them on coordinating cardstock and added them to my card front using 3D foam tape.  I am playing around with adding stitching to the triangles or dots to the outside of them.  Not sure, so for now it will remain as it is!!

Therese

Sunday, April 09, 2017

Serendipity backgrounds

My grand daughter was visiting this week and we made some quiltie serendipity backgrounds with the scraps I had sitting on my desk from last week's class.   She managed over 20 and I had just over a dozen!!  It was nice to be just gluing paper down on old card backs and spending time together even if not much was being said.  She has already used one of hers on a card!!  I will put mine in my stash and I am sure they will emerge shortly in my next few cardmaking sessions!!               Therese

Sunday, April 02, 2017

All Occasion Stack Class - just strips of paper, a greeting and an embellishment

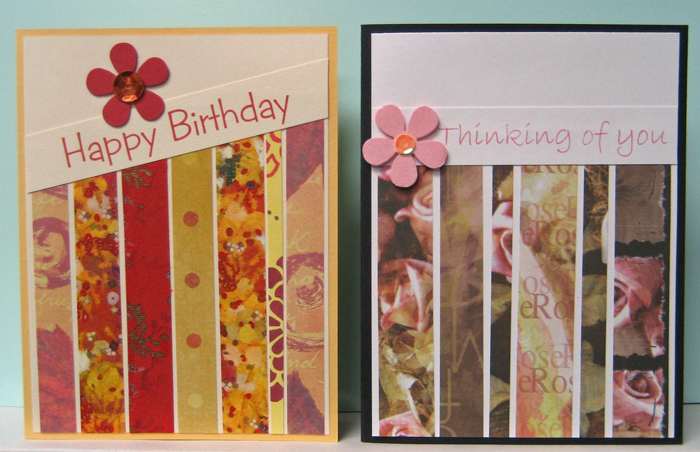
 I always leave the easiest card for last in my class!!  For these cards I sorted through my scraps and cut a wide variety of strips both in length (at least 5.5") and width.  Next, I set aside 7-8 that coordinated for each card kit.  I put the strips into envelopes and next created the greetings so they would coordinate with the strips printing them on ivory or white cardstock. I trimmed the individual greeting and added them to the envelopes.  Next, I cut white and ivory layers - 4" x 5.25" -to coordinate with the greetings and put them into the envelopes.  Next, I chose a card front that coordinated with what I had already prepared and added them along with an insert to the envelopes.  Finally, I created custom embellishments using my punches along with sequins or rhinestones for the kits!!  It was fun to see them all come together and how well all the pieces worked together.  This card had the most flexibility in layout.  The stripes could be glued at an angle below or above the greeting from left to right or right to left, OR they could be glued vertically above or below a horizontal greeting, OR they could be glued horizontally above or below a horizontal greeting, OR they could be glued vertically above or below an angled greeting!!  It was fun to experiment with all the options.  Once a layout was chosen the strips and greeting were glued to the neutral layer, trimmed to the edge and glued to the card front.  The little embellishment was adhered where desired on the card using 3D foam tape.  Again, there were a wide variety of layouts created beyond what I had laid out as ideas by the creative bunch of cardmakers - some complete newbies who learned quickly and executed their cards very well.  
We had a wonderful time and lots of beautiful cards were created!!!
Therese


Saturday, March 11, 2017

Scrappy backgrounds for quilted looking cards

 I dug out my scraps the other day and made a whole bunch of backgrounds.  I used straight edged scraps and glued them down to a substrate of paper or cardstock one at a time next to each other until the whole surface had been filled.  I trimmed as I needed to the edges or to make the pieces fit.  I embossed them once they were dry.
Here are some of the cards I made with the backgrounds I created.
The greetings are digital images from Mud Maven Designs.  She has some very cool greetings on her site!!  Worth checking out!!
I trimmed my background to 4" x 5.25", added a two lengths of scallop lace with pink ribbon between them.  I watercoloured the greeting, layered onto dark pink and adhered it to my card over the ribbon.  I layered two silk flowers and adhered them to my card front using a yellow brad.  I love that the greeting has a little graphic!!

 For this card I thought the greeting was most appropriate!!!  I trimmed my background to 4" x 5.25", I glued several short pieces of ribbon to back of the image and then stitched it to the background.  I glued this large element to the front of a black card.  I watercoloured the flowers on the greeting - adds a nice touch to have the graphics included with the greeting.
For this card, I trimmed my background to 4" x 5.25", added a brown gros grain ribbon cross the top portion and glued it to a blue card front.  I watercoloured the greeting, layered it onto a rectangle of green cardstock leaving extra on the right hand side which I punched with a scallop border punch (SU).  I added two lines with a glitter gel pen and then a little drop of blue glitter glue in each of the scallops to finish it off.
I really love the look of these backgrounds and they are super easy to make and use up scraps.  A great activity to do with the kids or with a group of friends when you are wanting to be creative together.               Therese


Thursday, January 19, 2017

"Every Day - A Gift" fabric postcard

It is the beginning of a new year and I have a new list for my fabric postcard birthday swap!!  I decided to use the quote  "every day - a gift" for my postcard so I went looking for a background and some small scraps which would work well for the gifts.  I found this soft teal fabric which worked well for the background so I cut a 4.5 x 6.5" piece and then cut a white backer the same size.  I have a small envelope of fabric scraps which have fusible adhesive on the back from previous projects so I started there looking for little squares and rectangles to create the gifts.  I found what I needed in there - just a little trimming to make them square on the sides and then I layered them onto the front of my postcard making sure that they would not interfere with the seam allowance.  I ironed them all into place once I had the layout worked out.  I decided to stitch around all of them to help define them and that allowed me to add the ribbon/fiber ties I wanted to add to create the bows.  Once the gifts were finished I used my Making Memories stamp set and stamped on my quote in dark blue.  I stitched my batting to the backer and then placed them good sides together and stitched around the perimeter leaving a gap so I could turn it inside out.  The front is fairly stiff with all the fusible adhesive on it so it was a little more difficult than I had anticipated but got it done.  I ironed it flat and then stitched all around the edge to keep it nice and neat. Next, I tied all the bows which I had pinned out of the way while I was sewing.  I am really happy with how it worked out!! I will be packaging it up and mailing it off tomorrow.  It should arrive for her birthday near the end of the month.  I am really enjoying these fabric postcards and the birthday swap is fun because you can challenge yourself to new techniques and ideas!!

Therese

Tuesday, December 06, 2016

Scrappy quilted heart ornaments

 I quilted up some heart ornaments for Christmas giving!!  I started with strips of mostly red printed fabric scraps and added a strip of white and a couple of patterned ones that include green and other colours just to give a good mix to the final product.  I made two pieces and stitched them together end to end.  I added a piece of batting and a backer in green patterned fabric with bears and Christmas lights.  I pinned them together and stitched along the length with red thread on the top and green thread in the bobbin. I made my own pattern using folded paper and pinned it to my fabric diagonally to make the best use of the piece and trimmed them out.  I got eight hearts!  I used red floss to blanket stitch the edges to finish them off nicely and used the end of the floss to create a hanger.  Handstitching is great for doing in the card on a trip so I finished them up on the weekend when we went to visit Dad for his birthday.  I laser printed buttons (Sweetly Scrapped) on cardstock, punched them out and sponged their edges and the two central holes.  I stitched them to my ornaments using red floss as well.

Loving the look of them and they are a wonderful scrappy project.  Triangular trees would make very efficient of a strip of green quilted fabric which I may try out next time.  Nice to have a few little gifts in your stash for last minute hostess gifts or for including in a card to a friend, etc.  

Therese

Thursday, August 11, 2016

Artsy Cards - Collaged buttons with doodling

I needed cards for my monthly card exchange and decided to revisit collaged buttons which I created earlier this year.  They are fun to do and fairly quick.  I combined a plastic circle die cut with some paper scraps and then punched two holes to make it a button!!  Check out the this link to find out how to make them!!  OR click the Tutorial tab above and click on the Collaged Button Tutorial.  I made several and created these cards.  I traced the button onto white cardstock using a pencil and then doodled that line with a fine tip Sharpie and continued until I was happy with the design.  I considered adding colour but so far have not - maybe next time!  I tied the button to the white layer then layered it onto black and then onto coordinating card fronts.  For the top one, I used a black marker on the edge of the white, layered it onto lilac and then onto a green card front.  I added a stamped greeting to one of them.  These were fun artsy cards!!
Therese

Sunday, January 31, 2016

A flapper fabric postcard in teal, pink and gold


On my fabric postcard group I joined a swap for January that was themed :  Teal, pink and gold!!  Very close to my favorite colours so I signed up to play!!!  I decided to use small scraps of fabric and create some flaps on the bottom portion of my teal postcard.  They were cut to 1/2" wide and I cut them to 1.5" in length and lined a group of them across the bottom of my teal fabric then stitched them into place with my sewing machine.  I placed another row above them overlapping the first row.  I also offset them just a bit and stitched that set into place. I really like this glittery butterfly fabric and the colours were all keeping with the theme.  I found a pink ribbon that coordinated, positioned it above my stitch line and stitched it into place tucking the ends underneath before stitching.  I added a layer of batting to the back and added wavy lines on the top portion and then again a few lines of stitching below the flaps to keep the batting in place.  I used fusible webbing to add an interfacing layer as well as a white backer.  I decided to create a button to introduce the gold.  I used plastic packaging, some gold foil  and several layers of fabric to create my 3D embellishment.  You can check out the tutorial I created that outlines the process of making this collage button here.  I used pink thread to sew my button embellishment to the front of my postcard.  Really happy with how this all worked out.  I was really hoping to add some beading but it seems finished just the way it is, so I anticipate that I will not be adding any.  The teal layer was large enough to fold over twice to the back and then I simple hand stitched the border in place to finish off the back of the postcard.  It will be off to my partner very soon.  

Therese

Wednesday, October 16, 2013

Fabric collage in greens

My first attempt at fabric collage and free motion stitching!!  It is really somewhat of a disaster but I kept over stitching until everything was held into place!!!  I used a white light weight base fabric, pinned on my green fabric scraps and then stitched a few lines to keep them in place.  Once the whole thing was covered with scraps I started free motion stitching.  I have never done this before so it was trial and error.  I broke my first needle and was having tension problems all the while trying to figure how hard to press on the pedal and how fast I should be moving the fabric and in which direction.  Having read up on FMS I was aware that my first attempts were not going to be fabulous.  Even accomplished people need to warm up before they can do good work.  Reminds me of calligraphy - no matter how accomplished it still requires some warm up before you work on a good project.  So anyway, much thread later I have a piece fabric collage that is lumpy and frumpy and needed a serious pressing. It looked a bit better after that.  I trimmed the edges of my piece to be even and ended up with a piece 9" x 16" so I cut it up into 3" x 4" triangles which will become trees for Christmas cards!!  I will need to embellish them a bit and come up with a card design but I am on a roll!!
My inspiration for this experiment was a library book my daughter brought along when she visited a while ago, called SEW WILD which contained lots of funky and interesting fabric collages.  I was working from memory as to how I was supposed to proceed. On hind sight, I am thinking that most collages would be created using fabric scraps backed with fusible webbing.  That would keep them in place but you do not get any texture from the frayed edges, etc which I enjoyed on this piece.   So, I will try again.  I really enjoyed the process and am happy to have found a use for this piece.

Therese

Wednesday, April 18, 2012

Cardmaking - April - woven accent

In the spirit of making the most of the supplies I have on hand and in celebration of Earth Day I decided to use the stash of paper strips I have accumulated as I trim paper for other projects.  I love how these worked out, though, I really prefer the randomness of the red one.  The one on the left used cut offs from these cards and I am really happy how bright the colours were next to the yellow cardstock but after I glued down the piece and added the image I thought it was just a little too square and even but taking it apart would have been problematic because these are made using wax crayons.  The butterfly image I downloaded from CLKER and the heart is from Torico, I laser printed them and use 1 3/4" punch to cut them out. Used a scalloped Nestibilities circle die to cut the layer.  The little patch of woven strips works really well over the embossed card fronts.
Therese

Thursday, October 20, 2011

Cardmaking - October - Rainbow Wishes

Love these rainbows!! I was inspired by this card from Splitcoast Stampers!! I dug through my cardstock scraps and started cutting little rectangles in seven different colours - red, orange, yellow, green, blue, purple and pink. Made a pile of each colour and then started matching them up - some more pastel, some more muted and others very strong and bold. I made a few specialty cards with what I had left over - all pinks or blues for baby cards and this green, orange and yellow combination for a Halloween card!! We did all sorts of embossing on our cards last night - some did just the elements others did the whole card front!!
I gave each person a scrap of white paper to glue their rainbow pieces to which allowed them to emboss the rainbow as an element before gluing it to the card. The greeting is laser printed onto white and then the pieces were trimmed apart (3/4" and 1.25") After embossing the elements were glued to a black card front. A bit of ribbon, a die cut, a stamped image or a few rhinestones would all be great 3D elements to add a bit more dimension to these cards!!
These are a quick and easy card once the rainbow pieces are cut. I have a lip on my trimmer which easily allows me to cut 3/4" strips so it was fairly quick to cut the scraps into strips. I really enjoyed matching up the colours but you could easily plan your colour combination in advance and only cut the pieces you need.
Consider red and green for Christmas cards!! A simple 3D element or some ribbon and you could make a bunch of cards in one day!! Are you inspired?? Make a few cards to add to your stash today!!

Therese

Monday, May 31, 2010

Cards, Cards, Cards - May 29 - little squares

I just loved this sketch when I saw several different cards on SplitCoast stampers that featured these cool little rounded squares!! These are so quick & easy and take so few supplies!! Choose a scrap of decorative paper - cut two 1" squares and corner round two opposite corners. I used my corner rounder from Michaels - it had a tighter round which worked better for the small squares. Choose two coordinating cardstocks and cut two 1" squares and corner round two opposite corners. Draw a cross on your cardstock with a black fine tip marker, add your rounded squares and stamp a greeting!! In my case, I laser printed the cross and greeting on white cardstock in advance so all that needed to be done was to glue on the rounded squares and then glue this layer to the card front!!!! All sort of colours for these ones and four different greetings!!
Therese