Showing posts with label tutorial. Show all posts

Monday, February 26, 2018

A few more washi tape cards with fun greetings from card kits

I have really enjoyed making these washi tape cards!!  You can check out my wahsi tape tutorial here.
I started by creating a bit of a background wash using ink and water using my handmade foam stamp.  Next, I applied coordinating lengths of washi tape.  The green on the blue card is handmade with mylar tissue and double sided tape.  All three on the "Thanks" card are handmade with decorative tissue and double sided tape.  I embossed both of them manually with a hammer using different embossing folders before gluing them to the coordinating card front from the kits. I watercoloured the fun die cut (SX) greetings (image and regular fonts) and applied them to the front of the cards using 3D foam tape.  Lastly, I finished them off by adding coordinating sequins using double sided tape to adhere them to the cards.  Love the look of these!!  Card kits made these quick and easy cards.!!!                        Therese

Sunday, February 18, 2018

Baby card with washi tape, sequins and a bit of watercolour

Another washi tape card!!  I sure am loving this design!!  I needed a card for a baptism today so I made up with baby one!!  I added green and blue distress ink my DIY foam stamp and stamped it onto my white cardstock which I had spritzed with a bit of water.  Quick and easy background!!  I added three strips of washi tape - the one on the left is commercial and the other two are handmade using coloured tissue/gift wrap and double sided tape.   I put the background in an embossing folder and manually embossed the edges using a hammer.  I watercoloured the laser printed die cut greeting (image font and regular font) and mounted it over the background using 3D foam tape.  I added sequins using double sided tape - five this time instead of the usual three.  I mounted this large element to a green card front. 
The congregation and the extended family were all invited to a potluck meal after mass and it was a wonderful time for everyone!! 

Therese

Monday, February 05, 2018

Embossing, washi tape and a large greeting die cut


A couple more washi tape cards to send off for my February card exchange!!  
I am really loving these cards!!!  You can check out a few more here.
For the left hand card I added four strips of washi tape to my white background layer.  The yellow, red and green are handmade by me using tissue paper and double sided tape.  Check out the tutorial here.  The blue one is a commercial washi tape.  After adding the tape I used a hammer and star embossing folder to emboss some stars all the way around then glued it to a red card front.   I used gel pens and watercolour to colour my laser printed large greeting.  The rainbow stars is an image from an image font to which I added a font greeting and then digitally inserted both of these elements into a double border frame which I cut with the smallest Deco Label thinlit.  I mounted the greeting to my card and finished it off with three colourful sequins.  
Pretty much "Ditto" for the card on the right.  The greeting is laser printed and die cut with the Deco Label thinlit and coloured with watercolour and gel pen on the frame.  The "hello" is from an image font.  I used a hammer and the Swiss Dot (CB) embossing folder to add texture to the outside of my background after adding the three strips of washi tape.  All three of these washi tapes were handmade by me using tissue paper and double sided tape.  Check out the tutorial on my Tutorial Page (click on the link at the top of this page) So much fun!!  You really should try it!! I added my greeting with 3D foam tape and finished off my card by added three sequins.  

Therese

Tuesday, January 23, 2018

DIY - Washi tape


I have a few rolls of washi tape that I have purchased over the years.  The ones purchased together coordinate but the groups do not coordinate very well so I am often left wanting to use the tapes but not finding what I need in the collection I have.  SO..... I decided more washi tape would be required before I could liquidate the supply I have.  Make any sense?? There is some logic to it but as you can see from the box that by the end of my Washi Tape making session I have pretty much tripled my selection!!  And so it is!  Those with clips have a carrier and those on the tube were made with the medical tape. 


I did a little bit of research on line looking for Washi Tape tutorials and found quite a few using several different techniques!!  I really like the translucent look of the ones made with tissue paper so I decided to give it a go!  I collected tissue paper, double sided tape, a pair of scissors and a scoring tool (AKA a bone folder).  For any tissue paper that was not smooth I gave it a bit of a press with my iron before getting started.  Once flat, I ran a length of double sided tape over the back side of the tissue paper and then carefully trimmed both sides with the scissors.  Next I burnished the whole length to ensure its adherence and smoothness.  It is best to work on a hard surface which reduces the amount of wrinkles introduced into the final washi tape.  I used clear double sided tape with a substrate as well as a carrier.  Having a carrier works the best when it comes to storing your newly created washi tape because you can just roll it up and it does not stick anywhere you don't want it too.  This washi tape is very sticky and therefore cannot be rolled onto itself like the commercial kind.  It does not tear easily because of the substrate but it has the translucent quality that the commercial ones have. 
For my second attempt I used a more opaque tissue which came wrapped around something and a wider different opaque double sided tape.  These two worked quite well together but the result is opaque and does not tear because of the plastic substrate as well.  It can easily be coloured with ink pads and stamped on to add some texture and designs which means it can be customized for any project.  Using wider tape allows you to cut it down in width and get twice as much washi tape for your effort. 
On my next attempt I used double sided tape from a local store which is very thin and has no substrate - just glue on a carrier!  This one works the best to make nice translucent tape that tears easily!!  You do have to be careful to use the clearest glue you can get.  Yellow glue will show through white tissue paper and affect the look of your washi tape.  Of course, if used on warm coloured tissue paper it matters much less.  Very close to the real thing though you cannot roll it onto itself because it is too sticky!!  I really liked this tape and it was fun to play in my supply of tissue papers!!  In the tutorials they suggested that the single coloured layer of paper napkins can be used in the same way.  Will try that next time!!
On my last attempt I used medical tape!! I laid out several strips on a the smooth back of a plastic place mat before applying colour with permanent ink pads.  I used tiny detailed stamps and coordinating permanent ink colours to add some texture and designs to these lengths of washi tape.  This tape does take colour reasonably well but is generally still quite translucent and when dry is the most like real washi tape as it can be rolled upon itself as it is not too sticky and tears very easily.  It is more difficult to get really bright and contrasting colours on this tape.  I have used watered down acrylics in the past and it works as well as the ink did. You can check out my Faux Washi Tape posting here!!   I will consider a coat of gesso on the tape when I try this next time.  It should give me a bit more opacity but also provide a better surface to which I can add paint or ink and get brighter colours.  This should allow a broader spectrum of ways to finish off the tape with colour, markers, stamping, etc which should provide a wide range of interesting washi tape that would more like the commercial ones. 
So I am very happy with my experiments with making my own washi tape!!  I most like the thin tearable double sided tape on the tissue paper and except for not being able to roll it onto itself it makes great washi tape.  It works for me because of the large variety of tissue papers I have. 
The medical tape works really well too and because it requires ink/paint and stamps it a good option for someone who had an abundance of those instead of a tissue paper supply. 
Be sure to create some coordinating washi tapes so you can combine them in your creative projects!!!!  Leave me a comment and include a link to your Washi Tape fun!!!

Therese

Saturday, September 10, 2016

Tutorial - laser toner resist & watercolour cards


I made laser toner resist cards a while back and this time I decided to take a few photos and prepare a tutorial to show the process of making them.  I used free digital images from CLKER for these cards as well and created my layouts in Corel Draw.  I created backgrounds and layouts with the images - 4 per 8.5" x 11" and laser printed them onto white cardstock.  I trimmed them apart to 4.25" x 5.5".


Here is what you are going to need:
quarter sheet laser printed images/backgrounds
watercolours
water
a large round brush
and a waterproof work surface
Wet your watercolours so they are really juicy. Choose an image/background.  I chose this hexagonal background for my first one.  I started by adding several splotches of yellow, added several blue splotches and where they mixed it created some green areas. I ran blue all the way around the edges to make sure that there would be colour to the edge all the way around. Keep adding colour until you are happy with how they look.  Don't mix too much - we don't want mud brown.  That is it!!!  Set this one aside and create another one.

For this one I tried adding plastic wrap over the wet paint to get a cool pattern but because the cardstock is very absorbent I was not able to get much of a pattern.


This one is a floral background. In this case I was a little more careful.  I painted all the centers yellow first, then I added colour to the petals and finally I painted the background green.  I found the large paintbrush worked well and helped me resist being really finicky with my application of colour.
So a different brush and a different colour palette resulted in a bit of a different look for these cards!!
It it worth your while to make a few while you are at it.  I would advise having a few blank images/backgrounds on hand for last minute cards!!

Once they are dry they may need to be pressed to flatten them.  You may also consider wiping the surface with a dry cloth to remove any watercolour that remains on the laser toner which will make it pop a little more.  Once they are pressed flat, it is time to make cards with them!!  Trimmed to 4" x 5.25" they are perfect for the front of an A2 sized card. They can be embellished with greetings, ribbon, bling - whatever you are inspired to add.
Have fun and leave me a link in the comments with your creations so I can go take a look!!

Therese

Thursday, August 25, 2016

Fabric collage heart cards


 I have been playing with fabric collage and needed a few anniversary cards so I decided to combine the two and made a few cards.  
To create my fabric collages I simply took coordinating scraps and sewed them to each other by overlapping their edges and machine stitching with a coordinating thread.   
To make my cards I took each collage and cut it into heart shapes free hand.  The first two cards were cut from one collage. For the first card I cut an ivory layer and mounted two strips of green cardstock one on each long side.  Next, I colour washed two strips of vintage white bandaging that looks like cheese cloth with green watercolour and, once dry, I positioned them on the layer and adhered them to the back using double sided tape. Then I positioned my fabric collage heart and overlaid it with a short piece of ivory lace and machine stitched it in place using coordinating thread.  I layered my laser printed greeting onto the same green cardstock I used on the layer and stitched it in place as well.  I found these little ribbon bows in my stash. I placed one over the lace and sewed it on with coordinating embroidery thread tying two knots to keep it in place.  This embellished layer was adhered to a coral card front to complete my card.  Really happy with how this card worked out!  Encouraged by my first attempt I made another one!!  For this card I used a similar piece of ivory cardstock and stitched on kraft cardsstock strips on each long side.  I added some scallop edged tulle (SU) over the middle and gathered the middle portion keeping it in place using double sided tape.  I positioned my fabric collage heart over the tulle and stitched it in place, layered my laser printed greeting onto lavender cardstock and also stitched it in place.  I finished off this layer by positioning a short piece of lace over my heart and sewing on a little bow using lavender embroidery thread knotting twice to hold them in place.  I adhered this embellished layer to a peach coloured card front.  Fun!!!


For this third card, I pieced strips of blue cardstock together by adhering them to each other on the back with regular tape then embossed this layer with a circle/dot embossing folder.  I layered my fabric collage heart over a white mesh fabric, stitched it with coordinating thread and then trimmed the mesh fabric close to the heart.  I positioned this heart on my blue layer, added a handmade collaged heart button and tied them in place using rose coloured embroidery thread.  I layered my laser printed greeting onto rose cardstock and adhered it to the blue layer using double sided tape.  This embellished layer was mounted to a white card front.
Loving the artsy look of these cards!!  You can check out the collaged button instructions by clicking the link in the text or by clicking TUTORIALS above and scrolling down to the Collage Button tutorial.

Therese

Monday, March 28, 2016

Paper Beads that can be customized

I have been wanting some slim beads for adding to my projects so I decided to make some paper ones that would fit the bill.  As I was prepping for this project I had white 24 lb paper scraps sitting around from another project that my grand daughter was working on so I decided that it might be best to use those scraps to create the beads which would allow me embellish them later to coordinate with my projects!  I used a piece of wire to wrap my beads around so that the hole would be a good size and I used short pieces of paper (2" x 3/4")  to make the beads not too bulky.  I just applied a layer of glue to one side of the paper leaving some space at one end to start the bead wrapping.  I made sure that the far end was well glued down to the rest of the bead as I finished it off.  I am happy with these!!  I will be able to embellish them with paint, markers or decorative paper depending on what works for my project.  I will likely give them a final coat of clear sealer before I use them.
I Love Paper Beads has a few paper bead making resources so you can check them out if you have never made paper beads before.
Will let you know where these end up as time goes on!!

Therese

Tuesday, February 09, 2016

Embossed metal tutorial


Embossing metal is fun and easy requiring only a few items which you probably already have on hand. It makes creating customized 3D embellishments for your projects possible and they look so authentic.  


First of all, you will need a piece of foil.  It needs to be reasonably thick so I often use foil pans which can be bought inexpensively or you might even find in your recycle bin.  You might also want to consider any foil seal you find on a variety of cans or containers.  The one above came off of a coffee tin but you can sometimes find them on cans of nuts or yogurt.  You will also need a block of wood.  Here I am using a wood mount from a stamp which I have unmounted but it could be one from the toy box or the workshop.  


Just rub the edge of the wood block over the foil to remove any wrinkles or embossing and make the surface nice and smooth.  


 Once it is nice and smooth, cut your shape out.  Here I cut a circle for creating the badge I was making for a card.  I used my Nestibilities but you could easily use any other die or even hand cut the shape you want.  


Embossing requires a forgiving surface beneath your metal. Here I have used a piece of fun foam but a stack of newspaper works just as well.  
I wanted a star in the middle of my shape so I centered a star die cut (SX) on the back of my shape and lightly traced it on to the metal using a pencil.  You could hand draw your image or place a printed image over it and trace lightly to transfer the image to the metal. Be sure to reverse any image or words before you emboss so it will be right reading on the front. 


Next, I embossed the image into the metal by tracing the shape with my pencil pressing medium hard.  You have to be careful because if you press too hard you will pierce the metal.  You are better off to trace the shape several times more lightly rather than to press too hard and risk making a hole where you do not want one. 


 You can see above what the star looks like on the front - the outline is raised up - embossed - in the metal.  


 I turned it over and embossed a few more details - dots, another frame and shapes in between the arms of the star.  


This is what it looks like from the front.  You can see here that I debossed (indented) the shapes between the arms of the star by applying pressure with my pencil from the front.  So as you go on, you can choose to emboss from the back and deboss from the front any of the elements you wish to add to your creation.  


You can see from the finished piece that I added some embossing inside the star as well as dots on the outside edge while I debossed all the shapes between the arms.  You could certainly also choose to pierce your metal embellishment.  I would suggest using a push pin over a stryrofoam tray to get uniform holes.  I would suggest piercing from the front so that the ragged edges created end up on the back of your creation.  Consider colouring your embossed metal embellishment using permanent markers like Sharpies or alcohol inks.  
I used 3D foam tape to adhere my shape to my scalloped circle but you could also use brads, staples, stitching, nails or eyelets to secure your 3D embellishment once you have created it!! 

Have fun!!! 

Therese

Monday, January 18, 2016

Tutorial - Collaged button


I made several collaged buttons a few weeks ago and thought it would be fun to provide a tutorial to describe the process I used.  


I started with a piece of thick plastic packaging which provides a good substrate for the process and makes a sturdy button.

I used a Sizzix Circle Die to cut a circle.  In this case, I used the smallest circle which is about an inch.  For this one I used the second largest which was 1.5".  


I sanded the edge and one side with fine grit sand paper.  The edge can be a bit rough after cutting so it may need sanding to smooth it out.  Sand the roughest side of the plastic circle - generally the one that has been on the outside of the packaging which leaves the nice smooth side for the good side of your button.  The sanding will provide tooth for the glue you will use for your collage.


Apply glue to the rough side.  I used Dimensional Magic but any clear glue will do.  Spread it over the whole surface being careful to not miss any spots.  If you miss some spots you will be able to see them from the front of the button and the collage will not be adhered properly to the plastic.


For the project I am working on I needed a gold button so I applied gold foil to the back.  Here you can see that the glue is well distributed and makes contact with the foil on the whole surface.  
This foil is combined with the brown and gold paper medallion which I used on a few of my recent cards.  You can check this featured post to see if you can figure out which tasty treat this packaging has housed.  Leave me a comment with your guess!


I roughly trimmed the extra foil and applied small binder clips to the edges.  I did, in this case, include a circle punchie on the bottom side so that the clips would not damage the foil.  It is best to leave this for a few hours or over night to ensure that the glue is dry. 


Once dry, I trimmed the foil to the edge of the circle and sanded lightly from back to front to ensure a smooth edge for my button.  You will likely have to clean the front of your button as well because there will be dried glue on it.  I use my finger nail to scratch off the dried glue as to not damage the front of my button.  
Now, you can use this as a 3D embellishment in your work as it does provide a nicely finished collage element.  Consider using a tag shape instead and make a hole at top instead. 
So many possibilities!!


I marked the holes with a black sharpie marker before punching them.  I am using the standard two holes but you could certainly use four if you prefer.  If you are using yours as an embellishment you could certainly punch the holes near the edges instead and attach it to your project with brads.  


I punched these holes with a 1/16" hole punch.  I used a 1/8" punch on the larger buttons I created.  
Use whatever size suit your purpose. 


Here is my button used on my project.  I layered it over a teal fabric circle and then onto a scalloped circle of sheer gold fabric.  It was exactly what I wanted!!

So I hope you will find this tutorial helpful.  I had been finding that adding buttons to my paper crafting and small fabric projects meant that I had to apply extra postage to send them on their way. 
These buttons have less dimension and therefore do not incur that cost.  The fact that they are artsy and fun is also very cool.  I love that I can make them to suit any project I am working on.  I can certainly see making some that would be used as 3D embellishments instead and be attached to my project in a different way instead of the holes which makes these ones buttons.  
A bonus is that most of the supplies for this project you likely have in your stash!!

Enjoy!  Please feel free to leave a comment if you have enjoyed the tutorial or if you have made up some collaged buttons!!

Therese

Friday, January 16, 2015

Chunky book page - blue, crackle paint and "allure"

Joined a 4"x 4" Chunky book page swap on one of my groups with the theme of "blue, distressed crackle and allure".  It took a few days and some internet research to come up with my concept for the project and to find tutorials for creating crackle paint.
I am very happy with my crackle background.  More info on that a bit farther down.   I decided to use techniques that draw me to creating - hearts, green and pink, texture, inspirational quotes, script backgrounds, hand lettering, etc.  I started by trimming my background to a four inch square and then stitched it with white thread to a white backer which was embossed with hearts.  I dug through my stash of hand decorated papers and found one with pink and green.  I glued a portion of it to cardstock and die cut a heart (SZ) out of it.  I embossed the heart using a script stamp (SU) and white embossing powder.  I glued it to my blue crackle 4" x 4" background using hot glue, added the felt flower and leaf embellishments and the little quote with hot glue as well.  I hand lettered the words and added the dots using a white gel pen.  Very happy with it!!
Crackle backgrounds - there are many tutorials on line for making them.  I started by using a clear crackle medium which I have own for a long time. I applied it to quarter sheet of dark blue hand decorated paper and followed the direction on the bottle.  I let it get tacky and then applied light blue acrylic paint to the surface.  It crackled some but not enough for my liking.  So I went looking for another method.  Someone on the group recommended several tutorials so I watched them and decided to use cheap white glue and paint.  As you can see on the left I started with several squares of blue serendipity paper which I painted liberally with cheap white glue ($1) and then painted with white and silver acrylic paint while the glue was still wet.  I had to apply a generous coat of paint to avoid disturbing the glue layer too much.  I left them over night and they crackled very nicely.  Unfortunately, the contrast between the upper and lower layeres was not really what I was looking for so I started over.
I used a quarter sheet of dark blue cardstock, applied the glue as described above, added a medium blue acrylic paint over it and left to dry overnight.  It crackled very nicely and the contrast between the two layers was much more what I was looking for.  The photo to the left is the same piece of crackle background as you see in my finished piece but they look so different.  Must be the light over my other work surface that made the difference.
So if you are looking to give this technique a try I would recommend the cheap white glue and acrylic paint technique.  It is cost effective and gives you very nice crackled background.  Here is a link to a tutorial.   Enjoy!!

Therese

Friday, December 26, 2014

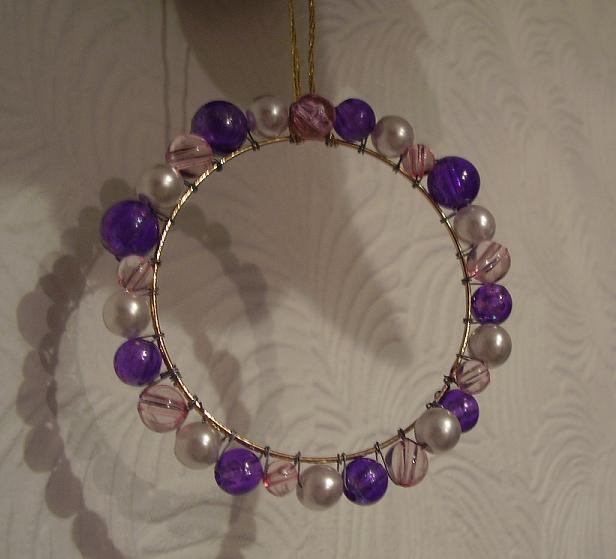
Wire & Bead ornaments for ByHand giftie swap

I worked up this ornament for a different swap on a different group but when my original idea for the gifties for this swap became too time consuming I decided to just make a few of these instead!!  I am very happy with how they turned out!! I managed to make them all different using my supply of Ebeads.  I did all the beading first - there were beads everywhere!!  I put all those supplies away and then dug out the ribbon and started matching ribbon to the contrasting beads.  I am always amazed that with hundreds of rolls of ribbon sometimes I cannot find a really good match - for those I came up with a colour that worked even if it didn't match perfectly.

You are seeing these here now because all the gifties made it to their recipients and patiently waited for their turn to be opened on the days leading up to Christmas.  
 Our tree is full of handmade ornaments and each has a memory attached!!  I hope these all found their way to Christmas trees this season and will be lovingly put away to be enjoyed next year and maybe even for years to come!!

Therese

PS
You can check out the tutorial for this ornament by clicking the link to Tutorials just under my header at the top of this page.

Tuesday, November 11, 2014

Handmade Wreath Ornament with a Tutorial


I have joined a handmade ornament swap on one of my groups so I went looking for ideas!!  I found an ornament similar to this one that fit my criteria - lightweight, fairly flat for easy mailing and used supplies I had on hand.  I dug out wire, beads and pliers and got started.  I decided to use E-beads because I have lots of them in a variety of colours.  After adding the first row of beads on the outside of the armature - it looked a bit "light"so I added a row on the inside. Better! but it needed a bit of accent colour so I added some different coloured beads to simulate "holly berries".  That was much better.  I added a charm and a bow and declared it done!! Not sure if it will be the one I use but I decided to document the process in case I want to replicate it in the future and no longer have the original!!


Handmade Wire & Bead Wreath Ornament Tutorial
You will need:  (I used)
Wire for the armature    (I used 26 gauge - 4-5 wraps around the jar (36"-40")
Wire for beading    (I used 28 gauge - about 48")
Beads     (Ebeads - 80 of the main colour, 16 or so of accent colour)
A charm       (metal snowflake charm)
A length of chain      (4 links)
A bow      (6" or so to construct a bow)
Thread      (24" or so to sew the bow onto the ornament)
Pliers     (snips and rounded beading pliers) 

Use what you have and adjust where you need to to accommodate the difference in supplies. 


 1.  Make the armature for your ornament.
  I wrapped 26 gauge wire around a jar of UTEE embossing powder 4 or 5 times.  

 Twist the wires to each other and then wrapped them around the loops of wire to secure them to each other.

 2.  Prepare your beads.
I strung my 80 green Ebeads onto a 48" length of 28 gauge wire and made a cluster of loops
at the end to ensure the beads would not fall off and to make it easier to pull through the armature.

 3.  Start adding beads to outside of armature. 
Wrap the end of the 28 gauge wire to the armature where the ends are, a couple of times to secure.
Bring one bead up to above the armature, hold it in place with the hole horizontal, fold the bead wire to the back and pull through the opening in the armature.  Tighten.  

 Repeat 39 more times leaving some room between the beads.  Wrap bead wire around armature to secure.

 3.  Now start adding beads to the inside of the armature by placing the bead horizontally below the armature, holding it in place and bringing the wire up and between the first two beads above the armature.
Bring wire down the back side and up through the opening in the armature.  

 Repeat 39 more times.  Wrap bead wire around the armature to secure.  

 4.  Add contrasting beads onto bead wire.

 Add these beads in between the ones already on the armature using the same technique as above. Start with a couple of wraps, add a bead below, a few more wraps and then add a bead above.  Keep adding beads alternatively until you have added beads randomly all the way around.  Secure your bead wire with a couple wraps around the armature when you are finished.  

 5.  Prepare a charm.  I used a metal snowflake charm and added four links of chain to it to make it hang in the right place on the inside of the ornament.  

6.  Attach charm to ornament.  I used one of the armature wires to create a loop for my charm to hang from.  If your beads are too close together at the top just nudge them gently to the sides.  They will adjust and make some room for you to hang the charm.  
Alternatively, you could use thread to hang your charm by just tying it to the armature hanging at the right height.  

7.  Add the bow.  I constructed a bow from ribbon and then sewed it to the top of the armature using embroidery thread.  
Alternatively, you could tie the ribbon to the wires that are sticking up and make a bow.  
I twisted all the wires together and snipped them even about 1.25 inches above the top of the ornament and used rounded beading pliers to make a loop hanger.  
Alternatively, you could add a jump ring using the wires to secure it and then snip them.  
Once you are finished, shape your ornament to get it nice and round. 

Very happy with my wreath ornament!!   I hope you will find this tutorial useful.  
If you use this tutorial, I would love for you to leave me a comment on this post 
and a link to your project if you have it online somewhere.  

Thanks for joining me!

Therese