Tuesday, November 09, 2010

Christmas Zentangles

Another fun swap on one of my lists!! I spent a couple of hours quietly drawing - adding lines to create shapes into outline letters I printed with a chunky font. It is great to have a good outline to follow. After that, it is all about deciding where the lines need to be, adding texture and varying the light and the dark for good contrast in the overall image. I have never zentangled words before but I have created zentangles in letters for monogram cards and some in squares!!
I am sending these off to my partner for this holiday themed swap and look forward to the ones I will receive in return!!
Christmas is a great time to be creating zentangles!! I have created these large enough to be framed so she can use them as art in her home every holiday season!! I have not added any colour because it keeps the art more graphic and black and white can be framed in any colour to coordinate with the current decor. So I challenge you to create a few zentangles for the holiday season! Print a whole bunch and add them to your holiday cards, frame a few to adorn your home or make a set of cards or some framed art as gifts for those who have everything!!

Be creative this Christmas and add a bit of your art in your home!!

Therese

Monday, November 08, 2010

Heart Ornament

Thanks to a friend of mine I have a few of these die cuts to play with - adorned heart Nestibilities!!
I created this ornament using two die cuts - there are three in the set - and simply inserting the red into the white and adding a backer to keep them nested. White embossed the word love on the red heart.
The Love stamp is a new one! Won it at a class on Quietfire's community two weeks ago!! Suzanne makes rubber stamps from her wonderfully calligraphed sayings!! I am looking forward to incorporating the rubber stamps I won into my projects in the next little while!!
Sending off this little heart with some love to a special person!!

Therese

Sunday, November 07, 2010

Christmas - tags

Tags are always fun for Christmas!! Here I have teamed them up with a little bit of ribbon and some snowflake punchies!! The background paper is decorative paper - light blue and white - which has been colour printed with an all over pattern of snowflakes!! I also added stitching with a white gel pen. The snowflakes are a font (WWflakes) which I cut and pasted one at a time, duplicated, coloured and resized to create this all over pattern. The embossed greeting has been cut from cardstock embossed with the greeting embossing folder from CraftsToo from Ecstasy crafts!!

Therese

Christmas cards - Queen Anne's lace

I love the look of pressed Queen Anne's lace for Christmas!! These surely are the snowflakes of summer and once pressed can present your holiday greetings most elegantly!! I created this card so the central scalloped element can be removed and used as an ornament on a tree!!
The main element features an ivory scallop (Nestibilities), a pressed flower attached with a single glue dot in the center and a clear scallop, cut from packaging, that protects the flower. I have attached the clear scallop using a small piece of double sided tape beneath the hanger (green crochet thread) which securely attached the two scallops. I punched a 1/16" hole at the top of the card to pass the hanger to the inside of the card where it is attached with invisible tape. This will allow easy removable once it has arrived at its destination. The two snowflake punchies (MS) help to keep the scallop ornament situated on the card and provide a link to the colour printed greeting. The background is gift wrap that has been stamped with an all over snowflake pattern.
So consider using pressed botanicals in your Christmas greetings - small cedar branches, small ferns to simulate Christmas trees or small red oval shaped leaves (euonymus or contoneaster) to create poinsettias!! They are really great combined with handmade paper!!

Therese

Christmas cards - Shimmer and Glitz

The main feature of this card is the shimmery fabric!! It is similar to vellum when it comes to attaching it - you have to do it discreetly so the adhesive does not show through. In this case, I used some double sided tape behind the greeting and several tiny pieces behind the snowflakes which pretty much disappeared once they were well burnished from the front. The ribbon which is attached to the inside of the card front fortunately keeps the left hand side of the fabric secure and the brad through the fiber snowflake on the right mechanically adheres the fabric to the card. I used shimmer paint on the cardstock before I embossed the greeting with a little embossing folder!!
The shimmery fabric is often featured as a gift wrap at this time of the year and I have purchased it with several different designs including snowmen and script holiday greetings!! Follow this link for information on making your own shimmer paper using supplies you probably have at home!!

Therese

Christmas cards - batik snowmen

These cards are part of ones I created for the girls that requested kits for my last class!! Wax resist - I am still on that kick!! I used the embossing folder (crafts too - Ecstasy crafts) open, placed the paper on the "bumps" and rubbed on clear wax to which I later applied a wash of watercolour!! Once dry, you just have to wipe the waxed areas to remove any colour which really makes the image pop. Because this image takes up so much of the card front I chose to add a simple colour printed greeting at the top. I mounted the greeting with a small piece of 3D foam tape in the middle, punched holes through all the layers on either end and inserted the ribbon, wrapped it around the card and tied the ends in a double knot on the front. Quick and easy and can be made up in a wide variety of colours!!

Therese

Saturday, November 06, 2010

Christmas cards - let it snow!

A cute little snowman embellishment is the 3D element on this card!! Can you tell I got a new border punch!! It just seemed to work so well for this batch of Christmas cards!! The background paper features a digital stamp - one I created myself!! It was fun to do and I am happy with how it turned out!! There is very little contrast in the paper - light blue and white - which makes it the perfect candidate for printing on!! I laser printed the greeting, cut the sheet into quarters, stamped on some mini snowflakes and then ripped the pieces in two!! Glued the two pieces on the card front leaving a gap to give the look of a snowbank!! Attached the snowman with 3D foam tape and glued on a random amount of snowflake punchies. I highlighted them with glitter glue and added some to the border as well. Always add your glitter glue the very last thing and set the cards aside to dry!!
There was a lot of creative use of glitter glue today!! Some highlighted the swirls and others attached their little punchie snowflakes with it - gave them little blingie halos!!

Therese

Christmas cards - three trees

Lots of white and texture on this one!! The background features dots created by the Swiss Dots (CB) embossing folder. I glued a layer of white tissue over the bottom third of the card to simulate a snowbank and added an embossed greeting with 3D foam tape which works the best with very dimensional elements. I used a Crafts Too embossing folder to emboss the greetings - 6 greetings at a time!! You can check out Ecstasy Crafts to find a variety of versatile embossing folders!!
I used a Sizzix Movers and Shapers die to cut the little trees and then embossed them with the D'vine swirl embossing folder (CB). I borrowed the die from a friend which is a great way to make the best use of your tools and supplies and provides some very nice quality crafting time!! The top of the card features a ribbon which looks like it has a bow tied in it but, in fact, it is an illusion. I came up with this option because some of the girls have trouble tying bows and this technique gives you the look in two easy steps. Attach a straight flat piece of ribbon to your card gluing the ends to the inside of our card with double sided tape. Now, take a smaller piece, 3" or so, slip it under the flat ribbon and tie a single knot, pulling tight. Voila!! the look of a bow without the fuss!!
Some of the girls used markers and chalks to highlight the embossing on their cards which adds yet more dimension and interest!!

Therese

Christmas cards - heart

I really like the contrast of red and white in this card!! It features a metal heart embellishment which I attached to the greeting layer using glue dots and features a simple little snowflake in the center oval to finish it off. The little red snowflake is a punchie produced when I created the snowflake border. I created the greeting in a layout program (CorelDraw) and colour printed it!! The white layer below the red snowflake border is actually flocked ribbon which I cut with a Borderabilities die by Spellbinders. The back of the ribbon was a bit shimmery and had been embossed by my cutting plate which made it interesting, so some of the girls used that to the front instead of the flocked side. Love that others think differently and are willing to do what works for them.
I really love these hearts and it took a while to come up with a design that I was pleased with and showed it off nicely!! Mission accomplished!!
The border punch (MS) is actually called a daisy punch which was a surprise to me when I took it out of its package because I bought it thinking it was a snowflake punch so I guess it will be more versatile than I originally had thought it would be!!

Therese

Christmas cards - little pieces of art

We made Christmas cards today!! A whole room of girls - big and little!! It is so fun to design card kits, have people add their own creativity to the supplies and end up with so many different looks by the end of the day!!
This card is simply elegant. I used Mary Engelbreit 3D stickers with glitter as my main element and simply added ribbon to make it look like a little piece of hanging art!! The background is embossed and the little bow is added with a glue dot!! I find that the "bunny ears" technique for tying the bows works the best when you want a nicely shaped bow that lays flat!!
I am always on the look out for interesting supplies for making cards. I bought these stickers after Christmas last year when they were being cleared out at Michaels. This design worked well because it accommodated the variety in sizes of the stickers. I chose cardstock colours that coordinated with the image so we ended up with cards in rather non traditional colours! It was a great opportunity to make good use of my collection of embossing folders.
A quick and easy Christmas card! Something we need come this time of year!!

Therese

Saturday, October 30, 2010

WoW bookmarks

Decided to take a break from the class prep and get my white on white bookmarks made up for a swap on one of my groups. White on white requires a bit of creativity. I like to use texture to add interest. I dug out everything that was white - handmade paper, cardstock, embossed paper, netting, fiber, etc. from my box of collage materials (scraps from projects that can be reused). I created a serendipity collage background by just gluing a variety of ripped up pieces from the pile to a piece of embossed cardstock. I used a lot of glue to make sure the items would stay in place, so I let that dry overnight. This morning I cut two squares from my collage to use as the bookmarks' backgrounds.
For the top one, I die cut butterflies (SU) from some wonderful flocked ribbon and three flowers from handmade paper. I added pearly flower stamens for antenna and some covered wire for a body to the large butterfly. Added pearl cotton for bodies and antenna to two others. The flowers I embellished with sequins, a die cut snowflake and a brad and added leaves hand cut from the leftover flocked ribbon.
For the second one, I embossed a little tree die cut (SX), added some glue dots which I rubbed with glitter to add a bit of bling and two snowbanks created from ripped embossed cardstock.
All the elements on these bookmarks were added with glue dots or double sided tape to make sure that all they would remain in place while the bookmark is in use. I also sprinkled baby powder over them and rubbed it in so any remaining glue would be neutralized. Necessary to enausre the bookmark would not stick to the pages of a book when in use.
I glued my little squares to triangles of folded cardstock to create the bookmarks. They sit on the corner of a page. I did add a bit of folded ribbon between the square and the triangle to make removing the book mark from a page easier.
All of the embellishments help add texture to the bookmarks as does the slight variation in the colours of the white papers used.
Another successful project!!

Here is a link to a tutorial on Splitcoast Stampers for making corner bookmarks!!
Here are a few more serendipity collage tutorials - technique zone, scrapjazz, artduscrapbooking (french but great photos) and mixedmediaarts.

Enjoy!!

Therese

Wednesday, October 27, 2010

Handmade paper!

Here is the stack of paper I made over the weekend. I taught papermaking on Saturday afternoon and then finished up the leftovers from the batches over the next day or so!! Great fall colours!!
I love making paper and it is so fun to do!! Imagine reusing/recycling paper scraps into new sheets of paper for crafting with!! It is so WIN/WIN!!
If you are a paper crafter consider becoming a paper maker as well. You will be able to make use of your scraps - any size works - and create very unique and one of a kind papers that will give your projects a very original and distinctive look!!
If you can't get into making your own paper then consider donating your scraps to someone who does!!

Therese

Wednesday, October 20, 2010

Quick and easy embossed cards!

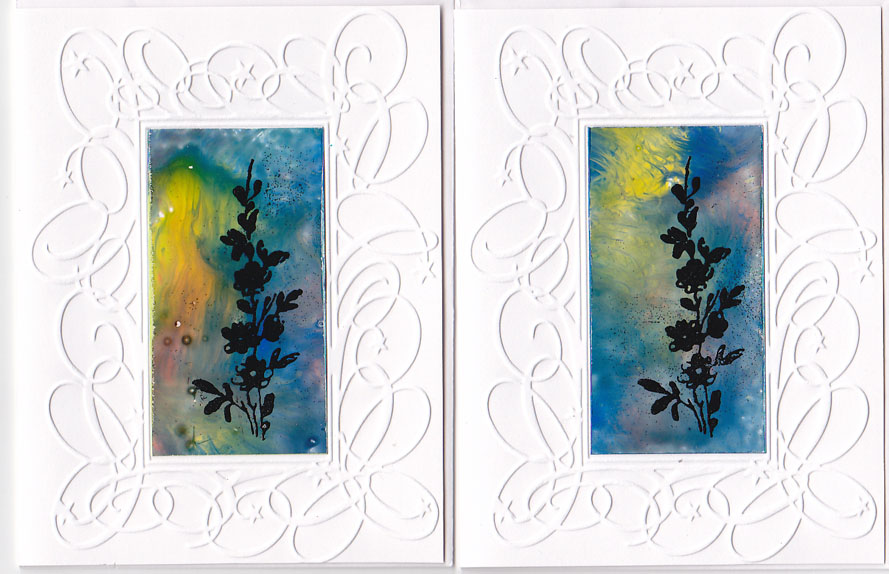
These are quick and easy!! The embossing folder is one that is so versatile, manufactured by Crafts-Too and sold locally at Ecstasy Crafts!! My head is spinning with the options but for tonight's class I just went digging into my stash for colourful papers that would best show off this beautiful swirly frame!! I cut the pieces of decorative paper just the size I needed to fit inside the embossed frame, stamped and/or embossed them in black and glued them in!!! That easy!!
So get creative and see how many ways you can use your embossing folders!!

Therese

Clear embossing powder resist


Another resist technique!! In this case, I used clear embossing powder as the resist. Stamped the image with Versamark on white coated paper and clear embossed. After some experimentation, I went with Distress inks on these backgrounds. I applied the ink in a circular manner with the pads directly to the paper, rubbed it lightly with a dampened paper towel which softened the inks very nicely and somewhat removed the ink from the clear embossed image. I did go back in with a barely damp paper towel and remove yet more ink from the embossing powder. I think classic dye inks might have worked better for this purpose but I was really liking the look of the distressed inks!!


Thrifty Tip: I did spritz the paper towels after I was done and wadded them up to disperse the inks which works so well with the distress inks. Colourful decorative papers to be used another time!!
I layered the birdie images with a white cardstock layer to which I attached, with double sided tape, a little piece of eyelet trim. Finished it off with a colour printed greeting attached with 3D foam taper. I created the greeting in a layout program (Corel Draw) so it could be punched with my large oval punch (SU). It is a great way to create custom greetings and gives you a wide variety of colour options especially useful when you have a limited amount of stamp pads!!

Therese

Glue resist technique

Here is a close up of the decorative paper I created using the glue resist technique described here!! I "printed" with the glue several times on this sheet and the areas blended very well and did not leave obvious edge marks.

So experiment with your embossing folders!! Be sure to scan the paper you create for use in your digital art!

Just another way to use what you already have!!

Therese

Glue resist and tag cards

These cards feature background papers created with a glue resist technique!! Yes, I was on a resist technique kick!! In this case, I used my embossing folders, again, to create the resist. I spread glue onto the "bumps" of my open embossing folder with a brayer (be sure to wash both before the glue dries), laid my mustard gold paper on it and rubbed the back to transfer the glue!! Repeat until your paper is covered. Worked very well!! Once the glue was dry I used washes of acrylic paint to add colour to the paper.

After experimenting with a few options I discovered that the easiest way to remove the colour from the glue was to place a sheet of bond paper over the wet one, rub the back of it and pull it off. If you keep using the same paper to remove the colour from the resist you get a bonus sheet of decorative paper you can use at some other time. It may have been the type of glue (wood glue) I used but I found it difficult to remove the acrylic wash from the resist areas once it was dry. I expect white glue would give better resist results. In the end, I am happy with the grungy look of this paper and it suited my colour scheme very well.
The paper is ripped in the middle to give some interest and texture to the background. I added an embossed tag that features a coloured image and attached the whole thing to the card front using 3D foam tape which adds dimension. I love the rick rack which adds a touch of country to these cards and really works with the colour scheme.

Therese

Wax resist backgrounds

Here is a sampling of the wax resist backgrounds I created for my class!!
I spent a few hours playing with this technique and finally settled on using coated paper as the substrate because it gave a nicely defined resist image. You can certainly use cardstock or even thinner paper for a different look. Experiment with what you have. You can read the instructions for this technique here!
I used clear wax but you could certainly use what you have for a different look - coloured wax crayons would add a very different dimension to the look of this technique.
I am very happy to have found yet another way to use my embossing folders!!

Therese

Wax resist and postage sticker cards

Another successful evening of cardmaking!! Lots of new people and a fairly large group but we managed to get out in good time!!
These cards feature wax resist backgrounds which I created using my embossing folders!! Check out this post for more information on how I did it.
The images are postage stamp stickers made by K&Company which I bought at Michaels when I was there last week. They are all the same size which works well for a class but a variety of designs which I find works well for me in my classes. I like to change up the element and cardstock so everyone willl have
different looking cards.
This is a fairly versatile sketch as the card can be landscape or portrait and the 3D element can also have either orientation which gives several options with the same supplies!!
So, the sticker is mounted on coordinating cardstock and trimmed. The ribbon is attached to the back of the decorative paper and then this element is glued to the card front. I used 3D foam tape to attach the sticker element to the card, overlapping the ribbon, because the decorative paper is a bit waxy!!

Therese

Tuesday, October 19, 2010

Birdie exchange card

I am meeting with my card making buddies tonight and this is the card I made for the exchange.
I have been playing with ways of doing resist for my class tomorrow night. Check out the background - it is one of the resists I came up with. A wax resist technique that uses an embossing folder and clear wax!! I placed my paper on the "bumps" of the open embossing folder, rubbed over it with clear wax crayon then added a watercolour wash!! Voila!! A great looking background!!
For this card I mounted my background on a white card front. The bird is also a resist technique - clear embossing powder on white cardstock - to which I added a watercolour wash. They compliment each other. Layered the bird on white and added a bit of lace below that and a colour printed greeting!!
Thrifty Tip: Where do you get clear wax crayons??? I am sure they exist but I created my own by cutting up a bar of paraffin into little bars with a hot knife and then rounding them on griddle surface covered with foil. Works very well. You could use a white wax crayon on white paper, or a yellow crayon on yellow paper, etc which would allow you to use the crayons you have on hand for this resist technique. On the other hand, a crayon of a different colour would give you a totally different look!! Will have to investigate that later!! I found that the rubbing was more defined on paper - I used coated laser printer paper - but you can use paper or cardstock. You can use anything with a textured surface for rubbing as well - fabric, lace, woven mats, screening, texture plates, etc, etc - but I was happy to find another use for my embossing folders.

So play a little today and see what you can do using this resist technique!!

Therese

Monday, October 18, 2010

Halloween contest card

Another Class Act contest card!! I received the mermaid as a prize in a previous contest and with this contest's theme being Halloween I decided to see if I could make a card with the mermaid!! I am happy with the card but I think it might need a greeting or something in the lower left hand side but, for the moment, I have left it without.
Stamped the mermaid in black, embossed her with black embossing powder, coloured her in with pearly watercolours in deep green and orange and trimmed her close! Printed off the scary house - internet find - and trimmed it close as well. Added a large punchie in orange - moon - behind the house and cut out a bat from glossy cardstock to add to the sky. Used some pearly gold cardstock for the water and a piece of torn grey cardstock for a rock for her to sit on!! I laid all of these onto a black background and then onto a bright orange card front!!
Halloween is a stretch for me artistically!! Keeping it simple helped me to create a piece I am happy with!!

Therese