Showing posts with label One Sheet Wonder. Show all posts

Tuesday, October 27, 2015

A couple more OSW cards!!


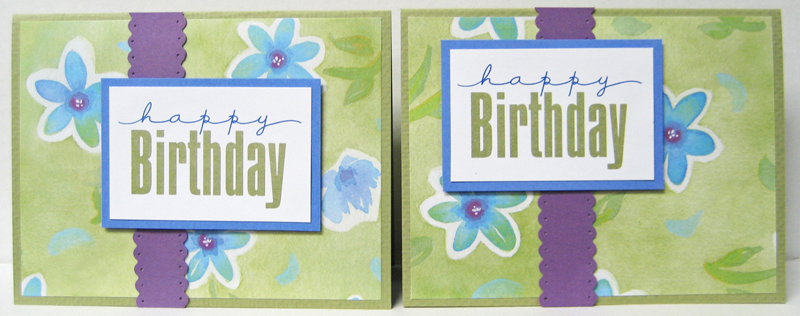
A few more One Sheet Wonder Cards!!  These are both using this template which I created a while back for my cardmaking class.  They both feature a 2" x 5.5" piece of decorative paper and a large laser printed greeting.  

On the first one I added a dark green punched border (SU) on either side of the decorative paper and mounted this element to the center of a purple card.  I layered the greeting with light purple and glued it over the center element using double sided tape only on the sides.  That allowed me to slip my flag ended rectangle behind it and position it where it looked most balanced.  I flagged the ends of my 1" white piece of cardstock using my chevron border punch (SU).  The greeting is a digital image from Stampin UP which I coloured digitally to coordinate with the paper and cardstock.  


For my second card, I cut the 2" x 5.5" piece in two and trimmed both of them to 5.25".  I border punched (SU) two lengths of dark brown cardstock with the eyelet punch (SU) and butted them right up to two strips of blue cardstock and then applied regular tape to hold them together. I glued the decorative paper strip to these elements leaving a border all the way around.  I positioned one element with the border facing up and the other with the border facing down on a coral card front.  I added a piece of dark brown seam binding in between which pretty much completely covered the coral strip that was showing.  I glued the ends to the inside of the card using double sided tape and then tied on a short piece to simulate a bow.  I layered my laser printed greeting (SU) with the same blue cardstock and then glued it to my card front using 3D foam tape overlapping the seam binding.  
I love the versatility of using the OSW technique and once you have your sketches, being able to use scraps to create cards, which is what I did in this case.  The greetings and decorative paper strips were leftover from this cardmaking class.  

Therese

Thursday, October 22, 2015

A few more cards!!

I made up a few more cards from card kits I had prepared for cardmaking to send to my card exchange partners.
I love that these kits are so flexible - you can create portrait or landscape cards, you can place your image in either orientation as well.
The first card features a bright floral decorative paper to which I added a dark purple punched border (SU) and added this to a dark pink card front.  I layered the cherry blossom image (Beccy's Place) which I watercoloured lightly onto a green layer and added it to the card front overlapping the purple border.  I added the laser printed greeting onto a Modern Label punchie and added it to the card front using 3D foam tape.   For the second card I repeated the same steps using a portrait orientation and an owl image from Arthur's Clipart.  Quick and easy!!

Therese

Thursday, October 01, 2015

OSW #7 - 6x6 - 3 cards for cardmaking at home

I had a few friends over last night to make cards.  It has been more than two years since I taught my last cardmaking class and it was great to be at it
again.
I decided to use a One Sheet Wonder template for the card kits I made up and it worked out very well.  I modified the dimensions and one layout from OSW#4 so I have created another file to cover the options in this class.
For my first card I positioned my rectangle (5.5" x 2") of decorative paper on the bottom edge of  my card after I adhered my punched border (SU) to the back of it.  I watercoloured my image (2" x 3") and added it to a layer before gluing it to the front of my card using 3D foam tape.  I layered my greeting onto its layer and glued it to the front of my card.  These cards kits are versatile as you can play with the layout of the elements on the card as well as change the orientation from landscape to portrait.  As you can see I prepared several options including Christmas cards.  I am a bit behind in my goal of making Christmas cards monthly so the few extras I have leftover will help me with that goal.  These three images are digital and available at CLKER.

 For my second card of the night I chose to put a clean border on each side of my decorative paper before adhering it to my card front.  I water coloured the images (cake and carriage - Black Berry Jelly images, bird - CLKER), glued them to their layers and glued them to my card front.  I glued my greeting to its layer and added it next.  You can see that the orientation can easily be changed. I also discovered that I could punch my printed greeting with the window punch (SU) and that the layer could be punched (modern label SU) from the middle of the image layer which gives the greeting a completely different look.  So many options!!!

I made the last card an easy one.  For this layout the decorative paper (6" x 2") is cut in half to give you two pieces    (2" x 3") which are glued to the card front in opposite corners in the landscape orientation.  The center cardstock strip was trimmed with decorative scissors before we glued it into place.  The images are all colour printed greetings (SU digitals), glued to a coordinating layer and adhered to the card front using 3D foam tape.  This card could have easily been created in a portrait orientation.

Here is the cutting template and card sketches I used in this class.  Again, you can easily and quickly create three cards using one piece of decorative paper that is 6" x 6" and three sheets of cardstock.  A real time saver when you are busy or need cards on a short notice.  It also creates a coordinating set of cards if you are in need of a small gift.

So I am very pleased to have a few people to make cards with and with any luck at all we will be a few more next time.

Therese

Sunday, September 20, 2015

OSW - 6x6 - 3 cards - #5 - Sympathy, birthday and Christmas!


I worked out another One Sheet Wonder template that allows you to create three cards from one sheet of 6"x 6" decorative paper and three sheets of cardstock - one neutral and two coordinating colours which in this case was green and maroon.
I was in need of another sympathy card when I designed this template to create three cards.  At the same time I created a Christmas and birthday card because that worked pretty well with my decorative paper.  I used digital images from Beccy's Place and added greetings in Corel Draw before I laser printed them on the sheet of neutral cardstock.  I cut all three sheets of cardstock in half and folded one of each colour in half to create my three card fronts.  I trimmed the decorative paper according to the cutting template. cut my greeting/images apart being careful to ensure that I could fit all the pieces I needed in before cutting anything.  I cut three cut maroon layers (1 7/8" x 3") for my images and then cut the other pieces I would need from my scraps.   I used four of the 1" x 3" decorative paper pieces on this card gluing them equidistant from each other and the edges on the ivory/neutral card front.  I sponged the ivory strip with maroon ink after I punched it with the scallop border punch so it would better show up on my card.  I added the green strip and then glued this element over the bottom edge of my decorative paper strips.  I watercoloured my image and adhered it to a maroon layer then glued it to my card front.  I added clear dots of Dimensional Magic to the scallops and let it dry over night.  It adds some subtle dimension to my sympathy card.
Next, I worked on my Christmas one.  I glued the 3" x 3" and one of the 1" x 3" strips to a 3.25" x 4.5" layer of ivory/neutral cardstock leaving a gap in between.  I cut a piece of green cardstock 3/4" x 3.25", embossed it with a wordy Christmas embossing folder and glued it in place over the gap.  I glued this whole element to the maroon card front.  I watercoloured my image, glued it to a maroon layer and mounted it on my card front overlapping the green strip using 3D foam tape.
For the birthday card, I glued the last four strips of decorative paper to my card front (see the sketch) leaving very small margins between the edges and the pieces.  I watercoloured my image, layered it onto a maroon rectangle and mounted it to the center of my green card front.  I added some small rectangles into the remaining spaces, added faux stitching with a marker and used watercolour and my stipple stamp to add a bit of texture to them.
Really happy with how these cards worked out.  There are other variations that can be created using these elements.  If you decide to play with this template I would love to see how you created your cards!!  Leave me a link to your creations in the comments below.

Enjoy!!!!!!!!!
Therese


Friday, September 11, 2015

OSW template - 3 cards using a 6"x 6" piece of decorative paper

 I have been playing with One Sheet Wonders in a effort to have a template I like for preparing kits for a cardmaking session I am teaching later this month.  Here is the latest one I have been working on.  With this template you can create three different cards using a 6" x 6" piece of decorative paper and three sheets of cardstock - one neutral and two different colours that coordinate with the decorative paper.
I printed my images (Digital Two for Tuesday) and my greetings onto my white cardstock before I cut it apart to create my cards.  I cut off the bottom to create one card front and then trimmed my images (2.25" x 3.5") and finally punched out my greetings using an oval punch (SU).  I trimmed my decorative paper into three strips of 2" x 6". Then I cut the other two sheets of cardstock in half ( one green, one deep purple) and used one of each to create my other two card fronts.
For my first card, I watercoloured the lily image and cut a layer for it from the other half sheet of green cardstock.  I punched a scalloped oval (SU) from the middle of it to layer under my greeting before gluing them to each other.  I watercoloured my greeting and glued it to my scalloped oval.  I glued my strip (2" x 5.5") of decorative paper near the left hand side of the purple card, added a strip of white cardstock which I cut from the white scraps, trimmed with decorative scissors and then pierced with a push pin to the right of my decorative paper strip.  I added my layered image overlapping the decorative edge and glued it into place.  I glued my layered punchie greeting below it.
The card went to the family of a neighbour who passed away last week.

For my second card I trimmed my 2" x 6" strip in half crosswise which gave me two identical pieces (2" x 3").  I glued one to the lower left hand corner and the other to the top right corner of my green card front.  I watercoloured my image and cut a layer for it from the other half sheet of purple cardstock.  Again, I punched a scalloped oval from the center of it before I glued my image to it.  I watercoloured my greeting and layered onto the purple oval.  I glued my layered image offset enough to the left to allow enough room for my layered greeting on the right hand side.

For my third card, I watercoloured my image and greeting and layered them as I had the previous one using purple cardstock scraps.  I positioned my decorative paper allowing enough room to add two strips of green cardstock which I cut from scraps.  I trimmed both of them using decorative scissors and glued them above and below my strip of decorative paper (2" x 5.5").  I added dots in the scallops using a white gel pen. I glued my layered image to the left hand side and added the layered greeting on the right centered on the lower strip of green.
Very happy with how these all turned out!!  I have more sketches floating around in my brain for this OSW template.

I have provided the cutting template for the decorative paper, the three card sketches, a supply list and some basic instructions.

This One Sheet Wonder template only uses one 6" x 6" piece of decorative paper and three sheets of cardstock to create 3 handmade cards!!   You can easily buy just what you need at your local scrap booking store and have your three cards made in a couple of hours.  If you have a stash of paper and cardstock,  you can shop at home!!

Good luck with creating some cards with this template and I welcome you to leave me a comment with a link to your creations!!

Therese


Monday, June 15, 2015

One Sheet Wonder - 6x6 makes 4 cards for Father's Day

I needed four Father's Day cards so I decided to create them One Sheet Wonder style!!  I found this tree decorative paper which came out of the same pad as these cards and these cards which I thought would work quite well.  I cut the sheet in half and trimmed one 6" x 6" sheet from the one half and used it to make my four cards.  I trimmed the 6" x 6" into four pieces of 2" x 4" - the cutting template is below.   In the end I decided to trim my 2" x 4" pieces in two (1' x 4") and backed
 them with tiny strips of two different greens - one on each long edge. I cut two different sheets of blue cardstock to create my four card fronts and stamped them all with a leafy background (ANM) in light green.  I downloaded four leaves from CLKER, cleaned them up in Photo Elements and printed them onto white cardstock.  After trimming them to 2" x 3.5" I watercoloured them to coordinate with my decorative paper.  I found four laser printed Father's Day greetings in my stash, punched them with out my oval punch (SU) and then layered them onto coordinating scallop oval punchies (SU). To assemble my cards I started by gluing down my layered decorative paper rectangles onto my stamped card fronts.  Because the paper is directional I had one set that went vertical instead of horizontal which changed up the sketch a bit and added variety to my cards. Next, I added my watercoloured images using 3D foam tape and then added the layered greetings using double sided tape.  Very happy with the variety of sketches I came up for the four cards I made.  After they were all assembled I thought they still needed "a bit of something" so I added a bit of stippling on the images.  That was better!!  So my cards are finished!  Some will be mailed off tomorrow and I will deliver the others in person on the weekend.

Therese

***********************************************************************

OSW #4 - 6x6 June 2015

Supplies for making four cards
1 - 6" x 6" of decorative paper
2 - 8.5" x 11" cut in two - four card fronts
      in coordinating colours
2 - 2" x 4" scraps of coordinating cardstock
      in two different colours
4 - 2" x 3.5" images on neutral cardstock
     stamped or printed
4 - oval punched laser printed greetings
     neutral cardstock
4 - scalloped oval punchies
     coordinating cardstock
Glue
3D foam tape (optional)

Cut decorative paper according to the diagram.
Cut large sheets of cardstock in half and fold to make card four fronts.  Prepare images as you wish.  Layer greetings.  Assemble cards as described or as you wish.

***********************************************************************


Thursday, June 11, 2015

OSW with 4" x 4" squares - feminine cards

These are the cards that I made with the other sheet of decorative paper. Check here for the cards I made with the first sheet.
I cut the 8" x 8' sheet into 4" squares then trimmed them at 2.5" which left 1.5" pieces.  I chose a coordinating red for my card fronts and dug through my red scraps and found some coordinating 7/8" maroon strips to use as an accent.
I trimmed 1.75" white strips on both sides using decorative scissors or border punches (SU) and went looking for greetings and images.  I found two rectangular images that already had greetings (Black Berry Jelly) and two round images (CLKER - tea and TORICO - hearts) which I combined with punched greetings.  I watercoloured my images and layered them onto red.  I glued my decorative paper to the card fronts leaving a gap in between. I layered the maroon strips onto the white ones and trimmed them to fit over the gap and glued them into place.  I added dots using a marker on the large scallop border and pierced the small scallop border using a push pin.  I added my layered images using 3D foam tape and positioned the punched greetings next to the scalloped circle images.  I varied the orientation of the cards and greeting/images to make the cards different.
So those two sheets of decorative paper made eight cards!!  A few more to add to may stash!

Therese

OSW with 4" x 4" squares - masculine cards

 I received two sheets of 8" x 8" decorative paper in one of my swaps this past week and so I decided to see how many cards I could make with them.  I started with this plaid sheet.  I cut it into four 4" squares then started designing my cards.  I found these round stamped images in my stash and they colour coordinated very well so I cut red layers for them using my circle dies (Spellbinders).  The train, loon and lighthouse are from Class Act .
The coffee cup is from Sugar Loaf.   I found some kraft cardstock that worked and made four card fronts.  I distressed the edges of the images then sponged all the way around them and the squares of decorative paper with black ink.  I used my stipple stamp (SU) on the card fronts to add a bit of texture.  I colour washed the fussy cut laser printed banner greetings (CLKER) to coordinate.   I added black seam binding to each card in a different way and tied a short piece to the length on three of them. I added faux stitching to one of the cards using a fine tip Sharpie marker.  By changing the image, the greeting, the orientation and the sketch for each card I managed to make four different ones with the same supplies.  These are all somewhat masculine cards which will go into my stash.

Therese

Wednesday, June 03, 2015

One Sheet Wonder for 12 x 12 to make 6 cards

 Needed a few cards for the next few weeks and decided to work on another One Sheet Wonder.  In this case, I have decided to work with a piece of  12" x 12" decorative paper and to make six cards with it.  I have cut my paper into six pieces that measure 4" x 5.25" which will give each card a full background.  I have cut three sheets of green coordinating cardstock in half to give me six card fronts and trimmed some purple scraps into strips  - one for each card.
 I created the greeting using a couple of fonts in two different colours in Corel Draw.  I laid them out for a half sheet (4.25" x 11"),  printed them on white cardstock and trimmed them to 1 7/8" x 2 7/8" using my cutter.  I cut six layers (2 1/8" x 3 1/8") for them from coordinating blue cardstock.
To assemble my cards I started by gluing my decorative papers to the card fronts.  I trimmed both long edges of my strips using scallop decorative scissors and then used
a pushpin to pierce each scallop.  I glued my greetings to their blue layers and then played with laying them out on my card fronts.  I was aiming at leaving as many flowers showing as possible.
As you can see there are lots of lay out possibilities.  You can use either portrait or landscape for the card fronts, the accent strips and the greetings!!!  So none of the cards are exactly alike.  I have also created one of the greetings to be a sympathy one but of course those could have also been all different and all the cards would have been unique.  Really enjoying this process and I am sure you will find this a quick way to make up six cards!!  Enjoy!!

Therese

*********************************************************************************
OSW 12x12 June 2015

Supplies for making six cards:
1 - 12" x 12" Decorative paper
3 - 8.5" x 11" coordinating cardstock (cards)
1 - 8.5" x 5.5" coordinating cardstock
                        (2 1/8" x 3 1/8" layers)
1 - 8.5"x 5.5"  coordinating cardstock (.75 strips)
6 - 1 7/8" x 2 7/8" greetings on neutral cardstock

-Follow this cutting diagram to cut your decorative paper into six.
- Cut large cardstock in half to make six cards.
- Greetings can be stamped or printed.
- Cut one smaller cardstock into 6 pieces of (2 1/8" x 3 1/8" to create the layers.
- Cut other smaller cardstock (or scraps)  into .75 strips.

*********************************************************************************


Tuesday, May 26, 2015

One Sheet Wonder - 6" x 6" template makes four cards

My sister was visiting last week and she has been working on One Sheet Wonder cards. She is working on ones for a 6" x 6" piece of decorative paper.  She has developed one or two which create 3 cards and was currently working on one that creates four cards. I decide to challenge myself and see what I could design.

Here is what I came up with.  I am happy with the results of this effort.  Below is the template I used to cut my decorative paper, the supply list for four cards and the instructions on cutting the rest of the supplies for creating the cards.
Wanting to add a bit of interest to my card fronts I stamped them with a background stamp (SU -Worn) in coordinating ink before I started assembling my cards.  I colour printed my greetings (SU) on white cardstock,  cut them apart to be 2" x 3" and layered them to their layers.  Each card gets one half inch strip of accent cardstock.  The layouts are quite easy and can be modified as you wish.

#1 - glued the three 1.5" decorative pieces across the bottom of my stamped green card front, added two short pieces of .5" red accent strips just above them and used 3D foam tape to adhere my greeting over them.
#2 - Glued my two pieces of decorative paper (3" x 1.5") to diagonally opposite corners of my brown stamped card front, added two short strips of .5 red accent cardstock across the middle and added my layered greeting over them using 3D foam tape.
#3 - Glued my 3" x 4.5 inch piece of decorative paper to my stamped green card front, added two short pieces of .5 red accent cardstock to the top and bottom and adhered my layered greeting overlapping it using 3D foam tape.
#4 - Glued a long strip of .5" red accent cardstock to the left hand side of my stamped brown card front, glued my 1.5" x 4.5" piece of decorative paper next to it and adhered my layered greeting over it using 3D foam tape.

All of my greetings were HAPPY BIRTHDAY but of course you could print or stamp whatever greetings suit you when you are preparing your cards.  Consider as well that all of the pieces do not need to be cut up.  You could leave the long side whole and just trim off the half inch instead of cutting it in half like I did.  The same with the last 1.5" x 4.5" piece - you could use it whole or cut it differently which can also be said for any of the other pieces.  I think I will play with the pieces the next time I work with this template and see what I can come up with.  You can also consider adding images instead of large greetings to change up the look.

One Sheet Wonders are great for getting cards made fast!!  They are also wonderful for making cards for gifts because the four cards coordinate and look pretty as a set.  So for both reasons it is worth considering using a One Sheet Wonder template for your next cardmaking session.   Have fun!!

Therese
******************************************************************************
OSW 6x6 May 2015

Supplies for making 4 cards:
6" x 6" decorative paper
2 - 8.5" x 11" coordinating cardstock
1 - 8.5" x 5.5" different coordinating cardstock
4 - 2" x 3" greetings on neutral cardstock
Glue
3Dfoam tape (optional)

- Follow this cutting diagram to get your decorative pieces ready.
- Cut both large cardstock in two to make 4 cards
- Greetings can be stamped or colour printed
- Cut smaller cardstock into four 2.25" x 3.25" pieces for layering and the rest will be trimmed into .5 strips.


*******************************************************************************

Tuesday, January 07, 2014

OSW with Japanese paper


 My aunt gave me a wonderful package of Yuzen Japanese paper over the holidays and I decided to make my holiday thank you cards with some of it. The sheets were 5.5" square and I did not want to waste any of it so I came up with a cutting template that would create three cards from each sheet.  See the cutting diagram below.
My first card (center) used A - 4" x 3" and B - 4" x 1".  I mounted both pieces to a coordinating card front -small one at the bottom, larger one at the top. I cut a 4" x 1" piece of white cardstock, gold embossed Thank You on the right side and added a little bow to the left using vintage seam binding. Added a gold embossed butterfly punchie (SU) with gold cord antenna using 3D foam tape to finish it off.
My second card (left) used C - 5.5" x 1.5".  I gold embossed my greeting (SU) on my card front.  I layered my decorative paper onto coordinating cardstock to create two accent pieces - one to fit above & another for below which left me a scrap of decorative paper - E.  I added a butterfly using 3D foam tape and used a push pin and a scrap piece of solid foam to create a paper pierced flight path.

For my third card I used D - 4" x 1.5" and E - scrap.  I layered both of these onto a coordinating piece of cardstock 5.5" long.  I added a vintage seambinding bow to cover the joint.  I embossed the right hand side of my card front and glued my accent piece to the left.  I added a layered greeting created using a laser printed greeting oval punchie (SU) and a scalloped oval punchie (SU) in a coordinating colour.  

I used five different pieces of paper and really love the way the cards turned out!!
Here is the cutting template for the decorative paper I used for these cards.

Of course, you could cut the pieces you need from scraps of decorative paper instead and make up these cards in a jiffy!!

It is blessing to receive gifts over the holiday season and an exercise in gratitude to send little notes with our thanks!!

Therese


Wednesday, November 27, 2013

One Sheet Wonder Christmas cards!

Here are the seven sets of Christmas cards I created using the One Sheet Wonder technique
- a total of 35 cards in all!!
I have blogged the details here, here and here.  
I thought you would like to see all the cards together 
that were created using the same OSW paper.  
You can check the bottom of this posting to find the One Sheet Wonder cutting 
template I used for these cards.  

Therese


OSW - Christmas - two rectangles - 5" x 1 7/8"


Here are the cards I made with my two 5" x 1 7/8" pieces of OSW.  I cut them in half and then diagonally to create four corners, being careful to cut the diagonals opposite each other so the corners would create the central diamond.  You could cut them into any configurations you wish.
 I cut a coordinating layer for mounting the triangles to and in some cases, I embossed the backing layer and for others I glued on the corner triangles and then embossed this layer.  I like the fully embossed layers better.
I created the central elements using downloaded images combined with greetings which I laser printed and then cut apart using an oval Nestibilities.   The images were all downloaded from CLKER.  Once cut, I watercoloured the images and then added some sort of embellishment - seam binding, ribbon, bakers twine, etc.  A couple of them have a small metal ring which was a spiral clip which I cut in two because it was too large in its original size.  The ovals were added to the card fronts using 3D foam tape.
Click on the images to see the details!!
You can see all the cards made with this One Sheet Wonder technique in this post!

Therese