For my Exchange cards this month I have made another attempt at creating cards from a card sketch which I rediscovered in my Inspiration file. These are pretty much CAS cards though they are not necessarily quick in that some thought and auditioning has to be done with the elements you are using to get good balance. I used rectangles and hearts in my last two cards and I thought that circles might work well so I hauled out my circle punchie stash and put together a few in varying size ( 1", 1.25", 1 3/8", 1 3/4") which I thought would work together. Next, I went looking for some subtle decorative paper which I could use with my little collections. After that I created coordinating cards to fit in the large envelopes I had chosen. I cut the circles in about half - one part just a bit bigger than the other with scissors. On hindsight, it might have been better to use my paper cutter because it cuts straight. I found two different greetings to use and stamped them onto the subtle papers I trimmed out in a coordinating ink colour. I used a square triangle in order to get the lines of elements perpendicular to the sides of the backgrounds. My purple greeting was created with magnetic letters - I am still missing my mount - so you can see that the greeting is not really straight but this only became very evident once I was gluing my elements in place so I decided to just go with it!! I arranged all the half circles until I was happy with the layout of them, moved them up a bit, added a length of double sided tape and then glued the bottom ones in place on the tape and then added the upper ones over them using white glue applied with a fine tip applicator. The circles give a more balanced look for this sketch but I did have to strongly resist adding dots or "something" to them. I am enjoying the challenge of this sketch and look forward to using other elements to see if other shapes work better than the ones I have used so far. Therese
Showing posts with label thinking of you. Show all posts
Thursday, May 14, 2020
Monday, January 20, 2020
Cards from card kits featuring embossed rectangles, layered silk flower embellishments and little greetings
I am in the process of cleaning up my craft room and preparing for my class at the end of the month so I started with seeing if I could refurbish the card kits I had sitting on my desk. I remember now that I have tried that in the past and was not successful so I just made them up and will have them on hand for giving as hostess gifts or for the next mortgage fundraiser.
These were all from the same card kits from the September card class. I used the corner rounder on some of the corners and embossed them all to give them texture. The focal elements are layered silk flowers with sequins and a brad to hold them together. After adhering my decorative paper to the front of my cards I added the embossed rectangles in a variety of configurations. I added the silk flower embellishments with 3D foam tape and finished two of them off with little laser printed font greetings. I left one without a greeting because it makes the card more versatile! Therese
Friday, June 15, 2018
Sunflowers in the sun for this "Thinking of you" card
I needed of a few cards for my stash so I went through the card kits on my desk and created this card! It features an embossed and sanded background which was created using white core cardstock. I love the velvety feel of the sanded pattern!! The digital image was downloaded from Pixabay (La Petite Femme), laser printed and trimmed to fit into the framed area of this swirly embossing folder. I distressed the edges and glued green raffia to the back in a swirly pattern to work with the background. I used double sided tape to secure the raffia to the image and more to adhere it to the card. I used 3D foam tape to secure the layered greeting (laser printed font punchie over a label (SU)) to my card front just off set from the bottom of the image.
I love these fun images from this designer and have downloaded a few for my cardmaking!!
Therese
I love these fun images from this designer and have downloaded a few for my cardmaking!!
Therese
Monday, June 11, 2018
A fun fold with coordinating layers and greeting!
Another card for my stash from the kits I made up for my March class. The double sided decorative paper was trimmed to 4" x 5.25" and cut with a 1.75" slit on the center of the right hand side. I scored between the end of the slit and the both right hand corners then folded the flaps over to reveal the pattern on the back. I used a little piece of double sided tape to secure the flaps placing the tape right at the fold to keep the tips raised a bit. I added a length of rose ribbon securing both ends with double sided tape. I punched a laser printed digital image of a flower using a 1.25" punch and watercoloured it to coordinate with my pieces. I layered it onto a scallop punchie (SU circle punch) and then layered it onto an orange scalloped circle (Nestibilities). I manually embossed the right hand edge of an orange card and then added my background. I mounted my floral focal image over the bottom of the slit using 3D foam tape. The little greeting is a laser printed font trimmed to the right sized and distressed before being tucked under the flap and adhered into place. The original ones from the class I had left with out greetings but as you can see greetings can easily be added. Therese
Saturday, March 17, 2018
A set of handmade cards with fun background paper
In an effort to expand my repertoire of card sketches that feature decorative paper backgrounds I decided to see if I could come up with a set of cards using four backgrounds cut from the same sheet of decorative paper. I trimmed my backgrounds and set about finding coordinating cardstock for my card bases. With that done it was just a matter of finding sketches that would work.
For my first card, I added a length of green ribbon and layered on a floral focal element which was constructed using diecuts/punchies. I die cut the petalled flower and manually embossed the petals before adding a green circle punchie and then an embossed pink center. I added a sponged laser printed punchie greeting to the lower left hand side to finish off my card.
My second card started with the same background to which I added a dark maroon strip of embossed cardstock near the bottom. I die cut the word "happy"(SX) in green and mounted it to the left hand side of the maroon strip which left just enough space on the right for my little "birthday" which I fortunately was able to tuck under the maroon strip.
For my third card I chose to cover the only bright red on my background with my layered focal element which gives this one a bit of a different look. I layered a green "hole" of a flower punchie over a maroon scalloped circle punchie and then embossed the petals before adding a pink circle punchie in the center to finish off the flower. I added a light green ribbon across the middle of the background paper before gluing it to my green card front then adhered my focal element over the end of it using 3D foam tape. The background paper details support the idea of the focal element being a flower.
For my last card I decided to try a technique that I have seen quite a few times on Splitcoast Stampers which involves cutting the decorative paper on the center about one third way in on the right hand side. I measured 2 5/8" up and 1 3/4" from the edge of my 4" x 5.25" background and cut the paper with my exacto knife. Next, I scored between the end of the line and both corners so I would get a neat fold. I gently folded the flaps up and used a tiny piece of double sided tape very near the fold to keep the flaps from springing up too much - just enough dimension and texture!! I added a ribbon across the middle from the end of the cut to the outside edge gluing the ends to the back with double sided tape. The cardstock in the "v" needed a bit of something so I manually embossed that area with a distressed strips embossing folder. For my embellishment I die cut a small red petal flower, added a green center and two embossed leaves before adhering it over the end of the cut with 3D foam tape.
Very happy with my challenge and did manage to find some sketches that worked with my backgrounds. I like that with these busy backgrounds I feel that the card don't really need greetings. My favorite is the one with the flaps - a great sketch. Will be using that one again!!
Therese
Saturday, March 10, 2018
Woven paper strips to create a background!!
This is the last kit to be made up from the bunch I found on my desk a while back!!!!!!!!!! This one featured strips of paper, a greeting and embellishment which were laid out differently for this card. I wove the strips together and then laid this large element over the ivory cardstock background and glued all the ends into place before trimming them off to the edge. I mounted this background to my peach card, inserted and trimmed my greeting and mounted the 3D embellishment ( punchie/sequin) to one end of it. As an after thought I decided to use my tracing wheel on my greeting. It worked out pretty well but is much more difficult to do once the greeting is already mounted to the card. I love how this one turned out and it exemplifies the versatility of card kits!! You don't have to follow the original instructions - you can just do your own thing!!!! Therese
Labels:
3D embellishments,
A2,
cards,
laser printing,
paper scraps,
punchies,
sequins,
thinking of you,
tracing wheel
Tuesday, March 06, 2018
Cards from kits that feature a tag, seam binding and watercolour!
In a effort to finish all the card kits I found on my desk I made these two up which use the same sketch. I watercoloured both laser printed images of flowers in a vase (Anne's Cards) and sponged the edges of the tag. I trimmed the bottom edge of the greetings and sponged those as well before gluing them to the back of the tag. I added the seam binding using double sided tape. I mounted the decorative papers to the front of my coordinating cards and added the embossed cardstock strips over where they join. I adhered the tags I had prepared onto my card fronts using 3D foam tape to get them a bit of dimension. I trimmed the ends of the seam binding after they were mounted to the card to ensure they fit within the boundaries of my cards. Always love how these turn out!!! Therese
Sunday, February 11, 2018
Fun background paper, ribbon and some die cuts!!
For these two cards I worked with a similar sketch. I used a chevron punch on the left hand card, flipped over the punchies and glued them back into the openings using regular tape. I love this beautiful double sided gift wrap which I bought years ago in London!! I layered a laser printed greeting on a black strip of cardstock and added a short length of gros grain ribbon to which I tied another short piece using one knot to simulate a bow. I glued this whole element to a pink card front. The right hand card has two pieces of decorative paper with a layered laser printed greeting with the same ribbon treatment over where they join. I added a butterfly die cut (QK) with its small body and antennae die cut!! This will work with quite a few of my butterfly punchies!!! I added it with a little strip of double sided tape in the center to leave the wings free!!
Nice to have a few more cards in my stash!
Therese
Thursday, February 08, 2018
Thinking of you with seam binding, a colourful leaf embellishment and decorative paper
I needed a few cards so started with this one which features some hand stamped background paper, seam binding and a beautiful leaf embellishment.
I started with a very neutral watercolour background and stamped the harlequin background (SU) over it using a warm brown ink. I cut the paper down and added a darker piece of scrapbook paper which has been stamped with a shell image in a dark brown ink. I glued both of these to the front of a dark brown card. I cut a piece of brown cardstock, added two lines of piercings created with my pattern tracing wheel and finally added a length of beige vintage seam binding in the center adhering the ends to the back using double sided tape. I tied a short piece to the length to simulate a bow. I adhered this element to the front of my card over where the papers join and then added the colourful plastic leaf embellishment over it. I used a laser printed greeting punched with the modern label punch and highlighted both ends with pieces cut from a dark brown one. I mounted the layered greeting with 3D foam tape. Therese
Thursday, February 01, 2018
January Cardmaking - decorative paper and 3D embellishments

For our last card I always try to make it the easiest one!!
For this one I used a decorative paper for the backgrounds - either a full quarter sheet or two coordinating pieces to create the whole. I added a layered greeting that coordinated and trimmed the ends to four inches.

The greetings were laser printed and layered onto coordinating cardstock. At this point on some of them I added texture with my pattern tracing wheel!! I tied a ribbon using a double knot on the one end that had room. I glued the greeting to the card over where the papers joined or wherever looked good on the ones that whole backgrounds. I created small 3D embellishments that were created using punchies or die cuts. The butterfly is a die cut (QK), the bird is a layered punchie (SU), the left hand one is a silver foil flower die cut treated with alcohol inks with a sequin and brad (TH) and the last one is layered punchies with a sequin and a brad. These were added with double sided tape or 3D foam tape. What a versatile design! By changing the paper and the greeting you could make a card for any occasion. Therese
Labels:
A2,
birthday,
brads,
cards,
decorative paper,
diecuts,
get well,
laser printing,
punchies,
ribbon,
sequins,
thinking of you,
tracing wheel
Tuesday, November 28, 2017
Reusing cards to create fun new ones!
These cards were created using parts of used cards which were donated to me for my cardmaking efforts. The one on the left is a a friendship card and was cut from the front of a large card. I added a green border on the right hand side which I punched with a scallop border punch and then added some iridescent glitter glue to coordinate with the glitter on the rest of this cute ladybug card. I ran my pattern tracing wheel a few times in between the glitter dots and the card front I had glued my border to. This focal element was glued to a coordinating card front and I was done!! The card on the left has a front trimmed from a large card leaving the central oval image of a cute kite flying mouse intact. I wrapped some green crochet thread around this layer and added a layered punchie greeting over it. I adhered this large focal element to the front of a coordinating card. Two more for my stash!! Therese
Labels:
A2,
border punch,
cards,
friends,
glitter glue,
laser printing,
punchies,
thinking of you,
thread,
tracing wheel
Wednesday, November 22, 2017
Quick and easy cards for gift giving
I am making cards for my stash and in cleaning up a packed box I found several of these paper backers which I created when I first designed these cards. It involves printing two lines that intersect with a greeting on the bottom right side of a white backer. I went looking for some bright decorative paper to create my "flower". I cut four 1" squares from the paper I chose and corner rounded two corners on each square before gluing them to the backers. I cornered rounded two corners of the backers and glued it to a card front that coordinated with my decorative paper squares. These are quick and easy cards that can be made for any occasion and combine nicely for a set of cards for gift giving. And, everyone can use a few cards for sending out to their friends and family. I did add a rhinestone to the intersection of the lines which nicely finishes off the flower. The first two have scrapbook paper, the pink one uses scraps from a used commercial card and the last one uses an alcohol ink background which I stamped with a flower and embellished with clear glitter gel pen. Therese
Thursday, October 12, 2017
Bright and cheery cards from card kits
I made up these bright and cheery cards from kits from this class. It sure is nice to have kits on hand as it makes getting last minute card made up very quick and easy!!
These fun backgrounds were created with ink I made up from the ink cartridges we removed from our inkjet printer a while back. I used 4" x 6" photo paper and then colour printed black images over the backgrounds before cutting them apart for my cards. These digital images are from Melon headz. I stamped the card fronts with coordinating ink and some of my background stamps. I colour printed the layers with their greetings and assembling the card was pretty simple after that!!
Therese
Thursday, October 05, 2017
Cards from kits - embossed rectangles and a printed digital image as a focal element

I needed a few cards this week so I made up some kits from last week's class. The first one features a sunrise digital image from Cre8tive Hands which I laser printed and watercoloured. I did add a font greeting before printing and see that it has ended up quite small but that does mean it is somewhat subtle which works for this card. I layered it onto red and then added four green embossed rectangles to a yellow card along with a bit of blue raffia to finish off my card. I like the fun image which made a great Thinking of You card! I made up the second card for a friend who has been in hospital!! She will be recovering at home and I know she loves cards so I made up this kit for her. I started with a dark blue card, added four light blue rectangles embossed with two different embossing folders and then added a length of ribbon across it punching a slot in the spine to insert my ribbon. I glued the ends to the inside of the card. I watercoloured this cute digital image of a puppie (Cre8tive Hands), mounted it onto a blue rectangle which I distressed then mounted it over the ribbon using 3D foam tape. I tied a short piece of ribbon to the one on the front using one knot to simulate a bow!! I am wishing her a speedy recovery and hopefully a good Thanksgiving weekend.
It is really nice to have card kits on hand for those days that you need a few quick cards!!
Labels:
A2,
cards,
digital images,
distressing,
embossing folder,
get well,
laser printing,
raffia,
ribbon,
thinking of you,
watercolour
Tuesday, October 03, 2017
September Cardmaking - white embossed images with all over watercolour
I have been wanting to try this out for a while and decided to include a card into the class that included white embossed images on watercolour paper coloured in an overall manner with watercolour!! It is always a bit of a surprise when you start adding watercolour because white embossing powder on white watercolour paper is very subtle!! Fun!! I included black cardstock in all the kits because it nicely highlights any colour and it was completely unpredictable what colour the participants were going to choose for their cards. We watercoloured our focal images and used a hair dryer to encourage the drying process. Next, we wrapped white fiber which would work with any colour of art around our dried artwork and threaded on our greeting before tying it off on the side. We did choose to watercolour our greeting slightly before cleaning our brushes so they would coordinate with our focal element. The greetings were stamped in black ink onto label die cuts (Spell binders). I did add a bit of double sided tape to the back of my greeting to keep it exactly where I wanted it. These large elements were then glued to our black card front. Love the look!! Here are a couple more with more of an all over embossed pattern.
Therese
Therese
Labels:
A2,
birthday,
cards,
die cuts,
fiber,
thermal embossing,
thinking of you,
watercolour,
watercolour paper,
white on white
Thursday, July 06, 2017
Black dragonfly die cuts embellished with shimmery paint as focal elements on these cards
A few cards for my stash using a die which I have never used before. This dragonfly is from a Spell Binders set called Bugs. I added a black scrap between the die and the background so I cut both pieces at a time - the hole and the dragonfly. The extra layer helped to emboss the black layer with the detail on the die. I left the black layer in the die and watercoloured it through the openings using shimmery watercolours. They look great!!!!!!!!! I used some background paper I found in my stash. I think these pieces were backers on a calendar I got from my sister for Christmas one year. They were way too nice to throw away!! I trimmed the one piece down and the other into two which gave me three pieces.
For the first one I backed the dragonfly opening with gold gift wrap, stitched it to a brown layer which was embellished with scallop decorative scissors and a pattern tracing wheel then mounted this large element to a deep yellow card front which I had stamped on the right hand side with a stipple stamp in brown ink. I added a dotted flight path using a fine tip permanent marker. I added a small laser printed vellum greeting inserting the one end into the dragonfly opening and attaching it with a tiny piece of double sided tape. I added just a tiny bit of glue stick behind the writing to get it to lay down nicely. I added a small strip of double sided tape to the body of the black dragonfly and adhered it in the opening on my card. The wings and body are free so you can see the gold through the dragonfly opening. The second one was created very similarly. I used a large piece of gold giftwrap for the background which I border punched with a scallop punch. I added two blue strips to my main focal element which allows the gold to show through the dragonfly opening. The third one used a large piece of background to which I added faux stitching and the other elements were created in the same fashion as my first card.
There are a few more critters in this set and I look forward to using them in a similar way. I have three dragonflies left over from these card which I will paint and use as embellishments on future cards!!
Therese
Sunday, June 11, 2017
Quick cards with laser printed digital images
I created this card using a digital image from Pixabay which I digitally altered so I could add my own font greeting. I love the cute little trees with hearts on them. Work so well for a thinking of you card!! I laser printed the image with font greeting on white cardstock, trimmed it out of the large sheet and used my distressing tool to distress the edges. I layered it onto an embossed layer of red cardstock and then onto a coordinating light blue card front. Printed images make quick work of getting a few cards ready for giving.
Therese
Therese
Friday, June 02, 2017
Cardmaking - May - Glossy photo paper watercolour backgrounds combined with colour inkjet printed digital images

We recently acquired an inkjet printer after being without for a number of years so I wanted to see what I could do with this new tool for this month's cardmaking class.
I chose to make some dye ink backgrounds using glossy photo paper using this common technique - apply colour to non stick mat, spritz with water and lay the photo paper glossy side down and twist a little. It worked very well and I ended up using old dried water based markers for the blue/green and green/purple ones. I used empty inkjet ink cartridges for the yellow and pink ones. You can check out a tutorial at Crafting a Green World. that explains how to use dried out markers to make watercolour ink. The sponges in the ink cartridges worked pretty much the same way. You can check what I did with them in this blog post. Once all the backgrounds were dry I used my new printer to print digital stamps on them (candles and cupcake - Melonheadz). I used Corel Draw to layout three different images for each 4" x 6" background and printed the images in black onto the colourful backgrounds though I could have converted my images and printed them in colour instead. It was easy to highlight some of the details in the images with watercolour by simply applying it with a small paint brush. I expect I could have added any colour of watercolour that I wanted to but I applied those I had used in the backgrounds. So there remains quite a few options I would like to explore with this technique. I cut the images apart and set out to create greeting layers. I chose light coloured coordinating cardstock and designed a layer that was 2.75" x 4.25" and added a greeting on the right hand side the colour laser printed them. The landscape images created landscape cards with the greeting below the image. For portrait images, it created portrait cards with a greeting running up the side. Next, I needed card fronts!! I chose to use rubber stamps and ink to embellish my card fronts. That was less successful in that I had difficulty getting non muddy prints from stamps that have been used and stained with dark colours in the past when I applied light coloured inks. So I have a pile of discards which will have to be repurposed!! I did finally get all the card fronts ready to go. I will consider colour inkjet printing my card fronts next time though I will have to acquire a few more vector digital background stamps that can be changed to different colours before I can do that. It will be a process. The card making process was fast and easy! Glue the image to the greeting layer and then glue this large element to the card front!!

These two cards were created while I was preparing kits for this class.
For the yellow one, I ended up trimming the overall stamped background to allow an even margin and gluing the whole layer to a dark blue card front. This worked very well too!!
For the butterfly card, I used bleach for the background and then realized that it would not work well for the other cards being as they were too light for the bleaching to show up well. I am very happy with the results of this experiment and I look forward to exploring the other options available to me in his process at a later date.
Therese
Tuesday, April 11, 2017
A beautiful thinking of you card that features a butterfly embellishment
I started this card with the butterfly! It is a plastic magnet with beautiful colour and detail. Love it!! I cut off the magnet and it made the perfect embellishment for this card. The orange background is two triangles of scrap stamped cardstock which I adhered together using handmade faux washi tape and it was the perfect colour to coordinate with the butterfly!! I added this yellow cardstock paperclip which I die cut a while back and has been sitting in my stash. It was the perfect colour as well. I glued the back of the paper clip to the orange layer then adhered my butterfly with two little strips of 3D foam tape which gives it great dimension!! I dug through my serendipity stash and found this decorative paper which worked nicely so I trimmed off a piece and adhered it to my brown card front after I had embossed the right hand edge. I added my butterfly focal element over that and finished off my card with a layered punchie greeting. Worked out so well and I love the deep rich colours!! Therese
Sunday, April 02, 2017
All Occasion Stack Class - just strips of paper, a greeting and an embellishment
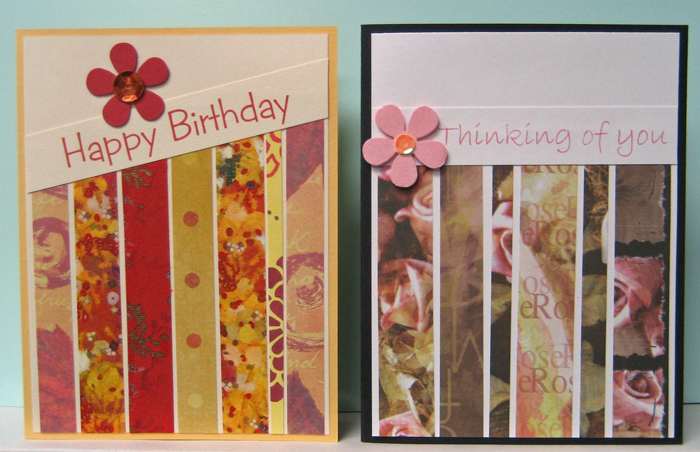
I always leave the easiest card for last in my class!! For these cards I sorted through my scraps and cut a wide variety of strips both in length (at least 5.5") and width. Next, I set aside 7-8 that coordinated for each card kit. I put the strips into envelopes and next created the greetings so they would coordinate with the strips printing them on ivory or white cardstock. I trimmed the individual greeting and added them to the envelopes. Next, I cut white and ivory layers - 4" x 5.25" -to coordinate with the greetings and put them into the envelopes. Next, I chose a card front that coordinated with what I had already prepared and added them along with an insert to the envelopes. Finally, I created custom embellishments using my punches along with sequins or rhinestones for the kits!! It was fun to see them all come together and how well all the pieces worked together. This card had the most flexibility in layout. The stripes could be glued at an angle below or above the greeting from left to right or right to left, OR they could be glued vertically above or below a horizontal greeting, OR they could be glued horizontally above or below a horizontal greeting, OR they could be glued vertically above or below an angled greeting!! It was fun to experiment with all the options. Once a layout was chosen the strips and greeting were glued to the neutral layer, trimmed to the edge and glued to the card front. The little embellishment was adhered where desired on the card using 3D foam tape. Again, there were a wide variety of layouts created beyond what I had laid out as ideas by the creative bunch of cardmakers - some complete newbies who learned quickly and executed their cards very well.
We had a wonderful time and lots of beautiful cards were created!!!
Therese
We had a wonderful time and lots of beautiful cards were created!!!
Therese
Subscribe to:
Posts (Atom)