Another star card for my oldest grandson!! I started by creating the embossed star. I cut a piece of foil packaging in a circle shape, embossed a star and then added more texture and details. I will be posting a tutorial soon. Once it was finished I used 3D foam tape to adhere it to a gold scalloped circle which I had die cut with my Nestibilities. I also punched a hole in each scallop. I added a safety pin to a white cardstock circle and glued it to the back so he can remove it and wear it like a badge!! I die cut the label (SX) out of black cardstock, tied the badge to it with black fiber and then embellished around it using a gold gel pen. I created the background using embossed metal foil tape which I had coloured with transparent acrylic paint for a project a long time ago. I trimmed and glued two pieces - one to the top and one to the bottom of a blue card and glued the focal element over them. I added the trimmed laser printed greeting over the bottom edge of this element using a star brad which I coloured with Sharpie marker to coordinate with the card. I glued the flagged end down with double sided tape. Once I was done I still thought it needed a bit of something so I added black faux stitching around the outside edges and in the spaces on the outside of the middle of the label with a fine tip Sharpie marker. That was better!!
Therese
Showing posts with label metal embellishment. Show all posts
Friday, February 26, 2016
Tuesday, February 09, 2016
Embossed metal tutorial
Embossing metal is fun and easy requiring only a few items which you probably already have on hand. It makes creating customized 3D embellishments for your projects possible and they look so authentic.
First of all, you will need a piece of foil. It needs to be reasonably thick so I often use foil pans which can be bought inexpensively or you might even find in your recycle bin. You might also want to consider any foil seal you find on a variety of cans or containers. The one above came off of a coffee tin but you can sometimes find them on cans of nuts or yogurt. You will also need a block of wood. Here I am using a wood mount from a stamp which I have unmounted but it could be one from the toy box or the workshop.
Just rub the edge of the wood block over the foil to remove any wrinkles or embossing and make the surface nice and smooth.
Once it is nice and smooth, cut your shape out. Here I cut a circle for creating the badge I was making for a card. I used my Nestibilities but you could easily use any other die or even hand cut the shape you want.
Embossing requires a forgiving surface beneath your metal. Here I have used a piece of fun foam but a stack of newspaper works just as well.
I wanted a star in the middle of my shape so I centered a star die cut (SX) on the back of my shape and lightly traced it on to the metal using a pencil. You could hand draw your image or place a printed image over it and trace lightly to transfer the image to the metal. Be sure to reverse any image or words before you emboss so it will be right reading on the front.
Next, I embossed the image into the metal by tracing the shape with my pencil pressing medium hard. You have to be careful because if you press too hard you will pierce the metal. You are better off to trace the shape several times more lightly rather than to press too hard and risk making a hole where you do not want one.
You can see above what the star looks like on the front - the outline is raised up - embossed - in the metal.
I turned it over and embossed a few more details - dots, another frame and shapes in between the arms of the star.
This is what it looks like from the front. You can see here that I debossed (indented) the shapes between the arms of the star by applying pressure with my pencil from the front. So as you go on, you can choose to emboss from the back and deboss from the front any of the elements you wish to add to your creation.
You can see from the finished piece that I added some embossing inside the star as well as dots on the outside edge while I debossed all the shapes between the arms. You could certainly also choose to pierce your metal embellishment. I would suggest using a push pin over a stryrofoam tray to get uniform holes. I would suggest piercing from the front so that the ragged edges created end up on the back of your creation. Consider colouring your embossed metal embellishment using permanent markers like Sharpies or alcohol inks.
I used 3D foam tape to adhere my shape to my scalloped circle but you could also use brads, staples, stitching, nails or eyelets to secure your 3D embellishment once you have created it!!
Have fun!!!
Therese
Saturday, February 14, 2015
Vintage looking Valentine's card for a special guy
I created this card for my DH for Valentine's!! I started with a black quarter sheet of cardstock which I trimmed slightly to leave an even border all the way around. I stamped it with a flourish background (IO) and embossed it with red embossing powder. It worked out great!! I rubbed on a bit of gold mica powder to add a bit of depth to it and stitched it to the front of a kraft coloured card using black thread. I added a red layer (ATC from my stash) that had a metal butterfly, some black stamping and a gold shimmer finish over which I mounted a square of serendipity background in reds and golds. I created my focal element using a laser printed digital image of a heart with leaves (CLKER) which I trimmed and watercoloured. Once it was dry I added some clear dimensional magic to the heart and berries. Once that was dry I mounted it to my card using 3D foam tape. I really like the vintage look in the red, white and black colour scheme!!
Therese
Wednesday, January 21, 2015
Art Quiltie for January
I am hosting another art quiltie swap for January!! You can check out these links for November & December. I have always loved the look of crazy quilts because of their randomness and their beautiful embroidery so I decided to go for it and made my January quiltie using that technique. I started with my back (on the right) so I could practice and start again if it didn't work out.


I started with a small dark piece and sewed a light one to it. Pressed them open and trimmed evenly the edge perpendicular to the seam and sewed another piece on that side. Repeated until I had a piece large enough to trim to 5" x 5". I was pretty happy with it so I chose the fabrics for my front and repeated the same procedure to create another crazy quilted square for the front of my art quiltie. I decided to machine stitch the outside edge so I put them right sides together and stitched almost all the way around leaving one side open so I could turn it over. Once I had my right sides out, I cut a 4" x 4" of batting, inserted it between the two layers and hand stitched the opening. Once it was pressed, I ran a line of stitching all the way around to properly anchor the batting to both sides.
Then, I started hand stitching. I had to download some stitching patterns off the internet to expand my repertoire of options for embroidery stitches. Once again, I started with the back, stitching in a variety of colourful embroidery floss over all the seams and in some cases adding beads as I went. I added a few flower sequins as well in a couple of the areas. It was fun to try new stitches and some didn't turn out quite like I thought they would but still looked good so I left them in place. Once I had finished the back, I started on the front. Again, I added stitching to all the seams and a variety of other stitching in the open areas. I added beads here and there as well!! I wanted to add at least one 3D embellishment so I went digging into my stash to see what I could find that would work. Quite happy with this little metal tag with "dream big.." on it. I stitched it on with embroidery floss. I am very happy with how it turned out though having added beads to both sides meant it required additional postage to get to my swap partner. No problem, it is still a reasonable cost for participating in international swaps. I added my credits using "iron on fabric label" by simply writing on the fabric label with a fine tip Sharpie and sponging on a bit of ink to tone it down before I ironed it onto the back of my quiltie. Details of the swap I added to a tag which I pinned on.
Therese
Saturday, January 03, 2015
Tim Holtz January Tag Challenge
Happy New Year!!
Wishing you and yours every blessing in 2015!!
It has been a busy holiday season with not too much creative time but I did manage some crafting today.
On one of my groups we are considering a Tim Holtz monthly tag swap or challenge so I decided to see what I could create in the creative spirit of Tim Holtz's January Tag! I was not interested in copying his tag exactly so I decided to do a 4"x 6" postcard instead and liberally substituted what I had for what he used in the way of product and put my own spin on the elements as well. I made a list before I headed to the craft room - tissue paper, paint, distress stains or spray, words, metal embellishments, glitter and seam binding which was my guide to the products which he used.
Tissue paper - I do have a wonderful piece of TH tissue paper which was gifted to me by my altered cuff swap partner and I set it aside in a "safe" place so I could use it for a project just like this. Needless, to say today when
I could have used it, it was no where to be found. I eventually gave up and dug out a piece of sewing pattern tissue and stamped it with a background newspaper stamp (IO) in black permanent ink to create tissue paper for my project. I could have chosen to create more of a collage look by choosing a variety of stamps instead. I am happy with what I produced. I did stamp a much larger piece than I needed so I will have some for future projects.
I started with a 4"x 6" glossy photo paper which I washed with some gray watercolour. I have a few of these colour palettes which I used previously for classes that I will be using up in my projects this year in a effort of using up what I have.

I applied glue to the whole front of my postcard, laid my piece of tissue over it and burnished it well. Once it was dry, I trimmed all the way around with my scissors. I chose a piece of tissue that was not too busy and featured only a few of the original lines on the sewing pattern.
Next, I went looking for distress stains or sprays. I had purchased vintage inks from Stampin Up a while back and thought they would do nicely for the spritzing I needed to do next. I mixed up some mahogany which turned out to not be as red as I had expected and then dried lighter. I chose Tea Stain (SU) next and found that it just blended into the surface and did not show up at all. Needing to add a bit of colour I decided to use Charcoal. That did the trick - it added colour in some very nice splotchy areas along with some nice spattered sections. Just what I needed. I tend to mix sprays as I need them instead of having some on hand. I admit that it means that I don't use them as often. Maybe this year I will use them more often by mixing more than I need and leaving it in the spritzer for next time.
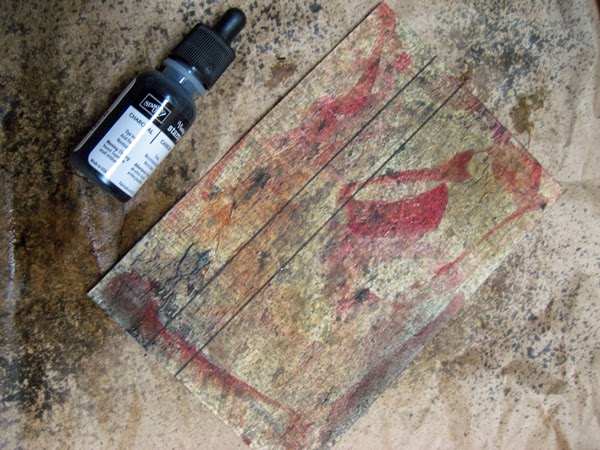

While the sprays were drying, I went looking for the other items I needed. I found stamped words (SU) in my greetings bucket which I cut apart and trimmed. I found a chipboard R which will work for one of my postcard swaps - bonus! Found some metal screening and a TH "wonderful" metal tag and decided that my next element should be a "U" which I die cut from shiny silver cardstock using a SU alphabet die. When I checked the list I still needed glitter
and seam binding so checked my heart bucket and found a red glittered heart and my stash of vintage seam binding and found some coordinating red seam binding which I had dyed for a previous project which was perfect. I used a permanent black marker on the chipboard "R" - completely covering up the bright pink!! Perfect!!
Once my postcard was dry I arranged my words, letters, red glitter heart and the metal embellishments. I decided to tie the seam binding to the R which worked in all of my elements. Once everything had a home I glued the words in place. I used three black diamond brads to attach the silver metal screening, a vintage gold brad to attach the round TH "wonderful" embellishment and three black mini brads to attach my "U". I tied a short length of the red seam binding to the stem of the "R" using a double knot, attached it with 3D foam tape and tucked the seam binding ends in around the "U". The glittered red heart was added using double sided tape. The words seemed too stark so I used the same gray watercolour I had used on the postcard front and added several light washes to tone them down a bit. I also added a bit of black to some of them to better define their edges.
I am very happy with my postcard and having used the "R" I can use it for the postcard swap for the end of the month!! So, a good use of my crafting time today as I managed to get the TH tag challenge done in the same project as the "R" postcard swap!!
Therese
Tuesday, November 25, 2014
Tarot card calendar
Another calendar for the holiday season! It is a gift you can give anyone!! Overnight, I remembered I had these wonderful image in my stash so yesterday morning I went searching and was lucky enough to find them straight away!! They come from a glossy publication that I purchased years ago at a thrift store. At the time, I thought they were wonderful images and would certainly work into one of my projects somewhere along the way. They are images of very old tarots cards - from a time when they were all hand painted and used by royalty to play a game. I trimmed the images leaving a slim black border. I cut kraft cardstock to 3.5" x 8.5" (6 of them) and stamped a flourish background (IO) on the top portion using black ink then mounted my image. I punched a ribbon border (SU) out of black cardstock and mounted it below the stamping using a glue stick. I adhered my trimmed 2015 calendar page (12 to page from calendarlabs.com) which I sponged lightly around the edges below that using a glue stick. This is a double sided calendar - January to June are on one side and July to December on the other. I did the one side first and then when I was doing the back sides I positioned the ribbon borders back to back. I pierced through a hole on each end so I could align them exactly over each other. Once they were dry, I pierced all the holes with a push pin over foam and used gold embroidery thread to add stitching to the ribbon border. Love the way it turned out!!! I created straight stitches on one side and diagonal ones on the other.

Thinking they needed just a bit more texture I added gold coins using large glue dots.
Just enough embellishment!! Here are all the pages I created!! I do have a few images left over for another project!!


Thinking they needed just a bit more texture I added gold coins using large glue dots.
Just enough embellishment!! Here are all the pages I created!! I do have a few images left over for another project!!

One uses handmade paper and pressed botanicals and the other, little blue bird collage photos

reused from a 2014 calendar.
These are quick and easy!! You
can use themed paper, printed digital images, printed clipart or old calendar images as

your focal elements. Just work out your cardstock size by laying out your images, calendar pages and any
other elements you would like to add for texture and interest.
I hope you are well on your way in preparing for the holiday season!!
I am very happy with the calendars I have created and am looking forward to getting my Christmas cards out the door!!
Therese
Monday, October 06, 2014
Fabric 4x4 quiltie
On one of my groups I am hosting a 4" x 4" fabric quiltie swap! The theme is open and all that is required is that the quiltie have fabric on front and back with batting in between, some hand stitching and is embellished a little.
This is the quiltie I made for the swap. It looks a little different than the little quilties I have been making for my journal covers. I did buttonhole stitch all around this one instead of the overcast stitch I have been using for the others. The front is pieced from a few small pieces - flowery for the bottom edge, green for the horizon and floral blue, pink and white for the sky. The pieces were sewn together by machine and then I trimmed my piece to about 4.75" so I would have enough to roll over for my edge and have it be a 4" x 4" finished size. I dug through my fabric scrap stash for the house body, the roof and the door. I applied "iron on hem tape" to the back of each piece using release paper to prevent the iron from sticking to it. I ironed on the house first, leaving the bottom up from the edge a bit to allow for the border, then I added the brown triangle for the roof and added the door last. I added the batting, my back and stitched all the way around using white thread and the button hole stitch. Next, I added extra stitching. I used brown thread to add several layers of stitching to the roof and then added beads (bugle and ebeads) in brown around the perimeter. I added a stitched half round window to the door and button hole stitch around the perimeter then I added a yellow ebead to the door to simulate a handle. I added French knots to all the flower centers on the body of the house and used stem stitch to add some definition to both sides. Added chain stitch to the top and bottom edges of the green landscape/horizon layer. I added some random stitches to the sky to give it some texture. Finally, I added two butterfly beads and a little metal silver heart above the door.
I used navy fabric with a white grid for the back and filled in the squares using several different stitches in several different colours of thread. I added my copyright using Iron On Label - I simply wrote on the label tape using a fine tip Sharpie and ironed it onto the back. I added the swap credits and info on a tag and pinned it on the back as well.
It was fun to make a quiltie with a theme and do a a variety of stitches. I printed off instructions for a few more so I can add more variety next time.
I hope there will be enough interest to make several more of these so we can all have a few pages to bind into a book!!
Therese
Labels:
fabric,
glass beads,
hand stitching,
machine stitching,
metal embellishment,
pins,
quilting,
tag,
thread
Saturday, September 27, 2014
An altered cuff with a metal embellishment in a zipper bezel!
Another cuff!! This is the one I created for the swap that more closely follows the guidelines provided for the Altered Cuff Swap on AFTCM. I started with two strips of sky blue cotton fabric. I stitched the lace, piping and teal bias trim to the right side of one of the pieces using my sewing machine. I cut an elastic to serve as the closure, pinned it at one end, laid the other piece of fabric right side down and sewed both ends and one side being careful not to capture the lace in the seam. I snipped the corners and turned it over. I added the white and turquoise ebeads over the teal bias trim using white embroidery thread and then added the buttons using turquoise sewing thread being sure to leave enough room in the middle for my embellishment. I used clear thread to attach the embellishment to the middle of the cuff. I really like how the zipper teeth create a bezel for the metal piece!! After that, I turned it back to inside out and sewed two short seams from each end, snipped the corners and turned it back to right side out. I pressed the whole thing and hand stitched the opening closed. I thought it needed a bit of something so I used white embroidery thread to add blanket stitching to both sides. That was better!! I added yet more stitching - French knots in between the eyelets in the lace and a stitch in the center of each eyelet to help keep it from rolling up.
The embellishment was created using an old earring, a piece of zipper, some sequins and clear thread. You can check this post for the construction details. I submitted it to one of my groups in their Zipper Challenge.
Therese
Thursday, September 04, 2014
"Through the Looking glass" chunky book page
I joined a swap on AFTCM for a fat book page with the theme of "Through the looking glass"!! I decided to use a frame placed over silver foil for the looking glass. I downloaded a frame from Graphics Fairy and digitally removed the horses that were inside the frame. I compiled my collage in Corel Draw - starting with the frame, inserting a tree (GF) and creating a stained glass look all the way around it using elements I created. Once I was happy with the look, I laser printed it on a transparency and trimmed it to 4"x 4". I used alcohol inks and sharpie markers to add colour my design and then left it for a full day to dry completely!! Once dry, I layered it onto a piece of silver foil which I cut just a bit longer to aid in binding if necessary and attached my looking glass to it using two little mini black brads on the frame. I added an alcohol ink background to the back and bound the layers using black and white washi tape along the edges. I added some very cool little metal fasteners which crimped on with pliers - added just the amount of the industrial look I wanted. I tied black and white bakers twine to one of them before adding it. Really happy with how it turned out!!
It is off to my partner in tomorrow's mail!!
Therese
It is off to my partner in tomorrow's mail!!
Therese
Thursday, July 31, 2014
Paperclip bracelets
My grand daughter was visiting recently and she wanted to make paperclip jewelry!! I was not sure what that meant so after a bit of an explanation we decided we would give it a go so we got started. We straightened some paper clip, added a metal charm and made a loop to capture it. We threaded on some beads and made another loop. I had to use two paperclips per side but she was able to use only one. We bent the beaded wire to conform to our wrists and added clasps!! They turned out very well!!
Therese
Labels:
beads,
charm,
jewelry,
metal embellishment,
paperclips,
wire
Saturday, February 22, 2014
Masculine cards - sponging with silhouettes
I am in need of masculine cards for next month's family birthdays so I decided to use these images which I printed when I created this card. Love how they turned out!!
For the first one, I started with a laser printed image of a skyline which I downloaded off of CLKER. To create the beautiful sunset I punched a 1.25" hole in a scrap of paper, positioned it over the buildings I wanted to highlight and sponged in some yellow ink. Next, I covered up the yellow with the 1.25" circle punchie and sponged on the orange and some dark pink. Using the edges of a few torn strips I added some purple and blue.
I mounted my image to a black layer capturing my printed greeting between the two, punched some slots on the bottom edge and inserted yellow ribbon. I embossed the right hand side of my dark blue card front, adhered my main element and glued the ends of my ribbon to the inside of my card using double sided tape. I added a "enjoy life" metal embellishment using a large glue dot.
For my second one, I started with an image of elephants (CLKER) and sponged brown at the bottom to form the earth, added another little layer for depth and then sponged yellow above that.
I added red sponging at the top and then used torn edges as I added a few more light layers of red over the yellow to get a nice gradation in the sky. I layered my image onto black, layered onto a torn and embossed maroon layer and glued it to my stippled yellow card front. I added a black ribbon embellishment and a sponged greeting.
For my third card, I started with another laser printed image of a cattail and some reeds (CLKER). I used a straight edge for the far side of the lake and sponged blue below it. I covered the blue and added some light green, added a torn edge and added some blue green. I covered the blue green with a torn edge and sponged on some blue and then used several torn edges to add layers to the blue sky. Finally, I created some mountains by sponging purple between two torn edges and stamped in a few green tree tops. I layered my sponged image onto black, layered it over my green embossed card front capturing a little flag ended embellishment made from cardstock and ribbon. I lightly sponged my printed greeting and layered it below the flag end of the embellishment.
It has been a lot of fun playing with ink and sponges!! The black silhouettes look so dramatic next to the vibrant colours.
Therese
For the first one, I started with a laser printed image of a skyline which I downloaded off of CLKER. To create the beautiful sunset I punched a 1.25" hole in a scrap of paper, positioned it over the buildings I wanted to highlight and sponged in some yellow ink. Next, I covered up the yellow with the 1.25" circle punchie and sponged on the orange and some dark pink. Using the edges of a few torn strips I added some purple and blue.
I mounted my image to a black layer capturing my printed greeting between the two, punched some slots on the bottom edge and inserted yellow ribbon. I embossed the right hand side of my dark blue card front, adhered my main element and glued the ends of my ribbon to the inside of my card using double sided tape. I added a "enjoy life" metal embellishment using a large glue dot.
For my second one, I started with an image of elephants (CLKER) and sponged brown at the bottom to form the earth, added another little layer for depth and then sponged yellow above that.
I added red sponging at the top and then used torn edges as I added a few more light layers of red over the yellow to get a nice gradation in the sky. I layered my image onto black, layered onto a torn and embossed maroon layer and glued it to my stippled yellow card front. I added a black ribbon embellishment and a sponged greeting.
For my third card, I started with another laser printed image of a cattail and some reeds (CLKER). I used a straight edge for the far side of the lake and sponged blue below it. I covered the blue and added some light green, added a torn edge and added some blue green. I covered the blue green with a torn edge and sponged on some blue and then used several torn edges to add layers to the blue sky. Finally, I created some mountains by sponging purple between two torn edges and stamped in a few green tree tops. I layered my sponged image onto black, layered it over my green embossed card front capturing a little flag ended embellishment made from cardstock and ribbon. I lightly sponged my printed greeting and layered it below the flag end of the embellishment.
It has been a lot of fun playing with ink and sponges!! The black silhouettes look so dramatic next to the vibrant colours.
Therese
Tuesday, March 05, 2013
Covers are done!!
We added our metal embellishments to our covers!! Using glue, we adhered our embellishments to our front covers. This provided us a way to keep it in place while we added four brads to provide a mechanical attachment for the embellishment which will be valuable in keeping the journal cover intact as it gets used over the next several years.
Here you can see a close up of the texture on the metal embellishment. It was super fun to create! If you would like more information on how we created them follow this link to find out!!
Therese
Friday, February 22, 2013
Metal embellishment for journal
Yesterday, we created our main decorative elements for our journals. I made available to the students a wide variety of elements - die cuts ( butterflies, bees, trees, birds, etc) and chipboard letters along with a wide variety of punchies (stars, circles, butterflies, flowers, etc) along with some pieces of mesh (window screening). They went through the elements, picked what they wanted and collaged them to a scrap piece of cardstock - 4 x 5.5. These elements provide the texture for the embellishment so it doesn't matter what colour they are or what they are cut from. After gluing everything in place we covered the surface in metal duct tape - two pieces with a seam down the middle. As we applied the tape we took the time to rub all the areas of the piece to help reveal all the glued down elements. Then, we used a dull pencil to follow the contour of each piece to highlight it and really start creating texture. It was then time to add texture to all the flat areas by simply drawing with the pencil using some pressure to indent the metal tape. We added lines, squiggles, shapes, cross hatching - just a lot of doodling and also impressed some areas of the mesh to create even more detailed texture within those areas. You can see that I was able to add details to the bee by just outlining the different areas. Once they were happy with all their doodling we covered the whole surface using a black permanent marker. Then, we used a paper towel and some elbow grease to remove as much colour as we wanted from the surface. The colour remains in the nooks and crannies of the piece to provide some great contrast and create some depth. Lots of fun!!! I die cut mine with the TH Ornamental die but some have chosen to keep the rectangle shape.
You can piece the metal tape for a more rustic and industrial look like I did when I created this frame. You can use a variety of inks and paints for colouring the recesses and it doesn't have to be black - any colour will give you a really different look.
Therese
You can piece the metal tape for a more rustic and industrial look like I did when I created this frame. You can use a variety of inks and paints for colouring the recesses and it doesn't have to be black - any colour will give you a really different look.
Therese
Wednesday, July 18, 2012
Steam punk cards
I made a couple of cards using the film strip art I created last week. I challenged myself to create a digital collage with a bit of a steam punk feel to go with it. I used images downloaded from Dover. I am on their email list and they regularly send links to free samples from the many excellent books they publish. Follow the link and sign up!!
I created clear backgrounds using Photoshop Elements for the man, the train, the airship and the border. I layered them over two different floral backgrounds and colour printed them. I trimmed my film strip to fit across the card, double knotted a piece of black vintage seam binding on the right and tied on a little metal star embellishment.
These are considered hybrid projects because they combine digital art with some hands on paper crafting!! I am liking combining the two!!
Therese
I created clear backgrounds using Photoshop Elements for the man, the train, the airship and the border. I layered them over two different floral backgrounds and colour printed them. I trimmed my film strip to fit across the card, double knotted a piece of black vintage seam binding on the right and tied on a little metal star embellishment.
These are considered hybrid projects because they combine digital art with some hands on paper crafting!! I am liking combining the two!!
Therese
Labels:
A2,
cards,
die cuts,
digital art,
digital stamp,
metal embellishment,
seam binding
Thursday, July 05, 2012
Memory Glass pendant
On AFTCM, I signed up for a 1x3 glass pendant swap which I have been working off and on for the last few days. Having never soldered before I did a bit of research to find some instructions and information. Discovered that jewelery should be soldered with lead free solder - a no brainer but I had not considered that when I signed up for the swap. So as an alternative, I started searching for the Ranger Memory glass frames which hold the slides. Was not able to find any locally so I needed to find a different way. Someone on the list suggested that most solder is now lead free so I did a search on the Canadian Tire website and lo and behold they do have a variety of lead free solder so off I went and bought a roll. I am a happy camper!! I created a collage sheet using images from Graphics Fairy for the inside of my pendant - background paper, butterfly, script, flourish and a scroll border. I delved deep into my Photoshop Element skills and developed some new ones on my way to making all these elements suitable for my collage. I made a yellow butterfly from the blue one, gave them all transparent backgrounds and changed the colour of several of them. I found lots of helpful information on line for doing what needed to be done but I did have to stretch my PSE muscles and follow the instructions CAREFULLY. What a great resource the internet really is!!!
So my pendant is finished!! The front and back are similar which means you can wear with on either side and the charms flip over from back to front. I cut a strip off of my laser printed collage sheet and cut two 1x3 pieces for the inside. Glued them back to back with only a LITTLE dab of glue because moisture between the two glasses combined with the heat from the soldering causes steam which could ruin the look. I applied copper foil tape (1/4") all the way around being sure to center the glass/collage sandwich and then burnished all the copper tape with a wood burnisher ( popsicle stick). Then, I started soldering with DH's variable temperature soldering iron (600F) following directions I found on line. Here is a link to a video on Stampington that was useful as well. Worked out pretty well. Adding the jump ring was a real challenge. I ended up adding solder to the wire and then creating the jump rings which worked better. Not a bad job of soldering for my second soldering project. I created a prototype with the other solder just to see if I could do it. I sanded off any little bumps and nibs, cleaned the glass and polished up the whole thing. This morning I added a little butterfly charm and a few beads with a jump ring, tied on a length of white seam binding and added an adjustable waxed cord.
I love joining swaps and challenging myself to learn new techniques!!
Therese
So my pendant is finished!! The front and back are similar which means you can wear with on either side and the charms flip over from back to front. I cut a strip off of my laser printed collage sheet and cut two 1x3 pieces for the inside. Glued them back to back with only a LITTLE dab of glue because moisture between the two glasses combined with the heat from the soldering causes steam which could ruin the look. I applied copper foil tape (1/4") all the way around being sure to center the glass/collage sandwich and then burnished all the copper tape with a wood burnisher ( popsicle stick). Then, I started soldering with DH's variable temperature soldering iron (600F) following directions I found on line. Here is a link to a video on Stampington that was useful as well. Worked out pretty well. Adding the jump ring was a real challenge. I ended up adding solder to the wire and then creating the jump rings which worked better. Not a bad job of soldering for my second soldering project. I created a prototype with the other solder just to see if I could do it. I sanded off any little bumps and nibs, cleaned the glass and polished up the whole thing. This morning I added a little butterfly charm and a few beads with a jump ring, tied on a length of white seam binding and added an adjustable waxed cord.
I love joining swaps and challenging myself to learn new techniques!!
Therese
Labels:
collage,
digital art,
digital stamp,
glass beads,
metal embellishment,
pendant,
project,
seam binding,
swap
Monday, January 23, 2012
Steampunk Doll
A steampunk doll!! I created her for a swap on AFTCM. We had free rein to create a doll that fit our imagination of what a steampunk doll was, so I did a bit of internet research, downloaded a few images and a template and started a bit of list of items I thought would be neat to include.
I started with a paper doll template from The Enchanted Gallery which I printed on white cardstock. I rough cut all the pieces, glued them to thin chipboard (back of a writing pad) and then cut them out properly. I chose to use the articulated arms and was happy I did when I was dressing her. I printed another set, cut them out and glued them on the back so she would be the same colour on the front as the back. I used a push pin to make holes and assembled my doll using black mini brads.
I downloaded a page of clipart from Aisling.net and printed one of the faces large enough to fit on the head. I had originally started with a moveable head but when I was getting ready to glue on the face I decided to remove the brad and glued the head to the body and the face to the head. I drew a bodice on her torso, coloured it in and added some sparkle. I drew her some stockings as well and coloured them in. I had taken a picture of her with just her undies but alas my camera did not have a memory card in it at the time, so, no picture!! I coloured the rest of her in with a mix of chalk and pencil crayon and drew her some boots which I glued in place.
The hat was on a victorian woman I downloaded from the Vintage Feed Sacks blog. I isolated the hat and sized it to fit on my doll. I coloured it, added some bling and then traced it onto cardstock and cut another one which I glued to the back of her hat just at the top which makes it removable!!
I created a necklace for her using chain and a little pendant to which I added a rhinestone. It nicely covered the transition from the neck (clipart) to the body (template). I also created a blouse for her. I laid her out on my fabric and marked out the T top I thought would be a good size and cut it out. I hemmed the sleeves and then put right sides together and stitched the back to the front. I did cut a small slit for the head before I sewed them together which I had to enlarge just a little to get the top on her. I was really glad she could fold her arms when I was fitting this top. I added a horizontal cut at the top of my slit which created the back of the neckline and folded the extra flaps from the front slit inside and sewed them in place by hand which finished the front quite nicely. You can see just a bit of her bodice peeking out of her V neckline. I did sew in a bit of a bauble at the bottom of the V and added a butterfly brooch once I was finished.

I sewed a straight black skirt for her. The selvage was all fringed so I used that instead of hemming it and created a cool metal embellishment to highlight the waist. I sewed on the embellishment and then ran a basting stitch from each side to the back leaving ends which I used to tie up the skirt once it was on her. Keeps everything nicely in place and gives a bit of a bustle look in the back. I added more metal embellishments - a few I sewed on, the others I added to the waist embellishment. I took the photo before adding the final embellishments.
It was fun digging through my stash to create embellishments. The waist one was created using an old earring back in the middle with a double heart stud earring attached in the center. I used modified shepherd hooks on either side.
I created a purse for her using a graphic I downloaded from Arthur's clip art.of an Astrolab. I isolated one of the circles, printed two of them, added colour and sandwiched a piece of chipboard between them. I added a black fiber ring all the way around to cover the chipboard's edge. I punched a hole in the top section and inserted my hardware (back of a clip on earring) and held it in place on the front using a glue dot. I love that it has a heart on it!! I punched a hole on each side and added a length of chain with jump rings.
It was fun to be dressing up a paper doll and creating metal embellishments from odds and ends I have saved from other projects!
Therese
I started with a paper doll template from The Enchanted Gallery which I printed on white cardstock. I rough cut all the pieces, glued them to thin chipboard (back of a writing pad) and then cut them out properly. I chose to use the articulated arms and was happy I did when I was dressing her. I printed another set, cut them out and glued them on the back so she would be the same colour on the front as the back. I used a push pin to make holes and assembled my doll using black mini brads.
I downloaded a page of clipart from Aisling.net and printed one of the faces large enough to fit on the head. I had originally started with a moveable head but when I was getting ready to glue on the face I decided to remove the brad and glued the head to the body and the face to the head. I drew a bodice on her torso, coloured it in and added some sparkle. I drew her some stockings as well and coloured them in. I had taken a picture of her with just her undies but alas my camera did not have a memory card in it at the time, so, no picture!! I coloured the rest of her in with a mix of chalk and pencil crayon and drew her some boots which I glued in place.
The hat was on a victorian woman I downloaded from the Vintage Feed Sacks blog. I isolated the hat and sized it to fit on my doll. I coloured it, added some bling and then traced it onto cardstock and cut another one which I glued to the back of her hat just at the top which makes it removable!!

I sewed a straight black skirt for her. The selvage was all fringed so I used that instead of hemming it and created a cool metal embellishment to highlight the waist. I sewed on the embellishment and then ran a basting stitch from each side to the back leaving ends which I used to tie up the skirt once it was on her. Keeps everything nicely in place and gives a bit of a bustle look in the back. I added more metal embellishments - a few I sewed on, the others I added to the waist embellishment. I took the photo before adding the final embellishments.
It was fun digging through my stash to create embellishments. The waist one was created using an old earring back in the middle with a double heart stud earring attached in the center. I used modified shepherd hooks on either side.
I created a purse for her using a graphic I downloaded from Arthur's clip art.of an Astrolab. I isolated one of the circles, printed two of them, added colour and sandwiched a piece of chipboard between them. I added a black fiber ring all the way around to cover the chipboard's edge. I punched a hole in the top section and inserted my hardware (back of a clip on earring) and held it in place on the front using a glue dot. I love that it has a heart on it!! I punched a hole on each side and added a length of chain with jump rings.
It was fun to be dressing up a paper doll and creating metal embellishments from odds and ends I have saved from other projects!
Therese
Subscribe to:
Posts (Atom)


