Showing posts with label quilting. Show all posts

Thursday, August 06, 2020

Little flannel chevron quilt


I have finished another little flannel quilt.  I added a border of solid blue around the chevron pattern I created with the half triangle squares.  This one is soft and comfy!!  It is 40" x 49" so would be perfect as a picnic blanket or an extra cover for a child's bed.  

Therese

Monday, May 18, 2020

Another set of six crumb quilting squares


With the weather outside this morning being windy and cooler I decided to spend the morning on another set of crumb quilting squares.  I discovered two long strips of squares (2.5") which were obviously coordinating but not exactly the same so I decided to add what I could to make another set of six squares.  I started by dismantling the strips into the closest measure to ten inches, the final size I wanted for my finished squares.  Next, I cut strips from a piece of a green fabric which featured a country side landscape with flowers and animals and stitched them onto one side of six of the 10+ strips.  I then, stitched another piece of the original ones next to it.  I needed to add about 4" to what I had so I could trim out a 10" square.  I dug through my little stash of crumb scraps and found the brown and pink floral fabric of which I had enough to add a strip to each of the pieces I had already stitched together.  I then played with what was remaining of the original strips deconstructing and adding a floral pink fabric to make up the 4" that I needed.  I trimmed them all to 10" and have another set of six squares for quilting with.  It is interesting to me that this set also has a pink and green theme with brown thrown in as well.  These ones look much more quilted because of the originals strips I started with.     Therese

Sunday, May 17, 2020

Quilting - Crumb square for trading

I had a bit of time this afternoon so I thought I would get started on some crumb quilting squares for my sister.  She has agreed to pass on her fabric scraps to me and I will pass back some 10" crumb quilting squares.  I started with a fairly large quilted piece which came in a bag of scraps and found a few other pieces that coordinated and got started.  I just kept sewing on pieces and making strips to add on until I could trim what I had to 10" square.  I see that there is one that has less green than the others but they generally coordinate fairly well.  I am really enjoying the crumb quilting process but I prefer to crumb quilt with larger pieces rather than those that are really tiny.  I am looking forward to making a few more in different colours!!

Therese

Thursday, May 14, 2020

Slow Stitching - second little house

I have finished my second little house in my Slow Stitching project!!  I used a fused panel of fabric for the base of the house because it allowed me to match the pattern and have a slimmer house.  I added brown roof, a chimney, two windows and a double layered door.  I like the fun look of this house.  I stitched the chimney horizontally to give it more texture and interest.  I did three rows of stitching around the edge of the roof.  I used soft teal thread to make the three rows around the base of the house and I like the softness of the colours.  I added two windows and stitched them in place using similar colours instead of contrasting which makes them really bright.  I used two layers of fabric for the door - a brown in behind and a turquoise/peach pattern for the double door which echoes the house colours.  I added to dark red stitches for the handles one for each door. Happy with this one!  I will use try to change up a few things for the next house - roof line, windows and maybe a different front door placement.  We shall see!!!!!!!  Therese

Thursday, May 07, 2020

Slow Stitching - my first house is finished


I have finished slow stitching my first house in my new Slow Stitching project!!  I have changed my daily routine in order to add a daily walk outside so slow stitching has moved to the evening but I don't always get to it so this project may take a little longer than I expected but it is summer time and there are other tasks that will need to be a priority.  No problem, this is a relaxing activity and I will do it as often as I can. 
I pinned the house body - a 5" square - and then added the windows and the door which I cut from scraps.  I used a 7" hoop to stabilize the area and then started stitching.  I did the perimeter of the house body with three rows of running stitch using a light yellow floss.  I stitched the windows in place using running stitch and dark brown floss.  I went around twice filling in the spaces on my first row on my second go around.  I like how that works!!  I added some bright yellow running stitches on the corners of all the panes to create a highlight.  I stitched the door using purple floss and then added a half round window and a door handle in light yellow floss.  I removed the hoop, pinned the roof in place and then flipped the top edge and put the chimney in place and stitching it down with several rows of running stitch in dark brown.  I replaced the roof and stitched it into place using dark maroon floss using three rows of running stitch all the way around.  I added some small black stab stitches in each little black line in the roof to give it a bit of texture.  Pretty happy with how it worked out!!  I am hoping to give all my little houses their own unique look so we shall see what the next one will look like.  I will consider adding foliage and flowers in between and possibly in front of the houses once they are all stitched in place.  We shall see!!          Therese

Monday, May 04, 2020

A little cowboy quilt

I have been working on and off on this little cowboy quilt which has been made up from two fabric panels I have had in my stash for a while.  After a bit of playing around with them to figure out how I could make them into a quilt I discovered if I overlapped them the designs lined up so I stitched them together!!  All the fabrics are heavier than the regular so it worked out well.  I stitched the two outside strips from precut pieces and they make a really nice border.  I added a couple strips of a solid taupe in between to help make a cohesive design.  I added fabric as batting and then a heavyweight cotton as the backing.  The binding is dark brown polyester cut from a raveled pillow sham.  I am please with how it turned out.  I will be washing it tomorrow and adding to my little pile of quilts for donation.           Therese

Monday, April 27, 2020

Slow stitched trees are all done!!

I have finally finished stitching my little trees to the bases.  I have added two rows of running stitch to all of them using yellow floss.  It frames them nicely, echoes the star and securely achours them to the squares.  Once I finished the stitching I trimmed all the squares to 6" and they will be used as an accent column in a future quilt.  I will have work on what sort of colour scheme will work and then get some fabric together.  For now it is on hold in the cabinet and I am working on my next slow stitching project.  It will be little houses!!!!!!!  I am currently working on the substrate for the houses which involves fabric collage and a new thread colouring technique. 

Therese

Sunday, April 19, 2020

Rainbow quilt top featuring my heart rainbow squares

I managed to get my rainbow quilt top made up today.  It features my little rainbow heart slow stitched squares which are in a column between the blue strips.  Without the strips they blended right in and were not very noticeable.  Very happy with the way it turned out.  I have a bit of trimming to do at the bottom and then it will be finding batting and a backing. 

Therese

Thursday, April 16, 2020

Finished the little heart & star quilt top


I have finished the little quilt top I mentioned the other day!!  I had enough the wrinkly gray fabric to create a binding.  I cut it 2.5" wide and folded & ironed it in half.  I stitched a single edge to the front of my quilted top and then folded it over the edge and then folded in another quarter inch and pinned it over the stitch line.  My corners are soft and rounded.  Not sure what exactly I did wrong but I will investigate and see what I need to do differently for next time.  For this time around they are soft and rounded and that will be fine.  I used dark thread on the top and stitched in the ditch from the front.  I did have a few places where I missed the fabric on the back - less than last time - so I will have to be more careful with my next one though I am considering not stitching in the ditch and actually stitching on the front edge which should guarantee that I do not miss the backing.  It is trial and error!!  Proficiency comes with experience and repetition!! 
This quilt finished at 36" x 46".  I used a cotton polyester fabric as a batting and a gray with soft stripes sheet on the back.  Glad to have given this little quilt a chance to bless another person in the world.  It will be headed to the Linus Project when things get back to "normal".           Therese

Tuesday, April 14, 2020

Slow Stitching - Trees

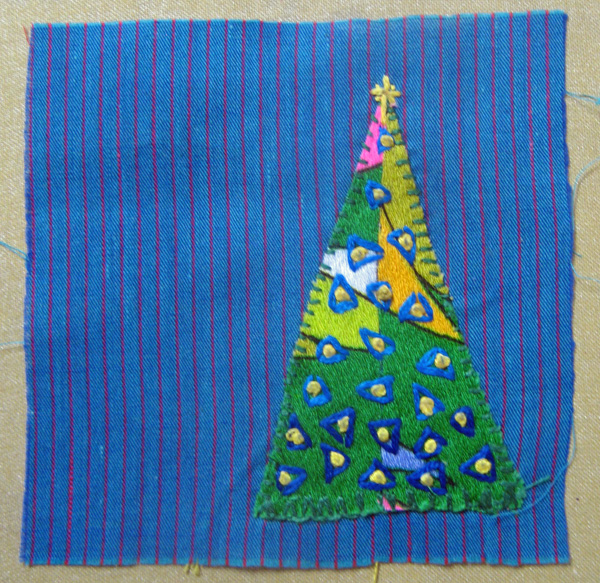
 I have been working on my slow stitching tree project for the last few weeks getting the little tree squares stitched to larger squares.  I have used blue floss for all the stitching in order to have the trees remain the focal points.  It has been fun to find stitches in my books which I have not done before that will overlap the edge of the square  - cretan, fern, closed fern, etc.  I have also used blanket stitch and a variety of combinations as well including fern, stab, daisy, etc. 
I am feeling like there is not enough stitching to keep these little squares attached to the larger one so more stitching will definitely be added.  Not yet inspired as to what exactly that will be so I will sleep on it and see what I can come up with tomorrow.          Therese


Another quilt top


I found this quilt top in my stash when I was sorting through fabric on the weekend. It was square and fortunately I had cut pieces and scraps of the same fabrics as well. I added a strip of the colourful fabric at the top and then a narrow piece of the wrinkly gray fabric and then at the bottom I added a narrow strip of the colourful fabric and then another of the wrinkly gray fabric.   Using the scraps I created pieces that were 3.5" wide and then arranged them into piles so I could evenly distribute the colours and textures into the border that I needed to add all the way around to get the quilt top to be about 35" x 45".  I stitched the border pieces to each other and then added a length of the border to each side which worked out really well.  I think the quilt looks reasonably balanced the large white areas are pretty much centered.  I will now have to find some batting and a backer.  I will also investigate if I have enough fabric left to actually create a binding for it.  It would be really nice if it coordinated.  If not, I will see if I can find a piece of dark green which would work very well for the binding.  Very happy to be able to give this little quilt top another chance!!!!!!!!  Therese

Saturday, April 04, 2020

My second flannel quilt is finished


I have worked on this quilt for a couple of days and have now finished it!!  I have given it a green polyester/cotton backing and used a white polyester/cotton fabric as batting on the inside.  Due to a flaw in the green fabric I was unable to use my usual binding method of self binding because there was no extra that could be left.  I trimmed my quilt, batting and backing to the edge of the quilt and then investigated the process of using a sewn on binding.  My sister uses this method all the time and has found a good tutorial for it which you can find here at Craftsy.  I cut my binding 2.5" wide from my backing fabric scrap and used a quarter inch seam to attach it to my quilt before folding it over and stitching it from the front using the "stitch in the ditch" method.  She indicates that meticulous pinning brings more success in capturing the edge of the binding on the back side of the quilt.  I certainly agree.  I had about 5-6 areas on the back of the quilt where I failed to secure the binding.  
I handstitched them using a needle and thread to ensure a continuous line of stitches on the binding.  I will have to consider my options for next time.  This method provides a double layer of fabric on the binding which was not a problem with this fabric as it was a bit on the light side.  I am wondering if only one layer of the binding could be stitched to the front and then folded over and then stitched in the same manner.  I am also considering stitching on the binding instead of in the ditch on the front which would likely gain me better capture of the binding edge on the back of the quilt.  
This method yields a much narrower binding but still very neat and acceptable. My finished quilt measures 36" x 45" and has been ironed and folded.  It has joined the other two in waiting to find its way to its final home through the Linus Project.                       Therese


Tuesday, March 31, 2020

Another small flannel quilt


I have finished up one of the flannel quilt tops I made up this past weekend!!  I filled it with layer of cotton fabric and backed it with a cotton/polyester floral fabric in coordinating pastel colours.  Really happy with how it worked out.  It measures 36" x 46.5" and is fairly light in weight because of the lightweight batting and backing.  I stitched up and down the columns beginning in the middle and moving to the edges rotating the quilt as I went to keep the quilt evenly quilted and not pulling in one direction because of the quilting seams.  I did a self binding by leaving about 1.5" of the backing fabric all the way around the quilt and then double folding it and stitching it down.  I used white thread to sew the top together and it worked very well for the quilting and binding seams as well.  I have added it to the little bright coloured one I made a while back.             Therese

Monday, March 30, 2020

Crumb quilting and two small flannel quilt tops

I have been working on cutting and piecing my flannel scraps and managed in the last couple of weeks to create two small quilt tops.  I originally had a top that was too long for its width so I removed one bright column and trimmed what I had left to 45.5" which gave me a top 36" x 45.5".  I trimmed the edge of my leftover and used scraps to fill in a couple of columns. I needed to add some length so I created a panel of crumb quilting with some of my pastel scraps - totally fun!!  I still needed some width so I stitched together three bright pieces - orange, bright stripes and aqua.  I stitched this strip to my original piece and then added my panel of crumb quilting.  Next, I added the bright strip which I originally removed to the top and bottom.  This gave me a quilt top 36" x 44".  So, I now have two small quilt tops which need batting and backers which I will work on next weekend.  I really enjoyed creating the crumb quilting panel and it was satisfying to use up even the little scraps!!      Therese


Saturday, March 28, 2020

Slow Stitching - Tree #11

I have finished my eleventh square!! I have added running stitch in horizontal lines and some in a chevron pattern in three different colours.  I am liking this pattern of stitching.  I added my stab stitch star which is working reasonably well.

I have decided to change the scope of this project as I have discovered more and more that the blue precut squares I chose for the backgrounds of these trees are not of a consistent size which will make assembling them into a column for a quilt difficult.  I have been pondering this issue for several days now.  I decided today that I will be stitching these squares to larger squares which I will cut to 6" in a variety of colours which means that I have already stitched enough little trees to make up the column I need for a quilt.  So I dug into my stash and found some squares which are cut larger than 6" which I will use as backgrounds for these squares.  I will be stitching these little squares to them and then they will be assembled into a column for a quilt.  I am not sure how much stitching yet but for sure a row all the way around to secure it to the background.  I am inclined to add a bit more but I am not sure exactly what manner that will be.  Will invent it when I get there!  I feel good about this new direction.  It will make the squares more interesting as the little trees will be framed with colour.  I will be getting started tomorrow! Looking forward to it!!            Therese

Slow Stitching - Tree #10

With a bit more time on my hands because were are choosing to stay home to avoid contact with Covid 19 and all of our outside activities and commitments have been cancelled I have spent more time stitching on my little trees than the bit of time I usually commit to in the morning.  So I have finished another one!!  This is my tenth one!!  I did blanket stitch around the edge of this one in light green crochet thread and couched a heavyweight red thread with orange floss over all.  I really enjoyed the  ability to shape the red thread any way I wanted so I will be doing this technique again!!  I added french knots in blue afterwards to punch up the colour a bit and add some interest and texture. I add the star in yellow using small stab stitches.   Therese

Friday, March 27, 2020

Slow Stitching - Tree #9


Here is my ninth tree for my slow stitching project!!  I started with a modified blanket stitch on the bottom edge and could not get it done consistently so I switched to just regular stab stitched for the rest.  I created blue rectangles over all of the tree and then added yellow french knots in the middle of all of them.  I added the star at the top using small stab stitches which seems to work out the best.  I remember to put them one on the right to help balance the collection!!     Therese

Tuesday, March 24, 2020

Slow Stitching - Tree #8

Here is my eighth little square in my Slow Stitching project!!  I made chain stitches all the way around and then filled in with running stitches in  coordinating thread all through the middle section.  Added the little star using yellow thread.  I laid them all out and I see that most of them are lefties so I will have to make a few righties to balance out the collection.              Therese

Monday, March 23, 2020

Slow Stitching - tree #7

Here is the tree I have been working on for a few days.  I used fern stitching in green to anchor the tree to the background and generally to contain the edges from fraying.  It was fun to be able to make the stitch curve and have motion though the tree is not big enough to really highlight that ability.  I might try again on a different one knowing how easy it is to get a curvy line with this stitch.  The stitches could also be executed a bit smaller which would allow more options for moving a line.  I will consider as well drawing a line or following the black lines in the fabric for a guide.  This star worked out better though I am using the same technique of building it using single running stitches. 

Therese

Friday, March 20, 2020

Slow Stitching - tree #6

I have one more finished!!!  I did have a bit of free time a couple of days ago and worked on it several times over the course of one day a few minutes at a time.  This is another tree comprised of two fused halves which I am liking a lot better.  I did a row of verticals and three rows of horizontal running stitches in green at the bottom and decided to repeat the pattern adding one more row of running stitch with each different colour.  I managed to add dark pink, purple, green and orange which brought me to the top.  My yellow star is looking a little mangled.  I made it the same as the others but somehow that is how it worked out.  To finish it off I added white french knots over the whole of it.   I am liking coming up with different patterns and thought up a few more overnight to use on my next trees.  I am enjoying the stitching.  They don't take quite as long as the larger squares but are a little less creative in that they are all trees in the same colour scheme.  Will change that up next time around.   Therese