Showing posts with label ornament. Show all posts

Monday, September 23, 2019

Birthday card featuring a layered floral focal element, decorative paper background and an embossed greeting

My youngest granddaughter has a birthday coming up and I made this card for her.  It has a fun and funky flower element which can be removed to put it in her room or in a window. 
I started with a large envelope and created a blue card to fit inside.  I trimmed a piece of decorative paper which has some glitter on it somewhat smaller than my card and cut it into four pieces.  I used a corner punch to trim two corners on each rectangle and then glued them in place with even margins on my card front.  I created the flower using a variety of flowers I found in my flower stash - a large die cut, an orange post it note flower, a coral die cut and a layered center created from a scalloped circle, a circle punchie of decorative paper, a 5 petal flower punchie, a sequin and a brad to hold them all together.  I punched a small hole on the top and strung a white cord through to create a hanger.  I positioned the flower on my card so the center was in the middle of the card and brought the hanger to the inside of the card and secured it with tape.  I put a tiny piece of double sided tape below the flower just to keep it in place until it is removed.  I trimmed a glittery embossed greeting, sponged the edges in pink and glued it to the front of my card using double sided tape.  It will be a fun card for her and she will be so happy to have something she can keep for herself to decorate her room!!     Therese
dffd

Thursday, November 29, 2018

Giving Tree tags


These tags are for our Giving Tree!!  I die cut the red circle using my Nestibilities dies and then
I cut a hole at the top using my Cropadile.  Added yarn for the hanger and the bow.  We will be able to staple our gift request to them.  

Therese

Friday, December 22, 2017

Dove ornament for Christmas!!

I created this red dove ornament for a special person and like it so much I will be making more to include in my Christmas cards to my friends this year!!
I cut two doves (SB) and glued them back to back and added a gold embroidery thread hanger.  Added the year on the back using a black marker.  They would certainly be great in any wonderful paper - glitter, metallic, shimmery, etc so I will have to scour my stash to see what I can find to make them special for each person on my list!!

Therese

Saturday, December 16, 2017

Die cut red dove Christmas ornaments


A few weeks ago I found this little pile of special red duplex paper in my stash.  I bought it years ago from a store that indicated that this paper was used by their Chinese community for Chinese New Year celebrations.  It symbolizes good fortune and joy!! Having recently become more aware of the Chinese New Year I did a google search and found that it is a country wide festival/celebration where people make every effort to go home and bring in the new year with their extended families.  They let go of the old year and welcome the new year wishing everyone good fortune and joy with little gifts in red envelopes.
So I have decided to wish my friends and special others good fortune and joy with little red dove die cut (Spellbinders) ornaments made out of this special paper. I added a simple gold thread hanger which made these very quick and easy!!  The paper is scented which just adds a little something to these ornaments.
They would look great on the Christmas tree but are beautiful enough to hang anywhere year around as a reminder to keep an eye out for the good fortune and joy that is coming their way.

Therese

Sunday, December 25, 2016

Handmade ornament for a gift exchange

I made this little quilted tree ornament for a gift exchange at our family Christmas on Christmas Day.  I found the top layer of the tree in my stash which I created at the same time as this one.  I finshed this one a little differently.  I added some batting which I machine stitched in place following the lines in the quilting.  I cut the same sized tree out of green felted wool and stitched it all the way around with green thread on the front and red thread in the bobbin.  I added a red rick rack garland and secured it with a few stitches where it touched the edges.  With the layers secured I used red floss to blanket stitch all the way around being sure to secure the garland on all the edges.  I found this white beaded trim in the bag with the tree so I decided to use it to trim the tree edges.  I simply stitched in into place along the edge using overhand stitches and white thread.  It softened the red outline which the blanket stitching had created which worked out better than I expected.  I stitched on some sequins - red, green and gold  - adding seed beads to keep them secure.  I stitched several beads in place on the garland to keep it in its place and add yet more sparkle.  I stitched on a rick rack hanger and added the layered sequin star which is secured by a little yellow crystal bead.  I added a drop of glue where the pearl beaded trim joined up to keep both ends aligned.  I added a tag on the back with my name and the year.  This ornament will be combined with a consumable gift which all has to fit in a shoe box and be wrapped in newsprint.  Looking forward to a great Christmas with my family!
Therese

Tuesday, December 06, 2016

Scrappy quilted heart ornaments

 I quilted up some heart ornaments for Christmas giving!!  I started with strips of mostly red printed fabric scraps and added a strip of white and a couple of patterned ones that include green and other colours just to give a good mix to the final product.  I made two pieces and stitched them together end to end.  I added a piece of batting and a backer in green patterned fabric with bears and Christmas lights.  I pinned them together and stitched along the length with red thread on the top and green thread in the bobbin. I made my own pattern using folded paper and pinned it to my fabric diagonally to make the best use of the piece and trimmed them out.  I got eight hearts!  I used red floss to blanket stitch the edges to finish them off nicely and used the end of the floss to create a hanger.  Handstitching is great for doing in the card on a trip so I finished them up on the weekend when we went to visit Dad for his birthday.  I laser printed buttons (Sweetly Scrapped) on cardstock, punched them out and sponged their edges and the two central holes.  I stitched them to my ornaments using red floss as well.

Loving the look of them and they are a wonderful scrappy project.  Triangular trees would make very efficient of a strip of green quilted fabric which I may try out next time.  Nice to have a few little gifts in your stash for last minute hostess gifts or for including in a card to a friend, etc.  

Therese

Sunday, December 06, 2015

Christmas ornaments with wooden angels


I made up over a dozen of these Christmas ornaments for a bazaar in my community!  I had a few backgrounds left over from this project last Christmas so decided to finish them off in the same manner to create ornaments. I added little handmade paper Christmas trees to the back which I embellished with iridescent glitter glue and a small gold sequin star along with finishing off the edge by adding glitter glue to each scallop.  For this project I used the little wooden angels with the horns and gifts.

Pretty happy with how these turned out!!

Therese


Thursday, November 12, 2015

Crazy quilted tree ornament


On one of my groups I joined a Crazy Quilted ornament swap. We could send as many as five ornaments - I decided to do just one.  I machine quilted a triangle using small scraps adding pieces one at a time around the green polka dot square.  It was fun to add a variety of fabrics and colours.  Once that process was finished I trimmed the edges evenly and started adding hand stitching to each seam using a variety of coloured floss and stitches.  Next,  I cut a triangle a half inch wider in every direction in a dark green fabric.  I laid it on the back of my triangle and folded the edge over twice and stitched over it using blanket stitch in green floss.  I had to iron it before I stitched because it was much too unruly otherwise.  Then, I added embellishments - sequins, beads and buttons.  It still needed a bit of something so I added a tiny rick rack garland which I stitched on with red floss.  Lastly, I added a sequin star at the top.  Oh, yes, I did add a rick rack hanger at the top in the process of doing the blanket stitch around the perimeter.  I did add some random red stitches on the back to better adhere the back to the front and added a shrink plastic tag with my credits on it.  This is my first crazy quilted project. I am happy with it how it turned out.  I hope to learn more stitches and to add lace to my next project.  Looking forward to receiving an ornament in exchange.

Therese

Monday, January 05, 2015

Angel favours!!


I created these favours for the Christmas Dinner for my family on Boxing Day!!  My daughter found these little angel ornaments on her vacation this summer and thought they would be great for the favours.  I agreed and started brainstorming ideas!!  The angels had twine hangers sticking out of their heads and nothing I thought up seemed to work with that feature so I decided to remove the hangers.  With a good swift tug, most came out clean.  Others, needed more convincing but eventually complied.  I filled the holes and painted them over with white paint.  That was better!!!  I decided that a round ornament would work well as a favour and could then be displayed on the tree in future years.  I have several on my tree from previous years where my sisters offered up ornaments as favours.  A 2.75" circle was sufficient to frame the angels so I cut them from a variety of red glittery decorative paper.  I layered the red circles onto white scalloped circles - both were cut with Nestibilities.  I did add a white crochet cotton loop between the two layers to accommodate a hanger.  I used GOOP to glue the angels to the circles.  I seriously considered adding glitter to the scallops and in the end decided that simple and elegant was a better choice and left them as is.   I added a circle on the back with year & event info and added a name tag to each one to indicate everyone's seat for our meal.  I am very happy with the way they turned out and I hope everyone will remember the fun of this Christmas when they add the ornament to their trees as the years go by.  

Therese

Wednesday, December 10, 2014

Ornament perfect for mailing

I made a few of these ornaments for including to friends and family in my Christmas cards!!  It is perfect for sending along as a "little gift".
I used a large white cardstock scallop circle to which I glued a 3" circle of decorative paper capturing a loop of white crochet thread between which serves as a hanger.  I added a white cardstock die cut of a tree which I embellished with a silver confetti star.  I signed the back and have sent them on their way.

My Christmas cards are ready to go!!  A little later than I thought I would have them ready but I am glad to send them on their way to friends and family.

Therese

Tuesday, November 11, 2014

Handmade Wreath Ornament with a Tutorial


I have joined a handmade ornament swap on one of my groups so I went looking for ideas!!  I found an ornament similar to this one that fit my criteria - lightweight, fairly flat for easy mailing and used supplies I had on hand.  I dug out wire, beads and pliers and got started.  I decided to use E-beads because I have lots of them in a variety of colours.  After adding the first row of beads on the outside of the armature - it looked a bit "light"so I added a row on the inside. Better! but it needed a bit of accent colour so I added some different coloured beads to simulate "holly berries".  That was much better.  I added a charm and a bow and declared it done!! Not sure if it will be the one I use but I decided to document the process in case I want to replicate it in the future and no longer have the original!!


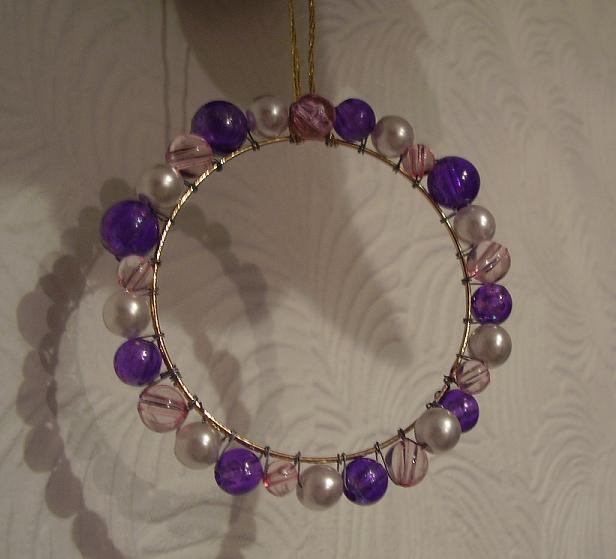
Handmade Wire & Bead Wreath Ornament Tutorial
You will need:  (I used)
Wire for the armature    (I used 26 gauge - 4-5 wraps around the jar (36"-40")
Wire for beading    (I used 28 gauge - about 48")
Beads     (Ebeads - 80 of the main colour, 16 or so of accent colour)
A charm       (metal snowflake charm)
A length of chain      (4 links)
A bow      (6" or so to construct a bow)
Thread      (24" or so to sew the bow onto the ornament)
Pliers     (snips and rounded beading pliers) 

Use what you have and adjust where you need to to accommodate the difference in supplies. 


 1.  Make the armature for your ornament.
  I wrapped 26 gauge wire around a jar of UTEE embossing powder 4 or 5 times.  

 Twist the wires to each other and then wrapped them around the loops of wire to secure them to each other.

 2.  Prepare your beads.
I strung my 80 green Ebeads onto a 48" length of 28 gauge wire and made a cluster of loops
at the end to ensure the beads would not fall off and to make it easier to pull through the armature.

 3.  Start adding beads to outside of armature. 
Wrap the end of the 28 gauge wire to the armature where the ends are, a couple of times to secure.
Bring one bead up to above the armature, hold it in place with the hole horizontal, fold the bead wire to the back and pull through the opening in the armature.  Tighten.  

 Repeat 39 more times leaving some room between the beads.  Wrap bead wire around armature to secure.

 3.  Now start adding beads to the inside of the armature by placing the bead horizontally below the armature, holding it in place and bringing the wire up and between the first two beads above the armature.
Bring wire down the back side and up through the opening in the armature.  

 Repeat 39 more times.  Wrap bead wire around the armature to secure.  

 4.  Add contrasting beads onto bead wire.

 Add these beads in between the ones already on the armature using the same technique as above. Start with a couple of wraps, add a bead below, a few more wraps and then add a bead above.  Keep adding beads alternatively until you have added beads randomly all the way around.  Secure your bead wire with a couple wraps around the armature when you are finished.  

 5.  Prepare a charm.  I used a metal snowflake charm and added four links of chain to it to make it hang in the right place on the inside of the ornament.  

6.  Attach charm to ornament.  I used one of the armature wires to create a loop for my charm to hang from.  If your beads are too close together at the top just nudge them gently to the sides.  They will adjust and make some room for you to hang the charm.  
Alternatively, you could use thread to hang your charm by just tying it to the armature hanging at the right height.  

7.  Add the bow.  I constructed a bow from ribbon and then sewed it to the top of the armature using embroidery thread.  
Alternatively, you could tie the ribbon to the wires that are sticking up and make a bow.  
I twisted all the wires together and snipped them even about 1.25 inches above the top of the ornament and used rounded beading pliers to make a loop hanger.  
Alternatively, you could add a jump ring using the wires to secure it and then snip them.  
Once you are finished, shape your ornament to get it nice and round. 

Very happy with my wreath ornament!!   I hope you will find this tutorial useful.  
If you use this tutorial, I would love for you to leave me a comment on this post 
and a link to your project if you have it online somewhere.  

Thanks for joining me!

Therese

Tuesday, December 04, 2012

Upcycled Heart ornaments

 I have been making little heart ornaments for my friends - just a little handmade something!!  The base of these hearts is a red sweater I bought years ago and wore all the time, especially at Christmas.  As it happens, it because a little stretched out and no longer looked great and fit well so it was removed from my closet to the give away pile.  When I was sorting through that pile I saw my sweater in a new light - crafts supply!!  So I brought into my craft room and cut it apart to so I could use it in my creations.  I first used it to die cut hearts for cards and went looking for it the other day to see if it would work for these little ornaments I had in mind.  One section had Heat N Bond already applied to it because it needed to be stabilized for die cutting earlier so I just ironed it to another piece of the same and  cut out hearts my hand.  I added a bead, round sequin and snowflake sequin to each side by sewing them together with crochet cotton.  I also added blanket stitch all they way around
using the same white crochet cotton.  I created the hanger using the two ends as I started my stitching at the top dip of the heart.
I am really liking the handmade look they have and that my red sweater will live on as tree ornaments in the homes of my friends and family!!
Christmas is about what is in your heart and not about what is under the tree!  There will be less under the tree this year because as a family we have decided to make a charitable donation instead of buying adult gifts. So we will be shopping for the grandchildren and sharing hand made goodies with our families!!
If the holidays are stressing you out, consider changing your mind about what needs to be done and changing any traditions that no longer work for you and your family.  You get to choose!!!

Therese


Tuesday, November 22, 2011

Tree ornaments

With card classes behind me I have been working on getting some of my other projects done!! In this case, tree ornaments for a swap on one of my groups - Art Techniques.
I started with a piece of fabric paper I created a while back. I always thought I would use it to make some hearts so when it came time to make ornaments I
decided to make some heart shaped ones!! I free hand drew the hearts on the back of the fabric paper, cut them out, laid them onto some coordinating ruby coloured upholstery fabric (remnant/sample) and cut out a backing piece for each one. I sewed a piece of cardstock with my info printed on it and embellished with a cancelled Christmas postage stamp to the backer. The filling I cut from some fleece I had on hand. I embellished the fronts by sewing on a piece of lace, ribbon and a length of twill tape on which I had stamped "spirit of peace" with a magnetic rubber stamp alphabet. I added a cancelled Christmas postage stamp from my collection to each one!! I layered all the pieces, added a ribbon hanger between the front and the fleece and sewed a close zig zag stitch all the way around to combine them. For a little dimension I added a little rosette of gathered tulle and a metal key charm. On the back I tied on a pearly button using the ends of the floss I used to sew on the rosette.
It will be fun to see what I get in return. If I am lucky they will arrive in return mail before Christmas!!

Therese

Thursday, December 02, 2010

Altered heart ornaments


A challenge to alter "something" was put out on one of my groups so I decided to see what I could find around the house. I found this small heart shape chipboard board book and it seems perfect for making altered ornaments for a community project called Evergreen Memories - similar to Festival of Trees elsewhere. I cut the binding off and trimmed the pages to round them out nicely. I covered the edges with red tissue paper and used gift wrap - red with snowflakes - on the front and back. I traced the hearts, so, after cutting they were just a bit big to fit really nicely so I crumpled them up and glued them down with wrinkles in them which gave them lots of texture and alleviated any issue of not having a perfectly cut outside edge. Once both sides were done I pressed them under weight to make sure the paper was well glued and to keep them flat. I decorated them today using colour printed vintage images, snowflake punchies, and scraps of lace, tulle and ribbon.
I am very happy with how they turned out and I am sure they will make a welcome addition to the tree. There are over a dozen trees that will be decorated by different organizations on the theme of Peace and will be on display at the museum for a couple of weeks. Over the course of the two weeks the public can drop by, enjoy the sound of music provided by local groups along with a tasty treat and get dose of holiday spirit. After wandering through the display they can choose to buy tickets for the ornament raffle. All the ornaments on all the trees are raffled off at the end of the display in support of local charities and programs. So these ornaments are off on an adventure which will ultimately find them a new home. I send them off with blessings!!

Therese

Monday, November 08, 2010

Heart Ornament

Thanks to a friend of mine I have a few of these die cuts to play with - adorned heart Nestibilities!!
I created this ornament using two die cuts - there are three in the set - and simply inserting the red into the white and adding a backer to keep them nested. White embossed the word love on the red heart.
The Love stamp is a new one! Won it at a class on Quietfire's community two weeks ago!! Suzanne makes rubber stamps from her wonderfully calligraphed sayings!! I am looking forward to incorporating the rubber stamps I won into my projects in the next little while!!
Sending off this little heart with some love to a special person!!

Therese

Friday, December 04, 2009

My Art - angels for a special tree

Angels for a special tree!! We have a program in our community where groups decorate Christmas trees with special ornaments and over the course of the season they are raffled off to support charities. I created these angel ornaments for one of the girls from church who is doing an angel tree - all the ornaments will be angels!!
I will take the opportunity next week to go and see all the trees when local choirs will be providing Christmas music. I am looking forward to getting a boost in my Christmas spirit!!
There are so many opportunities to participate in something bigger than ourselves and make others lives better! We should participate in any that pull on our hearts strings!! It is our way of making the world a better place!!

Therese


Saturday, November 14, 2009

My Art - snowflake ornament

Here is another ornament I made with the Sizzix snowflake die! The coaster snowflake is layered with a plastic one and then a silver punchie!! I added another punchie to the other side to finish it off nicely!! Added a bit of crochet thread to hang it! Made a few of these - can be used on the tree, on a special gift or in a window!!

Therese

Friday, October 02, 2009

MS - Leafy moths

One of the girls at Book Club last night was talking about getting UFO - unfinished craft projects done for the holidays. As I was going through my box of pressed leaves for a different project I found these skeleton leaves I have had for a few years and remembered seeing a project online that used them. The project is called Leafy Moths on Martha Stewart.
So I dug them out along with my bucket of sticks and made some moths!! They are huge and would be great on the edge of a pot, frame, candle or basket handle, on a bare branch as a fall and winter decoration or even as a package decoration!! With a magnet glued to the back they would be great on the fridge or file cabinet as well.

So I challenge you to find something in your stash today that can be finished! OR a project you can create with what you have on hand.

Therese

Thursday, October 01, 2009

My Art - snowflake ornament

Snowflake ornaments!! I created these yesterday though it took me all day to come up with a design I liked I did manage to get a dozen of them made after supper. The photo shows you the back and front of the same ornament.
I used the Snowflake #2 (Sizzix) to cut the snowflake from a chipboard coaster. Cut the smallest and the largest flower from the four flower set (CB) out of coaster as well. Was able to use scraps from the snowflake to cut the small one. I used the snowflake from the snowflake and embossing folder set (CB) to cut the coloured snowflake from a variety of blue cardstocks and punched a matching snowflake (MS). I layered the punchie onto the large flower and attached them together with a silver brad. I placed the coloured snowflake behind the large coaster snowflake and pulled all the legs of the coloured snowflake to the front. I placed the small flower on the front of the large snowflake and attached all three to each other with another silver brad. I then used hot glue to attach the flower/punchie element to the other side of the large snowflake element. This gives a finished look to both sides and each one a distinctively different look. I added a pearl cotton hanger to finish it off!! Really happy with the look of this ornament!! Certainly could be used on the front of a Christmas card as a gift/card combo or could be used as a package topper as well.
I had a variety of other inspirations for snowflake ornaments and maybe some of those will also see the light of day as the prep for the holiday craft season continues to inspire me. It is amazing how a deadline will put your creativity into action.
So set yourself a goal today - whatever it is - Christmas cards by December 1, handmade cards for the girls at the office, gift list by November 1 and then start looking for ideas and inspiration daily - a store front window, a sign on the highway, a jingle on the radio, a colour combination in the garden, internet blog hopping, etc and jot down your ideas in a journal or book. Pretty soon you will have what you need for the creative projects on your holiday gift list.

Therese

Tuesday, September 29, 2009

My Art - heart ornaments


Heart ornaments!! When my sister was visiting we found this tutorial on line for creating these cute heart ornaments. Quick and easy!! Because we used double sided cardstock for our version we were not able to staple the 8 pieces of cardstock together so we invented a process using one length of ribbon that bound the bottom, created a hanger and allowed us to hang some bling off the bottom!! I have also changed up the size a bit to make them smaller. I made them in a variety of colours. It takes a few to get the hang of it and not have strips of paper all over the place but in the end I have a bunch of them hanging on the tree which will find their way to Merchants Mill and finally to a new home for the holidays!! These would be great a package toppers as well. It's only 87 days to Christmas so we do have to start planning!!

Therese