I created this card for DH for our anniversary!! He is a music guy so I like to include sheet music when I make a card for him. I started with an oversized envelope and made an ivory card that fits inside.
I manually embossed the red metal heart which was in my stash with swirls and then found these TH die cuts which I cut a while back when I was visiting my friend, Linda. I combined a large sheet music heart with a black inner piece and then sponged all the way around in black so it would contrast against the polka dot embossed background. I chose three different fibers - white flat, red bumpy and black crochet thread and braided them together to create a fiber accent for my card. I added a black border to both ends of my white/watercolour background, positioned my fiber gluing the ends to the back and then mounted this to a red layer leaving a small margin all the way around. I mounted the red heart with 3D foam tape and then added the musical heart below it. I glued this large element to my ivory card. Finally, I added a small laser printed greeting which I sponged with a bit of red so it would stand out a bit using 3D foam tape. I seem to always gravitate to hearts for anniversary cards though I don't need much of an excuse to use hearts on any of my cards - one of my favorite elements. Therese
Showing posts with label embossed metal. Show all posts
Saturday, June 29, 2019
Friday, March 04, 2016
Women & lacy embossed metal on colour printed backgrounds
A couple more cards with these cool colour printed backgrounds on book pages!! You can click here to see the other ones I created for guys!
I decided to feature yet more embossed metal on these cards so this time I cut a strip from a metal foil pan and used a scallop Thinlits die (SU) to cut the edge and the coordinating embossing folder (SU) to emboss the design. I went through my stash of images and found these stamped images of 1930 women and they worked perfectly with the strong background and the lacy border.
I mounted the backgrounds to the blue card fronts - I left the bottom one whole and cut the top one into four pieces before I glued it into place. Once I started working with my pieces I decided that the lacy border was a bit too bright so coloured the whole surface with a black permanent marker and then sanded it. I like the way the recesses are darker and the embossed areas have a bit of a satin finish from the sanding. I used an eyelet punch (SU) to create a subtle blue border and mounted that to the back of my metal border. I sponged the cardstock edge just a bit to tone it down and then trimmed it to fit on my cards. I added vintage gray seam binding to both elements and used double sided tape to adhere them to the fronts of my cards. I softly watercoloured the edges of my images after I cut them into circles with my Nestibilities. I cut larger circles from black cardstock and mounted my images to them. I adhered the images to my cards using 3D foam tape. I added a layered laser printed greeting to the portrait card. I also tied a short length of seam binding to each of the ones on my cards to simulate a bow! I will be printing more backgrounds onto book pages!! It is a great way to reuse your art in your creations!! I suppose it would be possible to print onto dictionary pages, music sheets, maps or even gift wrap!!! Oh, the possibilities!!
You can check out my embossed metal tutorial by clicking on the featured post or by clicking the TUTORIALS tab just below my header!! If you give it a try, come back and leave a comment with a link to your creation!!! Would love to see what others are doing!!
Therese
I decided to feature yet more embossed metal on these cards so this time I cut a strip from a metal foil pan and used a scallop Thinlits die (SU) to cut the edge and the coordinating embossing folder (SU) to emboss the design. I went through my stash of images and found these stamped images of 1930 women and they worked perfectly with the strong background and the lacy border.
I mounted the backgrounds to the blue card fronts - I left the bottom one whole and cut the top one into four pieces before I glued it into place. Once I started working with my pieces I decided that the lacy border was a bit too bright so coloured the whole surface with a black permanent marker and then sanded it. I like the way the recesses are darker and the embossed areas have a bit of a satin finish from the sanding. I used an eyelet punch (SU) to create a subtle blue border and mounted that to the back of my metal border. I sponged the cardstock edge just a bit to tone it down and then trimmed it to fit on my cards. I added vintage gray seam binding to both elements and used double sided tape to adhere them to the fronts of my cards. I softly watercoloured the edges of my images after I cut them into circles with my Nestibilities. I cut larger circles from black cardstock and mounted my images to them. I adhered the images to my cards using 3D foam tape. I added a layered laser printed greeting to the portrait card. I also tied a short length of seam binding to each of the ones on my cards to simulate a bow! I will be printing more backgrounds onto book pages!! It is a great way to reuse your art in your creations!! I suppose it would be possible to print onto dictionary pages, music sheets, maps or even gift wrap!!! Oh, the possibilities!!
You can check out my embossed metal tutorial by clicking on the featured post or by clicking the TUTORIALS tab just below my header!! If you give it a try, come back and leave a comment with a link to your creation!!! Would love to see what others are doing!!
Therese
Thursday, March 03, 2016
A few masculine cards with colour printed background on book page
I made a few cards today. I was looking to create some different backgrounds so I did some internet research on creating backgrounds and was inspired to print some of my scanned backgrounds onto book pages. I dug through my stash of books for collage and found a text book of Latin Prose which I got free on a boulevard a few years ago. The pages are 5" x 8" which I thought was close enough to half a page to work in the printer. I searched some several older folders of my scanned backgrounds to find something to print on the pages. I created this one by brushing Citrasolv onto a colourful page from a National Geographic magazine and letting all of the colours blend. A very cool technique!! I opened the scan in Corel Draw and sized it onto a half page so it would print on 5" x 8" and ran the book page through my colour laser. I love how it worked out!! I printed several sheets while I was at it so I have a few extra!! I would highly recommend to all of you to scan or photograph your creations for reuse in future projects!!
For this card I made two cuts on each side of my decorative paper which gave me nine pieces. I layered them onto my blue card front and adhered them in place. I watercoloured this boat image (CLKER), layered it onto teal and trimmed the left hand side with decorative scissors piercing the edge to add texture. I created my greeting by adding a watercoloured laser printed greeting to a blue tag. I punched a slot at the top of the tag so I could thread my gray vintage seam binding through it. I adhered the ends of the seam binding to the inside of my card using double sided tape. Note in the photo you can see that I used my slot punch to create an opening on the spine of my card to insert my seam binding. I love multi purposes for tools!! I adhered my image to my card front above the seam binding, positioned my greeting and adhered it with 3D foam tape and then tied a short piece of seam binding to the length to simulate a bow!! Love the look of the background on this card.
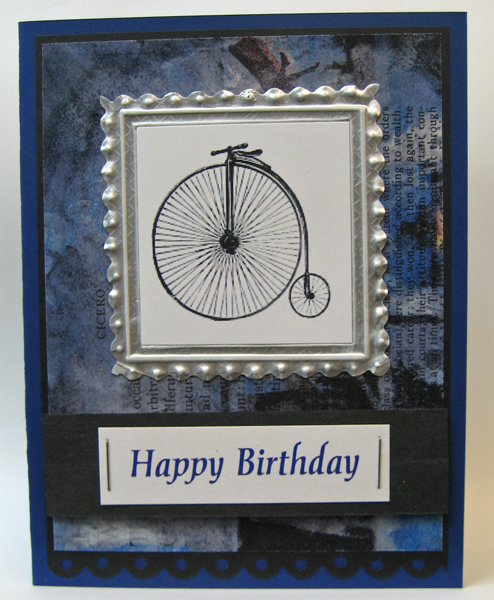
For this card I adhered this little bicycle image onto metal foil and trimmed a border all the way around using scallop decorative scissors. I embossed a frame right next to the image and then another next to it and then used my pencil to emboss dots in all the scallops!! I love how it came out. You can check out my Featured Post to check out my Embossed Metal Tutorial or follow this link or Click the Tutorial Link on my header. I layered my decorative paper onto black and then onto a medium blue card front. I adhered my image with its embossed metal frame to the top portion using double sided tape. I layered my laser printed greeting over a strip of black paper and used staples to secure it in place. I used 3D foam tape to adhere this element to my card front.
Had a fun day of cardmaking!!
Therese
Friday, February 26, 2016
Embossed metal star card
Another star card for my oldest grandson!! I started by creating the embossed star. I cut a piece of foil packaging in a circle shape, embossed a star and then added more texture and details. I will be posting a tutorial soon. Once it was finished I used 3D foam tape to adhere it to a gold scalloped circle which I had die cut with my Nestibilities. I also punched a hole in each scallop. I added a safety pin to a white cardstock circle and glued it to the back so he can remove it and wear it like a badge!! I die cut the label (SX) out of black cardstock, tied the badge to it with black fiber and then embellished around it using a gold gel pen. I created the background using embossed metal foil tape which I had coloured with transparent acrylic paint for a project a long time ago. I trimmed and glued two pieces - one to the top and one to the bottom of a blue card and glued the focal element over them. I added the trimmed laser printed greeting over the bottom edge of this element using a star brad which I coloured with Sharpie marker to coordinate with the card. I glued the flagged end down with double sided tape. Once I was done I still thought it needed a bit of something so I added black faux stitching around the outside edges and in the spaces on the outside of the middle of the label with a fine tip Sharpie marker. That was better!!
Therese
Therese
Thursday, February 11, 2016
Valentine's card featuring an embossed metal tag
I created this card for DH for Valentine's. I started with a piece of decorative paper I made a while back. It is a page of music which I stamped with a harlequin background stamp (SU) and embossed with clear embossing powder. I painted it with red watercolour and cleaned off the embossed areas once it was dry. I mounted it to a a black layer, added a strip of black paper with deckled edges, overlaid a strip of gray seam binding and turned the ends over the edge securing them with double sided tape. I stapled both ends as well to repeat the colour of my focal element and then glued this large element to my red card front. I created my focal element using an old foil baking pan which had been washed in the dishwasher too many times and also had some holes in it. I cut the pan into pieces using utility scissors and used one of the sides to die cut my tag (SX). I turned it over onto a piece of fun foam and used a pencil to create the textured design. I started by adding dots along the outside edge, next I added the frame on the main body along with the swirls around the hole. Next, I turned it over and positioned my felt heart embellishment and traced around it with pencil. I embossed the line with my pencil and then used a popsicle stick to create a depression on the inside of the heart. After that, I turned it over again and added all the swirls and dots around the heart inside the rounded frame. To create a bit of contrast I sanded the embossed areas on the front side which made them shinier than the rest of it. I love this embossed metal tag!! I added a length of red seam binding trimming the ends neatly, added my heart in the depression I created with a large glue dot and used 3D foam tape to secure it to my card front. I embellished my little laser printed greeting with watercolour and used double sided tape to adhere it into place after it was dry. Really happy with how this card turned out!
I have added an embossed metal tutorial here!!
Therese
I have added an embossed metal tutorial here!!
Therese
Tuesday, February 09, 2016
Embossed metal tutorial
Embossing metal is fun and easy requiring only a few items which you probably already have on hand. It makes creating customized 3D embellishments for your projects possible and they look so authentic.
First of all, you will need a piece of foil. It needs to be reasonably thick so I often use foil pans which can be bought inexpensively or you might even find in your recycle bin. You might also want to consider any foil seal you find on a variety of cans or containers. The one above came off of a coffee tin but you can sometimes find them on cans of nuts or yogurt. You will also need a block of wood. Here I am using a wood mount from a stamp which I have unmounted but it could be one from the toy box or the workshop.
Just rub the edge of the wood block over the foil to remove any wrinkles or embossing and make the surface nice and smooth.
Once it is nice and smooth, cut your shape out. Here I cut a circle for creating the badge I was making for a card. I used my Nestibilities but you could easily use any other die or even hand cut the shape you want.
Embossing requires a forgiving surface beneath your metal. Here I have used a piece of fun foam but a stack of newspaper works just as well.
I wanted a star in the middle of my shape so I centered a star die cut (SX) on the back of my shape and lightly traced it on to the metal using a pencil. You could hand draw your image or place a printed image over it and trace lightly to transfer the image to the metal. Be sure to reverse any image or words before you emboss so it will be right reading on the front.
Next, I embossed the image into the metal by tracing the shape with my pencil pressing medium hard. You have to be careful because if you press too hard you will pierce the metal. You are better off to trace the shape several times more lightly rather than to press too hard and risk making a hole where you do not want one.
You can see above what the star looks like on the front - the outline is raised up - embossed - in the metal.
I turned it over and embossed a few more details - dots, another frame and shapes in between the arms of the star.
This is what it looks like from the front. You can see here that I debossed (indented) the shapes between the arms of the star by applying pressure with my pencil from the front. So as you go on, you can choose to emboss from the back and deboss from the front any of the elements you wish to add to your creation.
You can see from the finished piece that I added some embossing inside the star as well as dots on the outside edge while I debossed all the shapes between the arms. You could certainly also choose to pierce your metal embellishment. I would suggest using a push pin over a stryrofoam tray to get uniform holes. I would suggest piercing from the front so that the ragged edges created end up on the back of your creation. Consider colouring your embossed metal embellishment using permanent markers like Sharpies or alcohol inks.
I used 3D foam tape to adhere my shape to my scalloped circle but you could also use brads, staples, stitching, nails or eyelets to secure your 3D embellishment once you have created it!!
Have fun!!!
Therese
Saturday, July 25, 2015
Distressed Victorian postcard
I created this postcard for a swap on one of my groups. We were each sent this image of a woman and given free rein to create with it!! The digital image was provided as well for those who wanted to print off a few copies for experimenting with before they started their project. I downloaded the image and sized it for my postcard then printed it on copy paper. I used packing tape to make a transfer which I applied to a music sheet that had been very lightly washed with watercolour.
Packing tape transfers are very easy - you need a laser printed image, clear packing tape and water. Trim your image close to the printing, lay a piece of packing tape over the image and burnish well. Next, soak the tape/image in water. Once the paper is softened put the transfer on a hard surface and rub off the paper which leaves the toner adhered to the packing tape. FUN and easy!! You can check this link for a tutorial.
Back to the project, I used markers to add colour to the back of the image (sticky side of the tape), trimmed the top and bottom of the transfer then applied it to the music sheet making sure there were no marks on her face. I burnished it well then ripped the paper on all four sides. I layered it this piece onto a piece of coordinating hand decorated paper and then onto black cardstock. Next, I created my background. I started with a 4" x 6" piece of scrap cardstock to which I glued torn scraps of embossed silver foil left over from a long ago project. Once the glue was dry, I applied colour using sharpie markers in purple, blue and black. I scribbled colour in a small area and rubbed lightly it to smooth out the marks. This process removed a bit of colour but I like the look - a bit distressed. I added the blue and purple first and then did the black a little more aggressively. I like the way the black remained in the texture of the foil. After I was done, I went back in and added more colour where I thought it needed a bit more. Very happy with the resulting background!! I adhered my layered image on the top portion using double sided tape and added a length of black lace below it gluing the ends to the back. I added double sided tape below the lace where I was putting the flowers and then added the flowers using large glue dots. I cut another piece of 4" x 6" cardstock and glued it to the back to nicely finish off my postcard. Really happy with how this project turned out. It will be off to my partner this week.
Therese
Packing tape transfers are very easy - you need a laser printed image, clear packing tape and water. Trim your image close to the printing, lay a piece of packing tape over the image and burnish well. Next, soak the tape/image in water. Once the paper is softened put the transfer on a hard surface and rub off the paper which leaves the toner adhered to the packing tape. FUN and easy!! You can check this link for a tutorial.
Back to the project, I used markers to add colour to the back of the image (sticky side of the tape), trimmed the top and bottom of the transfer then applied it to the music sheet making sure there were no marks on her face. I burnished it well then ripped the paper on all four sides. I layered it this piece onto a piece of coordinating hand decorated paper and then onto black cardstock. Next, I created my background. I started with a 4" x 6" piece of scrap cardstock to which I glued torn scraps of embossed silver foil left over from a long ago project. Once the glue was dry, I applied colour using sharpie markers in purple, blue and black. I scribbled colour in a small area and rubbed lightly it to smooth out the marks. This process removed a bit of colour but I like the look - a bit distressed. I added the blue and purple first and then did the black a little more aggressively. I like the way the black remained in the texture of the foil. After I was done, I went back in and added more colour where I thought it needed a bit more. Very happy with the resulting background!! I adhered my layered image on the top portion using double sided tape and added a length of black lace below it gluing the ends to the back. I added double sided tape below the lace where I was putting the flowers and then added the flowers using large glue dots. I cut another piece of 4" x 6" cardstock and glued it to the back to nicely finish off my postcard. Really happy with how this project turned out. It will be off to my partner this week.
Therese
Monday, October 06, 2014
Cards using ATCs
On Saturday, World Card Making Day, I spent some time in my craft room making some cards for donation. I decided to work with my stash of ATCs which usually makes the creation of a card quick and easy!!
These two embossed metal heart ATCs are ones I created years ago for trading. You can read more about them here!! I added a layer to each of them (black on left, orange on right), added them to red card fronts and stamped greetings.
I used alcohol backgrounds on both of these cards and ATCs from my collection!
I added a bit of script on the left hand one before I adhered the ATC along with a flagged greeting.
I love this ATC - a bit of a sewing theme!! I adhered the ATC to the card front and stamped a small greeting on the right hand corner. Love it!!
For the one on the left I added a multi layer background and a yellow one before I layered the ATC element onto the coordinating alcohol ink background and rust card front. I added a small stamped greeting to the right hand corner.
For a friend who needs to know that we are thinking of you her I have created an angel card using an ATC I created years ago for trading. You can check out the details here! I stamped the greeting on the watercolour background first, added it to my blue card front and then adhered my angel ATC equidistant from the top left hand corner. I like the way the colours coordinate so nicely!! I hope my little angel will be a comfort to her while she heals!!
Therese
These two embossed metal heart ATCs are ones I created years ago for trading. You can read more about them here!! I added a layer to each of them (black on left, orange on right), added them to red card fronts and stamped greetings.
I used alcohol backgrounds on both of these cards and ATCs from my collection!
I added a bit of script on the left hand one before I adhered the ATC along with a flagged greeting.
I love this ATC - a bit of a sewing theme!! I adhered the ATC to the card front and stamped a small greeting on the right hand corner. Love it!!
For the one on the left I added a multi layer background and a yellow one before I layered the ATC element onto the coordinating alcohol ink background and rust card front. I added a small stamped greeting to the right hand corner.
For a friend who needs to know that we are thinking of you her I have created an angel card using an ATC I created years ago for trading. You can check out the details here! I stamped the greeting on the watercolour background first, added it to my blue card front and then adhered my angel ATC equidistant from the top left hand corner. I like the way the colours coordinate so nicely!! I hope my little angel will be a comfort to her while she heals!!
Therese
Labels:
A2,
alcohol ink background,
ATC,
cards,
donate cards,
embossed metal,
stamping
Saturday, May 04, 2013
Little girl's birthday!!
I made this for a little girl who likes pink and purple! She is getting a little older so I decided to give her a more sophisticated version of her favorite colours!!
I used a lilac card front and layered on a floral embossed layer (CB) in a blue purple colour and added a strip of deep pink which I stamped with a butterfly image in a similar colour to give it dimension without too much contrast. I coloured the butterfly image (CLKER) with watercolour and added some shimmer using acrylic paint. Layered it onto an embossed silver foil scallop circle (yogurt seal), then onto a darker purple scallop and finally onto a medium toned scallop circle which were all cut with Nestibilities. I added both this element and the colour printed greeting to the card front using 3D foam tape. I did embellish the greeting with watercolour when I was painting the butterfly to ensure it would coordinate perfectly!!
Nestibilities are a great way to get perfectly sized elements for layering!!
Therese
I used a lilac card front and layered on a floral embossed layer (CB) in a blue purple colour and added a strip of deep pink which I stamped with a butterfly image in a similar colour to give it dimension without too much contrast. I coloured the butterfly image (CLKER) with watercolour and added some shimmer using acrylic paint. Layered it onto an embossed silver foil scallop circle (yogurt seal), then onto a darker purple scallop and finally onto a medium toned scallop circle which were all cut with Nestibilities. I added both this element and the colour printed greeting to the card front using 3D foam tape. I did embellish the greeting with watercolour when I was painting the butterfly to ensure it would coordinate perfectly!!
Nestibilities are a great way to get perfectly sized elements for layering!!
Therese
Friday, February 22, 2013
Metal embellishment for journal
Yesterday, we created our main decorative elements for our journals. I made available to the students a wide variety of elements - die cuts ( butterflies, bees, trees, birds, etc) and chipboard letters along with a wide variety of punchies (stars, circles, butterflies, flowers, etc) along with some pieces of mesh (window screening). They went through the elements, picked what they wanted and collaged them to a scrap piece of cardstock - 4 x 5.5. These elements provide the texture for the embellishment so it doesn't matter what colour they are or what they are cut from. After gluing everything in place we covered the surface in metal duct tape - two pieces with a seam down the middle. As we applied the tape we took the time to rub all the areas of the piece to help reveal all the glued down elements. Then, we used a dull pencil to follow the contour of each piece to highlight it and really start creating texture. It was then time to add texture to all the flat areas by simply drawing with the pencil using some pressure to indent the metal tape. We added lines, squiggles, shapes, cross hatching - just a lot of doodling and also impressed some areas of the mesh to create even more detailed texture within those areas. You can see that I was able to add details to the bee by just outlining the different areas. Once they were happy with all their doodling we covered the whole surface using a black permanent marker. Then, we used a paper towel and some elbow grease to remove as much colour as we wanted from the surface. The colour remains in the nooks and crannies of the piece to provide some great contrast and create some depth. Lots of fun!!! I die cut mine with the TH Ornamental die but some have chosen to keep the rectangle shape.
You can piece the metal tape for a more rustic and industrial look like I did when I created this frame. You can use a variety of inks and paints for colouring the recesses and it doesn't have to be black - any colour will give you a really different look.
Therese
You can piece the metal tape for a more rustic and industrial look like I did when I created this frame. You can use a variety of inks and paints for colouring the recesses and it doesn't have to be black - any colour will give you a really different look.
Therese
Saturday, March 10, 2012
Cards with calendar page art
This week we finished our calendars so I prepared cards kits for the students to work on for the last two classes.
Here are some of the cards I put together with pieces I had previously prepared for the art calendars. I was working with a 4.25" x 5.5" format so I simply trimmed their edges with decorative scissors and glued them to coordinating card fronts.
The embossed leaf was in my stash so I combined it with decorative paper and
coordinating cardstock then added a short piece of ribbon with a mini staple tocreate a card!!
We also played with shrink plastic which is always a hit with the students.
Therese
Here are some of the cards I put together with pieces I had previously prepared for the art calendars. I was working with a 4.25" x 5.5" format so I simply trimmed their edges with decorative scissors and glued them to coordinating card fronts.
The embossed leaf was in my stash so I combined it with decorative paper and
coordinating cardstock then added a short piece of ribbon with a mini staple tocreate a card!!
We also played with shrink plastic which is always a hit with the students.
Therese
Labels:
A2 cards,
brads,
cards,
embossed metal,
embossing,
embossing folder,
fibers,
glitter,
handmade paper,
postage stamps,
ribbon,
sequins,
staples
Monday, March 05, 2012
Embossed metal art
This piece of art features an embossed metal flower which the students created in this class. It is layered onto an embossed oval (NS), an embossed silver foil label (TH) and then layered onto a piece of my new restructured paper which I also embossed!!
I love the splash of colour created by the brads and the oval in contrast to the neutrals of the background and the glitz of the foil!!
This is the twelfth piece of art for the calendar so we will be putting it all together this week!! Everyone will be able to decide which piece of art will be featured on each month so their calendars will be unique.
It has been really fun to come up with the layouts for all of these little pieces of art.
Therese
I love the splash of colour created by the brads and the oval in contrast to the neutrals of the background and the glitz of the foil!!
This is the twelfth piece of art for the calendar so we will be putting it all together this week!! Everyone will be able to decide which piece of art will be featured on each month so their calendars will be unique.
It has been really fun to come up with the layouts for all of these little pieces of art.
Therese
Friday, February 24, 2012
Embossed metal art
Here is the first piece of art I designed for the calendar I am creating with my class of young adults. I provided them with several foil shapes and they embossed them with their own designs. For this page they embossed a design around a teal paper confetti flower. Embossing foil is easy. Simply place it upside down on a piece of folded newspaper to provide a bit of cushion and draw your design using a pencil. In this case, we confined our designs to the inside of a frame which I had already embossed with an embossing folder. We glued a small sheet of pink paper to a quarter sheet of teal paper and added our embossed metal art to the pink using 3D foam tape. We then added a rhinestone brad to the flower by piercing through all the layers. This will help to provide integrity to the whole piece when we add it to the calendar page.
Therese
Therese
Saturday, May 28, 2011
All Occasion cards - butterfly
I love this butterfly!!! A recent acquisition created by Marianne Designs and sold at Ecstacy Crafts!! I started by stamping a subtle background on my card and added a free form border with a fine tipped Sharpie marker. I added a layer of embossed metal tape which was trimmed with decorative scissors then layered on this beautiful butterfly using double sided tape only to its middle so its wings are free to flutter. To finish it off I added three little black punchies (1/4" circle punch) to the lower edge and a flight trail below the butterfly with the black marker!!
It can be difficult to cut a die with this intricate a pattern and get all the pieces to come out of the die when removing the die cut. I have found that using a layer of wax paper between the die and the cardstock really helps though it does not completely prevent having to pick some of bits out of the solid backed die!! But, it is so worth it!!
I applied the metal duct tape to some scrap cardstock which gave it some substance before I embossed it.
Therese
Labels:
A2 cards,
Cardmaking,
cards,
die cuts,
drawing,
embossed metal,
embossing,
embossing folder,
punchies,
sharpie markers,
stamping
Sunday, January 30, 2011
Technique book pages - metal embossing
So here is what I created while playing at embossing metal!! I have done this several times before and found it such a cool way to add interest and personality to a project!!This one features metal tape over cardstock and embossing in an embossing folder to which transparent acrylic paint has been added. The heart is die cut and hand tooled with a design and letters which have to be inscribed on the back - backwards - to be right reading on the front. It is attached with 3D foam tape.
These are my pages featuring embossed metal. Top row - metal tape over cardstock and embossed with an embossing folder, four different metals (yogurt, applesauce and nut can seals) embossed using texture plates using silicone mat in a die cutting machine, metal tape over cardstock and embossed with an embossing folder with a hand tooled foil pie plate heart diecut. Row two - flower aluminum can die cuts embossed in embossing folder and layered, flower aluminum can die cuts embossed in embossing folder, aluminum foil pie plate hand tooled through a stencil. Row three - aluminum can die cut flower embossed with embossing folder and a hand tooled applesauce foil seal, hand cut aluminum can seal hand tooled, yogurt container seal hand tooled with a circular design. The colour was added to all using transparent acrylic paint. You can buy metal for tooling but I find there quite a few options for reusing foil that is readily available such as seals from yogurt, applesauce, cans of nuts and tea. Certainly, foil bakeware can be purchased locally and provides a heavier metal for working with. Aluminum drink cans are yet a little heavier and also readily available though I would caution being careful of sharp edges when cutting cans apart. The metal foil tape can be purchased at hardware stores and depending on the weight may need to be supported by cardstock. Be on the look out for metal items that can be embossed such as copper plant tags, etc.
I have used a pencil for tooling my designs. Consider a pen, knitting needle, crochet hook, blunted skewer, paper or wood stump. Almost any object with a blunt rounded end will do the job. Of course, embossing folders, texture plates and crimpers do the job in a heart beat. Consider using a rubber mallet to emboss the metal in the embossing folders.
You will need a soft surface for embossing - I use just a small stack of newspapers. You want something with just a little give so you don't pierce your metal. A foam placemat, mouse pad or stiff fun foam would also work.
I used a homemade acrylic paint for adding colour. You could consider any of the transparent window paints recommended for suncatchers. Alcohol inks, glass paint, Sharpie markers, acrylic inks, fluid acrylics and thinned acrylic paints would also do the job.
If you would prefer not to tool your own design onto the metal consider using printed clipart, a stamped image or a stencil. Stained glass designs work well to start because of their bold style.
To get started, place your metal right side down on your soft surface and use your tool to create a design. Turn it over to see how it is coming along. There is no such thing as an eraser per se but I have used a wooden spoon or wood handle from a spatula for removing all the embossing and started over. You will see that there is an embossed and debossed side to each piece. You can choose the one that you like best. You can create backgrounds, embellishments and focal elements using metal!!
There are coloured foils which can be embossed and then sanded for a great look. Check out this video for a really cool project!!
So save a few pieces of metal from your daily life and see what you can create using what you have on hand - a newspaper and pencil at the very least - a put a little more of yourself in your next project!!
Therese
Saturday, November 06, 2010
Christmas cards - heart
I really like the contrast of red and white in this card!! It features a metal heart embellishment which I attached to the greeting layer using glue dots and features a simple little snowflake in the center oval to finish it off. The little red snowflake is a punchie produced when I created the snowflake border. I created the greeting in a layout program (CorelDraw) and colour printed it!! The white layer below the red snowflake border is actually flocked ribbon which I cut with a Borderabilities die by Spellbinders. The back of the ribbon was a bit shimmery and had been embossed by my cutting plate which made it interesting, so some of the girls used that to the front instead of the flocked side. Love that others think differently and are willing to do what works for them. I really love these hearts and it took a while to come up with a design that I was pleased with and showed it off nicely!! Mission accomplished!!
The border punch (MS) is actually called a daisy punch which was a surprise to me when I took it out of its package because I bought it thinking it was a snowflake punch so I guess it will be more versatile than I originally had thought it would be!!
Therese
Friday, April 30, 2010
Handmade Paper cards and holder #2
These cards also feature the same handmade paper!! The one on the left features a thermally embossed flower which the students coloured with chalks once their cards were finished. It was layered onto colour cardstock and features a flower embellishment. I created the embellishment using two Cuttlebug die cuts - the solid one from coloured vellum and the outline cut from metallic chipboard. They were layered onto each other, highlighted with a sequin then attached to the card front with a coordinating brad.The right hand card features an embossed metal heart which was die cut from a heavy foil pie plate. The students embossed their hearts as they wished using a pencil and a newspaper pad. Once embossed, it was mounted using 3Dfoam tape on a double layer of cardstock which was previously glued to the card front. The ribbon features a pop can tab as a buckle which was a great accent with the embossed metal heart.
Therese
Tuesday, March 09, 2010
Chunky Art Book - # 10 - embossed heart
Colourwashed background paper, doodled border, border punched strip with stamped images, embossed metal heart and word sticker.Created the word stickers using the laser printer, word processor, Dymo font and labels. Fun to play with fonts!! This heart was not painted - liked the texture of it just the way it was so it stayed silver. The heart charm is added with red eyelash fiber.
Therese
Labels:
border punch,
doodling,
embossed metal,
hand decorated paper,
stamping,
stickers
Monday, March 08, 2010
Chunky Art Book - # 2 - cultivate compassion
The background paper was one where white paint was added to a colour washed paper. The page features a metal embossed flower with a little red heart lady bug, a strip of layered cardstocks with a heart punchie and an embellished gold embossed quote. The embossed metal sunflower is mounted with 3D foam tape to keep it dimensional. I added dotted swirls with a Sharpie to just finish off the page once all the elements had been adhered.One of our art sessions was spent creating embossed metal accents. I provided pieces of foil (the weight of pie plates) and they used pencils to emboss a design in the surface using folded newspaper for padding. Once finished, they were painted with "acrylic paint" using q-tips and left to dry over the weekend. I created the "paint" using acrylic finish and stamp pad reinkers - worked very much like those sold for painting suncatchers. I like using quotes and words in my layouts. Some of the students featured quotes on their pages - others used a combination of papers and elements to create their layouts.
Therese
Friday, February 19, 2010
Cardmaking - Feb - pouffy flower card
Another month has come and gone!! Had my cardmaking session this past week!! Time is flying by!!We created these cool little pouffy flowers for these cards!! Eight scallop punchies (SU) of tissue paper stapled in the center to a cardstock scallop punchie is all it is!! Scrunch your scallop punchies, flatten, stack and staple. Once stapled you scrunch the first one really hard to the middle and then each subsequent one gets the same scrunch until you have done them all. Makes a nice 3D accent for any crafty item you might be creating. I added little leaves - SU five petal punchie cut apart!! Too easy. I got my inspiration from this posting from Mercy's blog. I layered that onto a metallic silver square and then onto a decorative edged white square. The middle accent is a strip (1.5") of white cardstock punched on both sides with the MS doily border punch. On the first card I added some flowers to the strip and some dimension to the leaves with watercolour. The bottom of the card has a layer of metal tape - heat duct tape from the hardware store - glued to the bottom edge and then embossed with D'vine Swirl (CB) embossing folder.
The flowers flatten fairly easily so they should go through the mail fairly easily. You could add a note to the card that the flower needs a little scrunching to look its best.
Therese
Subscribe to:
Posts (Atom)