Showing posts with label papercast. Show all posts

Wednesday, February 19, 2020

Christmas cards featuring red and blue plaid paper, a variety of images & greetings and some ribbon

I am committed to making Christmas card regularly over the course of this year so I will have them ready by December when I need to have them mailed out.  I decided to use up a piece of foil gift wrap that was around one of our gifts this past season.  It is a red and navy plaid so I just cut what was usable from the piece and got eight 3.75" squares.  I found cardstock that coordindated  - one red and one navy and cut eight cards and the corresponding navy layers for each card.  I dug through my Christmasimage stash and found a few that would work with this sketch and colour scheme.  I also dug through my stash of Christmas greetings and found some that would also work.  I created the cards one at a time after that.
The first one features a Melonheadz image of Santa and the baby Jesus.  I trimmed the image into a square, watercoloured it and added faux stitching all the way around using a permanent marker.  I mounted the navy layer to the red card, added the plaid paper square then mounted the image over the paper using 3D foam tape.  I added a strip of the same red cardstock below the image and mounted my laser printed greeting over it using 3D foam tape.
The second one has a similar sketch.  I added a length of white seam binding to the navy/plaid paper layer before mounting my sleigh image (Black Berry Jelly) with 3D foam tape.  It is watercoloured, glittered and layered with navy cardstock. The greeting is stamped in blue, layered on red and flagged on the right hand side and mounted with 3D foam tape.
The third one features a snowman paper cast which I made a long while back to which I added a little turquoise snowflake with a tiny silver brad.  The paper has turquoise lines which only show when you look at it from an angle.  The laser printed greeting is layered with red, has a folded ribbon on the right hand side and is mounted below the focal image with 3D foam tape.
The fourth one is a bit of a departure from the sketch.  Because the image was larger I tore the square in two and mounted the two pieces to the top and bottom of the navy layer.  I watercoloured the angel (SU) and ran the tracing wheel on all the edges before mounting it to the layer with 3D foam tape.  I punched a Modern Label layer from a scrap of foil turquoise paper which is glued to cardstock to make it stiff enough to mount.  I added a small laser printed turquoise greeting.  I mounted the greeting overlapping the image and added a bit of 3D foam tape to the bottom edge when it attaches to the background.
The fifth card has the plaid paper adhered to the navy glued to the red card.  I layered a die cut nativity image (reused card) onto a white scalloped circle (Nestibilities) which I mounted with 3D foam taper for the plaid paper.  I layered the stamped greeting (SU) with red and mounted it with 3D foam tape.  To finish it off I added a length of white seam binding below the elements and adhered the ends to the inside of the card with double sided tape.
The sixth one has a very similar layout featuring a layered image of a couple of friends out for a walk in a winter wonderland (reused card) layered onto a white scalloped circle with a laser printed image layered with red below the plaid square.  I trimmed the red cardstock with decorative scalloped scissors, paper pierced the scallops and added a couple of embossed lines to each side of the greeting.
For the seventh one, I embossed the navy layer and mounted the paper over it.  Not the best idea with foil paper.  I layered the image of a beautiful house all ready for Christmas (reused card) with turquoise and mounted it this layer using 3D foam tape.  I adhered this large layer to the red card.  I layered the laser printed greeting with red before mounting it to my card front using 3D foam tape.
The eighth and last card features a small die cut ornament in navy.  I used glitter pens to colour the top and the wavy band and added dots of clear glitter to the rest of the ornament.  I mounted it to a white embossed strip with 3D foam tape, added a red ribbon to the top and flagged the end of the strip before mounting it to the navy/plaid paper layer.  I added clear glitter faux stitching all the way around the navy layer and below the plaid paper.  I trimmed a laser printed greeting, layered it with red, flagged both ends and added some embossed lines on each side before mounted it to my card front.
It was really fun to be back making Christmas cards after a bit of a break.  I am very happy with how they all worked out and that they are all a bit different.               Therese

Tuesday, November 26, 2019

A Christmas card featuring a white snowman paper cast, an sanded embossed background and a snowflake embellishment

For this card I started with the little paper cast of a snowman I found in my stash!!  I will have to make more of these as they are so beautiful!!  I embossed and sanded a piece of blue white core cardstock which nicely simulated a snowy sky.  I adhered my little paper cast to the background and added a layered snowflake with a tiny white brad to the background.  I mounted this large element to a white card for finish it off!!

Therese

Thursday, November 10, 2016

A fun card for a new home owner

A friend of mine has just bought her own place and so I made her this card in recognition of her accomplishment!!  The house image was cast into a sheet of white handmade paper many moons ago but was just perfect for this card.  I layered it over a red and kraft decorative paper on a red card front and stitched it into place using red thread  and incorporating a little punchie in the left hand top corner in the process.  A quick and easy card!!  I wish her every blessing in her new home!!!

Therese

Thursday, September 29, 2016

September Cardmakng - Handmade Paper Cast featured on these arty cards

 I created the handmade paper casts using white paper pulp and my own moulds which I made using hot glue.  I love the texture of them and so after finding a little collection of them I decided to feature them as the quick card for this cardmaking session!
I chose appropriate cardstock and trimmed the pieces to 4" x 5.25" and embossed them with an appropriate embossing folder.  I used a bit of double sided tape to adhere my paper cast to the layer and another little piece to adhere my greeting to the paper cast and then used my sewing machine with white thread and stitched all the way around capturing the greeting in the process!  I love adding stitching to my cards!!  To finish off the cards, we simply glued this stitched element to a coordinating card front.  I like the little greetings which help show off as much of the paper cast as possible!!

UPDATE:

A few more Christmas ones!!


And a few more that were included in the kits from last week's class!  Love the simplicity of these cards!!

Therese

Tuesday, April 15, 2014

Paper cast card for a swap

Joined a swap on AFTCM which involved creating a card that featured a paper cast made out of toilet paper.  I have made paper casts from bond paper in the past but have never tried this method so I did a bit of online research and found this tutorial.  I used an unmounted Magenta rubber stamp which I placed design side up on a plate.  I placed one sheet of toilet paper over it and used a wet sponge to mould it to the surface of the stamp.  I repeated this process six more times.  To get fine details in the final piece it is necessary to really get the paper into the recesses of the stamp so I used a little brush to tamp down the paper and left it overnight to dry.
Once dry, I applied a little bit of watercolour to highlight the flowers, leaves and ribbon. I was careful not to add too much water as it would dissolve the details in the paper cast.  I dried it with my heat gun and sprayed it with hair spray to protect it.  I trimmed the outside edge into a large oval shape.
I used a dark pink card front, added a black label and mounted a blue embossed frame over it which had been cut with the same label die (SX).  I added a dark pink ribbon across the middle and glued my paper cast over it framing it nicely in the opening.  Paper casts created with this method would be prone to delaminating so I added a few stitches through the paper cast to attach it more securely to the card front.  To finish it off I added a layered greeting using a word window punchie (SU) over a modern label punchie (SU).  I did find some tutorials which recommended adding glue to the water you used which would help prevent the delamination and would add some strength to the paper cast which may be a good idea for next time.  On hindsight, I expect that chalk would have been a very effective way of adding colour as well.
It is always fun to try new things!!  

Therese

Thursday, May 20, 2010

KN - Handmade paper cards

I created these cards for a new venue - Elacyn Designs - a new store contained in the Knitting Nimrod Collective yarn store - a very cool place with LOTS of very cool fibers!!
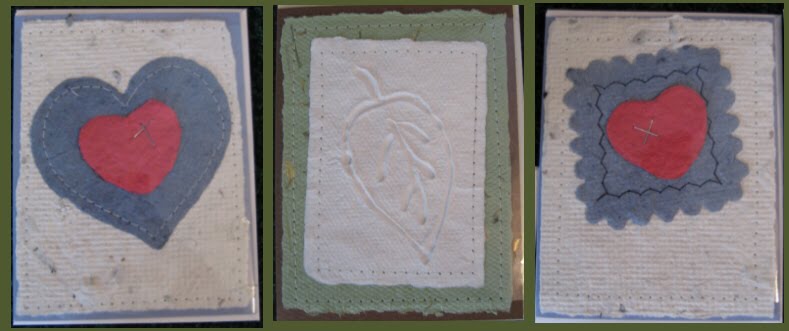
These feature handmade paper shapes which are sewn to handmade paper sheets sewn to the cardstock fronts!! The hearts have been stapled to the shape before sewing. The middle one features a leaf paper cast done in white handmade paper! I love sewing handmade paper and am planning to do more of it!! I brought a selection of cards which featured handmade paper which you have seen previously on my blog.

The next few posts will feature product I made for the store!!

Therese

Friday, November 20, 2009

My Art - Cardmaking - snowman

I so loved this handmade paper when I made it!! Looks like large fluffy snowflakes coming down from the sky!! I knew I wanted to use it with a snowman!! I used an acrylic ornament to create a papercast of this great little snowman just the size I needed for this card!! I attached my handmade paper to my card front and used hot glue to attach the snowman paper cast. Added some white fiber on the left hand side with a snowflake punchie and a white snowflake brad. Added another snowflake punchie to the lower right hand side with a regular white brad.

I love the handmade look of this card and the soft white of the papercast!! I will be making more handmade paper with confetti to create this look of falling snow!!

Therese