Once I got started making these backgrounds with the paper strips it seemed so easy to just make a few more!! The background is created by gluing paper strips to white bond and trimming it down to the shortest strip. After embossing it, I layered it onto a yellow card front and added the green embossed strip. I went looking in my scraps to find an image - this little patchwork horse (Beccy's) was perfect. I watercoloured it then layered a couple times and added glitter glue to the scallops of the white circle. The greeting I also found in my stash and I embellished it with this beautiful yellow fiber which was just what I needed to finish off this wonderful baby card!!
Never know when you are going to need one of those so it will go into my card stash for now!!
Therese
Friday, September 13, 2013
Thursday, September 05, 2013
Four season Thank you!
This card is for a couple we met on that August weekend. They were so welcoming and friendly - we felt right at home!!
I found this image (Magenta) in my stash and watercoloured it! I love how it features the four seasons!! Once coloured, I layered it onto green and mounted it to my embellished card front using 3D foam tape. The card front was stamped with a stipple stamp and layered with two strips on the left hand side. After mounting my image I added three dots of green on the blue strip and added the layered greeting (SU).
I love watercolouring and this was a fun image to colour!!
Therese
I found this image (Magenta) in my stash and watercoloured it! I love how it features the four seasons!! Once coloured, I layered it onto green and mounted it to my embellished card front using 3D foam tape. The card front was stamped with a stipple stamp and layered with two strips on the left hand side. After mounting my image I added three dots of green on the blue strip and added the layered greeting (SU).
I love watercolouring and this was a fun image to colour!!
Therese
Fall Thank you card
A thank you card for someone who hosted us at the beginning of August and I just remembered today that I should get a card out to him. Life should not get so hectic that we forget to be grateful and express that to those close to us!!
This was a quick and easy card! I dug into my stash buckets and found this sunflower image, the beautiful background paper, a coordinating greeting and some sparkly blue fiber to finish it off!! I added several colours using glitter gel pens to my watercoloured image but is does not show up well on my photo. The background paper has some silver accents and the fiber has a thin copper line in it!
I am happy with how all of it came together and it is on its way tomorrow!!!
Therese
More little quilts!
I have been working on these little quilts on our various trips in the car this summer!! They were inspired by Teesha Moore's little quilts which she has used for making up journal covers. Here and here are the ones I made previously. It is only a little stash so far but I am happy with my little collection.
These were made up of cotton fabrics and I found them so much easier to sew.
I am looking forward to having enough to make up a journal cover - maybe by the summer of next year.
This is a great way to use up scraps of fabric that are left over from quilting or even from clothing that you no longer wear or have been ruined with a stain (bleach!!)
Therese
These were made up of cotton fabrics and I found them so much easier to sew.
I am looking forward to having enough to make up a journal cover - maybe by the summer of next year.
This is a great way to use up scraps of fabric that are left over from quilting or even from clothing that you no longer wear or have been ruined with a stain (bleach!!)
Therese
Tuesday, September 03, 2013
Sympathy cards
I have created three sympathy cards to have on hand. I thought it easier to make some now than wait until I really needed one. I used the same angel image for all three which I dug out of my stash. These photos were laser printed on transparency and trimmed.
For the first card, I layered the image on a very light decorative paper which I ripped on the right hand side and then onto a light ivory card front. I added four yellow brads to hold the image in place. I punched a hole in the card front and then used the same punch to created a slot in the fold of the card through which I threaded a length of yellow seam binding and double knotted it on the front. I added a double layered greeting using 3D foam tape and then trimmed the ends of the seam binding.
For this card I chose another low contrast decorative paper and trimmed it with a large margin all the way around. I sponged it with ink and then attached my image using two yellow green brads. I had just enough room to add some ruffled seam binding to the bottom along with a double layered greeting in coordinating colours. The ruffled seam binding is easily done - apply a piece of double sided tape across the area and then start applying the seam binding to the sticky surface adding folds and bumps as you go.
For this card I chose another subtle decorative paper and cut it to 4"x 5.25". I layered on the image and attached it with two rust brads and then wrapped a length of coordinating fiber to the right hand side and tied it with a double knot. The laser printed greeting has been punched with the window punch (SU) and then layered onto a modern label punchie (SU).
I am glad to be able to add a few sympathy cards to my stash. It is always good to let people know you are thinking about them when they lose a loved one!
Therese
For the first card, I layered the image on a very light decorative paper which I ripped on the right hand side and then onto a light ivory card front. I added four yellow brads to hold the image in place. I punched a hole in the card front and then used the same punch to created a slot in the fold of the card through which I threaded a length of yellow seam binding and double knotted it on the front. I added a double layered greeting using 3D foam tape and then trimmed the ends of the seam binding.
For this card I chose another low contrast decorative paper and trimmed it with a large margin all the way around. I sponged it with ink and then attached my image using two yellow green brads. I had just enough room to add some ruffled seam binding to the bottom along with a double layered greeting in coordinating colours. The ruffled seam binding is easily done - apply a piece of double sided tape across the area and then start applying the seam binding to the sticky surface adding folds and bumps as you go.
For this card I chose another subtle decorative paper and cut it to 4"x 5.25". I layered on the image and attached it with two rust brads and then wrapped a length of coordinating fiber to the right hand side and tied it with a double knot. The laser printed greeting has been punched with the window punch (SU) and then layered onto a modern label punchie (SU).
I am glad to be able to add a few sympathy cards to my stash. It is always good to let people know you are thinking about them when they lose a loved one!
Therese
Monday, September 02, 2013
Autumn beauty!
A card for a special person! She loves autumn colours so I incorporated them as much as I could in her card. I started with strips of brown patterned paper which I glued to a quarter sheet of white bond. I trimmed it to fit on my card front, embossed it and added a bordered punched layer in a peachy colour to which I had added some peach seam binding by gluing it down all ruffly like over a piece of double sided tape! Love the way it worked out. I trimmed the lower edge using pinking shears - really old ones that no longer cut fabric - and then pierced each little triangle. I watercoloured the gold embossed flower image and the greeting to coordinate. To add a nice little accent and some texture I added a die cut button tied with embroidery thread over a couple of leafy green punchies (MS). I did use the back side of the punched border to stencil the top of the card - just a little more texture for good measure!!
I will be seeing her soon! Looking forward to giving her this wonderful card!
Therese
I will be seeing her soon! Looking forward to giving her this wonderful card!
Therese
Saturday, August 31, 2013
Pink butterflies!
I created this card for someone special who is becoming a teen!!! I used paper strips in two different pink patterns and glued them to a layer of white cardstock trimmed to fit on my pink card front. I added faux stitching to the left hand side with a white gel pen. I trimmed notches into all the ends for a cool look. I punched the butterflies out after I had glued down the strips which was not very convenient. Next time I will position and trim my strips, mark where I would like holes and then punch each strip individually before I glue them down. I added tape to the back of one of the punched holes and applied pink glitter to the front. I applied glue through a stencil (punched shape in cardstock) and applied glitter to the glue. Not the best result because my substrate was a bit too thick to get good glue coverage but it does add a bit of sparkle. I punched a few white butterflies and added them. Also glued several of the pink butterfly punchies to the white layer and added some dots with a pink gel pen. I added a window punchie greeting (SU) using two white brads.
I am really happy with how this card came together and I love the the look of it.
I started out wanting to use up some of my scraps - 3/4" strips which I had cut out previously for making paper beads for one of my classes last year. I will be working on some other cards that feature strips in the next little bit!!
Therese
Thursday, August 29, 2013
Light house card
The last card I included in my set of gift cards.
I started with a navy card, added this cool piece of paste paper which I created years ago, added a strip of distressed yellow cardstock, wrapped some coordinating yellow fiber around the card front then added my layered light house photo (taken in PEI). This greeting matched perfectly so I trimmed it, layered it onto navy and attached it with 3D foam tape.
I am enjoying making "one of" cards!! I can use supplies from my stash of images, papers and fiber to create some unique cards!!
I forgot to take a photo of the wrapped cards. I used a square of decorative paper folded into an envelope and tied with fiber. Check out this posting to see another example and a template.
Quick and easy!!
Therese
I started with a navy card, added this cool piece of paste paper which I created years ago, added a strip of distressed yellow cardstock, wrapped some coordinating yellow fiber around the card front then added my layered light house photo (taken in PEI). This greeting matched perfectly so I trimmed it, layered it onto navy and attached it with 3D foam tape.
I am enjoying making "one of" cards!! I can use supplies from my stash of images, papers and fiber to create some unique cards!!
I forgot to take a photo of the wrapped cards. I used a square of decorative paper folded into an envelope and tied with fiber. Check out this posting to see another example and a template.
Quick and easy!!
Therese
Colourful flower card
The image was stamped over a hand made transparent acrylic paint background with black pigment ink and embossed with black embossing powder. I really like the way the high contrast silhouette of the image works with the background and how the fiber adds some softness.
An any occasion card!!
Therese
Angel card
Another card for giving!! I found the angel (laser printed on transparency) in my stash. This blue glittery hand decorated paper I made a while back worked well with the image and I found this greeting that did the same. I attached the image to the decorated paper using black mini brads, tied on some black fiber and then glued the whole element to a black card front. I ripped the edges of the saying, chalked them then added it to the card front using 3D foam tape overlapping the fiber.
It was fun to work with fiber again!! It is amazing how many options there are for decorating cards!!
Therese
It was fun to work with fiber again!! It is amazing how many options there are for decorating cards!!
Therese
Labels:
A2,
cards,
chalks,
fiber,
laser printing,
stamping,
transparencies
Cat card
I have been working on a set of cards to give a good friend who has been taking care of my garden (four tomato plants, some herbs and an orphaned spruce tree) over the last few months. I so appreciate her willingness to help me and really wanted her to know it.
This is the first card I made. I received both images in swaps years ago and always thought they would go well together. I trimmed the stamped image of the cat (unknown) and used a black permanent marker to add a nice layered look to the edge. I trimmed the fish bone background (Magenta), layered it onto red and then added it to the black card front. I glued the little laser printed greeting that I found in my stash to the back of the cat image and glued it to the front of the background. I really considered colouring the image but in the end decided I liked the simple look of black and white with one colour.
I would highly recommend giving all your non cardmaking friends some handmade cards!! They are useful creative gifts which can give as a unit or sending along to their family and friends!! It is a win-win gift!
Therese
Monday, August 26, 2013
Handmade paper
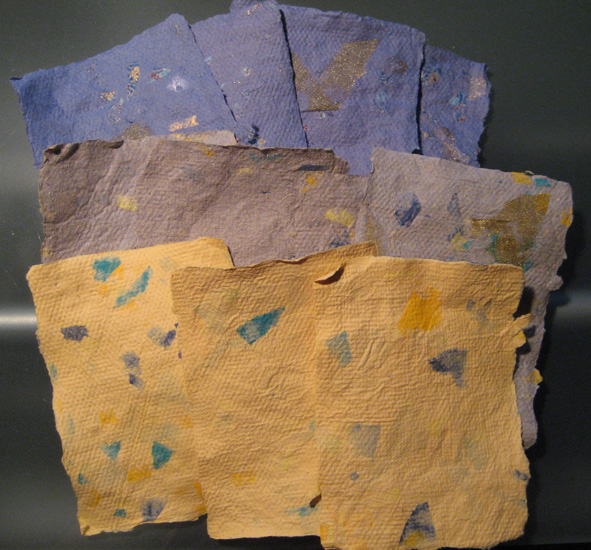
Our last day we made some handmade paper!! I had brought the paper pulp ready to go - blue and yellow. We started with the blue and chose the additions from a variety I had brought along and made a few small sheets of paper (3.5" x 4.5"). We drained off the blue from the vat and added the yellow pulp to which we added a variety of paper napkins snippets and made a few more sheets. We then added the left over blue pulp to the yellow we had in our vat and made the "green" ones. They are not as green as we were expecting and certainly were looking quite unappetizing when they were wet.
Not sure what she will do with her sheets!! I may see if I can make some Christmas cards with my blue ones because they have some nice gold scraps in them. The yellow ones are nice and bright and lend themselves nicely to floral cards. The "green" ones will need some creativity to turn them into cards. They may get a wash of colour to help them along at some point!!
A week of fun and creativity!!
Therese
Not sure what she will do with her sheets!! I may see if I can make some Christmas cards with my blue ones because they have some nice gold scraps in them. The yellow ones are nice and bright and lend themselves nicely to floral cards. The "green" ones will need some creativity to turn them into cards. They may get a wash of colour to help them along at some point!!
A week of fun and creativity!!
Therese
Serendipity and more cards
I introduced my young cardmaker to serendipity!! There are always little pieces of paper around when you have crafters and their house is no an exception. I had brought along a variety of gold, red and green scraps (gift wrap, decorative paper, tissue paper, candy wrappers, card fronts, handmade paper, hand decorated paper,etc) which I culled from my stash. I had already ripped them into small pieces so all that was left to do was to glue them down onto quarter sheets of scrap cardstock. It matters not at all what the cardstock looks like
because in the end it is completely covered with scraps so you can easily use pieces that were botched with stamping or incorrectly printed or even junk mail if you want.
I made three pieces of serendipity paper and used parts of the third one to make these two cards. I cut one strip of about 3/4", then trimmed it into squares which I layered onto several layers of coordinating cardstock to create the accent for this card. I distressed the edges of the layers and added texture to the card front using pencil crayons.
For this card, I trimmed a large piece of serendipity into strips and layered them over two pieces of red cardstock on a yellow card front. I discovered this ART stamped image which I coloured to coordinate with my colour scheme and then highlighted the letters with pencil and the black pencil crayon. I added a little self adhesive vellum greeting on the lower left hand side.
She loved making serendipity sheets and cut different shapes out of hers.
Just goes to show you that even with basic supplies you can create some interesting and effective cards!
Therese
because in the end it is completely covered with scraps so you can easily use pieces that were botched with stamping or incorrectly printed or even junk mail if you want.
I made three pieces of serendipity paper and used parts of the third one to make these two cards. I cut one strip of about 3/4", then trimmed it into squares which I layered onto several layers of coordinating cardstock to create the accent for this card. I distressed the edges of the layers and added texture to the card front using pencil crayons.
For this card, I trimmed a large piece of serendipity into strips and layered them over two pieces of red cardstock on a yellow card front. I discovered this ART stamped image which I coloured to coordinate with my colour scheme and then highlighted the letters with pencil and the black pencil crayon. I added a little self adhesive vellum greeting on the lower left hand side.
She loved making serendipity sheets and cut different shapes out of hers.
Just goes to show you that even with basic supplies you can create some interesting and effective cards!
Therese
Labels:
A2,
A2 cards,
colour pencils,
distressing tool,
serendipity,
stamping
Cards with basic supplies
Here I coloured my image before I scoured the pile of card fronts and was left having to put my accent piece onto a green card front. It works reasonably well but I think pink or purple would have been better. The digital image is from Beccy's, and laser printed. I used coloured pencils to colour it. I taught my young friend to distress the edges of the cardstock layers using the cutting edge of the scissors. She liked that a lot!! Here I distressed the edges of my layers and added a bit of detail to the greeting as well. I used pencil crayons to add texture to the card front in several colours that worked well with the image.
For this card I coloured the heart, added dots in black pencil crayon to simulate small brads on both the image and the greeting and again embellished the card front with several different colours of pencil crayon to add texture.
Here I coloured the bear and knowing that I had red scraps to layer the image coloured the ribbon and heart in red as well. I distressed one of the red scraps and added to my card front below the greeting. I highlighted the bear using a pencil and black pen to give it more definition and that really helped with the eyes as well.
For this card I found this coloured image and found the decorative paper in the recycle bin which I was very happy to find matched very closely. I trimmed the binding edge off of one of the cardstock pieces and used it as a design element below my layered image. I hand trimmed the greeting and layered it twice to help it stand out.
I found a scrap of adhesive fun foam which we cut up and used instead of 3D foam tape to pop our images.
I used the pencil crayons to add colour and texture to my decorative paper as well as the cardstock.
Again, I used the decorative paper which we found in the recycle bin. It has been creased so I just decided to wrinkle it up completely and then used pencil crayon to highlight the folds. knowing I had a blue card front for this card I decided to colour the scarf in similar colours. The image is from Melonheadz Illustrations!! Again, I simulated brads using a pencil crayon and added a trimmed binding as a design element.
We had a wonderful time and made a few other crafts as well.
Therese
For this card I coloured the heart, added dots in black pencil crayon to simulate small brads on both the image and the greeting and again embellished the card front with several different colours of pencil crayon to add texture.
Here I coloured the bear and knowing that I had red scraps to layer the image coloured the ribbon and heart in red as well. I distressed one of the red scraps and added to my card front below the greeting. I highlighted the bear using a pencil and black pen to give it more definition and that really helped with the eyes as well.
For this card I found this coloured image and found the decorative paper in the recycle bin which I was very happy to find matched very closely. I trimmed the binding edge off of one of the cardstock pieces and used it as a design element below my layered image. I hand trimmed the greeting and layered it twice to help it stand out.
I found a scrap of adhesive fun foam which we cut up and used instead of 3D foam tape to pop our images.
I used the pencil crayons to add colour and texture to my decorative paper as well as the cardstock.
Again, I used the decorative paper which we found in the recycle bin. It has been creased so I just decided to wrinkle it up completely and then used pencil crayon to highlight the folds. knowing I had a blue card front for this card I decided to colour the scarf in similar colours. The image is from Melonheadz Illustrations!! Again, I simulated brads using a pencil crayon and added a trimmed binding as a design element.
We had a wonderful time and made a few other crafts as well.
Therese
Young cardmaker!!
I spent the last week with two of my grandchildren and it was wonderful to spend time with them. The oldest loves to craft so we made cards together several times. Here you can see the great cards she created!! She is an inspiration!! She does not second guess herself, she is not afraid to try (she cut out the little red embossed heart - inside and out) and she does not give up. She makes art in all different sizes - you can see a little one there is a passport. She was adding a drawing and an address on the inside.
We had basic supplies - her box of pencil crayons which included a few markers, a couple of pencils,
some wax crayons and one black pen, one pair of safety scissors, glue sticks, a few cardfronts and a small stack of cardstock pieces along with two clam shell cases of images from my stash and one of greetings. No fancy machines, no embossing folders, etc and we had a wonderful time making cards!!
I am looking forward to many years of time spent creating with her!!
I hope you take the opportunity to craft with young people when they present themselves!! They are so willing to try and we just need to let them be - no judgement or advice about our visions of their projects!!
Therese
We had basic supplies - her box of pencil crayons which included a few markers, a couple of pencils,
some wax crayons and one black pen, one pair of safety scissors, glue sticks, a few cardfronts and a small stack of cardstock pieces along with two clam shell cases of images from my stash and one of greetings. No fancy machines, no embossing folders, etc and we had a wonderful time making cards!! I am looking forward to many years of time spent creating with her!!
I hope you take the opportunity to craft with young people when they present themselves!! They are so willing to try and we just need to let them be - no judgement or advice about our visions of their projects!!
Therese
Sunday, August 25, 2013
Quilted Christmas cards
Another set of Christmas cards I made when my sister was visiting!! I was thinking Christmas trees when I came up with this cutting design but did not fully appreciate that more balance was needed between the two colours for all of the green ones to look like trees though it was serendipity that the blue ones looked like mountains and that worked just as well with my design. I layered two different blue decorative papers and two different green decorative papers over each other (4" x 5.25"), held them together with bull clips on the edges and started making cuts - seven in all - using my paper cutter. This is called "Stack and Whack" in the quilting world. With all the pieces in stacks I started creating individual layers - like a puzzle - using the different coloured layers. Once I had pieced together the four layers I glued them to red quarter sheets of cardstock by putting just a small amount of glue in the middle of each of the pieces and then used my sewing machine with white thread to sew all of them to the red layers. I also sewed around the outside edge. Glue and sewing needles do not mix well which is why I only glued the pieces in the centers to avoid having to stitch through glue. I found the laser printed greetings in my stash, layered them to red and then to my decorative stitched layers. I trimmed the red edges close and then glued the mountain ones to blue cardstock and the tree ones to green card fronts. I have another stack of decorative papers which I will cut with a different pattern to give me four more cards.
This design works well with 12x12 decorative papers because you are cutting your layers to 4 inches. Really love the graphic quality of these cards!!
Therese
This design works well with 12x12 decorative papers because you are cutting your layers to 4 inches. Really love the graphic quality of these cards!!
Therese
Poppy card for a swap
On AFTCM, I joined a card swap with the theme of cascading dimensional blossoms in red and yellow. I first decided to create the paper for the flowers using coffee filters and fluid acrylic ink. Love the vibrant colours I achieved!! I cut half circles from the filters, added glue to the straight edges and gathered them to create my flowers. I used a black marker to add black centers and then thought it would be cool to add black seed beads as well so I just added some clear glue, sprinkled on the seed beads and left it to dry. I created the background using a variety of blue paints on white cardstock and then stamped on a script (SU) background in a very similar colour to add subtle texture. I glued down my flowers, drew on stems with a black sharpie, added a double tied piece of white seam binding and attached the whole accented layer to a black card front.
This is a large card and I love how vibrant the colours are!! It has been mailed off to my swap partner!!
Therese
This is a large card and I love how vibrant the colours are!! It has been mailed off to my swap partner!!
Therese
Christmas cards - Stockings
My first Christmas cards in quite a while!! I do need to get started so I will have what I need come the beginning of December!! I used three little stockings on these cards which I hand cut from a gift bag I received a while back. They look enough like 3D stickers that I am submitting them for my sister's August Christmas card challenge! It is a great time to get started on your Christmas cards and you can check out her monthly challenges here if you need some inspiration to get started.
I stared with a white card, layered on a red embossed layer (SU - Northern Flurries) on the bottom edge and a plain red strip at the top, added a scalloped green layer (SU - Scalloped border punch). I tied white fiber to a purple rectangle which was distressed on the top and bottom edges to which I glued the three little stockings using 3D foam tape. Found these round punched greetings (SU) in my scrap bucket and layered them over green and attached them to the front of my card with 3D foam tape. I have about 4 of them complete and 5-6 with all the pieces cut that just need to be assembled.
It was fun to have my sister over for the long weekend and I did get a few cards made to add to my Christmas card stash. Making a date to craft with friends is a great way to make the time to get some of your projects started and/or finished!!
Therese
I stared with a white card, layered on a red embossed layer (SU - Northern Flurries) on the bottom edge and a plain red strip at the top, added a scalloped green layer (SU - Scalloped border punch). I tied white fiber to a purple rectangle which was distressed on the top and bottom edges to which I glued the three little stockings using 3D foam tape. Found these round punched greetings (SU) in my scrap bucket and layered them over green and attached them to the front of my card with 3D foam tape. I have about 4 of them complete and 5-6 with all the pieces cut that just need to be assembled.
It was fun to have my sister over for the long weekend and I did get a few cards made to add to my Christmas card stash. Making a date to craft with friends is a great way to make the time to get some of your projects started and/or finished!!
Therese
Labels:
A2,
A2 cards,
border punch,
cards,
Christmas,
embossing,
embossing folder,
fiber,
layered punched shapes,
punchies,
stickers
Sunday, July 28, 2013
Masculine birthday card
A monochromatic masculine card!! I started this card with the background paper which I created for this card earlier this year. I was playing with images and had printed several versions before I had what I really wanted for it, so the others ended up in my background paper stash. I used a stamp pad to add colour, which coordinated with my seam binding, to both the background and the greeting. I watercoloured the image (Beccy's Place), trimmed it close and layered it onto coordinating cardstock before I adhered it to the card front using 3D foam tape.
Monochromatic always makes elegant cards!!
Therese
Monochromatic always makes elegant cards!!
Therese
Friday, July 26, 2013
Fat book page!
It has been a very busy few weeks but I have managed in the last couple of days to get this digital 4x4 fat book page finished for my swap partner on AFTCM!! I found all the images on Graphics Fairy and manipulated them to allow them to be layered and combined to create this cool scene of a little cafe with a bike parked out front. I colour printed my creation and printed an extra of the flowers so I could cut them out and add them over the original with 3D foam tape. I added a length of seam binding as well nicely knotted on the edge of the page so it will add texture to the book when the page is bound.
My craft room remains unorganized as we take time to help out with the grand children.
It was wonderful to spend time with my daughter (broken baby toe) and her children in the last couple of weeks!!
I will be in my craft room in the next few days and hope to gain significantly in unpacking boxes and sorting all my supplies into their proper homes!
Therese
My craft room remains unorganized as we take time to help out with the grand children.
It was wonderful to spend time with my daughter (broken baby toe) and her children in the last couple of weeks!!
I will be in my craft room in the next few days and hope to gain significantly in unpacking boxes and sorting all my supplies into their proper homes!
Therese
Monday, July 15, 2013
Thank you card
The creation of this card centered around the stamped greeting!! I added two strips of scrapbook paper which echoes the blue of the greeting and the cardstock I used for the card to the top and bottom edges of the card front. I added a length of seam binding in a coordinating colour to the center and tied on a short end to simulate a bow. I distressed the edges of the greeting, layered it onto brown and applied it to the card front using 3D foam tape over the seam binding and just overlapping the decorative paper.
A quick and easy card!!
Therese
A quick and easy card!!
Therese
Labels:
A2,
cards,
decorative paper,
seam binding,
stamping
Saturday, July 13, 2013
Coordinating cards
These two were spin offs from the others. The left hand one features a quilted background using scraps of embossed blue cardstock which I quilted using a zig zag stitch on my sewing machine. I sewed on a fabric strip including 5 little strips running perpendicularly. I tied knots in the little stripes which added lots of texture and made a very nice accent for my card. All it needed was a little greeting to finish it off. The card on the left features a stamped and embossed butterfly image, a stitched fabric strip, a hand cut border punched accent with a ribbon and a greeting.
Have really enjoyed my couple of days of card making and look forward to finding the rest of my supplies and giving them homes!!
Therese
Have really enjoyed my couple of days of card making and look forward to finding the rest of my supplies and giving them homes!!
Therese
Labels:
A2,
border punch,
cards,
colour printed accents and greetings,
embossing,
fabric,
ribbon,
sewing,
stamping,
stitching
Thank you cards with butterflies!
I was on a roll so kept at it!! For these two I used butterflies from my stash embellished with ink and glitter. I embossed both backgrounds, added a bordered strip of white cardstock to which I added a strip of fabric. On the right hand side I wove the fabric strip into the slots I had created using the slot border punch by Fiskars - really like the look. On the left hand card I sewed on the fabric strip using my sewing machine and white thread. Glued the elements to the card fronts and added punched greetings.
I love adding stitching to my cards and find it really easy to use my regular sewing machine. I have a thin needle that I use exclusively for sewing paper because paper dulls needles very quickly.
Therese
I love adding stitching to my cards and find it really easy to use my regular sewing machine. I have a thin needle that I use exclusively for sewing paper because paper dulls needles very quickly.
Therese
More thank you cards!
For these cards I used scraps of blue cardstock that coordinated with the fabric strip to create a bit of a background. I used a scrap of white cardstock, layered on the embossed strips, covered them with the accent strip and sewed them all together. I glued them to the card fronts. I tied a fabric bow on the first one and added a layered butterfly to the other one along with a punched greeting for each of them. The little butterfly (SU) I found in my stash and tied black thread around the middle to create a body and some antenna.
I am happy to be making cards again!! It is fun to be making single designs and using what I have available.
Therese
I am happy to be making cards again!! It is fun to be making single designs and using what I have available.
Therese
Thank you cards!
Hey!! I am back to cardmaking in my new craft room. It is not yet all unpacked and set up but I did find enough supplies to make a few cards - mostly Thank you ones.
I sewed a strip of plaid fabric to a white border punched strip embellished with holes for both of these cards and added a layered flower. The blue background was embossed with the latest embossing folder (CB) I purchased. It has a large folder with a coordinating strip in a nice rounded diamond pattern. I reminds me somewhat of a quilting pattern. The greeting is from "The Lemonade Stand" digital collection (SU) which I printed on white cardstock and punched out.
We are loving our new home and community!! Summer is not as hot as we are used to but it has been pleasant to sit on the deck and soak in the rays!! Hope you are all enjoying your summer!
Therese
I sewed a strip of plaid fabric to a white border punched strip embellished with holes for both of these cards and added a layered flower. The blue background was embossed with the latest embossing folder (CB) I purchased. It has a large folder with a coordinating strip in a nice rounded diamond pattern. I reminds me somewhat of a quilting pattern. The greeting is from "The Lemonade Stand" digital collection (SU) which I printed on white cardstock and punched out.
We are loving our new home and community!! Summer is not as hot as we are used to but it has been pleasant to sit on the deck and soak in the rays!! Hope you are all enjoying your summer!
Therese
Friday, July 12, 2013
Handmade paper thank you cards
I just found these cards! We created them one of the last days of my class with the young people in March!
We layered white embossed handmade paper images we had made earlier in the art session over some coloured handmade paper which was layered onto a white card front. It was easy to just add a punched colour printed greeting to the fronts using 3D foam tape. These can be used as notecards without the greetings and are also suitable for a variety of occasions with added greetings.
I love the look of white embossed handmade paper!!
Therese
We layered white embossed handmade paper images we had made earlier in the art session over some coloured handmade paper which was layered onto a white card front. It was easy to just add a punched colour printed greeting to the fronts using 3D foam tape. These can be used as notecards without the greetings and are also suitable for a variety of occasions with added greetings.
I love the look of white embossed handmade paper!!
Therese
Saturday, July 06, 2013
Dragonfly birthday card
This was a fun card for create!! I started with the fun dragonfly image (unknown - received from a swap) which I watercoloured, added shimmer with acrylic paint and dimension with clear dimensional paint! I distressed the outer edges and added a bit of colour using a stamp pad. I layered it onto yellow and found this background paper in my staxh which I created with my Creole Spice Kaleidoscope ink pad and a brayer quite a while ago which work perfectly. I dug through my greetings and found this one that worked well and then layered all of these onto a grape layer and then onto the green card front.
Gotta love it when things all fall into place and you love what you created!!
Therese
Gotta love it when things all fall into place and you love what you created!!
Therese
Wednesday, June 26, 2013
Anniversary card for DH
I created this fun anniversary card for DH! He loves music so it is always fun to include sheet music on his cards and this is from one of his favorite songs. I colour washed the music with watercolour and stamped a bit of texture on there too. I added a length of wood (he is a woodworker) which he gave me - trimmings off of a plank - when we were doing renovations in our previous house which I added to the card front using brown brads. Wood splits easily to it is best to drill holes where you need them. I gently used an awl which worked on one side unfortunately on the other side it split the wood. Nothing a little double sided tape didn't fix!! I added small heart die cuts (buttons on the SX gingerbread man) as well as an embellished punchie greeting. It still needed a bit of something so I added two large embellished hearts. The open heart is one from a triple set Sizzlet which I coloured with brown and yellow ink. The full heart is from a SU heart Sizzlet which I cut from foil cardstock and coloured with Sharpie markers until it was the colour that I wanted.
I really like how this turned out!!
Therese
I really like how this turned out!!
Therese
Sunday, June 16, 2013
Father's Day card
I made this card for my Dad using scraps of wood that my DH trimmed off of an oak plank during our renovations at our previous house. I simply cut the wood strips into lengths using scissors, glued them to the card front using double sided tape, added "nails" with a brown Sharpie marker and to add a bit more texture stamped them with a crackle looking background. I added several strips of suede looking trim between the "boards". I had previously embossed the card front using the SU wood grain embossing folder and used the same texture stamp around its edges. I watercoloured the image then trimmed it close and adhered it to the card front uisng 3D foam tape. I do not know who makes this image as it was received in a swap many years ago. I like the way all these elements came together!! My Dad used to be a carpenter so I really like adding wood to his cards.
Therese
Therese
Labels:
A2,
cards,
embossing folder,
sharpie markers,
stamping,
SU - StampinUP,
watercolour,
wood
Sunday, June 02, 2013
Another masculine card!
I created this card with elements I had set aside from one of my classes!! I used darker colours to keep it looking masculine. The stippled background is one I downloaded from here on Sylvia's blog and watercoloured black. While I was at it I also watercoloured the large U and the little birthday cake (computerclipart). I trimmed the greeting and distressed the edges then positioned it next to the large U (font) on the background which I adhered to a maroon card front. I trimmed the cake image close and used 3D foam tape to adhere it to the front of the card. Did the same with the little metallic number two at the top of the card.
Sylvia, my sister, has ready to go card kits for sale which gives you everything you need to assemble hand made cards in minutes with basic tools!! I am finding that having supplies at hand certainly makes card making much quicker. Check out her site to see what she has available for All Occasion Kits as well as Christmas card kits. This is a great way to go if you like to give handmade cards but have not yet invested in a large variety of tools.
Therese
Sylvia, my sister, has ready to go card kits for sale which gives you everything you need to assemble hand made cards in minutes with basic tools!! I am finding that having supplies at hand certainly makes card making much quicker. Check out her site to see what she has available for All Occasion Kits as well as Christmas card kits. This is a great way to go if you like to give handmade cards but have not yet invested in a large variety of tools.
Therese
Saturday, June 01, 2013
Masculine birthday!
I created this masculine birthday card using a colour printed image of a light house I photographed several years ago during a trip to Prince Edward Island! I layered the light house image and the colour printed greeting (SU) onto black cardstock and then onto a red cardstock layer. I layered this element over an embossed layer which was wrapped with gray seam binding and glued to my white card front.
A quick and easy card!!
Therese
A quick and easy card!!
Therese
Friday, May 17, 2013
A sophisticated cupcake!
Created this card for my niece who is in high school so I choose red and black to create a sophisticated card!! I watercoloured the laser printed digital image (Beccy's Place), used acrylic shimmer paint for the icing, added clear dimensional paint to give it depth and finally added some Diamond Dust - chunky glitter from the the good old days to give it lots of texture!! It looks great!! I layered the image over a red embossed layer (CB -D'vine Swirl) and onto a black card front. Added a black strip of cardstock to which I glued the punched (SU) colour printed greeting which I embellished with two red dots of watercolour.
Really like the way this card turned out and I am sure she will enjoy it as well!!
Therese
Really like the way this card turned out and I am sure she will enjoy it as well!!
Therese
Thursday, May 09, 2013
Dinosaur birthday card!
Dinosaurs are always popular with kids and our three year old grand daughter is no exception!! She is having a dinosaur birthday so I made her a corresponding birthday card!! I used an image from (CLKER) and laid it out with the greeting and some fossil looking footprints which I printed onto white cardstock. I watercoloured the images after I had ripped the edges. I glued the image to the dark brown card front, added some twine and tied on a couple of ends to create some texture. I added a cut out footprint using 3D foam tape to create yet more dimension.
We brought some fun dinosaurs for the family when we were there last and they were a hit. I am sure she will enjoy her dinosaur cake and the day with her family!! Her brothers had birthdays in Feburary and I made her older brother this card.
Therese
We brought some fun dinosaurs for the family when we were there last and they were a hit. I am sure she will enjoy her dinosaur cake and the day with her family!! Her brothers had birthdays in Feburary and I made her older brother this card.
Therese
Labels:
3D foam tape,
A2,
cards,
colour printed accents and greetings,
twine,
watercolour
Tuesday, May 07, 2013
Some more thank you cards!
A couple more!! It seems I am on a roll with these cards!! Again, most of the supplies are coming from my stashes of supplies - images, greetings and background paper.
For the top card I combined an embossed image which was watercoloured blue and a silver embossed script greeting to create one element. I layered it using a coordinating cardstock and laid it over the white seam binding which I attached to the embossed card front. You can see a bit of the white insert just above and below the greeting. I love this colour of blue!!
For the bottom card I used a section of decorative paper I created earlier this week when I made this card. I added a piece of cardstock to the card front, a stamped and embossed greeting over some brown seam binding and I was done!!
These are quick and easy if you are lucky enough to find coordinating elements in your stash!!
Therese
For the top card I combined an embossed image which was watercoloured blue and a silver embossed script greeting to create one element. I layered it using a coordinating cardstock and laid it over the white seam binding which I attached to the embossed card front. You can see a bit of the white insert just above and below the greeting. I love this colour of blue!!
For the bottom card I used a section of decorative paper I created earlier this week when I made this card. I added a piece of cardstock to the card front, a stamped and embossed greeting over some brown seam binding and I was done!!
These are quick and easy if you are lucky enough to find coordinating elements in your stash!!
Therese
Sunday, May 05, 2013
Masculine retirement card
A retirement card for a friend who has decided to retire from the military. He is taking on a new job and they will likely be looking for a different house as well so lots of changes but in the end everything is falling into place so I coined this phrase just for this card.
I have been wanting to try this technique for a while - pigment ink on the inside of the watches/clock embossing folder and then embossed with clear embossing powder. I added some white shimmering pigment ink to the white areas and embossed them with clear embossing powder as well. I like they way it turned out!! I printed the watch (digital image from CD) on the card front as well as another to fuzzy cut out and raise over the original image. I added clear dimensional paint over the watch to create the look of glass and added black cording as well.
Really like this technique and will be playing with it some more - after I move into the new house!!
Therese
I have been wanting to try this technique for a while - pigment ink on the inside of the watches/clock embossing folder and then embossed with clear embossing powder. I added some white shimmering pigment ink to the white areas and embossed them with clear embossing powder as well. I like they way it turned out!! I printed the watch (digital image from CD) on the card front as well as another to fuzzy cut out and raise over the original image. I added clear dimensional paint over the watch to create the look of glass and added black cording as well.
Really like this technique and will be playing with it some more - after I move into the new house!!
Therese
Labels:
A2,
cards,
cording,
digital image,
dimensional magic,
embossing folder,
pigment ink,
thermal embossing
Saturday, May 04, 2013
Little girl's birthday!!
I made this for a little girl who likes pink and purple! She is getting a little older so I decided to give her a more sophisticated version of her favorite colours!!
I used a lilac card front and layered on a floral embossed layer (CB) in a blue purple colour and added a strip of deep pink which I stamped with a butterfly image in a similar colour to give it dimension without too much contrast. I coloured the butterfly image (CLKER) with watercolour and added some shimmer using acrylic paint. Layered it onto an embossed silver foil scallop circle (yogurt seal), then onto a darker purple scallop and finally onto a medium toned scallop circle which were all cut with Nestibilities. I added both this element and the colour printed greeting to the card front using 3D foam tape. I did embellish the greeting with watercolour when I was painting the butterfly to ensure it would coordinate perfectly!!
Nestibilities are a great way to get perfectly sized elements for layering!!
Therese
I used a lilac card front and layered on a floral embossed layer (CB) in a blue purple colour and added a strip of deep pink which I stamped with a butterfly image in a similar colour to give it dimension without too much contrast. I coloured the butterfly image (CLKER) with watercolour and added some shimmer using acrylic paint. Layered it onto an embossed silver foil scallop circle (yogurt seal), then onto a darker purple scallop and finally onto a medium toned scallop circle which were all cut with Nestibilities. I added both this element and the colour printed greeting to the card front using 3D foam tape. I did embellish the greeting with watercolour when I was painting the butterfly to ensure it would coordinate perfectly!!
Nestibilities are a great way to get perfectly sized elements for layering!!
Therese
Tiny card
I created this tiny card for a challenge on one of my groups! I decided to mine my desk for the supplies for this card - surely I had enough there to make a tiny card! Sure enough, I found the envelope and card front which was left over from a set I prepared for the parcels I sent my grandchildren a few weeks ago. I stamped it with a background stamp that was sitting there. I found the layered flower on my desk as well - leftover supplies from creating these tags. I added a central decorative brad to hold the flower together and then dug into my bucket of "extras" to see if I could find a leaf - sure enough I found one!! I found the greeting in my bucket of extra greetings. I added a bit of watercolour and glued it to the back of the flower and did the same to the leaf. Applied double sided tape to the back of all the elements and adhered it to the front of my tiny card!! My desk is a bit cleaner and I have a tiny card to add to my card stash!!
Therese
Therese
Sunday, April 28, 2013
Custom art folder
My youngest grand daughter is just beginning to enjoy painting and creating so I made her a custom art folder that holds 8.5 x 11 paper which she can create on and it can also be used to store her art.
I started with a large sheet of cardstock 12" x 18", scored it twice just a bit wider than the the 8.5" and used red fabric tape to bind the edges. Fortunately, the tape will also protect the edges from wear and I really like the contrast between the red and blue. I created the tie using punchies and brads and covered the tangs in the inside to protect the contents of the folder. I tied on a cotton tie in red. I die cut letters from ivory sticker paper and added her name!! I am sure she will most enjoy her new folder and the process of creating some art!! Kids are so uninhibited about creating - they just do it! They don't have voices in their heads that tell them that they can't do it. As adults, we often have to choose to ignore the voices and do it anyway.
Therese
I started with a large sheet of cardstock 12" x 18", scored it twice just a bit wider than the the 8.5" and used red fabric tape to bind the edges. Fortunately, the tape will also protect the edges from wear and I really like the contrast between the red and blue. I created the tie using punchies and brads and covered the tangs in the inside to protect the contents of the folder. I tied on a cotton tie in red. I die cut letters from ivory sticker paper and added her name!! I am sure she will most enjoy her new folder and the process of creating some art!! Kids are so uninhibited about creating - they just do it! They don't have voices in their heads that tell them that they can't do it. As adults, we often have to choose to ignore the voices and do it anyway.
Therese
Refurbished cards for donation
Here are a lot of cards I have refurbished to donate to a local non profit. I have used card fronts from commercial cards which were donated to me and have also refurbished some handmade cards I received.
It is quite easy to refurbish commercial cards. Most times it is just a matter of trimming the card and layering it onto a folded card front. You can easily add a bit of embellishment like a ribbon and/or a greeting. The hardest thing is to find an envelope that will fit it. I am fortunate to have some commercial card envelopes that were donated to me so I usually find an envelope that works.
If you don't have envelopes you can certainly make custom ones that will work perfectly.
Here are a few sites that give you instructions to make them:
This one uses a template - letter size and invitation size:
http://frugalliving.about.com/od/makeit/ht/Make-Your-Own-Envelopes.htm
This one uses just paper to make them:
http://www.wikihow.com/Make-a-Greeting-Card-Envelope
This one uses a scoring tool and has a formula for making a custom envelope:
http://www.scor-pal.com/envelope/
Here's one that creates a custom envelope by just folding paper around your card:
http://scrapinator.blogspot.ca/2009/03/easy-peasy-3-minute-envelope.html
I encourage you to refurbish cards for donating to a local group that could use them - nursing homes, churches, non profits, etc. They will be most appreciative and it will give those beautiful cards another life!!
Therese
It is quite easy to refurbish commercial cards. Most times it is just a matter of trimming the card and layering it onto a folded card front. You can easily add a bit of embellishment like a ribbon and/or a greeting. The hardest thing is to find an envelope that will fit it. I am fortunate to have some commercial card envelopes that were donated to me so I usually find an envelope that works.
If you don't have envelopes you can certainly make custom ones that will work perfectly.
Here are a few sites that give you instructions to make them:
This one uses a template - letter size and invitation size:
http://frugalliving.about.com/od/makeit/ht/Make-Your-Own-Envelopes.htm
This one uses just paper to make them:
http://www.wikihow.com/Make-a-Greeting-Card-Envelope
This one uses a scoring tool and has a formula for making a custom envelope:
http://www.scor-pal.com/envelope/
Here's one that creates a custom envelope by just folding paper around your card:
http://scrapinator.blogspot.ca/2009/03/easy-peasy-3-minute-envelope.html
I encourage you to refurbish cards for donating to a local group that could use them - nursing homes, churches, non profits, etc. They will be most appreciative and it will give those beautiful cards another life!!
Therese
Subscribe to:
Posts (Atom)