Wednesday, November 19, 2014

Altered glasses case

 I finally refurbished my glasses case this morning!!  It has been a while since I noticed that it was wearing and either needed to be refurbished or replaced.  I am super happy with how it turned out and it will be easier to find in my purse now because it has more contrast!!
 So, this is how it looked before I started.  It had fabric glued to the metal case.  Have to say that it was fairly durable because I bought it used probably 10 years ago.
The covering was fairly easy to peel off.  The inside was a bit corroded but it is in fine shape otherwise.  Mechanism still works properly and is not too complicated.
 I managed to get all the glue off and sanded it down inside and out which removed most of the roughness of the corrosion that had occurred on the inside.  It looked pretty neat as it was but thought it would look more interesting with a bit more attitude!!
 I used fabric tape for the inside.  It took four strips of tape to do the whole inside. I started with the lid and then did the bottom.  The two middle strips overlapped nicely to cover the mechanism.  I trimmed the tape to the edges of the case.
Then I covered the outside with this cool lettered packing tape!!  It took four strips to cover the outside as well.  I did the lid first and then the base with the strips overlapping at the hinge.  I trimmed the packing tape on the inside to leave an even overlap to the inside.
I am super happy with how it turned out.  If and when it wears through or starts looking rough again I will consider removing the tape with a heat gun, spray painting it and creating a little quiltie for the inside.  For today, this project has been time efficient and I really like the look!!

Therese

Monday, November 17, 2014

Shabby chic card

I made this card for one of my friends down east!  I was putting away some of the paper crafting supplies I have won as prizes on one of my groups and lo and behold I found this element and this paper that coordinated!!  I trimmed the Victorian floral element from the sheet it was printed on and trimmed the decorative paper to fit on my blue card front with a small border all the way around.  I added the lace to the decorative paper and then sewed it to my card front with my sewing machine. I love the look!!  I added a couple of ribbon flags to my floral element and glued it over the lace on the front of my card using 3D foam tape.  Dug through my greetings stash and found - happiness - and thought it was most appropriate.  I sponged it very lightly with some distress ink to tone down the white and added it to the front of my card with 3D foam tape.
I love it when things fall into place!!  I managed to finish off the blue cards, create the purple cards, make this card and a sympathy card for my sister today!!  I also did laundry, washed up bathrooms, made muffins and walked to the post office!!  Good enough for today!  I am off to read my book for a bit before heading for bed!!

Therese

Purple and snowflakes!

It is sometimes a blessing to not finish a project all in one day.  I am sure I would have made all of these cards in blue had I made them all in the same day.  It was just the vision I had for them when I started.
Today, when I went to finish them I made three of them blue because those supplies were already cut and waiting for me on my desk.
I was open to be inspired today so started digging in my stash of papers for background paper for the last three.  I found this thin tissue like paper which I thought nicely highlighted the glitter in the snowflakes. I trimmed three pieces to the right size, stamped them with the same flourish stamp (IO) I had used for the last ones in purple.  The stamping did not show up at all - the colour of the ink was tool close to the colour of the paper.  So I decided to use blue instead and that worked much better.  I glued this decorative paper to by dark blue card fronts.  I added silver dots with a gel pen, adhered the snow flake with a brad, added a silver ribbon and mounted my layered greeting over that using double sided tape.  I am really liking how the silver and purple work together.  Gives this set of three quite a different look!!  With these three I am up to 89 Christmas cards for this year.

Therese

Snowflake Christmas cards

I started these cards last week and finished them off today. They are the last few I need to have all of my cards finished for the beginning of December.
The snowflakes were ornaments I bought at a dollar store about a month ago.  They have a thin white plastic armature with glittery fiber wound around the arms of the snowflake - nice and slim.  I went digging into my stash of decorative paper and found this glittery acrylic paint paper I made years ago.  The scrap was less than 4" wide so I had to layer it to get the element wide enough to properly show off the snowflake.  I stamped some flourishes on it in dark blue (IO).  I added a layer of blue cardstock on the back which I punched on the bottom with the snowflake/daisy punch (MS). After mounting the decorative paper I added a length of white gros grain ribbon which I tied with silver cording and glued the ends to the back of the layer.  I adhered the snowflake using a silver brad and then mounted the whole element to the front of a white card.  Lastly, I added a "let is snow" laser printed punchie (SU) greeting which I adhered with 3D foam tape. Really liking these cards!!  I made three of these which brings my current Christmas card count to 86!!
Therese

Sympathy card

This is a last minute card for my sister who's father in law passed away last week.
I used a purple card front which I sponged all the way around and added a layer of decorative paper which I cut so the butterfly would be in just the right place.  I sponged the edges and glued it to my card front.  I trimmed my greeting, sponged it as well and added to the card using 3D foam tape.
Simple but effective because of the layout of the paper!!

Therese

Thursday, November 13, 2014

Christmas Art Quiltie

I am hosting a Winter/Christmas themed Art Quiltie Swap in November on By Hand and finished my quiltie last night!! I received some fabric scraps from my daughter a while back and found some wonderful Christmas fabrics among them.  One of them is an all over pattern of this nativity scene.  I love that it is bright and includes the animals, stable and the star.  Unfortunately, because we are doing 4"x4" I had to sacrifice the star so I could keep the manger scene. To keep as much of the image as possible I also chose to construct the quiltie with my sewing machine.  I used an off white fabric with gold stars for the back and sandwiched some batting in between.  After turning it over I sewed a seam close to the edge to give the quiltie some definition.  I added seed beads to the stars on the back and added french knots in yellow in between to create a beautiful starry sky and stamped NOEL(Quietfire) in red which makes it really stand out near the bottom edge.
I started outlining the details on the front in running stitch with embroidery thread.  It gives the individual elements more definition and creates some texture.  I wanted to add a 3D element but was reticent to cover up too much of the image.  After auditioning a wide variety of options from my stash I decided to create a little shrink plastic charm that I could sew on.  I stamped JOY (Quietfire) in red on an oval of rough and ready shrink plastic, punched a couple of holes on either sides and heated it until flat.  I love the way it turned out though I should have used a larger punch for my holes because I ended up having to drill them out to a larger size so I could get my needle through them.  I sewed my little charm on the lower right hand side just by the sheep.  I created a little shrink plastic charm with my swap info as well and sewed it on the back over my starry night.
I am very happy with my little quiltie!!  It will be packaged and sent off to my partner in the next day or so.

Therese

Tuesday, November 11, 2014

Winter Pocket card

On one of my groups I joined a card swap with the theme of Winter Twilight in Silhouette with the requirement that it also be a pocket card.  It took a while for me to envision a card that would fit all the criteria but when I found a shallow pocket card on Splitcoast Stampers, things started to fall into place! I started by creating my scene using digital images from CLKER and adding a few lines to define the horizon. Once it was laser printed and trimmed down to a tag I cut a mask and sponged the sky and added a bit of blue to the snow creating a bit of shadow for the deer.  I added a border (SU) punched layer of decorative paper (SU) to the bottom of my kraft coloured card gluing only the bottom and both sides to create a pocket.  I added a length of kraft cording to which I had already tied a short length of the same cord over the decorative pocket and then layered on a glittery snowflake embellishment using double sided tape below the cording and a glue dot just behind the snowflake.  I added a rounded tab (SU) to the top of the large tag and embellished it with a kraft coloured snowflake.  I used a Sakura clear glitter pen to add a bit of sparkle to the embellishment and the little snowflake too!!  I will be making a few more of these for my card exchange this month.

Therese

Handmade Wreath Ornament with a Tutorial


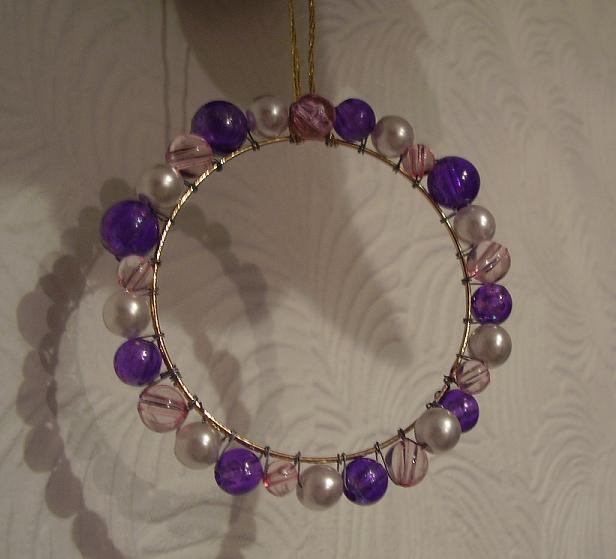
I have joined a handmade ornament swap on one of my groups so I went looking for ideas!!  I found an ornament similar to this one that fit my criteria - lightweight, fairly flat for easy mailing and used supplies I had on hand.  I dug out wire, beads and pliers and got started.  I decided to use E-beads because I have lots of them in a variety of colours.  After adding the first row of beads on the outside of the armature - it looked a bit "light"so I added a row on the inside. Better! but it needed a bit of accent colour so I added some different coloured beads to simulate "holly berries".  That was much better.  I added a charm and a bow and declared it done!! Not sure if it will be the one I use but I decided to document the process in case I want to replicate it in the future and no longer have the original!!


Handmade Wire & Bead Wreath Ornament Tutorial
You will need:  (I used)
Wire for the armature    (I used 26 gauge - 4-5 wraps around the jar (36"-40")
Wire for beading    (I used 28 gauge - about 48")
Beads     (Ebeads - 80 of the main colour, 16 or so of accent colour)
A charm       (metal snowflake charm)
A length of chain      (4 links)
A bow      (6" or so to construct a bow)
Thread      (24" or so to sew the bow onto the ornament)
Pliers     (snips and rounded beading pliers) 

Use what you have and adjust where you need to to accommodate the difference in supplies. 


 1.  Make the armature for your ornament.
  I wrapped 26 gauge wire around a jar of UTEE embossing powder 4 or 5 times.  

 Twist the wires to each other and then wrapped them around the loops of wire to secure them to each other.

 2.  Prepare your beads.
I strung my 80 green Ebeads onto a 48" length of 28 gauge wire and made a cluster of loops
at the end to ensure the beads would not fall off and to make it easier to pull through the armature.

 3.  Start adding beads to outside of armature. 
Wrap the end of the 28 gauge wire to the armature where the ends are, a couple of times to secure.
Bring one bead up to above the armature, hold it in place with the hole horizontal, fold the bead wire to the back and pull through the opening in the armature.  Tighten.  

 Repeat 39 more times leaving some room between the beads.  Wrap bead wire around armature to secure.

 3.  Now start adding beads to the inside of the armature by placing the bead horizontally below the armature, holding it in place and bringing the wire up and between the first two beads above the armature.
Bring wire down the back side and up through the opening in the armature.  

 Repeat 39 more times.  Wrap bead wire around the armature to secure.  

 4.  Add contrasting beads onto bead wire.

 Add these beads in between the ones already on the armature using the same technique as above. Start with a couple of wraps, add a bead below, a few more wraps and then add a bead above.  Keep adding beads alternatively until you have added beads randomly all the way around.  Secure your bead wire with a couple wraps around the armature when you are finished.  

 5.  Prepare a charm.  I used a metal snowflake charm and added four links of chain to it to make it hang in the right place on the inside of the ornament.  

6.  Attach charm to ornament.  I used one of the armature wires to create a loop for my charm to hang from.  If your beads are too close together at the top just nudge them gently to the sides.  They will adjust and make some room for you to hang the charm.  
Alternatively, you could use thread to hang your charm by just tying it to the armature hanging at the right height.  

7.  Add the bow.  I constructed a bow from ribbon and then sewed it to the top of the armature using embroidery thread.  
Alternatively, you could tie the ribbon to the wires that are sticking up and make a bow.  
I twisted all the wires together and snipped them even about 1.25 inches above the top of the ornament and used rounded beading pliers to make a loop hanger.  
Alternatively, you could add a jump ring using the wires to secure it and then snip them.  
Once you are finished, shape your ornament to get it nice and round. 

Very happy with my wreath ornament!!   I hope you will find this tutorial useful.  
If you use this tutorial, I would love for you to leave me a comment on this post 
and a link to your project if you have it online somewhere.  

Thanks for joining me!

Therese

Saturday, November 01, 2014

Red and gold birthday card

Another card for my stash!  I started with a dark brown card front onto which I mounted a red layer which I stamped with a word background stamp (TH).  I found this warm coloured alcohol ink background which I also stamped with the same background stamp using red ink.  In my stash, I found this serendipity label which was left over from this card.  I layered an oval greeting over it which I had sponged with yellow ink to coordinate with the colours in the serendipity.  It still needed just a bit of something so I added red in the scrolly part using a bit of watercolour.  Just what it needed.
I started by mounting the alcohol ink background to the left of my card front and then added the ribbon across the middle of the card gluing both ends to the inside of the card using double sided tape.  I adhered the label/oval element to the card front with its center aligned with the right hand edge of the background piece.  I tied on a short piece of ribbon to the left of that which nicely simulates a bow.
Therese

Tuesday, October 28, 2014

Circle themed card

Have a few guys to send cards to in the next few weeks so I have started on some cards for them.  I have seen several circle themed cards on Splitcoast Stampers lately and thought I would give it a go.
I started with a small piece of decorative marbled paper which I cut apart and layered onto black - love the stone look of it.  I added some blue and silver circles halves to each side of this element by just taping them to the back once I had placed them where they needed to be.  I embossed a dark blue card front using a circle embossing folder (CB) and then glued my focal element to it using double sided tape.  It still needed a bit of something so I used a silver gel pen and added some dots to the blue half circles and that was enough to make it work for me.  I trimmed a greeting and layered it onto black and mounted it over my element using double sided tape on one side and 3D foam tape on the other.
Really loving the look of that marbled paper!!

Therese

Sunday, October 26, 2014

Fall card with an ATC

I made this fall themed birthday card for one of the guys in my family.
I started with a rust card that I embossed with a leaves embossing folder (QK) and then distressed with my stipple stamp (SU) and then sponged all the way around with brown ink.  I added a strip of decorative mesh (window screening that has been embossed with gold embossing powder) which I cut with flag ends and adhered with two pieces of handmade washi tape.  The bright background is from an ATC which I dismantled and it worked perfectly for this card.  I added a watercoloured laser printed greeting to the back using double sided tape and adhered this focal element over the mesh.  I found some wonderfully autumn looking paper in my paper stash, glued it to some cardstock to add some heft to it and die cut several leaves (TH - Tattered Leaves).  I embellished it with several colours of ink using a sponge and added some veining with watercolour.  Attached the leaf to my card front using 3D foam tape.

Therese

Friday, October 24, 2014

Cute pirate card

My grandson's birthday is coming up and he is having a pirate themed cake!!
I found this cute penguin pirate on CLKER
which was just the look I was going for  - not too scary!!  I added "ahoy matey" in a fun font and colour printed the image.  I trimmed it, distressed the edges, layered it onto black and added a small laser printed greeting.  I used a red card and layered a piece of blue decorative paper to which I had added a pierced wavy border of blue cardstock.  I added some orange fiber to the left hand side and added the focal element I had created centered on the decorative paper using 3D foam tape.  Love it when the creation matches the vision that you started with!!

Therese

Friday, October 17, 2014

4x4 art card!

For a swap on one of my groups I needed an alcohol ink background so I played a bit and ended up with a few.  I created these cards as well as these while I was playing.
I decided to doodle some funky flowers for my 4x4 art card.  I love the bright colours of this background and thought the funky flowers would show it off nicely.  I started by tracing the shape of the button on the background and doodled my flowers from there using fine tipped Sharpies in several different colours. I used black to create the stems and the border as well as a couple of layers on my flowers.  The buttons are colour printed and punched out - I like the way they look so real!!  I punched the holes out, sewed in some coordinating thread and used half inch glue dots to attach them to the center of my flowers!!  I am loving the contrast between my plain paper buttons and the bright glossy background.  If you are interested in making some 4x4 art cards I would recommend checking out Joggles art card video!! This one will be on its way to my partner in the next couple of days!!

Therese

Doodled alcohol ink backgrounds on cards


The card on the right was left partially assembled on my work surface after making these Bokeh cards.  I found it as I was trying to find enough space to create today so I finished it off!!  I layered a stamped butterfly punchie (SU) over a white one and tied them together with silver cord to create my focal element.  It works out well that the ends of the cord creates antenna for the butterfly.  I added a dotted trail below the butterfly using coloured fine tip Sharpies, trimmed and sponged my greeting and adhered it in place over the trail using 3D foam tape.  Another card for my stash.  
I do love those alcohol ink backgrounds!!  
The card on the left I will be using for my card exchange and features another alcohol ink background onto which I doodled with gel pens - several colours of blue and both a thick and fine nibbed white one.  I created some flowers and added an uneven doodled border.  I added a white punched border that features dots and flowers which I backed with some blue metallic paper trimmed to the edge of the border.  I layered this element to a dark blue purple card front and added an embellished colour printed greeting punchie (SU).  
Therese

Cards with alcohol ink backgrounds!


I am working on a swap that needs an alcohol ink background so I thought I would play around a bit and see what I could come up with.  While I was playing I came up with what I needed for my swap and made a few other cards as well.  Above on the left, a Christmas card.  I created the background by using my busted baster to create circles in green and red on the light red alcohol background.  I also added some thinner red lines using several size of lids which I have been saving out of the recycle bin.    I stamped my greeting in green and to give it a bit of punch I decided to add a bit of a bokeh effect by adding white pigment ink from my Brilliance Moonlight stamp pad sponged through several different sizes of circle stencil.  I stitched it to a red layer.  It has four embossed ornaments on the left hand side which I had to do by hand (hammer on a sturdy surface) because the orientation is wrong to get the whole thing to run through my Big Kick.  I added an embossed line around the rest of the main element using my scoring tool (MS).  
This adds one to my current count of 82 giving me 83 Christmas cards ready for this holiday season!!  
On the right, I added some thin red circles (lids), some solid circles (foam stamp) in red and yellow  and a bit of bokeh (Brilliance Moonlight ink) to this alcohol ink background.  I inked the leaf stamp using yellow, red and green ink and stamped it onto the 4x4 background.  I reinked it four more times and stamped it around the first image.  I added two orange strips which were embossed with a wood grain embossing folder and sponged with brown ink.  I added a colour printed greeting layered onto dark brown over several lengths of unraveled hemp cord.  
Really happy with these cards!!  I believe that the leaf stamp had never been inked before!!  I will be using the leaf one for my card exchange!  

Therese

Monday, October 06, 2014

Cards using ATCs

 On Saturday, World Card Making Day, I spent some time in my craft room making some cards for donation.  I decided to work with my stash of ATCs which usually makes the creation of a card quick and easy!!
These two embossed metal heart ATCs are ones I created years ago for trading.  You can read more about them here!!  I added a layer to each of them (black on left, orange on right), added them to red card fronts and stamped greetings.
I used alcohol backgrounds on both of these cards and ATCs from my collection!
I added a bit of script on the left hand one before I adhered the ATC along with a flagged greeting.

I love this ATC - a bit of a sewing theme!!  I adhered the ATC to the card front and stamped a small greeting on the right hand corner.  Love it!!


For the one on the left I added a multi layer background and a yellow one before I layered the ATC element onto the coordinating alcohol ink background and rust card front.  I added a small stamped greeting to the right hand corner.

For a friend who needs to know that we are thinking of you her I have created an angel card using an ATC I created years ago for trading. You can check out the details here!  I stamped the greeting on the watercolour background first, added it to my blue card front and then adhered my angel ATC equidistant from the top left hand corner.  I like the way the colours coordinate so nicely!!  I hope my little angel will be a comfort to her while she heals!!

Therese

Fabric 4x4 quiltie


On one of my groups I am hosting a 4" x 4" fabric quiltie swap!  The theme is open and all that is required is that the quiltie have fabric on front and back with batting in between, some hand stitching and is embellished a little.
 This is the quiltie I made for the swap.  It looks a little different than the little quilties I have been making for my journal covers.  I did buttonhole stitch all around this one instead of the overcast stitch I have been using for the others.  The front is pieced from a few small pieces - flowery for the bottom edge, green for the horizon and floral blue, pink and white for the sky.  The pieces were sewn together by machine and then I trimmed my piece to about 4.75" so I would have enough to roll over for my edge and have it be a 4" x 4" finished size.  I dug through my fabric scrap stash for the house body, the roof and the door.  I applied "iron on hem tape" to the back of each piece using release paper to prevent the iron from sticking to it.  I ironed on the house first, leaving the bottom up from the edge a bit to allow for the border, then I added the brown triangle for the roof and added the door last.  I added the batting, my back and stitched all the way around using white thread and the button hole stitch.  Next, I added extra stitching.  I used brown thread to add several layers of stitching to the roof and then added beads (bugle and ebeads) in brown around the perimeter.  I added a stitched half round window to the door and button hole stitch around the perimeter then I added a yellow ebead to the door to simulate a handle.  I added French knots to all the flower centers on the body of the house and used stem stitch to add some definition to both sides.  Added chain stitch to the top and bottom edges of the green landscape/horizon layer.  I added some random stitches to the sky to give it some texture.  Finally, I added two butterfly beads and a little metal silver heart above the door.
I used navy fabric with a white grid for the back and filled in the squares using several different stitches in several different colours of thread.  I added my copyright using Iron On Label - I simply wrote on the label tape using a fine tip Sharpie and ironed it onto the back.  I added the swap credits and info on a tag and pinned it on the back as well.

It was fun to make a quiltie with a theme and do a a variety of stitches.  I printed off instructions for a few more so I can add more variety next time.
I hope there will be enough interest to make several more of these so we can all have a few pages to bind into a book!!

Therese

Saturday, September 27, 2014

An altered cuff with a metal embellishment in a zipper bezel!


Another cuff!!  This is the one I created for the swap that more closely follows the guidelines provided for the Altered Cuff Swap on AFTCM.  I started with two strips of sky blue cotton fabric.  I stitched the lace, piping and teal bias trim to the right side of one of the pieces using my sewing machine.  I cut an elastic to serve as the closure, pinned it at one end, laid the other piece of fabric right side down and sewed both ends and one side being careful not to capture the lace in the seam.  I snipped the corners and turned it over.  I added the white and turquoise ebeads over the teal bias trim using white embroidery thread and then added the buttons using turquoise sewing thread being sure to leave enough room in the middle for my embellishment.  I used clear thread to attach the embellishment to the middle of the cuff.  I really like how the zipper teeth create a bezel for the metal piece!!  After that, I turned it back to inside out and sewed two short seams from each end, snipped the corners and turned it back to right side out.  I pressed the whole thing and hand stitched the opening closed.  I thought it needed a bit of something so I used white embroidery thread to add blanket stitching to both sides.  That was better!! I added yet more stitching - French knots in between the eyelets in the lace and a stitch in the center of each eyelet to help keep it from rolling up.
The embellishment was created using an old earring, a piece of zipper, some sequins and clear thread.  You can check this post for the construction details.  I submitted it to one of my groups in their Zipper Challenge.  
Therese

Felted wool cuff with layered flowers


I created this felted wool cuff for an Altered Cuff Swap I am participating in on AFTCM.  I used felted wool that my daughter gave me along with some coordinating fabric.  I pieced three pieces of navy together to create the base onto which I sewed the teal flower die cuts (TH) using turquoise thread.  I used heat and bond to adhere two strips of fabric together to create the smaller flowers.  They were die cut using the smallest flower on the Tim Holtz Tattered Flowers die.  I sewed them on over the teal ones stitching over each petal as close to the center as possible.  As a final embellishment I added a large turquoise sequin with a gold bead in the center.  I added two small snaps as a closure for this cuff!!    I really like how it turned out!!  
Upon rereading the guidelines it would seem that I have strayed too far off the mark and will be making another that complies more closely.

Therese

Friday, September 26, 2014

Zipper Challenge

On MMS, they issued a Zipper Challenge - create something using a zipper!  I decided to use part of a zipper as a frame on a project I was working on.
I cut one side of a zipper just long enough to frame this metal embellishment and sewed the ends together and then sewed a basting stitch through the fabric part of the zipper and gathered it in to create a flat bezel.  The metal  embellishment is an old earring from which I removed all of the innards and replaced them with turquoise sequins. I placed it over the zipper bezel  and sewed them together using clear thread.  Worked out perfectly for what I wanted for the project I was working on which I will share later.

Therese

Alcohol ink & ATC birthday card

This card features an ATC I made a few years ago.  I had these scraps of alcohol ink background left over from a "make & take" at the local scrapbook store - Scrapbook Lane - which is located in the Pharmasave in town!!
I cut some of the scraps into 1" squares and glued them down the two sides of a black card front and then measured the space in between and cut two pieces for top and bottom to complete the frame.  I added the ATC in the center using 3D foam tape.
The ATC was created using a slide mount (SX), an image printed on transparency, an alcohol ink background and a quote handwritten with a silver gel pen.  You can check out the details here.
I stamped the tiny greeting (SU) just below the ATC using black ink.
I love the vibrancy of this card!!

Therese

Tuesday, September 16, 2014

Baseball zig zag card


I joined a swap where I needed to create a zig zag card with a baseball theme. Wouldn't you know it I had this baseball player image in my stash.  I actually had two of them so decided to make two cards.  I created the layout of this card digitally in Corel Draw so it could be printed on white cardstock which would reduce the layers and ensure it could be mailed for first class postage.  I created a background using black dotted lines which mimic a baseball uniform.  I added the baseball image (CLKER) on the left hand side and inserted a little birthday greeting then added the bats (CLKER) at the top of each section.  I duplicated another card on the other half of my sheet, laser printed it and cut them apart by cutting between the bats.  It gives the cards a cool decorative edge.  I folded the cards between the bats, sponged all the edges and used my stipple stamp (SU) with brown ink on a few of the edges.  I added a bit of watercolour to the bats and created a shadow on the baseballs.  I added the layered images of the baseball players on the right hand panels and left the center ones for a personal message.  Love how these worked out!!  They have a bit of a vintage look which I like.  

Therese

Leafy wrist cuff

 Played with felt last week and came up with this leafy cuff for my daughter using scraps she donated to me.  I have limited colours but thought I could make a leaf cuff work.  I chose scraps that were big enough to cut with the TH Tattered Leaves die and cut 12 leaves.  I used wool thread which I obtained at a local thrift shop  - also limited colours.  I found some to coordinate with all of my leaves and did the button hole stitch around all of them hiding my ends in the felt.  I wanted to add a bit of colour so used gold thread in my sewing machine
and added the veining in each leaf. Now came the fun part - layering them to create a pleasing arrangement.  Once I liked the placement, I pinned them to each other to maintain their order and stitched them together.  I used regular sewing thread and hand stitched each leaf to the one below it where they overlapped.  I used very small stitches and did not go all the way through the felt so the underside looks as nice as the front.  I added two little black snaps as a closure which could be moved if it didn't fit perfectly.  As it was, it was just right and she liked it!!

Therese

Friday, September 12, 2014

Washi tape Collage card!!

Our god daughter has a birthday next week and I made her a wahsi tape collage card!!  Super happy with how this one turned out!!  I started with an alcohol ink background  which I had sitting on my desk from a fun day with my sister.  I had stamped it with a script stamp but they had overlapped a bit and made it a bit darker which I found distracted from the whole.  So, I just covered it with washi tape!!  I used a whole strip of the diagonal black and white design which very nicely started a trend so I continued with some pink and polka dots and then a piece of checker next to that on both the top and the bottom!! It was working out well!! I then mounted it to a black card front.  I dug a checkered heart ( Meljens)  from my image stash and watercoloured it to coordinate, added some glittery details with a pink gel pen, fussy cut it out and added it to my card front using 3D foam tape.  I watercoloured my laser printed greeting (CLKER) and thought it needed just a bit of something so I added some pink heart punchies below it!  Just what it needed!!
I have not created a collage card in quite a while and think I will have to try the technique more often!!  It was fun to play with all the elements to make a pleasing design!

Therese

Wednesday, September 10, 2014

Red ornaments on glittered snow!


I would like to say that I have been inspired by the snow of recent days for these cards but I created the background paper and picked out the ornament punchies over a week ago!!  I created the background paper by rubbing dimensional snow paint from a jar onto white cardstock with my finger until it was completely coated and left it to dry. The ornament punchies (SU) are some that I received in a prize from one of my groups. I loved the red colour with the little bit of glitter they had so I thought they would look great on my glittery snow backgrounds. I trimmed my backgrounds to 4" x 5.25" and embossed them with Christmas embossing folders (SX CB).  I punched several leaf branch punchies (MS) from green cardstock and added silver cord hangers to my ornaments.  I positioned the  ornaments on my background first and adhered them with a little strip of 3D foam tape and then positioned the branch punchies so that they could be made to look like they were hanging from them by drawing a black line (Sharpie) between the two.  I glued the branches on with white glue using a fine tip applicator and added a stitch using green thread to ensure that they would not fall off as the card was handled.  I then glued this layer to a white card front!!  Pretty happy with how these worked out!!  I made two of each which adds four to my Christmas card stash for this holiday season!!  That brings my total to 82 from the 78 I had after I made these elf shoe ones.   I have one more sheet of snowy glitter paper so I will have to come up with a design for four more!!
Have you started your Christmas cards??  I have been making a few every month so that they will be ready by the time I need them.  It is not too late!!  You can start today and have fun making them over the next couple of months!!

Therese

A couple more ATC cards!

Here are a couple more cards I created using ATCs from my collection!!
The one on the left features a beautiful koi fish image that was quite glittery.  I layered it over an alcohol ink background I made a while back adding a rust and blue layer along with a flagged strip with blue rhinestones which were coloured with a sharpie marker!!
On the right I layered the leaf ATC onto another alcohol ink background which I bokehed and stamped with a flourish in red.  I added the flagged greeting that coordinated in colour.
These are quick and easy cards because the focal elements are ready to go!!
How many ATCs have you collected?  Do you have them put away or on display? Do you think you will convert some into other projects like cards?

Therese

Monday, September 08, 2014

Subway canvas - Love is . . .

I have been wanting to make a subway art canvas for quite a while and in the last few days I have finally managed to get all the elements together and make it happen!
I bought an 
8 x 10 art canvas at a local discount store and painted it with red acrylic paint in several shades and added a few gold highlights.  I created the subway art in Corel Draw using a wide variety of fonts with the theme of Love is. . . .. 
I reversed it using the Reverse Function in the laser printing process which worked great.  I applied a generous coat of Modge Podge to the canvas and laid my printed art carefully over it (printed side down) and rubbed gently to make sure that the two surfaces were in contact everywhere.  I left it to dry overnight. On hindsight, there was a bit too much glue in some places which created a few ridges.  Those ridges dried and became permanent fortunately they do not detract from the look of the finished piece.  
I generally followed this subway art tutorial at Full of Great Ideas  but I think it is absolutely necessary for the glue to be completely dry before you begin to remove the paper.  As it was, I did lose some detail in some of the letters as I was removing the paper which I touched up with a black fine tip Sharpie.  I followed that with a coat of matte Modge Podge which blended the colours in the letters and covered up any little bits of paper that I had not removed.  I am a happy crafter!!  I will be adding a ribbon hanger and it will be good to go.  I will certainly be making more of these in the future.  
 This is loosely patterned after the bible verse but the verse has so many nots in it that I went looking for words that portrayed positive attitudes and attributes that would provide inspiration for everyone.  I added the I AM and the YOU ARE at the top as a reminder that we must set these goals for ourselves and it behooves us to appreciate these qualities in those close to us.  It is also a reminder that it takes two to create a good relationship and both have to work at it regardless if the relationship is with our spouse, partner, parents, siblings, extended family, friends, etc.  

Therese


Fairy Door


 A fairy door!!  
Everyone should have one just to stay in touch with the other dimensions of life that blur in our awareness as we grow older!!
I did some research when I joined this swap because I had never heard of them before.  What a cool concept!  It keeps the child in us alive!!
It took several weeks to really work out the concept of how I would create the different layers and what features I thought would be necessary in my creation. 


I finally decided that my door would be able to physically open.  I wanted it to open into a world that was airy and not defined by me so I decided to use metallic cardstock behind my door so the world everyone sees when they open it will be of their own making.  I found one on line that had this feature and I liked the idea of it right away.  I wanted my door to have a window to provide light for the world that lay beyond.  I wanted the frame to have a peaceful greeting.  
So last week I started on my door.  I cut two pieces of light weight chipboard to 5.5"x 8.5".  I painted all four sides with black acrylic paint.  While they were drying I went looking for the pieces I would need.  I found the little strip of wood that I used on the frame of my door.  DH is always bringing me little scraps of wood from his shop knowing that I like to add them to my creations!!  It was about two feet long and a 1/16" thick.  Perfect for the frame of my door.  Next, I located the tiles for framing my opening.  I have a stash of letter tiles I have collected over the years from games, etc and so I started there.  I had originally thought I would use Scrabble tiles to keep wood as a theme but when I found these black letter tiles I decided these ones were "the ones" because they would make the words much more subtle.  I laid them on my chipboard and figured out that I needed 22 to go around so started working out a saying that would work with that many letters.  Needless to say, the paint had long been dry but I now had the wood for my door and the tiles for my frame so I could figure out how big my door was going to be.  I measured three times and cut once!!  I cut both pieces of chipboard with the same opening and marked the backs of both of them so I could keep my layers in proper order.  My tiles were a bit shiny so I decided to paint them black with the bit of acrylic paint I had sitting from painting the chipboard.  Dulled them very nicely but not completely - perfect!!  I decided to build my door first.  I measured and cut my wood strip to make the frame all the way around.  I sanded their edges and dry fit them until I was happy how they went together.  Once I knew how much room there was between the frame pieces I decided on my window size - 1.25".  I used my circle cutter to cut the hole in the top layer, placed it on the back layer, traced the hole onto it and used the circle cutter to cut that one too.  Once I laid them back to back I was pretty close so I just tweaked both of them a bit with an exacto knife.  I decided to add some words, so I found a book page that would do and trimmed it to fit under the wood frame.  I found a scallop punchie in kraft and black (prize on one of my groups) and cut a hole in it as well to create a frame for my window.  Next, I worked on the hinges.  I originally thought two would be enough but when I got to this step I decided that three would be better.  I cut them using a latch die (SX) from leather using my Big Shot.  Perfect!!  I knew that I would need just a bit of play in my door to accommodate the hinges so trimmed just a smidge off the door.  Fortunately, I had allowed a border all the way around my wood frame so I did not have to change that.  Next, I dug out my jewellery findings in hopes of finding something that would work as a handle for my door!!  I found an old earring with this beautiful hoop and with a bit of jigging I made myself a door handle!!  With all the pieces of my door ready to go I started assembling.  I started by gluing my book page to the front of my door.  I cut triangles in the window opening and glued all of them to the inside front of the door.  I glued my wood door frame in place using double sided tape and then used a small drill bit to make the holes I needed through all the layers for my brads.  I drilled holes because I did not want to split the wood which easily happens when the wood is so thin.  I used tiny black brads.  They look like bolts!!  I positioned my hinges, used my awl to mark the holes, drilled them out, attached the hinges with double sided tape and added the brads.  Added my little door handle and glued the frame around my window.  I then glued the back to the front which left the inside of the door neat and clean with all the brad tangs hidden between the two.  I used a black permanent marker on the cut edges to remove the kraft colour of the chipboard on those edges.  Once the door was finished I completed my frame by gluing those two back to back.  Onto my tiles!!  They were hollow at the back so I needed to work out a way to glue them to my frame.  In the end, it was an incremental process.  I glued small squares of cardstock to the inside hollow using hot glue then added a square of 3D foam tape to that which gave me the correct depth to attach to my frame.  I positioned them on the frame to find that I had made a slight error - I had not trimmed my chipboard before I created the door so now I had a half inch on both sides of the frame that was untiled!!  I went looking for something that would do the job of filling that space.  I found a bike reflector (found object on one of my walks) that was the perfect size after I cut it out of its holder and trimmed it in half using a hack saw.  Sanded the edges, added several cardstock layers to the inside and two layers of double sided tape and they were ready to be added to my frame.  I laid out all the tiles and made sure they were all in the correct order before I started gluing them into place.  I started in the top left hand corner and did all that side applying LOTS of pressure to get the foam tape to stick completely to the chipboard.   Next, I started in the right hand corner and started placing tiles.  On my fourth tile, I realized that the last two were flipped though it was difficult to tell because they were an "H" and an "O".  I immediately applied some heat and gently lifted them up.  They did tear a bit of the chip board's painted surface but I was able to repair that and reposition the tiles!!  The little reflectors fit just perfectly at the bottom of each frame and will allow the door to been seen at night!!  A feature I had not intended but adds nicely to the design of my fairy door.  I cut a piece of silver metallic cardstock just slightly smaller than the back and glued it in place using double sided tape!!  The door jammed a bit after it was all assembled and I trimmed it a bit.  I should have waited a bit longer because after everything dried for a bit it may not have been necessary after all but what was done was done - a lesson learned.  In the end, the gap between the door and the frame is a little larger than I would have liked but it works well which is the important thing.  So, it has been pressing for the last day.  I will be packing it up today and sending it on its way to my partner!!
I thoroughly enjoyed the process of creating this little door and I look forward to finding a place in my craft room for the one I will be receiving in return!!

Therese