This is what my work area looks like since the beginning of the new year. Needless to say, it has not always looked like this but I had to clean up my space completely before the holidays because we had company and we needed the space in this room to accommodate a bed. Fortunately, it was DH and I who slept in the bed so being surrounded by boxes of supplies was not a surprise to us. I am making a serious effort to clean up after each project and keep the area ready for the next one!!
Therese
Saturday, January 10, 2015
Friday, January 09, 2015
Chunky book covers
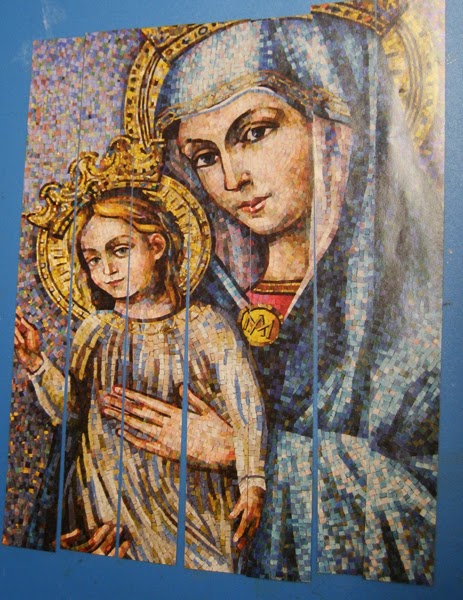
On one of my groups we are going to be having a 4"x 4" fat book page swap every month so for January we have been challenged to make covers for our books! The theme for the swap is Shades of Colour. After a bit of "sitting" with the concept I decided to use the following magazine cover to create my book covers.
I loved this mosaic image as soon as I saw it on the cover of a magazine that arrived before Christmas!! When it was time for the magazine to be recycled I tore off the cover not sure what I was going to be doing with it.
I cut off the text and cut the remainder into 1" squares.
I sorted the squares into colour groups - sixteen blueish ones for the front cover and sixteen mulit-colour for the back cover. I glued them to edge to edge onto white cardstock, pressed them under weight and trimmed them to just under a four inch square.I cut off the text and cut the remainder into 1" squares.

I cut two 4"x 4" pieces of chipboard and glued my collages to them. I used decorative packing tape to finish off the edges.

I cut the tape in two, adhered the white edge to the front of my covers and folded the remaining part with the letters to the back creating a nice collage on the inside covers as well. I am super happy to have created art with this beautiful piece of paper that manages
to maintain the beauty of it without keeping the original context. I love how you can see eyes, a mouth and fingers on the back without really knowing where they come from.
I will be binding my pages from the swap into the covers using my Zutter Bind it all machine using a large binding which will give me lots of room to add charms, fibers and tags if I wish.
I added ribbon and a 3D embellishment to my cover. The embellishment is one I created when my grand daughter was visiting this summer. We played with bottle caps and I filled this one with a punchie that says, "Think HAPPY, BE happy". I glued it to the cavity of a flatten bottle cap, added some clear Dimensional Magic and then inserted the blue iridescent beads all the way around the words and left it to dry. The colours are a perfect match for my covers. I used double side tape to adhere my ribbon to the outside and inside of my front cover and tied the ends together at the top. I used an awl to make holes in my bottle cap and my covers then used coordinating thread to stitch it to my cover over the ribbon.
So the journey begins!! I am looking forward to the swap and all the interesting pages I will receive this year. As the cover says, we must think to be happy, nurturing the good that arrives in our lives and being grateful for every blessing is what will bring us happiness.
Enjoy what you love today!!
Therese
Thursday, January 08, 2015
Large cards with lovely little girl in pink & green!
I made theses cards for my monthly card exchange. They are large 5"x 7" cards - I found some envelopes with flat cards in my stash and decided to use them up.
For each card, I started with a 5.5" x 4.25" piece of scrappy collage paper I created a while back. I cut them in two so they would be large enough and added a layered tape border over the gap. This tape - sort of like duct tape - arrived on my Christmas Secret Sister gift. I was able to remove it intact so I saved it!! The colours were perfect for these cards. I glued those elements in place and went looking for images and greetings. I found these two images of little girls by Lilac and Lavendar which I thought would do perfectly so I trimmed them to size and watercoloured them. The greetings were in my stash - I layered them with colour coordinated label punchies (SU) which I cut in two so they would provide just a nice frame around them. I glued the images in place over the tape border and added the layered greetings to the lower right. I thought that the image on the pink card needed a bit of something so I added a gel pen faux stitching border. I added a dotted line border with the same gel pen on the greeting on the green card for the same reason. I love this colour combination!!
Therese
For each card, I started with a 5.5" x 4.25" piece of scrappy collage paper I created a while back. I cut them in two so they would be large enough and added a layered tape border over the gap. This tape - sort of like duct tape - arrived on my Christmas Secret Sister gift. I was able to remove it intact so I saved it!! The colours were perfect for these cards. I glued those elements in place and went looking for images and greetings. I found these two images of little girls by Lilac and Lavendar which I thought would do perfectly so I trimmed them to size and watercoloured them. The greetings were in my stash - I layered them with colour coordinated label punchies (SU) which I cut in two so they would provide just a nice frame around them. I glued the images in place over the tape border and added the layered greetings to the lower right. I thought that the image on the pink card needed a bit of something so I added a gel pen faux stitching border. I added a dotted line border with the same gel pen on the greeting on the green card for the same reason. I love this colour combination!!
Therese
Monday, January 05, 2015
Teesha Moore inspired Postcard
I joined a postcard swap on one of my groups!! The Theme: a raised letter A in Teesha Moore style!! I started with a 4" x 6" lightly coloured alcohol ink background that I had in my stash. I used my new Dylusions - Triangles - stencil which I got for Christmas from my sister to add some texture on the right hand side. I simply placed it over the background and sponged some inks through the holes - purple, green, teal & blue.

I punched the left hand side with a Fiskars ribbon slot punch, added some doodling around the holes using a fine tip Sharpie and then did all the way around the postcard edges using a wider black permanent marker. It added the contrast I like in my favorite Teesha Moore art. Then, I went looking for elements I could add to my collage. I started with the chipboard "A" which fit right in and then found a cool sister poem on the gift tag I received from my sister this Christmas (will have to find out where she got it), a teal coloured glittery heart, a little fairy girl and a couple of butterfly punchies. These struck my fancy and complimented the colours of my background very nicely!! I did sponge the poem with the same colours I had used on the stencil to get it to coordinate.
With my elements chosen I gave some thought to how I was going to add words. Teesha often writes between the lines in her art so I drew wavy lines from the dips on my left hand border and added dots in between. Really liked that!! The border needed a bit more colour, so I used a variety of gel pens to colour in all around the slots. That was better!!
I glued down my sisters poem and used 3D foam tape to adhere my "A" in place. It needed a bit more contrast so I added some black doodling to it. The poem also needed a bit of something so I added some black dots on three sides and some drops of coordinating nail polish to the right hand side of it. With those main elements in place I started adding words using a variety of hand lettering with a fine tipped Sharpie marker. I started by adding "sister" next to my "A" and kept adding words and doodles between the lines. I did get some inspiration for my lettering from Jenny Doh's book - Creative Lettering. Once I had filled all the lines, I glued on my butterflies, the glittery heart and the fussy cut little girl. I found the coordinating fiber in my stash which was off my sister's gift!! It was so fun that I was able to incorporate so many elements that she gave me into this collage!!! I tied the end of the fiber into the first slot and then cut it off. Tied it into a different slot and cut it off. I repeated the process until I had filled all the slots and no fiber remained - perfect!! I really love how much texture it adds to the final piece. I added another 4"x 6" postcard to the back and hand lettered "postcard", added a dividing line and little postage square in the corner. I am very happy with my postcard!!! We will be doing monthly postcards on the group - I am looking forward to doing more letters using different techniques. You can check here to see the "R" postcard I made using the Tim Holtz January Tag as inspiration.
If you received some crafty items for Christmas, dig them out and use them!! Get creative today!!
Therese

I punched the left hand side with a Fiskars ribbon slot punch, added some doodling around the holes using a fine tip Sharpie and then did all the way around the postcard edges using a wider black permanent marker. It added the contrast I like in my favorite Teesha Moore art. Then, I went looking for elements I could add to my collage. I started with the chipboard "A" which fit right in and then found a cool sister poem on the gift tag I received from my sister this Christmas (will have to find out where she got it), a teal coloured glittery heart, a little fairy girl and a couple of butterfly punchies. These struck my fancy and complimented the colours of my background very nicely!! I did sponge the poem with the same colours I had used on the stencil to get it to coordinate.
With my elements chosen I gave some thought to how I was going to add words. Teesha often writes between the lines in her art so I drew wavy lines from the dips on my left hand border and added dots in between. Really liked that!! The border needed a bit more colour, so I used a variety of gel pens to colour in all around the slots. That was better!!
I glued down my sisters poem and used 3D foam tape to adhere my "A" in place. It needed a bit more contrast so I added some black doodling to it. The poem also needed a bit of something so I added some black dots on three sides and some drops of coordinating nail polish to the right hand side of it. With those main elements in place I started adding words using a variety of hand lettering with a fine tipped Sharpie marker. I started by adding "sister" next to my "A" and kept adding words and doodles between the lines. I did get some inspiration for my lettering from Jenny Doh's book - Creative Lettering. Once I had filled all the lines, I glued on my butterflies, the glittery heart and the fussy cut little girl. I found the coordinating fiber in my stash which was off my sister's gift!! It was so fun that I was able to incorporate so many elements that she gave me into this collage!!! I tied the end of the fiber into the first slot and then cut it off. Tied it into a different slot and cut it off. I repeated the process until I had filled all the slots and no fiber remained - perfect!! I really love how much texture it adds to the final piece. I added another 4"x 6" postcard to the back and hand lettered "postcard", added a dividing line and little postage square in the corner. I am very happy with my postcard!!! We will be doing monthly postcards on the group - I am looking forward to doing more letters using different techniques. You can check here to see the "R" postcard I made using the Tim Holtz January Tag as inspiration. If you received some crafty items for Christmas, dig them out and use them!! Get creative today!!
Therese
Labels:
border punch,
chipboard,
clipart,
doodling,
fiber,
gel pen,
glitter,
ink,
postcard art,
punchies,
sharpie markers,
sponging,
stencil,
teesh moore
Angel favours!!
I created these favours for the Christmas Dinner for my family on Boxing Day!! My daughter found these little angel ornaments on her vacation this summer and thought they would be great for the favours. I agreed and started brainstorming ideas!! The angels had twine hangers sticking out of their heads and nothing I thought up seemed to work with that feature so I decided to remove the hangers. With a good swift tug, most came out clean. Others, needed more convincing but eventually complied. I filled the holes and painted them over with white paint. That was better!!! I decided that a round ornament would work well as a favour and could then be displayed on the tree in future years. I have several on my tree from previous years where my sisters offered up ornaments as favours. A 2.75" circle was sufficient to frame the angels so I cut them from a variety of red glittery decorative paper. I layered the red circles onto white scalloped circles - both were cut with Nestibilities. I did add a white crochet cotton loop between the two layers to accommodate a hanger. I used GOOP to glue the angels to the circles. I seriously considered adding glitter to the scallops and in the end decided that simple and elegant was a better choice and left them as is. I added a circle on the back with year & event info and added a name tag to each one to indicate everyone's seat for our meal. I am very happy with the way they turned out and I hope everyone will remember the fun of this Christmas when they add the ornament to their trees as the years go by.
Therese
Labels:
3D embellishments,
decorative paper,
favour,
glitter,
Nestabilities,
ornament,
scallop edging,
thread
Saturday, January 03, 2015
Tim Holtz January Tag Challenge
Happy New Year!!
Wishing you and yours every blessing in 2015!!
It has been a busy holiday season with not too much creative time but I did manage some crafting today.
On one of my groups we are considering a Tim Holtz monthly tag swap or challenge so I decided to see what I could create in the creative spirit of Tim Holtz's January Tag! I was not interested in copying his tag exactly so I decided to do a 4"x 6" postcard instead and liberally substituted what I had for what he used in the way of product and put my own spin on the elements as well. I made a list before I headed to the craft room - tissue paper, paint, distress stains or spray, words, metal embellishments, glitter and seam binding which was my guide to the products which he used.
Tissue paper - I do have a wonderful piece of TH tissue paper which was gifted to me by my altered cuff swap partner and I set it aside in a "safe" place so I could use it for a project just like this. Needless, to say today when
I could have used it, it was no where to be found. I eventually gave up and dug out a piece of sewing pattern tissue and stamped it with a background newspaper stamp (IO) in black permanent ink to create tissue paper for my project. I could have chosen to create more of a collage look by choosing a variety of stamps instead. I am happy with what I produced. I did stamp a much larger piece than I needed so I will have some for future projects.
I started with a 4"x 6" glossy photo paper which I washed with some gray watercolour. I have a few of these colour palettes which I used previously for classes that I will be using up in my projects this year in a effort of using up what I have.

I applied glue to the whole front of my postcard, laid my piece of tissue over it and burnished it well. Once it was dry, I trimmed all the way around with my scissors. I chose a piece of tissue that was not too busy and featured only a few of the original lines on the sewing pattern.
Next, I went looking for distress stains or sprays. I had purchased vintage inks from Stampin Up a while back and thought they would do nicely for the spritzing I needed to do next. I mixed up some mahogany which turned out to not be as red as I had expected and then dried lighter. I chose Tea Stain (SU) next and found that it just blended into the surface and did not show up at all. Needing to add a bit of colour I decided to use Charcoal. That did the trick - it added colour in some very nice splotchy areas along with some nice spattered sections. Just what I needed. I tend to mix sprays as I need them instead of having some on hand. I admit that it means that I don't use them as often. Maybe this year I will use them more often by mixing more than I need and leaving it in the spritzer for next time.
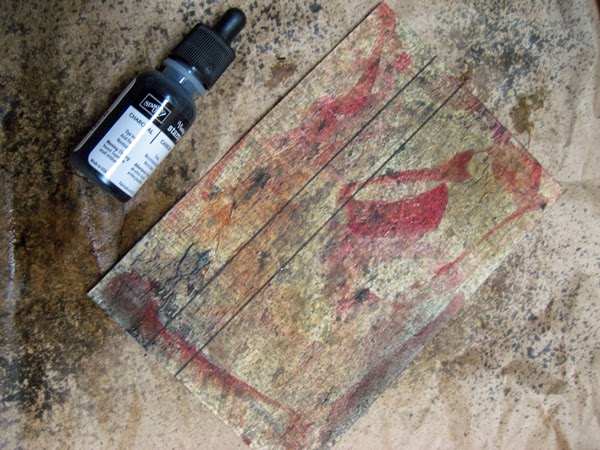

While the sprays were drying, I went looking for the other items I needed. I found stamped words (SU) in my greetings bucket which I cut apart and trimmed. I found a chipboard R which will work for one of my postcard swaps - bonus! Found some metal screening and a TH "wonderful" metal tag and decided that my next element should be a "U" which I die cut from shiny silver cardstock using a SU alphabet die. When I checked the list I still needed glitter
and seam binding so checked my heart bucket and found a red glittered heart and my stash of vintage seam binding and found some coordinating red seam binding which I had dyed for a previous project which was perfect. I used a permanent black marker on the chipboard "R" - completely covering up the bright pink!! Perfect!!
Once my postcard was dry I arranged my words, letters, red glitter heart and the metal embellishments. I decided to tie the seam binding to the R which worked in all of my elements. Once everything had a home I glued the words in place. I used three black diamond brads to attach the silver metal screening, a vintage gold brad to attach the round TH "wonderful" embellishment and three black mini brads to attach my "U". I tied a short length of the red seam binding to the stem of the "R" using a double knot, attached it with 3D foam tape and tucked the seam binding ends in around the "U". The glittered red heart was added using double sided tape. The words seemed too stark so I used the same gray watercolour I had used on the postcard front and added several light washes to tone them down a bit. I also added a bit of black to some of them to better define their edges.
I am very happy with my postcard and having used the "R" I can use it for the postcard swap for the end of the month!! So, a good use of my crafting time today as I managed to get the TH tag challenge done in the same project as the "R" postcard swap!!
Therese
Tuesday, December 30, 2014
Navy and purple felted wool cuff
seam so it would camouflage it was much as possible. I started by doing buttonhole stitch all the way around using thin lavender wool yarn (thrift store find). I positioned the focal element (thrift store find), pinned it in place and sewed it in place using embroidery thread that was the same colour. I wanted to add yet more texture but not take away from the beauty of the embroidered piece so went looking for seed beads I could use to embellish it with. I found these that did exactly what I wanted - they almost look like stars in the night sky!! I sewed them on randomly using navy embroidery thread so the stitching does not show.
This wood bead was just the right colour so I drilled an extra hole in it to make it a button and sewed it on with navy thread. I created a wrap by braiding three pieces of lavender wool yarn into a string which will create an adjustable closure on this cuff.
Really happy with how this one turned out and love the colours!
The giftie swap was for Christmas so this is appearing here only after the gift has arrived and been opened by the recipient.
Therese
Labels:
adjustable closure,
buttons,
cuff,
embroidered element,
fiber,
glass beads,
hand stitching,
thread,
wood,
wool felt
Another ATC card - anniversary
This card features an ATC from my traded collection. I liked that this collage had a heart so I decided to use it to make an anniversary card. I stippled my orange card front using my stipple stamp (SU) and brown ink. I stitched on this piece of burlap which was sitting on my desk with orange thread and then stitched on the ATC using the same thread. I love how all the pieces look together. I trimmed this laser printed greeting, watercoloured it to coordinate with the card and adhered it using double sided tape.
Hope you are enjoying your holiday season and are grateful for every blessing you have received in 2014!! I am!! Wishing every thing good in the 2015!
Therese
Hope you are enjoying your holiday season and are grateful for every blessing you have received in 2014!! I am!! Wishing every thing good in the 2015!
Therese
Labels:
A2,
ATC,
burlap,
cards,
colour printed accents and greetings,
laser printing,
stippling,
stitching,
watercolour
Monday, December 29, 2014
Gray and rust felted wool cuff
I have joined a swap on one of my groups where we are swapping little gifts for Christmas. I have decided to make cuffs for the participants so needless to say these are only appearing here after they have been opened for Christmas by those who received them.
I started with felted wool scraps that my daughter gave me after she was finished her large projects like table runners and teapot cozies. I started with gray wool (1 1/2" x 8 1/4") for this one and did buttonhole stitch all the way around using dark gray thread. I added the rust fiber using my sewing machine in free form arrangement. I die cut a little row of ovals out of dark red felted wool using a large Sizzix border die. I pinned it in place over the fiber and sewed my embellishments in place through all the layers.
The little circles are plastic and the others are a combination of gold sequins and black seed beads. After sewing the embellishments in place I went back adding a stitch between each little oval using the same black thread. Finally, I added two black beads on the end that combined with the long length of fiber creates an adjustable closure for this cuff.
I am enjoying making cuffs. You can check here, here and here for some I have made recently. I did several others over the summer unfortunately I did not get photos of those.
Therese
I started with felted wool scraps that my daughter gave me after she was finished her large projects like table runners and teapot cozies. I started with gray wool (1 1/2" x 8 1/4") for this one and did buttonhole stitch all the way around using dark gray thread. I added the rust fiber using my sewing machine in free form arrangement. I die cut a little row of ovals out of dark red felted wool using a large Sizzix border die. I pinned it in place over the fiber and sewed my embellishments in place through all the layers.
The little circles are plastic and the others are a combination of gold sequins and black seed beads. After sewing the embellishments in place I went back adding a stitch between each little oval using the same black thread. Finally, I added two black beads on the end that combined with the long length of fiber creates an adjustable closure for this cuff.
I am enjoying making cuffs. You can check here, here and here for some I have made recently. I did several others over the summer unfortunately I did not get photos of those.
Therese
Labels:
3D embellishments,
beads,
die cuts,
fiber,
glass beads,
hand stitching,
sequins,
sewing,
stitching,
thread,
wool felt
Sunday, December 28, 2014
Secret Sister card with clipart image
I have been participating in a Secret Sister swap on one of my groups and I made this card for mine. It is appearing here because she now knows who I am!!
I used a commercial image that I received as a prize some time last year and trimmed it to have an even border. I used a pink card front which I stippled on the edges using pink ink with my stipple stamp(SU). I added a green layer which I tore on the right hand side which I stippled with green ink. I added a bit of lace to it before I glued it to the pink card front. I layered my image over the lace and stamped a little "Hello" below its lower right hand corner.
Has been fun being a secret sister!!
Therese
I used a commercial image that I received as a prize some time last year and trimmed it to have an even border. I used a pink card front which I stippled on the edges using pink ink with my stipple stamp(SU). I added a green layer which I tore on the right hand side which I stippled with green ink. I added a bit of lace to it before I glued it to the pink card front. I layered my image over the lace and stamped a little "Hello" below its lower right hand corner.
Has been fun being a secret sister!!
Therese
Saturday, December 27, 2014
Another couple cards with serendipity collage
I have been on a collage kick for the past few days and here are a couple more cards that use a serendipity collage. I used green and blue for this serendipity and it ended up with some orange in it too which was kind of fun.
I created the collage on 8.5" x 11" scrap paper using a regular glue stick, stamped it with a newspaper column background stamp (IO) using green ink.
For this card, I punched the left hand side with a chevron punch (SU) and backed the holes with navy cardstock. I added a navy gros grain ribbon and stitched the whole layer to an orange card front using orange thread. I added a colour printed greeting which I trimmed to look like a tag to the ribbon using orange fiber. I created a bit of a collage on the right hand side using a colour printed light house image (mine) and a green and blue rectangle. Once the collage was in place I used double sided tape to adhere the greeting in place. The large white area to the left of the greeting seemed to pop too much so I dug through my used postage stamps and found this one that had the right colouring and size. I glued it in place with double sided tape. That was much better!!
For this card, I used an ATC from my traded collection which features a beautiful little bird done in glittery transparent embossing paste. I started by adding navy ribbon to my serendipity collage and then stitched the whole thing to my green card front using red thread. I added a colour printed greeting to the bottom edge of the ATC and then adhered this element to my card front using double sided tape.
Using ready to go focal elements makes for quick and easy cards!!
Therese
I created the collage on 8.5" x 11" scrap paper using a regular glue stick, stamped it with a newspaper column background stamp (IO) using green ink.
For this card, I punched the left hand side with a chevron punch (SU) and backed the holes with navy cardstock. I added a navy gros grain ribbon and stitched the whole layer to an orange card front using orange thread. I added a colour printed greeting which I trimmed to look like a tag to the ribbon using orange fiber. I created a bit of a collage on the right hand side using a colour printed light house image (mine) and a green and blue rectangle. Once the collage was in place I used double sided tape to adhere the greeting in place. The large white area to the left of the greeting seemed to pop too much so I dug through my used postage stamps and found this one that had the right colouring and size. I glued it in place with double sided tape. That was much better!!
For this card, I used an ATC from my traded collection which features a beautiful little bird done in glittery transparent embossing paste. I started by adding navy ribbon to my serendipity collage and then stitched the whole thing to my green card front using red thread. I added a colour printed greeting to the bottom edge of the ATC and then adhered this element to my card front using double sided tape.
Using ready to go focal elements makes for quick and easy cards!!
Therese
Friday, December 26, 2014
Wire & Bead ornaments for ByHand giftie swap
I worked up this ornament for a different swap on a different group but when my original idea for the gifties for this swap became too time consuming I decided to just make a few of these instead!! I am very happy with how they turned out!! I managed to make them all different using my supply of Ebeads. I did all the beading first - there were beads everywhere!! I put all those supplies away and then dug out the ribbon and started matching ribbon to the contrasting beads. I am always amazed that with hundreds of rolls of ribbon sometimes I cannot find a really good match - for those I came up with a colour that worked even if it didn't match perfectly.
You are seeing these here now because all the gifties made it to their recipients and patiently waited for their turn to be opened on the days leading up to Christmas.
Our tree is full of handmade ornaments and each has a memory attached!! I hope these all found their way to Christmas trees this season and will be lovingly put away to be enjoyed next year and maybe even for years to come!!
Therese
PS
You can check out the tutorial for this ornament by clicking the link to Tutorials just under my header at the top of this page.
You are seeing these here now because all the gifties made it to their recipients and patiently waited for their turn to be opened on the days leading up to Christmas.
Our tree is full of handmade ornaments and each has a memory attached!! I hope these all found their way to Christmas trees this season and will be lovingly put away to be enjoyed next year and maybe even for years to come!!
Therese
PS
You can check out the tutorial for this ornament by clicking the link to Tutorials just under my header at the top of this page.
Thursday, December 25, 2014
Shabby chic card
I made this card for my Secret Sister on one of my groups earlier this year and scheduled it to appear here now that she knows who I am!!
I started with a taupe card and when I was finished it I signed my name on the back!!!!!!!!!! Bummer, I cut the front off the card and remounted it to a warm blue card front and found a larger envelope to put it in!!!
I stamped the taupe card with a flourish background stamp (IO) in a blue green colour. I mounted over that a element I created that features a layered flower and some lace. I used a backer that came with Prima Flowers as a base. I trimmed the top using a label die (TH) and a partial cutting plate in my Big Kick.
Having a partial plate allows you to position your plate therefore only cutting certain parts of a die!! I really like having that flexibility. Where did I get a partial plate?? It is the remnants of a full plate that broke in two pieces so in effect I have two partial plates!!
I distressed the outer edge, stippled the edges in several colours and then sponged on a bit of brown. I added a short piece of lace across about two thirds down and attached the ends on the back using double sided tape. I used the Tim Holtz Tattered Flowers die and cut the large one from an alcohol ink background that coordinated, a smaller one from gold coloured vellum and the smaller one from the scrap I cut off the top of the Prima packaging. I added a button brad to hold them all together which I distressed with a green Sharpie marker. I attached the layered flower to the layer using double sided tape and stamped a greeting below the lace using a clear stamp set in a blue green ink.
It is a little out of my ordinary in regards to style but I am trying to do create cards that will not give me away!!
Therese
I started with a taupe card and when I was finished it I signed my name on the back!!!!!!!!!! Bummer, I cut the front off the card and remounted it to a warm blue card front and found a larger envelope to put it in!!!
I stamped the taupe card with a flourish background stamp (IO) in a blue green colour. I mounted over that a element I created that features a layered flower and some lace. I used a backer that came with Prima Flowers as a base. I trimmed the top using a label die (TH) and a partial cutting plate in my Big Kick.
Having a partial plate allows you to position your plate therefore only cutting certain parts of a die!! I really like having that flexibility. Where did I get a partial plate?? It is the remnants of a full plate that broke in two pieces so in effect I have two partial plates!!
I distressed the outer edge, stippled the edges in several colours and then sponged on a bit of brown. I added a short piece of lace across about two thirds down and attached the ends on the back using double sided tape. I used the Tim Holtz Tattered Flowers die and cut the large one from an alcohol ink background that coordinated, a smaller one from gold coloured vellum and the smaller one from the scrap I cut off the top of the Prima packaging. I added a button brad to hold them all together which I distressed with a green Sharpie marker. I attached the layered flower to the layer using double sided tape and stamped a greeting below the lace using a clear stamp set in a blue green ink.
It is a little out of my ordinary in regards to style but I am trying to do create cards that will not give me away!!
Therese
Wednesday, December 24, 2014
Serendipity collage cards
While I was digging in my scrap bucket for the strips for these cards I found a baggie of scraps I had been saving to make another serendipity collage similar to the one I used here adding in a few more coordinating scraps that were still sitting on my desk. I used an 8.5" x 11" piece of scrap paper as my base and glued my coordinating scraps which were torn into small pieces randomly onto the surface using a regular glue stick. Once it was dry, I stamped the final piece using a flourish background (IO) using red ink. I cut the sheet into quarters and used two of them to make these cards.
For this card, I cut out a square using Nestabilities and stitched the remaining frame to a rust coloured card front using my sewing machine with rust coloured thread. I trimmed a watercoloured stamped image of a coffee cup to fit perfectly in the opening and glued it into place. I added a flag ended colour printed greeting just below using 3D foam tape.
For this card, I used a label punch (SU) to punch a hole in the top portion of my quarter sheet collage, inserted a punched colour printed greeting into the aperture and used tape on the back to keep it in place. I added a row of coordinating ribbon pieces below it placing another piece of ribbon through the middle of them which I sewed in place thereby securing all of them to my collage. I sewed the collage to a rust card front and added a layered punchie flower over the ribbon accent using double sided tape.
Really liking these collage for giving my cards an unique artsy look!!
Therese
For this card, I cut out a square using Nestabilities and stitched the remaining frame to a rust coloured card front using my sewing machine with rust coloured thread. I trimmed a watercoloured stamped image of a coffee cup to fit perfectly in the opening and glued it into place. I added a flag ended colour printed greeting just below using 3D foam tape.
For this card, I used a label punch (SU) to punch a hole in the top portion of my quarter sheet collage, inserted a punched colour printed greeting into the aperture and used tape on the back to keep it in place. I added a row of coordinating ribbon pieces below it placing another piece of ribbon through the middle of them which I sewed in place thereby securing all of them to my collage. I sewed the collage to a rust card front and added a layered punchie flower over the ribbon accent using double sided tape.
Really liking these collage for giving my cards an unique artsy look!!
Therese
Saturday, December 20, 2014
Scrappy collage and cards
I am always looking for ways to use my scraps so I dug out these 3/4" wide strips from my stash and decided to find a way to use them up. I cut these for making a patchwork layout for a journal class a few years ago, then for a log cabin patchwork for a cardmaking class and used a few more for paper beads for another class. They are sorted by colour so I picked green and pink - my favorite combination - and glued them end to end then side by side on an 8.5" x 11 scrap of used printer paper which was sitting by the printer. Once dry, I cut it into quarters and stamped two of them with pink ink and the other two with green ink using a newspaper column background stamp (IO). I cut one of the green quarters into two and started cardmaking!!
For this card I used one of the collages I had stamped with pink. I cut the quarter into two and used one of the halves for this card. I cut the 2.75" x 4.25" piece randomly into six pieces, glued them to brown cardstock and then machine stitched all the way around using brown thread. I trimmed the brown cardstock to leave a large border on the bottom to accommodate my laser printed greeting and an even border on the three other edges. I added my sponged greeting and a coffee cup image which I had punched with a 1.75" circle punch (SU) and layered with pink before I glued the whole piece to a kraft card front.
Two cards ready to go for the new year!! That leaves me three full quarter sheets of this collage to play with later on and the possibility of creating another six cards with this collage which I created out of scraps!! I like the artsy and unique look I get when I create these collages for my cards.
Therese
Wednesday, December 17, 2014
Christmas Tag printables!!
Wrapped gifts earlier today and I could not find my stash of gift tags!! It is possible that the collection ended up in my serendipity bucket!! Anyway, after reading about printables on this blog, I decided to see what I could find to just print!! LOTS of choices out there!! These ones coordinated the best with my gift wrapped gifts so I printed them (on cardstock) directly from the website - "control P" and I got a window from which I could print the file!!! Too easy! I trimmed around them and punched a hole and they were ready to go!! Here is a link directly to the blog post on Caroline Johansson's blog.
The gifts are wrapped!!
Therese
The gifts are wrapped!!
Therese
Brown paper packages tied with string
Hey! Just here to share a really easy gift wrapping idea - brown paper tied with string!!
The brown paper showed up yesterday in a package that was delivered to the house!! A long length of brown paper perforated every foot or so which I thought could easily be repurposed for decorative paper but later in the day I thought "I need a very simple wrapper for this gift" and remembered the brown paper. I ripped off one length, folded it in half, ironed it flat and used my sewing machine with green thread to seal up both sides using a zig zag stitch!! I tied it closed with some red cotton string!! Too easy!!!!
Hope you holiday prep is going well. The gifts are now wrapped and will go under the tree once we set up the tree - probably on the weekend!
Therese
The brown paper showed up yesterday in a package that was delivered to the house!! A long length of brown paper perforated every foot or so which I thought could easily be repurposed for decorative paper but later in the day I thought "I need a very simple wrapper for this gift" and remembered the brown paper. I ripped off one length, folded it in half, ironed it flat and used my sewing machine with green thread to seal up both sides using a zig zag stitch!! I tied it closed with some red cotton string!! Too easy!!!!
Hope you holiday prep is going well. The gifts are now wrapped and will go under the tree once we set up the tree - probably on the weekend!
Therese
Labels:
cording,
machine stitching,
packaging,
sewing,
thread
Sunday, December 14, 2014
Birthday card with botanical collage
I created the collage for this card when I was working on this calendar. I laid a dried flower over a page from a song book, covered it with a piece of white tissue paper coated with matt Modge Podge and added another layer over the the whole thing. Love how the flower petals have become translucent so you can see the music notes through them. I also love the wonderful texture provided by the dimension of the flower's center and the stem.
To make my large card, I started by trimming my collage to fit my card front and glued it in place. I added a wrap of lovely fiber to the left hand side finishing with a double knot. I trimmed the vellum Happiness quote and included it when I stitched a couple times around the collage using wonky lines. I added a punchie greeting layered over a scallop punchie in coordinating colours. The greeting is embellished with a bit of gel pen and sponged around the edge.
Going out to a girl who loves music and deserves every happiness!!
Therese
To make my large card, I started by trimming my collage to fit my card front and glued it in place. I added a wrap of lovely fiber to the left hand side finishing with a double knot. I trimmed the vellum Happiness quote and included it when I stitched a couple times around the collage using wonky lines. I added a punchie greeting layered over a scallop punchie in coordinating colours. The greeting is embellished with a bit of gel pen and sponged around the edge.
Going out to a girl who loves music and deserves every happiness!!
Therese
Wednesday, December 10, 2014
Ornament perfect for mailing
I made a few of these ornaments for including to friends and family in my Christmas cards!! It is perfect for sending along as a "little gift".
I used a large white cardstock scallop circle to which I glued a 3" circle of decorative paper capturing a loop of white crochet thread between which serves as a hanger. I added a white cardstock die cut of a tree which I embellished with a silver confetti star. I signed the back and have sent them on their way.
My Christmas cards are ready to go!! A little later than I thought I would have them ready but I am glad to send them on their way to friends and family.
Therese
I used a large white cardstock scallop circle to which I glued a 3" circle of decorative paper capturing a loop of white crochet thread between which serves as a hanger. I added a white cardstock die cut of a tree which I embellished with a silver confetti star. I signed the back and have sent them on their way.
My Christmas cards are ready to go!! A little later than I thought I would have them ready but I am glad to send them on their way to friends and family.
Therese
Labels:
Christmas,
confetti,
decorative paper,
die cuts,
ornament,
scallop edging,
thread
Thursday, December 04, 2014
Another calendar with birdie photos
I made another birdie calendar with the photos from my second 2014 photo calendar. Here is the first on I made. I have enjoyed the calendar all year on my desk and have now given it a new life and it will bless someone else this coming year. I wanted this one to have a lighter feel so I used blue cardstock (8.5" x 5.5") and stamped it on the top portion with a newspaper text background stamp (IO) using Versamark ink. Because it darkens the cardstock colour it always coordinates. It was just as much texture as I was wanting. I trimmed the blue bird images (4" x 4") off the original photo calendar (4" x 6") and layered them onto 4.25" squares of black paper before I glued them to the top of the calendar pages. I printed another of the calendars I created for the first one, trimmed them to leave a slim border and glued them below the layered photos. I added a length of wide white gros grain ribbon in between and added a little flower sequin with a brad on the left hand side. I added all the flowers before I used double sided tape to affix the right hand side of the flagged ribbon which covers the back of the brad from the other side. I added a silver bull clip at the top to keep the pages together. The calendar can now be hung on a pin or nail, attached to any metal surface with a magnet or will stand on its own on the bottom edges of the pages.
Here are the rest of the pages I created for this calendar. Again, this is a double sided one - January to June are on one side and July to December are on the back.

I have really enjoyed creating these calendars for gift giving this year. I have more ideas for next year!!
Therese
Here are the rest of the pages I created for this calendar. Again, this is a double sided one - January to June are on one side and July to December are on the back. 
I have really enjoyed creating these calendars for gift giving this year. I have more ideas for next year!!
Therese
Labels:
birdie,
brads,
calendar,
collage,
digital art,
digital image,
IO - Impression Obsession,
ribbon,
sequins,
stamping,
versamark
Subscribe to:
Posts (Atom)