Saturday, April 15, 2017

Mother's Day cards from card kits


I made up these two card from card kits that I have on hand from a while back.  For both of these, I cut the decorative paper twice - once vertically, once horizontally though I did angle the second one a bit which created a different effect.  The pieces are glued to the layer leaving a bit of room between them and all around the edges then it is glued to the coordinating card front.  Both of these have layered greetings created from round digital images.  The round greeting image is one I found on The Spruce.  I added a silk flower and some leaves with a sequin and brad to the one on the left which I had laser printed as is. On the right hand one, I digitally added a little flower digital image from Meljens Designs before laser printing and watercolouring it.  I sponged both with a bit of colour before layering them onto coordinating scalloped circles which I cut using Nestibilities.  I added dots on the pink one using a silver gel pen.  Cards from kits is always very quick because part of the work is already done!!  Nice to have a few of those on hand.        

Therese

Friday, April 14, 2017

Mother's Day cards created reusing card fronts


Mother's Day is coming and I am preparing a few cards for my stash.  I decided to see how many I could make reusing old card front which have been donated to me.  
For the first card I trimmed out a floral element then gold embossed a greeting on the lower left, added a pink foil layer and glued this large element to a light blue green card.  I added a beautiful pink silk ribbon gluing the ends to the inside of the card and tied on a short length with a single knot to simulate a bow.  I slit the spine of my card to insert my ribbon before gluing.  
For the right hand card, I pretty much repeated the process.  I trimmed the beautiful rose image, silver embossed a greeting, added a silk ribbon with a simulated bow and glued this large element to a coordinating red card front.  
For the center card it was a bit more complicated.  Once I had trimmed out the floral image there remained some writing on the top right hand side so I created a "patch" that coordinated, layered them and punched both layers at the same time.  Next, I positioned my patch in the opening and taped it into place on the back.  I added a small silk flower over the area and secured it with a rhinestone brad.  Next, I wanted to add a ribbon down the right hand side so I removed the flower/brad and ran the ribbon between the tines of the brad and reassembled the embellishment.  I glued the ends of the organza ribbon to the back of the layer and tied on a short length to simulate a bow.  Like how that worked out!!  I had no greetings that would fit in the open spaces so chose to punch a hole and mount a small sponged greeting to the back instead.  I added dots all the way around using a silver gel pen.  I glued this large element to a coordinating light blue green card front.  
Some times reusing a card front takes more time than creating from scratch but it is nice to be able to reuse those beautiful images.  

Therese

Thursday, April 13, 2017

A few more Easter cards


 I made up a few more Easter cards for my stash!!  These two were created using one used greeting card with beautiful crocuses on it.  I cut around the crocuses from the front of the card and layered it on an embossed purple card front and added a layered punchie greeting.  
For the second card I used the image on the inside of the card and trimmed it to size.  I added a yellow organza ribbon to which I tied a short length with one knot to simulate a bow.  I glued this large element to a purple card front.  I added a laser printed layered punchie greeting to the lower right.   

For this card, I layered two coordinating pieces of decorative paper to a purple card front and overlaid a white ribbon where they met.  I cut a slit in the spine of the card with my slot punch (SU) so I could insert my ribbon before gluing both ends to the inside of my card with double sided tape.  I stamped an Easter greeting in dark green (SU) and punched it out with a 1.75" punch (SU) and then layered it onto a purple scalloped circle which I cut with my Nestibilities.  I sponged the edges of my greeting before gluing it to my circle and then adhered this element over the ribbon using 3D foam tape.  I love this crocus paper!! Reminds me of heading out in the spring with my aunts on the farm to find the wild crocuses!!

Therese

Wednesday, April 12, 2017

A couple Mother's Day cards with reused elements


I made a couple of Mother's Day cards to add to my stash!!
For the one on the left, I started with a pink card front.  My next layer was trimmed from a used card.  I added half of a white paper doily and covered the edge with a strip sitting on my desk that was trimmed from a used card which I stitched in place with my sewing machine.  I added this beautiful collage element tag which was a RAK in a previous swap on a light blue organza ribbon gluing the ends to the back of the layer with double sided tape.  I added a couple pieces of tape in behind so it would stay in place.  I glued this large element to my card front and finished my card with a round watercoloured circle punchie greeting (Desert Diva).  I like the shabby chic look of the vintage image with the lace and ribbon.
For the card on the left I stared with a trimmed layer from a used card which I embossed only on the left hand side avoiding the beautiful gold edge on the bottom.  I layered it onto pink and then onto a light pink card.  For my focal element I started with a small colour laser printed floral element (Pixabay) to which I digitally added a greeting using a font.  I layered it onto green and tore of the bottom.  Added a little piece of white fiber which I tied on the front with a double knot and then layered onto pink which I also tore on the bottom.  I glued this on my card front on the left hand side to cover writing from the original card.  Pretty happy with both of these cards!!
Mother's Day will be here faster than we expect!!

Therese


pab plus a font
desert diva greeting

Tuesday, April 11, 2017

A beautiful thinking of you card that features a butterfly embellishment

I started this card with the butterfly!  It is a plastic magnet with beautiful colour and detail. Love it!!  I cut off the magnet and it made the perfect embellishment for this card.  The orange background is two triangles of scrap stamped cardstock which I adhered together using handmade faux washi tape and it was the perfect colour to coordinate with the butterfly!!  I added this yellow cardstock paperclip which I die cut a while back and has been sitting in my stash.  It was the perfect colour as well.  I glued the back of the paper clip to the orange layer then adhered my butterfly with two little strips of 3D foam tape which gives it great dimension!!  I dug through my serendipity stash and found this decorative paper which worked nicely so I trimmed off a piece and adhered it to my brown card front after I had embossed the right hand edge.  I added my butterfly focal element over that and finished off my card with a layered punchie greeting.    Worked out so well and I love the deep rich colours!!         Therese

Monday, April 10, 2017

A light house birthday card with LOTS of texture

Had a whole lot of fun with this card!!  I received an art postcard from my aunt just after Christmas because she received my exchange gift on Christmas Day.  She is an artist and this was a cool postcard made up from art of a friend of hers.  I saved it because it was cool!!  I have been sort of brainstorming how to best use it and today I figured it out!!  I trimmed it to size and then embossed it with a gears embossing folder.  Next, I sanded it which very quickly really gave it lots of texture!!  I was going to colour wash it as well but in the end decided not to.  I went looking for an image to use with it and found this paper in my serendipity stash which I thought would work pretty well so I trimmed it and stamped it with a light house (Class Act ) and a birthday greeting (SU) in black ink.  Very happy with that!!  I lightly colour washed the image and the background of the greeting before tying on a short piece of twine with a double knot.  I added a piece of torn vellum to my postcard background and then adhered it to a brown card front.  I added my lighthouse focal element over it using 3D foam tape.
I really love how it worked out!!!    Therese

Sunday, April 09, 2017

Watercolour and white embossing resist on watercolour paper


My grand daughter was visiting this week and we spend some time in the craft room.  She was working on her own projects so I got started on a technique that I have been wanting to revisit - white embossing resist!!  I discovered some small sheets of watercolour paper in my stash a while back and thought they would work very well for this technique which I have been seeing on Splitcoast Stampers lately.  I started with a couple of small clear stamps that have not seen much,  if any use.  I stamped them with Versamark on the small sheets of watercolour paper and embossed them with white embossing powder. I added a greeting (SU) under the floral swirl and embossed it as well.   I used regular palette watercolours on the left hand one by simply applying several colours with a very wet paintbrush until I was happy with the look of it.   For the second one, I used distress inks applied to a craft sheet, spritzed with water and laid the paper in the puddle.  I kept dipping until I was happy with the look!!  Once dry, I trimmed the sheets neatly and stitched them to coordinating layers (4" x 5.25") using my sewing machine. Next I layered them onto coordinating card fronts.  I finished off the left hand one with star punchies which I painted with pearly acrylic paint and I used colourful sequins on the other one.  Very happy with how these turned out and I will be using them for my exchange cards for my partners this month.    Therese

Serendipity backgrounds

My grand daughter was visiting this week and we made some quiltie serendipity backgrounds with the scraps I had sitting on my desk from last week's class.   She managed over 20 and I had just over a dozen!!  It was nice to be just gluing paper down on old card backs and spending time together even if not much was being said.  She has already used one of hers on a card!!  I will put mine in my stash and I am sure they will emerge shortly in my next few cardmaking sessions!!               Therese

Tulips for a get well card

I colour printed several of these tulip tags from Graphics Fairy when I was printing images for other cards a few days ago.  They are really cute and came in a sheet with several other Easter images.  I trimmed the image to the edge of the design, ran a marker around the edge and then ran a brush full of water all the way around it and it created an automatic colour wash of the edge!! The versatility of waterbased markers!!  I found this nice polka dot paper which coordinated nicely so I trimmed out a piece and glued it to a red card front.  I inserted a piece of red organza ribbon through the hole in the tag and then glued both ends to the inside of my card snipping a slot on the spine for it using my slot punch (SU).  I adhered my tag to my card using 3D foam tape and added a laser printed layered punchie greeting (SU)  just below it to finish off my card. It is a springy card which will work nicely to cheer someone who is under the weather.

Therese

Saturday, April 08, 2017

Be you card featuring a colour washed paper doily

A "for any reason card" embellished with a graphic from a sheet of Adorn It scrapbook paper. My sister gave a selection of them to me for my birthday a couple of years ago and I am working on using them up.  They are very beautiful and the paper is good quality so they take watercolour very nicely!!  I trimmed the image, watercoloured the flowers and words and layered it onto a decorative paper that featured roses and pearls which I have always thought was very beautiful. I embossed my dark green card front with a corner embossing folder (SU) doing it twice to get both corners that would be showing once I glued on my colour washed paper doily.  I have some smaller pieces from broken plates for my Big Shot which allow me to selectively use certain areas of an embossing folder or die and in this case allowed me to get both corners embossed with two passes without debossing any of the other area.  Fun!!  I glued my paper doily in place and trimmed off what went over the edge of my card.  I added a length of shimmery organza ribbon over the doily gluing both ends to the inside with double sided tape.  I then mounted my focal element using 3D foam tape which nicely finished off my card.    Therese

Friday, April 07, 2017

Leather leaf embellishment from reused leather

I have been collecting leather to make die cuts for cardmaking and recently I finally cut the pieces up and die cut as many leaves and acorns as I could out of them.  They were both dark brown - a tanned leather wallet and a pair of suede slippers both beyond being used any more.  I got a whole bucket full and I am looking forward to creating with them.
For this card, I started with the leather leaf and created a background for it from light brown cardstock which I embossed (TH-SX) and colour washed around the edges.  I added a small piece of double sided tape to keep it in place and then used my sewing machine to stitch it in place all the while giving it veining detail!! I tied a small piece of twine to the stem.   Next, I went looking for a background in my stash and found this piece of paste paper in dark brown which I made years ago which really worked with my leaf.  I trimmed a piece and layered it onto green. I glued my leaf embellishment into place then added two brown mini brads - top and bottom. Next, I glued this large element to a black card front and to finish it off I added a colour washed Decorative Label (SU) greeting punchie!!  Very happy with how this one turned out and I look forward to more with my little stash of leather embellishements.       Therese

Art Quiltie with a locket and key with hidden quotes

I am participating in an Art Quiltie swap on my fabric postcard group!!  I have really enjoyed creating these little works of art and this one was no exception!!
I started with the folded fabric points which I found in my fabric stash after I moved a few years ago. I do not recall exactly which project I was working on at the time of their creation but I have a little baggie of them.
I chose 8 of them - 4 blue, 4 red and then found a 4" x 4" precut floral square in a coordinating yellow which I used for the front of my quiltie.  I positioned the points around the edge and stitched them in place with a line of machine stitching very close to the outside edge.  I thought I was being very careful in laying them out but I see that they are all off a bit at the points which I did not notice until much later in the process.  I could not undo at that point so it is how it is. I cut a piece of batting and stitch it to the front by folding back the points and stitching as close to the first seam as I could.  On hindsight it might have been better to do that seam first but I did not have that vision before I started.  I hand lettered some quotes onto fusible fabric label tape and adhered them below the points.  I stitched one of  my fabric collage into the center, finished adding the quote in fabric label and stitched on a small locket and key charms.  Next, I chose a yellow tiny gingham fabric square (4.5") for the back of my quiltie.  I added fusible webbing to the edges, positioned my quiltie to the wrong side, folded the edges over the front and fused them in place.  That finished off the edges very neatly.  Wanting to add a bit of hand stitching I did blanket stitch all the way around using dark blue crochet thread.  Once finished I thought a few beads would be nice as well so I added yellow, red and blue beads (seed & longer ones) all the way around using light weight yellow crochet thread.  That finished it off nicely and gives it a handmade look!!  It is off to my partner as we speak!!  I hope my partner will find the quotes on the inside front below the petals!!  A bit of creative fun!!

Thursday, April 06, 2017

Beautiful cross on an Easter card

An Easter card with a beautiful cross!!  This image is from Art by Jean and she has a wide variety of beautiful images for download on her blog including backgrounds!!
I colour printed the cross on ivory cardstock and layered it onto a blue green cardstock.  I used a blue green card, added a yellow background paper to which I had adhered a lacy die cut and embossed border (SU) which was colour washed with yellow watercolour to tone it down a bit.  I glued the background to the card, adhered my focal element and then added a layered laser printed punchie greeting.
I really like that the darker edge of the decorative paper creates the sense of a line in the design and putting the cross askew a bit allowed my greeting to nest into one of the scallops.  Perfect!!

Therese

Wednesday, April 05, 2017

Easter lilies in deep colours

Here is another Easter card that is a bit out of  my comfort zone in the way of colours.  I started with a green card which I stamped with green ink using two different homemade stamps to create an interesting background.  I added an embossed dark blue layer and then a strip of gold embossed mesh (window screening) which I flagged on one end.  I layered the laser printed lily image (Clipartfox) onto orange before adhering it to my card front using 3D foam tape.  I chose the colours from the image - green, blue and orange so it works on one level but the jury is still out if they are too intense for Easter.    Therese

Tuesday, April 04, 2017

Easter cards with printed vintage graphics

For these two cards I expanded my mind to include more toned down colours for Easter cards using blues, browns and greens in deeper shades that I would ordinarily.  I am happy with them though they are a bit somber for spring Easter cards. They no doubt will suit someone.
I used a greeny blue card for the first one and added two squares of brown cardstock just off set a bit from each other.  The laser printed vintage image (Graphics Fairy) was layered onto  pink and then onto yellow before being adhered to my card front.  Love those little blue birds!!   For my second card, I used a vintage image from Clipartpal which I laser printed and trimmed.  I started with a blue card front and added a green embossed frame die cut (SX) to which I had added two punchie eyelet borders (SU) in brown top and bottom.  My image fit perfectly in the center!  I added three little ribbon flags to my image before mounting it in the opening of the frame with 3D foam tape - brown, yellow and green which I trimmed with flag ends.
It is good to stretch ourselves creatively, to expand our ideas, to do something out of our comfort zones regularly.  That is how new things are invented and fun serendipities come to bless our lives.

Therese

Layered Easter card with a digital greeting

In all the years I have been  making cards I have always thought that this crocus paper is the very best for Easter cards.  Unfortunately, I have only four small pieces left and I am not even sure where I can buy more.  I went looking for pieces of decorative paper that would coordinate and found three - green, yellow and purple!  I layered all the strips onto a green rectangle leaving spaces on the top and bottom and in between them.  I then adhered this large layer to the front of a green card.  I used a punchie greeting which I created using a digital file from Netty's cards. She has a huge collection of greetings and many round ones which can be printed the right size to be punched with round punches.  For this one I used a 1.75" round punch (SU).  I laser printed it on ivory and watercoloured it with yellow and purple to coordinate with my card.  I layered it onto a purple scalloped circle which I cut with my Nestibilities.  Very happy with how this one turned out!!
Therese

Monday, April 03, 2017

A beautiful Easter card in blue and green

For this card I used a digitl image of a cross from Clipartkid which I laser printed on ivory and punched with my 1.75" round punch (SU).  I went looking in my stash for something to layer it to and found these two large scallops that I very much liked together.  It took a while to convince myself that I did not need to add another layer in between.  I like the space!!  I chose a soft blue card and added this soft decorative leafy paper (inside of a used card) as a background.  I added some organza ribbon adhering both ends to the inside of the card and then adhered my focal element over the ribbon using 3D foam tape.  I punched the label from the green layer before I glued my focal element together which insured that it was exactly the right colour.  I layered a small laser printed greeting to the green label and then adhered it to my card front below the focal element.  To finish off my card I tied a short length of the same ribbon to the length on my card using one knot to simulate a bow.
Happy with this one too!              Therese

Sunday, April 02, 2017

All Occasion Stack Class - just strips of paper, a greeting and an embellishment

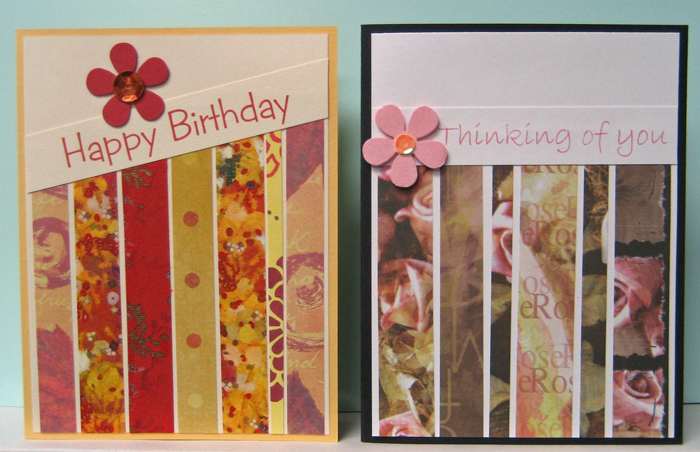
 I always leave the easiest card for last in my class!!  For these cards I sorted through my scraps and cut a wide variety of strips both in length (at least 5.5") and width.  Next, I set aside 7-8 that coordinated for each card kit.  I put the strips into envelopes and next created the greetings so they would coordinate with the strips printing them on ivory or white cardstock. I trimmed the individual greeting and added them to the envelopes.  Next, I cut white and ivory layers - 4" x 5.25" -to coordinate with the greetings and put them into the envelopes.  Next, I chose a card front that coordinated with what I had already prepared and added them along with an insert to the envelopes.  Finally, I created custom embellishments using my punches along with sequins or rhinestones for the kits!!  It was fun to see them all come together and how well all the pieces worked together.  This card had the most flexibility in layout.  The stripes could be glued at an angle below or above the greeting from left to right or right to left, OR they could be glued vertically above or below a horizontal greeting, OR they could be glued horizontally above or below a horizontal greeting, OR they could be glued vertically above or below an angled greeting!!  It was fun to experiment with all the options.  Once a layout was chosen the strips and greeting were glued to the neutral layer, trimmed to the edge and glued to the card front.  The little embellishment was adhered where desired on the card using 3D foam tape.  Again, there were a wide variety of layouts created beyond what I had laid out as ideas by the creative bunch of cardmakers - some complete newbies who learned quickly and executed their cards very well.  
We had a wonderful time and lots of beautiful cards were created!!!
Therese


All Occasion Stack class - cut and circled


For my next card, I decided to feature decorative paper in hopes of reducing my stash!!  Not even dented!!  
I cut the decorative paper 3.75" x 5" and made two cuts - one in each direction and when the pieces were glued to the next layer it created a cross as the lower colour showed through.  I discovered that once cut the pieces provide a puzzle to be solved before they can be glued in place!! I chose to layer my circle greeting over the intersection of the lines but the creative ones at class chose many more options in both the cutting and the layout of these cards!!  The circle greetings were laser printed on white or ivory and punched with a 1.75" circle punch (SU).  They were layered onto scalloped circles which were die cut from coordinating cardstock using my Nestibilities.  I found most of these round greetings at Netty's cards.  She has a really good variety and some for every occasion.  The little turtle one is very cute and the floral element were found on line but I do not have a record of where I found them.    Therese


Handmade paper and stitching

When I was preparing the kits for this class I came across this beautiful handmade paper!  It was very thick and therefore I set it aside because it would not glue well. Yesterday, I created a card with it.  I cut the elements and stitched them in place instead of using glue.  That works very well!!  I love stitching handmade paper!!  I stitched the center to the flower then the border to the background paper.  I positioned the flower, situated the leaves and stitched them into place.  I repositioned the flower and stitched all around the center to anchor it to the background.  I positioned the greeting and stitched it into place as well.  Lastly, I stitched this large element to the front of an ivory card!!  LOVE IT!!               Therese

All Occasion Stack Class - handmade paper


I just taught a cardmaking class featuring all occasion cards as a fundraiser!!  The two classes went very well and I had some very creative participants who were not at all afraid to do their own thing so there was a wide variety of cards produced from the kits I prepared.  It is one of the very best things about teaching is that others will create with the supplies you provide things you would never have thought of doing!!  So much fun!!!
For this set of cards I decided to continue the theme I started with my middle of the week class and feature my own handmade paper.  
 So I trimmed down my handmade paper to 4" x 5.25" and glued it down with a generous layer of regular glue to a neutral card - white or ivory.  Handmade paper is very textured and requires a substantial amount of glue to be effective.  I die cut two different borders for the cards using a large Sizzix die.  You can see one of on these cards.  The other was a little zigzag.  The borders were glued to the cards using regular glue.  The large focal elements were layered & glued if need be and then glued over the border.  The little coordinating laser printed greeting punchies (SU) were also glued in place.
The cards really need some pressing to ensure a good adhesion of all the layers so I recommended that they be set  under weight when they got them home.
I created several focal elements - hearts, flowers, leaves and butterflies which were cut from coordinating handmade paper.  The flower were embellished die cut centers, the hearts had an extra little heart cut from cardstock, the butteflies had tied cording which created a body and antennae and the leaves had knotted twine as an accent.
I really love handmade paper and am glad that I decided to check out the papers I had in my boxes.  I will continue to feature handmade paper on my cards as time goes on!!!  Will consider making more this summer when the weather outside is warm and sunny and the sheets can dry outside.
Therese

Easter and birthday card created by reusing a beautiful rose card


These two cards were created using the most beautiful card full of shimmery gold and roses!!  I trimmed off the front and turn it over onto the back inside which had the stripes and that worked well for a background.  For the first card, I created a focal element using a floral background from Artsy bee on Pixabay combining it with a vintage rose image from Clipartfox and a font greeting which I then printed it onto ivory cardstock.  After trimming I layered it onto green.  I glued the two layers of my background together, added a pink organza ribbon across the width and layered on my focal element with 3D foam tape.  I tied on a short length of ribbon to the one on the card using a single knot to simulate a bow.  I layered this large element to a pink card.  
For my second card, I created the background with the ribbon in the same manner and glued it to a light pink card.  The rose focal element I fussy cut from the front flap of the original card and glued it over the ribbon using 3D foam tape.  I sponged the edges of a punchie greeting with green and pink and adhered it just below the focal element over the ribbon with 3D foam tape.  Beautiful!!
Therese

Saturday, April 01, 2017

Quick and easy card resusing images from cards - a beautiful little cottage

The cottage image on this card was pretty much the right size for making an A2 sized card.  Just needed a bit of trimming!!  I wanted to layer it with something appropriate.  I found a card layer with a beautiful very abstract landscape image that worked perfectly and reflected the light in the image.  I am really happy with how that worked out!!  Who would have guessed???  It helps to have a variety of elements at hand (a messy desk) because it gives you the opportunity to audition items that you would not necessarily think of otherwise.  I simply added a layered punchie greeting and it was done!!
Therese

Friday, March 31, 2017

Easter card with a beautiful iris collage element

Another Easter card to add to the stash!!  This one started with this beautiful iris collage element which I received as a RAK in an exchange card years ago.  I found the green embossed layer in my background stash and decided to layer it to a navy layer which I embossed with the Swiss Dot embossing folder.  Before gluing them together I added a length of ivory ribbon on the lower portion of the green layer. I glued this whole element to the front of an ivory card front.  I added my iris image to the top portion a bit askew and my oval punchie stamped greeting (SU) below that overlapping the ribbon. A fairly quick and easy card as several of the elements were ready to go!!

Cardmaking - March - feature little birdie sticky notes


These cards feature birdie stick notes my sister shared with me.  She is always looking for cool things to use on her cards and so she gave me a few for my birthday a while back.  You can see here another card I made recently with one.  I started these cards by choosing background paper which I adhered to coordinating cards.  I die cut some grass (SX) which I glued to the bottom of the card.  I embellished the stick note birds with a black brad eye, a hand cut yellow beak and a paisley punchie wing!!  For the first card I placed the bird on a branch (TH Tree SX) which was created using a strip of brown cardstock die cut with the TH Tree die.  The branch was then pruned of odd and stubby pieces.  The greeting is stamped (SU) and layered twice onto coordinating circles of cardstock and mounted to the card using 3D foam tape.  For the second card I drew the bird some legs and feet using a fine tipped permanent marker.  Very happy with how this any occasion cards worked out!!

Cardmaking - March - more handmade paper combined with vellum images


More handmade paper on these cards!!
In this case I took small sheets of  seed paper which were smallish for the front of a card and ripped them into strips and collaged them together to make a larger piece which I trimmed to size before running the sewing machine around the edge to make a mechanical connection to hold them all together.  I glued this background to the front of a coordinating card.  I laser printed images with greetings on vellum and used two halves of an embossed label (SU) to attach them to my handmade paper background by apply double sided tape to the back of the pieces and overlapping the edge of the vellum when I adhered them to the card front.  I coloured the back of the image with chalk which gives the image a some muted look.  The flower bouquet image is digital from Beccy's Place, the flower wreath is a digital from Melonheadz, and the little girl image is from Heather Ellis which I believe I downloaded from Paper Crafts Magazine quite a while back.  

Therese


Cardmaking - March - handmade paper, flowers and ribbon


We got together again this week and made cards!!  It is always great to have your friends over for a visit and do something creative while you are catching up!!!  
This was our first card of the evening!!  I decided to see if I could include my own handmade paper into a card for this month!!  I dug out the couple of boxes and was quickly convinced that it would be easy enough to feature handmade paper on a card.  I had forgotten how many beautiful papers I had created over the years!!  
I tore the papers to size and found coordinating card fronts.  I added a ribbon - after I glued my handmade paper to my card on the first one ( was a little distracted ) and to the handmade paper layer in the case of the green one.  I had to make sure that I positioned it low enough so I could center my focal element over it.  For the red card, I die cut a flower (SX TH Tattered Flowers) from red cardstock, embossed it with Swiss Dots (CB) and added a circle punchie cut from decorative paper.  I glued it over the ribbon and added a layered punchie greeting (SU) on the lower right.  I had a small piece of ribbon left over so I tied it to the length on the front with one knot to simulate a bow.  
For the green card, I cut a poinsettia (Spellbinders) from three different red cardstock and embossed them before gluing them to each other. I added a small yellow circle in the center.  I cut a few green "leaves" using the largest poinsettia die which I added around the edges after I glued my assembled flower to my card front.  I added a layered punchie greeting to the lower right.  
I have not made any Christmas cards yet this month so I can now count ONE towards my goal of making six for this month!!  
Therese

Thursday, March 30, 2017

Grungy card with beautiful butterfly embellishment

This card started with the butterfly! The background it is mounted to is two triangles which I taped to each other using handmade faux washi tape and then trimmed to the right size.  I layered this background to black cardstock before adding my butterfly using 3D foam tape and drawing in a little flight path with a fine tipped permanent marker.  The beautifully printed butterfly is a magnet which I bought years ago. I used edge cutters to trim off the magnet.  I added two lengths of gold embossed mesh (window screening) to the back of my focal element - one top right, the other lower left.  Now I needed a background!  I was looking through my decorative paper backgrounds and found this one but it had a kraft background which did not work as well as I wanted so I simply colour washed it with some orange watercolour and that worked much better.  I glued the decorative paper to an orange card front then added my focal element at at bit of an angle.  I colour washed my laser printed punchie greeting in the same way and adhered it below my focal element with 3D foam tape.
I bought this gift wrap paper in London, England and it is the first time I have considered colouring it.  Very good quality as it held up very well to the watercolour and the black printing resisted it!!

Therese

Wednesday, March 29, 2017

Die cut rose in turquoise and green

I received this rose die cut as a RAK in one of my exchange cards a while back!!  It was just as you see it when I received it so I am guessing it was coloured with Copic markers - beautiful!!  I found some coordinating cardstock and stamped it with a script background (SU) in turquoise ink.  I cut a rectangle of white cardstock that was just big enough for the rose, embossed it with the Swiss Dot embossing folder and layered it onto a brown cardstock rectangle.  I used a fine tip glue applicator (fabric paint bottle filled with white glue) to adhere the rose and leaf into place and then added a laser printed vellum greeting in brown.  I folded over the ends of the greeting and adhered them to the back of this element before gluing the element to my stamped card front.  Love the look of it!!

Therese

Tuesday, March 28, 2017

Sticky note birdie on this card!

Who doesn't love cute little birds??  This one is a sticky note!!  My sister is always on the look out for cool embellishments for her cards and found these a while back.  She gave me a few and this might be the first I have used of them!!  I started by stamping the greeting in the lower right hand corner in dark blue ink on my white layer.  I embossed distressed lines above that and added a rectangle of striped decorative paper to the left of this. The little bird was the perfect colour so I added a bit more glue and positioned him in the middle of the card.  I used a black permanent marker to draw him a pair of legs.  I added a tiny black brad for the eye and trimmed a tiny scrap of yellow to create a beak.  He was looking pretty good but a wing would add some dimension!!  I remembered my paisley punch - it would make a great wing!!!!  It sure did so I finished him off with a fancy white wing!!
Love how it turned out!!

Therese

A fabric postcard that features little fabric collages


I used some of these little fabric collages that I created a while back to embellish this fabric postcard.  I started with a yellow fabric rectangle and positioned the little collages on - four on top and four on the bottom.  I stitched them down using a single line of stitching in yellow thread.  I added an unfolded length of black bias trim in between and stitched it into place as well.  I trimmed a little quote from a sheet of fusible fabric that my sister printed for me on her inkjet printer.  I fused it into place over the black bias tape and then hand stitched a flower embellishment to the right of it.   The embellishment combines little green silk leaves, a red silk flower with a yellow button center.  Next, I embellished all the squares by stitching on some fun pieces - a peach silk flower with a yellow sequin center held in place with  yellow seed bead, an little silver leaf embellishment, a little red button, a plastic butterfly embellishment, a white sequin flower with an orange flower sequin center held in place with a yellow seed bead, a silver metal butterfly charm, a little red heart sequin and a gold star sequin layered with a little red flower sequin held in place with a yellow seed bead.   I created a backer and stitched it to my front then couched the black fiber braid to the outside edge using a zig zag stitch on my sewing machine.  I am really happy with how this one worked out and the little fabric collages are just how I wanted them to look.  It is off to my partner for the birthday swap.                  Therese

Monday, March 27, 2017

Cards made by reusing beautiful floral cards


A few more cards created with beautiful used cards!!  The top two were made from one card front which I cut in half.  I used the bottom on the left hand card and added a embossed die cut of a lacy border (SU) on the top portion to hide the writing.  I added just a bit of gray watercolour to the border to tone down the white and give it a bit of dimension.  I fussy cut a little laser printed floral wreath (Melonheadz) and watercoloured it to coordinate with the border.  I added just a touch of gray watercolour to soften and shade the edge of this element as well.  I stamped a greeting in the open area and positioned the wreath to the left of it.  I glued this large element to the front of a blue card.  For my second card I used the top half of the card.  I added a length of scalloped lace across the bottom edge securing the ends to the back of the image using double sided tape.  I really wanted to add some dimension and thought maybe I could overlay the printed butterfly in the border with another.  I spotted a container of butterflies on my desk from another project and found this one that would work perfectly.  These are plastic butterfly magnets with beautiful colour and detail which I bought years ago.  I removed the magnet and trimmed the back side before adding 3D foam tape to adhere it over the printed one!! Perfect!!!  


For the left hand card I used an inner flap from a large used card. You can check out the card I made with the image on the front of the card here.  I wanted to add a bit of dimension so I punched a white eyelet border (SU) and glued it to the left hand edge of the image and then added an off white organza ribbon which I doubled knotted on the front leaving the ends long.  I stamped a little greeting (SU) on the lower portion of the image and embossed it in gold.  I glued this large element to a pink card front.  
For the right had card I fussy cut around the flowers from another card front and then trimmed it down to fit on my pink card.  This card front was left over from a card kit so it was embossed on the edges but that worked well for this card.  I stamped and embossed the Easter greeting onto a strip of vellum, tore both edges of the strip and then positioned it on my image then folded back both ends which I taped to the back.  I punched a butterfly from a scrap of the card front and embellished it with a bit of watercolour before stitching it to my image.   To finish off my card I glued this large element to the pink card.            
Hope you will all consider reusing the cards you receive from others in fun and creative ways for making other cards!!    Four or five, nicely packaged, make a nice hostess gift or can even be a blog give away prize!!

Therese

Sunday, March 26, 2017

Reusing cards - beautiful flowers for Easter cards


Easter cards!! It will be here before we know it!!
I have chosen to repurpose some commercial cards that were donated to me to create some new ones.
I managed to make two cards from one large beautiful card!!  I trimmed out the large red camellia to begin with.  The layer was just a bit too wide so I trimmed out about 3/16" and taped the pieces back together on the back so that I would not lose the gold decorative edges.  I added an ivory ribbon where they join and glued the whole layer to a red card front.  I stamped the little Easter greeting (SU) in the empty space between the flowers in gold pigment ink and embossed it in gold embossing powder.  Worked perfectly with this beautiful image and the gold borders.
For the next card I used the cut off from the first card that featured a small spray of flowers with gold borders which worked here because I used the whole piece - 5.5" tall.  It was not wide enough so I took a strip of the shimmery card, die cut the scalloped edge with a SU Thinlit then embossed it with the coordinating lacy embossing folder. Perfect!!  I sponged the front edge with gold pigment ink to coordinate with the gold edging and used double sided tape to adhere them together where they overlapped.  I cut out the little rose from the inside, trimmed it into a tag, manually embossed the edges and sponged all the edges with a bit of pink and green.  Next, I applied some gold pigment ink then some gold embossing powder to highlight the dry embossing.  I added a little gold embossed Easter greeting (SU) stamped on vellum.  I tore the edges and folded the ends to the back and secured with regular tape.  Next, I added a pink organza ribbon to my layer and threaded on the tag before securing the ends to the back with double sided tape.  Finally, I glued this large layer to the front of an ivory card.  The tag hides the printing that was on the front of the original card.

In comparison, this card was easy!!  I trimmed the tulip image from the large card, added a layered greeting and a little vellum butterfly punchie!!
I used a scrap from the original card below my trimmed laser printed Easter greeting.  I used just a whiff of glue stick between the vellum and the decorative paper before I attached them to the image layer using a tiny black brad and trimmed them to the edge.  I glued this large layer to a red card front.  I punched the little butterfly from a vellum scrap and adhered it to the card front using a tiny strip of double sided tape which just highlights his body!!

Very happy with how these cards turned out and it was fun to reuse cards in my cardmaking!!

Therese

Saturday, March 25, 2017

Cards from kits - changed up the sketch and added images

 Still making up kits from my last class.  These ones were heart themed for Valentine's so needed to be changed up to be appropriate for another occasion.  For the first one, I combined the decorative paper from two kits which provided me with a full 4" x 5.25" background.  I simply taped them together on the back before gluing it to the coordinating card front.  I watercoloured a cupcake image (Melonheadz) from my stash and added pearly paint to the icing and the star.  Fun!!  I layered it onto a green rectangle and added a border die cut to which I added gold glitter glue dots and some green watercolour half circles.  I glued this focal element to the front of my card.  I layered my colour laser printed greeting and added it to the bottom of my card below the image.  My favorite colour combo - pink and green!!  For my second card, I added the piece of decorative paper from the kit then added a piece of white vintage seam binding gluing the ends to the inside of the card.  I snipped a slot on the spine of the card using my slot punch (SU) to allow the end of the seam binding to be glued to the inside.  I found this coordinating vintage birthday image in my stash (clipart CD) so I trimmed it and added it over the seam binding using 3D foam tape.  I tied a short length of seam binding to the length on the card using a single knot to simulate a bow!! I had embossed borders on these card kits which you can see on this card.
It was really hard to change up this kit because the paper had hearts on it and it was red!!  So I decided to layer the greeting over gold embossed mesh (window screening)  then onto a trimmed (decorative scissors) rectangle of red and flagged all the ends.  I plucked these watercoloured and gold embossed hearts from an old card.  They worked really well for this anniversary card!!
The polka dot papers are from Digital Graphics Cafe and the heart one if from the Morgue File.
Again it was a fun challenge to use up these supplies to make up some new cards!!

Therese

Friday, March 24, 2017

More cards from kits - decorative paper framed images

 A few more cards made up from kits from my last class.  I have made several up others over the last little while but this is not a very flexible kit in that the supplies pretty much need to be made up using this sketch.  It does allow a lot of variety in regards to occasions though as you can see these are baby and birthday, Valentine's here, anniversary here and sympathy here.
They are easy to put together - simply glue the strips to create a frame on the card front and then colour the image and glue it inside the frame before gluing the little strip of embossed card stock over the bottom of it.  I discovered that the decorative paper for the little balloon bear was double sided so I used two strip of each design. That worked out really well and adds a bit of interest.
For the next two which were both the same cupcake image (Digital Graphics Cafe)  I used pearly paint on the icing and clear dimensional paint on the little hearts which was fun!!    The little horse is from Beccy's Place and the little bear is from Birdie Brown.      Therese

Thursday, March 23, 2017

Cards from card kits - hearts with embossed layers

 I have had these kits sitting on my desk for more than a month!!  I got started on making cards with them a few days ago.  I decided to change them up because I find it difficult to make lots of any one design.  Click here to check out the original design. I have made several other sketches since then - these ones and this one.
For these two, I used only one of the decorative paper hearts and layered them onto scalloped heart die cuts from previous kits and then onto the embossed backgrounds.  For the first one, I layered on some gold embossed mesh (window screening) then added strip of red decorative paper.  I added the layered hearts using 3D foam tape and trimmed the greeting before I tucked it below the mesh.  For the second one, I ripped the embossed layer to create a strip of brown over which I glued my layered heart.  I trimmed my greeting and tucked it just below the heart and then added the little brown heart die cut.  The blue heart was punched from a hand decorated layer from an old ATC.  Love the dimension of it!!

For these two I used three hearts!!  I ripped the embossed layer for the first cards to create a contrasting line and glued my hearts over the gap.  I trimmed and layered my greeting before tucking it below my last heart.  As a final touch I added the little red heart die cut to the bottom heart to help draw the eye to the greeting.  Using only three hearts on the blue one simplified the design and gave the card a cleaner look!  Used the little heart die cut on the far end of my greeting.
It has been fun to reinvent cards with these card kits!!              Therese