Wednesday, November 13, 2013

Gifts of Imperfection - Authenticity

I have finally found the time to search for a photo for my week two exercise!!  I was not sure how many photos I had of myself as a child but I knew I had an envelope that Mom had given me of old photos which were left over from her scrapbook.  This morning I went looking - we have moved since I last remember where it was located - and was fortunate to find it fairly quickly though not were I expected!! I had more photos that I expected!!  The assignment was to pick one - but I chose three!!  The largest one is a photo of my twin and I over thirty years ago!!  Love it!  We often take fun photos of ourselves when we are together.  The top right photo is of me pregnant with my son - days before I delivered  - with my oldest daughter.  I so loved being a Mom and so loved her cuteness!!  The black and white is of me when I was 5 years old.  We (my twin and I) had been ice fishing with Dad & Pepere (a huge privilege) and had each caught a little fish that we were showing off.  It was really special to me to have the opportunity to spend time with my family in the great outdoors!!
For the layout I cropped the photos and arranged them over a scan of some fabric paper I made and added the word "Authenticity" in a font I like!!  I have colour printed it and will journal over it in white gel pen!! Going back and looking at photos of my life has been so fun and encouraging.  So often we remember so little of the richness of our experiences and photos help us to remember more!!
So dig through your photos and see how much more you can see in them!!!  For me, it has been a life expanding experience in that I have been able to add to my remembrance of events - enrich my memories of the past.  It is also a reminder to take photos often to keep building that resource for myself and future generations.

Therese

Tuesday, November 12, 2013

A modified shutter Thank you card

I created this card - a modified shutter card - for a swap on AFTCM.  I found the tutorial on Splitcoast Stampers and adjusted the measurements to accommodate an 8.5" x 5.5" piece of cardstock for the base - 2 1/8" for the large sections and just over an inch for the small sections.  I scored all the folds, cut out the two sections and trimmed decorative paper to fit the panels - the grungy plum for the three large sections and bright yellow for the four little sections.  I layered a piece of waxed fabric (3.5" square) over yellow and then onto plum cardstock and stitched all the way around incorporating two lengths of seam binding in the process using bright green thread.  After the stitching, I tied the seam binding pieces together using a double knot and added a colour printed greeting punched with the Modern Label punch (SU) using 3D foam tape.  I really love how it came together and the wonderful punch of colour provided by the yellow cardstock and decorative paper.  It is off to my partner in tomorrow's mail!!
You can check out the other cards I created using waxed fabric here, here and here.

Therese  

More baby cards!

These are the other set of baby cards I made up. The decorative paper is from a set of paper announcements I bought a few years ago.  Pink and green makes them just perfect for baby cards!!
I cut the original panel in two and die cut the bottom edge with a thin wavy die.  I trimmed the other edges just a little bit so they would fit nicely on my green card fronts.  I stamped the baby saying (SU) on the tags provided in the kit and added a section of ribbon which was also included.  I attached the tag using 3D foam tape and added some faux stitching along the wavy edge using a white gel pen.  It was just as easy to make them portrait as landscape.
Love making cards - baby ones are fun!!

Therese

Baby cards - Series #3

These cards will go with a few more as a gift for a new Mom.  It is always a busy time when you bring a new baby home and having cards on hand to acknowledge the gifts you receive always appreciated!!
These cards are the last in a series I started a couple of months ago.  You can check the others out here and here.  The supplies were still sitting on my desk.!!
For these cards I embossed the card fronts, added the decorative paper in several different patterns and added the embossed flowers as my main elements.  Three of them have little circular greetings on the card and the other has a colour printed greeting.
It was fun to make these cards and I was happy to be able to make good use of the supplies I had at hand.
I made a few more cards for the baby gift.  You can check them out here.

Therese

Card for a new baby!


Our neighbour's daughter had a baby last week!!  What a wonderful thing!!  It is a bit premature but both are doing well and they are already both home.  So off I went to make a baby card and for a gift I made some cards she can use to send her thank yous.
This baby card has an embossed pink card front, two pieces of decorative paper, a layered stamped image and a little border punched laser printed greeting to which I added some white thread.  It all came together fairly quickly as some of the supplies were already sitting on my desk.
You can check out the other cards in this series here and here!

Therese


Friday, November 08, 2013

Gifties on their way!

My gifties all wrapped up and on their way! I joined a Giftie Exchange - 12 Days of Christmas!!  I have Day 1 so wanted to make sure that my little packets arrived on time for the December 13 deadline.  I will be revealing the contents on December 13 once my swap partners have opened their little packets.  It was a fun project and I am looking forward to sharing with all of you what I made.  I have a few extra so I will be hosting a GIVEAWAY starting December 13 right here on my blog.  So come back and participate!!
I wrapped my little gifts in hand decorated paper which I made this summer when I sister was visiting and we took a shot at doing monoprinting.  It was lots of fun and I made several large sheets.  I cut them up into 8.5" x 5.5" pieces, folded them into three, inserted the little gift and stitched both ends with my sewing machine making sure to include my Day 1 tag in the process.  I hope they will enjoy the giftie and will be able to use the decorative paper in their creations - would work great for serendipity or collage of any kind.
So be back here on December 13 and see what I created!

OOPS!!!!!!
(My apologies to everyone - turns out I have been an eager beaver and sent out my gifties very early!!  The deadline is December 13th for opening our Day ONE gifts so I have corrected the above info)

Therese

Train card for a special little boy!

Our grandson was two on Tuesday and we are will be celebrating with him and his family on the weekend.  I made this little train card for him - he is really into trains at the moment!!
I cut the train with one of my sister's dies a few weekends ago and made up the card this week.  The die is made by Quik Kuts and it cuts all the pieces at once.  I layered the coloured cardstock on the die so I could have all the little pieces a different colour!!  I really like the way it turned out.  I glued all the layers to each other to create the little cars then added dotted lines to them with a black sharpie to give them a bit more definition.  I used a sponged piece of blue decorative paper to create the sky behind the train and layered it onto a green card front.  I stamped the top section with "choo, choo" using an alphabet stamp set and then added the train cars by attaching them with 3D foam tape.  I added the greeting by hand.  On one of my group we have been challenged to add handwriting to our creations and because I did not have a stamp that would fit below the train I decided to give it a try.  I used a pencil to outline the letters to make sure they would all fit and then went over them with a black fine tip sharpie.  I thickened some of the lines by going over them a couple of times.  Not too bad for my first try at it. I was using "Creative Lettering" by Jenny Doh on page 100 - examplar by Lisa Engehbrecht - as a visual for my lettering.  This book has a wonderful array of cool lettering with some instructions and examples to get you started.
Looking forward to seeing everyone and giving him a hug!!

Therese

Waxed Thinking of you card

 Another card I created using a square of waxed fabric I created a while back.  I really love the bright colours on this piece of waxed fabric and I thought it would be appropriate for this "Thinking of you" card which I am sending to cheer someone's day!!
I stitched the fabric square to a dark blue layer of cardstock and added a colour printed greeting to which I had stitched some seam binding flags.  I added some stippling to the edges of my rust card before I glued the layer on.
You can check out the other cards I have made with this fabric here and here.
Have a few more to go!!

Therese


Monday, November 04, 2013

More waxed fabric cards!

A couple more cards using those squares of waxed fabric.  Pretty much the same steps - stitched my fabric square (3.5") to a coordinating card stock using coordinating thread on my sewing machine.  On the left hand card, I punched the edge with my eyelet border punch (SU), embossed it with a stitching embossing folder (CB), layered this whole element on my yellow card front and added a colour printed greeting.  On the right hand side card I added some coordinating seam binding as I stitched the waxed fabric to the coordinating layer, glued the whole thing to a card front and added the colour printed greeting using 3D foam tape.
Was really fun to play with this waxed fabric!!

Therese

Waxed fabric thank you cards

Here are some cards I made with the fabric I waxed with wax crayons a while back.
I started by stitching my little waxed fabric square (3.5") to a coordinating card stock layer with coordinating thread on my sewing machine.  On the left hand card, I added a tied piece of seam binding on the lower section and a layered colour printed greeting.  On the right hand card, I embossed the cardstock layer with a button embossing folder, layered the whole element onto an embossed card front and added a colour printed greeting.  It was fun to create cards that look quite different using pieces cut from the same piece of fabric.  I am really enjoying the challenge of trying different techniques!!  I will try something really different next time I use wax crayons on fabric - all sorts of ideas in my head.

Therese

Thursday, October 31, 2013

Happy Halloween!!


                                             Have a safe and enjoyable Halloween!!

We are having a beautiful day and it should be above zero for all the kids who will be out and about tonight.  For Alberta, that is fantastic!!  Sometimes we have snow and temperatures well below zero at this time of the year!!  Not sure how many we will get but it will be fun to see them all!!

Therese

Carving a pumpkin!


I carved my pumpkin for Halloween this morning!!! It was such fun to be creative with the process. I rediscovered my little "saw" tool when we moved earlier this year.  You can see here that I made my own - two scrap pieces of wood, a used jigsaw blade & a couple of screws.  It works so well!!!  I drew my design on my pumpkin, "X"ed the areas that needed to be cut out and started carving!  You have so much more control and it is fast!!  Once I had all the pieces cut out I used a Sharpie marker to fill in all the solid areas and added some doodling all the way around as well.  I am super happy with how it turned out and am looking forward to handing out hot chocolate to all the little trick or treaters who show up at my door this evening!

Therese

Jewelry display


I have been wanting to create this frame for my jewelry for a while to prevent having to untangle my chains every time I want to wear a piece but it has taken some time to clarify the vision and find the pieces I needed.    So, I found the frame and the plastic aida canvas to put in it at a thrift store a while back and I decided to put it all together the other day.  It worked out so well!!!!!!!!!!!  I created little "N" hooks using silver paper clips to hang each piece of jewelry on!!

I used hot glue to adhere the plastic 14 count aida canvas to the inside of the frame on the back.  I tacked it first and then added another good bead all the way around to make sure that it will support the weight of the jewelry.  I did have to vet my collection to get it all on the frame but that needed to be done anyway.  So, now all my pieces are at hand and I can see everything I own.  It will make it easier to decide what works with any outfit and I will likely wear it more often because there will be no more tangling issues!!

Therese

Wednesday, October 23, 2013

Gifts of Imperfection - selfie & courage

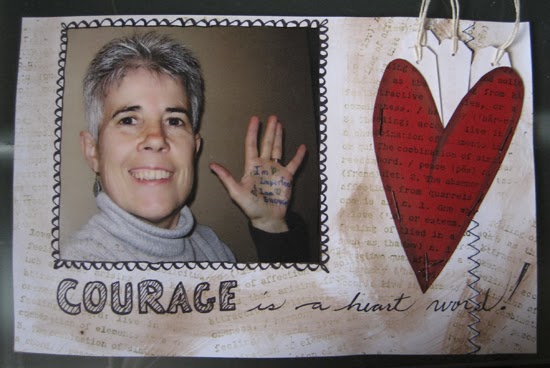
Today, I worked on this journal page for my ecourse - Brene Brown and The Gifts of Imperfection.   Our mantra is "I'm imperfect and I am enough".  Today I wrote this quote on my hand with a sharpie, embellished it with hearts and then took a picture of myself - a selfie.  How fun is that!!  I had to give myself permission because as kids we were taught that writing on our hands (or anywhere else) was unacceptable.  I have had henna tatooes done before but I think that Sharpies make wonderful tatooes that are permanent enough and so much less expensive than a real ones and give you the opportunity to change it up whenever you feel the need!!
I printed my photo onto my half sheet (8.5``x 5.5``) of white cardstock, added some doodling around the photo with my fine tip Sharpie, colour washed the rest with burnt umber and then stamped my `LOVE`` definition (SU) all over in a darker ink.  I hand lettered the COURAGE quote and added a heart embellishment. To create my embellishment I drew the heart on red cardstock, cut it out, added definition with a bit of watercolur and then stamped the same `LOVE`` stamp on it!!  I stapled it to my page and added some cute little tags that hold the names of the people whose opinions I value and have earned the right to hear my story.  I did some personal journaling on the back of the page.
I don`t have many pictures of myself!!  It is interesting to see what I really look like!  I am loving my new haircut!!

Therese

Gifts of Imperfection - permission slips

Here is my next journal page - permission slips!! Brene emphasized that we sometimes need to give ourselves permission to do those things that we fear or have come to accept as being unacceptable!!  I have a long list on the front and the back of this page!!
I hand lettered the words "Permission Slips" and added a grid to write in.  I stamped "I may" in each rectangle and then just added with my fine tip Sharpie the things I wanted to give myself permission to think, say and do!!  I added a second page so I have all sorts of room to add more as I become aware of them!!  I added the watercolour wash afterwards with a wide brush - one that had never seen water or colour before this day!!

Therese

Fabric bead jewelry - bracelet and earrings!

So, here is my fabric bead bracelet!!and earrings!!  I found some turquoise and black beads in my stash which worked well with my fabric beads so I strung them onto stretchy cord to make my bracelet.  In the end, it was too long so I took it apart and removed two of the fabric beads which worked much better. The two beads just sitting there seemed to be pleading to be used so I decided to create a pair of earrings to match!!  Worked out so well!!  I love the contrast of the matte fabric beads and the shine of the other beads.
I did find that the beads became a little fuzzy at the ends as they were unstrung and restrung so sewing the beginning of the beads would be a good idea in that it would keep the channel more integral. I will consider if there is a way of adding a sturdier material at the core of the bead to reduce the wear and tear of stringing and restringing the beads.
I have managed to clean up the supplies that I had laid ALL OVER in my quest to find everything I needed to make up this project - beads, stretchy cord, findings, etc.

Therese

Fabric beads!!

I have been investigating making fabric beads in order to create bracelets for a swap that I have signed up for.  These were really fun to make!! There are a lot of different ideas out there for making fabric beads so I ended up sort of combining several to get what I was looking for.  I used a strip of fabric about 5" long x 1" wide.  I folded in the edges and added a short piece of double sided tape at my starting end so that the bead would hold together when I started rolling it on the skewer.  I rolled up the fabric strip as neatly as I could and at the end folded over the short end and stitched it up to create the bead.  To keep them from falling apart you really need to add some sort of stitching so, while I was at it I decided to use my floss as decoration as well. I wrapped two different colours of floss around the bead all the while adding stitches as I went.  I added stitching to both ends as well to keep those nice and neat.  Once done, they looked a little plain so I decided to stitch on a row of white seed beads as well.  I really like how they worked out.
On hind sight, I chose floss that coordinated with my fabric but I see that the fabric does not show very much now that they are all done.  Using double sided tape on the inside of the bead made stitching it difficult by gumming up the needle.  I may have to stitch the beginning end similarly to how I stitched the finishing end to create a base for the bead and maybe some other kind of glue that would be better for stitching.   I will have to experiment.
So in the end, though I love the look of the beads and I am sure they will make a beautiful bracelet the time commitment to making enough beads to make a bracelet for each of my swap partners is more time than I have!!  Darn!!  So I will be looking for a different project for that swap.  In the mean time, I have decided to make a bracelet for my self with my beads!!

Therese

Waxed fabric!

On one of my groups we have been challenged to use wax so I have been perusing the internet for ideas to try out!!  I discovered a site that showed how to use fabric instead of cardstock as the base for a wax painting!!  Too easy!!  I looked through my stash for a piece of white fabric and got busy!  I laid foil over my griddle and turned it on. I played with the temperature a bit and found that 200F or so worked just fine to melt the wax into the fabric.  So I just played for while and doodled some flowers onto my fabric. It takes no time for the wax to harden once you remove it from the heat and it stiffens the fabric nicely.  After a few calculations, I decided to cut my piece into 3.5" squares to make a few stitched cards using my pieces as the main element!!  I try to remember to take a photo of my art (for use digitally later) before I cut it all up and you can see from the photo that I was already into the process when I remembered to take a photo.  I will be able to "heal" that cut with the aid of Photoshop Elements and a bit of time.
My piece yielded nine squares so I will post my cards once I have a few made.  The site I mentioned above described a way to create batik fabric which was really cool.  I did not have dye but overnight I got thinking that I probably can use something else - acrylic paint or ink - instead. I may try to batik a couple of my squares.

Therese

Tuesday, October 22, 2013

Masculine card

Catching up on cards for family and friends!!  Today I made a masculine card using a fabulous leather leaf die cut, a bit of collage and a piece of dyed fiber.
I started the collage on a kraft card front by layering a piece of sponged text and adding colorful little scraps all the way around.  I sponged the collur printed greeting and glued it in place.  I laid the torn fiber (dryer sheet) over the collage and stitched all the way around in dark brown thread staying just on the edge of the collage.  To finish it off I added a length of knotted ribbon across the lower portion of the card front and adhered the leather leaf using 3D foam tape.  I added a bit of definition to leaf die cut using watercolour.  I am really happy with the way it turned out!!
The leather leaf is a gift from my daughter when she visited for Thanksgiving.  She is working on a variety of products for her Etsy shop, ThatMomShop.  She has copper leaves - real copper!!  Check it out!!!

Therese

More little quilts!

I have finished off another bunch of little quilts!  I created these with quilting scraps that I received from my sister when I was up home a few weeks ago.  She and my Mom both quilt so I had emailed saying I would appreciate any small scraps they are willing to part with so I brought home a little bag of scraps from each of them.  My sister gave me a bunch of little pieces.  Some were pieced - off cuts of the quilting process. I decided to use some of these first so I backed them with fabric from my stash and stitched their edges!!  They look a little different than the ones that are one fabric on the front and a different one on the back like these, these and these but I am liking them!!  Mom gave me several larger pieces which I will incorporate as time goes on.  My ziploc baggie is getting quite full!!! Maybe I will make myself a cool cover for my Brene Brown art journal with them!!  It would work perfectly into the theme - The gifts of Imperfection!!  I will have to work out the placement but I bet I can leave a window so I can see my handlettered title through the cover!!  Teesha Moore has made all sorts of funky covers for her journals and is the inspiration for these little quilts.  I may even have to make a few more in a specific size to make it work or even in certain colours.  Will have to work that into the next batch of these little quilts.  That is the fun of being the creator!!  You just get to make what you need!!

Therese