While my sister, Sylvia, was visiting a few weeks ago I decided to continue to create cards with the supplies my other sister left here. She is always very busy at the beginning of the school year and knew she would not be getting any more card made for a while so I encouraged her to leave the supplies and I would continue to work on them as I had time.
I am really enjoying making these large cards. It is fun to go digging through the paper stash and find something interesting and then create any thing I want!!!
Made a few Christmas ones this time and used up some pieces left over from the last session!!
Therese
Monday, September 14, 2015
Friday, September 11, 2015
OSW template - 3 cards using a 6"x 6" piece of decorative paper
I have been playing with One Sheet Wonders in a effort to have a template I like for preparing kits for a cardmaking session I am teaching later this month. Here is the latest one I have been working on. With this template you can create three different cards using a 6" x 6" piece of decorative paper and three sheets of cardstock - one neutral and two different colours that coordinate with the decorative paper.
I printed my images (Digital Two for Tuesday) and my greetings onto my white cardstock before I cut it apart to create my cards. I cut off the bottom to create one card front and then trimmed my images (2.25" x 3.5") and finally punched out my greetings using an oval punch (SU). I trimmed my decorative paper into three strips of 2" x 6". Then I cut the other two sheets of cardstock in half ( one green, one deep purple) and used one of each to create my other two card fronts.
For my first card, I watercoloured the lily image and cut a layer for it from the other half sheet of green cardstock. I punched a scalloped oval (SU) from the middle of it to layer under my greeting before gluing them to each other. I watercoloured my greeting and glued it to my scalloped oval. I glued my strip (2" x 5.5") of decorative paper near the left hand side of the purple card, added a strip of white cardstock which I cut from the white scraps, trimmed with decorative scissors and then pierced with a push pin to the right of my decorative paper strip. I added my layered image overlapping the decorative edge and glued it into place. I glued my layered punchie greeting below it.
The card went to the family of a neighbour who passed away last week.
For my second card I trimmed my 2" x 6" strip in half crosswise which gave me two identical pieces (2" x 3"). I glued one to the lower left hand corner and the other to the top right corner of my green card front. I watercoloured my image and cut a layer for it from the other half sheet of purple cardstock. Again, I punched a scalloped oval from the center of it before I glued my image to it. I watercoloured my greeting and layered onto the purple oval. I glued my layered image offset enough to the left to allow enough room for my layered greeting on the right hand side.
For my third card, I watercoloured my image and greeting and layered them as I had the previous one using purple cardstock scraps. I positioned my decorative paper allowing enough room to add two strips of green cardstock which I cut from scraps. I trimmed both of them using decorative scissors and glued them above and below my strip of decorative paper (2" x 5.5"). I added dots in the scallops using a white gel pen. I glued my layered image to the left hand side and added the layered greeting on the right centered on the lower strip of green.
Very happy with how these all turned out!! I have more sketches floating around in my brain for this OSW template.
I have provided the cutting template for the decorative paper, the three card sketches, a supply list and some basic instructions.
This One Sheet Wonder template only uses one 6" x 6" piece of decorative paper and three sheets of cardstock to create 3 handmade cards!! You can easily buy just what you need at your local scrap booking store and have your three cards made in a couple of hours. If you have a stash of paper and cardstock, you can shop at home!!
Good luck with creating some cards with this template and I welcome you to leave me a comment with a link to your creations!!
Therese
I printed my images (Digital Two for Tuesday) and my greetings onto my white cardstock before I cut it apart to create my cards. I cut off the bottom to create one card front and then trimmed my images (2.25" x 3.5") and finally punched out my greetings using an oval punch (SU). I trimmed my decorative paper into three strips of 2" x 6". Then I cut the other two sheets of cardstock in half ( one green, one deep purple) and used one of each to create my other two card fronts.
For my first card, I watercoloured the lily image and cut a layer for it from the other half sheet of green cardstock. I punched a scalloped oval (SU) from the middle of it to layer under my greeting before gluing them to each other. I watercoloured my greeting and glued it to my scalloped oval. I glued my strip (2" x 5.5") of decorative paper near the left hand side of the purple card, added a strip of white cardstock which I cut from the white scraps, trimmed with decorative scissors and then pierced with a push pin to the right of my decorative paper strip. I added my layered image overlapping the decorative edge and glued it into place. I glued my layered punchie greeting below it.
The card went to the family of a neighbour who passed away last week.
For my second card I trimmed my 2" x 6" strip in half crosswise which gave me two identical pieces (2" x 3"). I glued one to the lower left hand corner and the other to the top right corner of my green card front. I watercoloured my image and cut a layer for it from the other half sheet of purple cardstock. Again, I punched a scalloped oval from the center of it before I glued my image to it. I watercoloured my greeting and layered onto the purple oval. I glued my layered image offset enough to the left to allow enough room for my layered greeting on the right hand side.
For my third card, I watercoloured my image and greeting and layered them as I had the previous one using purple cardstock scraps. I positioned my decorative paper allowing enough room to add two strips of green cardstock which I cut from scraps. I trimmed both of them using decorative scissors and glued them above and below my strip of decorative paper (2" x 5.5"). I added dots in the scallops using a white gel pen. I glued my layered image to the left hand side and added the layered greeting on the right centered on the lower strip of green. Very happy with how these all turned out!! I have more sketches floating around in my brain for this OSW template.
I have provided the cutting template for the decorative paper, the three card sketches, a supply list and some basic instructions.
This One Sheet Wonder template only uses one 6" x 6" piece of decorative paper and three sheets of cardstock to create 3 handmade cards!! You can easily buy just what you need at your local scrap booking store and have your three cards made in a couple of hours. If you have a stash of paper and cardstock, you can shop at home!!
Good luck with creating some cards with this template and I welcome you to leave me a comment with a link to your creations!!
Therese
Thursday, September 10, 2015
Birthday greetings with gold embossed tulips
Another birthday card!! I watercoloured the gold embossed image of tulips and added a red layer. I colourwashed the laser printed greeting punchie and layered it onto a red scallop which I punched from the same piece I layered on the tulips - always matches perfectly when you do that!! I glued my decorative paper to my red card front, added a gold ribbon gluing the ends to the inside of the card and then layered on my image and greeting.
Another card for a special person!!
Therese
Another card for a special person!!
Therese
Monday, September 07, 2015
Birthday card with alcohol ink background
I love this card!! It features a polished stone background that I made quite a while ago on which I stamped a script background stamp in rose. I added the rose organza ribbon to it and adhered the ends to the back using double sided tape and then glued the whole element to my blue card front. I mounted my watercoloured greeting (Black Berry Jelly) to a red layer and mounted it to the front of my card over the ribbon using 3D foam tape. To finish it off I tied a short length of the ribbon with a single knot to the right of my greeting.
It will be off to a very special person come the beginning of September.
Therese
It will be off to a very special person come the beginning of September.
Therese
Labels:
A2,
birthday,
card,
digital images,
laser printing,
polished stone,
ribbon,
stamping,
watercolour
Monday, August 31, 2015
Heart fabric postcard
On my TFPC group I have joined a no theme postcard swap for August. I have Traci Bautista's Collage Unleashed book out of the library and saw that she had created one of her backgrounds using little strips of fabric. Having seen a bag of fabric strips at the second hand store a while back I went back to see if it was still there. Yes, it was!! I brought it home, ironed all the little strips and choose several that coordinated to create my first background. I have no idea what these would have been cut up for but they were perfect for this technique.
I started with a scrap piece of fabric. It doesn't matter what it looks like because it will all be covered up. I adhered my strips to my base fabric using "no sew hem tape" which is just heat and bond fusible web in a strip which worked perfectly!! I cut a strip of no sew tape for each strip and layered them onto my base fabric then passed the iron over it which fused it in place. Repeated until the whole surface had been covered. Next, I added a 4"x 6"piece of batting to the back and used red thread in my sewing machine to randomly sew all over the surface which bound all the layers to each other. I added a fabric heart which I stitched in place using several colours of thread and then added black stitching all the way around it as well. I added a white backer, folded it to the front and stitched all the way around to finish it off. It still needed a bit of something so I ironed on a little strip of label tape on which I had written "Love is kind". Perfect!! I added postcard details to the white back using a black sharpie and it is ready to be mailed off to my partner.
I am really enjoying making these little fabric projects!! This one is a little more textured because the edges are left just cut but that is the way it is with love and life - it is always beautiful but a little more textured in some cases.
Therese
Sunday, August 30, 2015
Zentangle Art Charms
I have been working on Zentangle art charms for a personal swap. The above are my first attempts which ended up being much too large to be art charms - the feathers are 2.5"!! I am very happy with them so they will be put aside and used for a different project.
I used Rough and Ready Translucent Shrink plastic. I used a fine tip Sharpie to create my designs on the smooth side and coloured them on the rough back side using coloured pencils except for the one on the far right which I coloured with alcohol inks. I should have been much more light handed with the ink because once they shrink the colour is much darker. Lesson learned!!
So, at my second attempt I created the designs much smaller so they would end up closer to 1.25" once they were shrunk. I was then able to add the findings and danglies and have them much closer to the 1.5" criteria for the exchange. I created two so I can keep one and will be sending the other to my partner. These are the mandalas I created.
I changed up my leaf design on my second attempt because it was harder to created the thin point at the smaller scale. Still very happy with how these turned out. I made beaded danglies for them.
Loved how these turned out too. I simply reduced my original hand drawn design and tried to replicate my original zentangles but as you can see I had made a few changes!! I added metal charms to the zentangled ones to create some movement and interest!!
So I will have these ready to go to my partner in tomorrow's mail. I am a few days late because of having to redo in the smaller size but all in all I am sure she will be happy with them. Looking forward to hers in return mail.
Therese
Labels:
art charms,
charms,
colour pencils,
danglies,
hand drawn,
sharpie markers,
shrink plastic,
Zentangle
Saturday, August 22, 2015
Stash busting weekend!!
My sister (I have five) is here this weekend and she brought along some supplies for card making!! She is wanting to translate a pile of card stock and decorative paper into something she can use. So after a couple days of creating we have over twenty cards made between the two of us. Here's a sampling!!
These are large cards - 8.5" x 5.5"!! It has been so fun to create with abandon. She is looking for a variety of cards so pretty much anything goes. I dug out my little boxes of images & greetings, ribbon, the bins of scrap paper and tools and so far we have managed with the supplies we have out. Great fun!!!
Therese

These are large cards - 8.5" x 5.5"!! It has been so fun to create with abandon. She is looking for a variety of cards so pretty much anything goes. I dug out my little boxes of images & greetings, ribbon, the bins of scrap paper and tools and so far we have managed with the supplies we have out. Great fun!!!
Therese

Friday, August 21, 2015
Raised N postcard with a twist
We have an ongoing swap on one of my groups - postcards with raised letters. I thought I would give "raised" a bit of a twist and created a postcard where you raise the N using a ribbon!! Very cool technique I have in the past used with tags and cards. I created the front on blue cardstock by first drawing wavy lines in pencil and tracing them using a fine tip black sharpie. I punched the hole for my ribbon, drew in my letters, filled them in and then zentangled the rest of the spaces. I added the foil elements with a bit of a black strip of cardstock to set them off from the artwork. I created my back on green cardstock - just postcard elements hand drawn along with my swap information.

Next, I created my N. I started with a small piece of alcohol ink background that was the right colour, hand wrote "never" all over the front and then hand drew the N and filled it in. I ran a large black marker around the edge just to give it a bit of definition. I then created the U I needed to hold my N between both layers and glued the front to the back using double sided tape which left a pocket in the middle which will hide my N until someone pulls on the ribbon. As you pull on the ribbon the N element slowly rises!! Very cool!! You can find a tutorial for the pull up mechanism here on SplitCoast Stampers. It will be off to my partner in the next few days!!
Therese

Next, I created my N. I started with a small piece of alcohol ink background that was the right colour, hand wrote "never" all over the front and then hand drew the N and filled it in. I ran a large black marker around the edge just to give it a bit of definition. I then created the U I needed to hold my N between both layers and glued the front to the back using double sided tape which left a pocket in the middle which will hide my N until someone pulls on the ribbon. As you pull on the ribbon the N element slowly rises!! Very cool!! You can find a tutorial for the pull up mechanism here on SplitCoast Stampers. It will be off to my partner in the next few days!!
Therese
Wednesday, August 19, 2015
Magical 4x4 chunky book page!
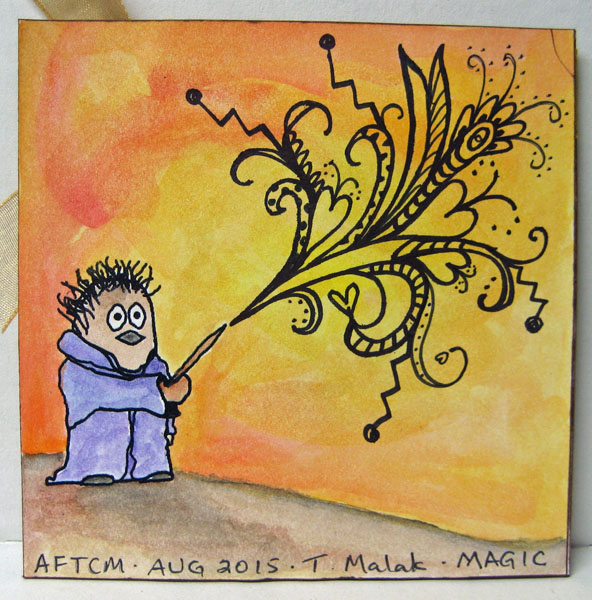
On one of my groups I joined a 4" x 4" chunky book swap with the theme of magic and the colour orange!! I did a bit of brainstorming, sketched a layout and went looking for what I would need to create it!! I found the book of spells on line on a geocaching site. It was exactly what I was looking for - a beautifully illustrated book with a orange undertone. I found the bottle on CLKER and added the label which I also found somewhere on line. Perfect!! I imported the book in Corel Draw after I had made a few modification in PSElements to give it more height. I imported the bottle as well after I had added the label in PSElements. While looking for elements I had found an illustration of a little magician spewing magic so I decided I wanted something similar on the back of my page. I downloaded this little guy (b&w) from CLKER and modified it in PSElements changing the eyes, hair, mouth, position of the arm and added a wand.

I positioned everything in Corel Draw and then laser printed it on white cardstock. I trimmed it to be 4" x 8" and folded it in half. I trimmed my bottle close and then ran a black sharpie around the edge to remove the white shadow. I watercoloured the bottle and then applied glossy varnish to give it it a shiny finish. I rounded the edges a bit and mounted it to the front of my 4x4 using 3D foam tape. I felt like the page needed a bit more texture so I added an orange organza ribbon to the top. That was better!! I added some hand lettering and it was done! On the back, I watercoloured the whole thing - the background in yellow and orange, the hill in browns and the wizard in purple. He is a bit strange looking but I like him. I have very little experience in digital drawing. Once it was dry, I sprayed it with hair spray to seal the surface so I could add my magical zentangle. I used a fine tip sharpie for the zentangle and just kept adding until I thought it was finished. There are a few hearts in there because it is Love Potion after all!!! Super happy with the result of my experimenting!!!
This little chunky book page will be off to my partner next week!!!
Therese

I positioned everything in Corel Draw and then laser printed it on white cardstock. I trimmed it to be 4" x 8" and folded it in half. I trimmed my bottle close and then ran a black sharpie around the edge to remove the white shadow. I watercoloured the bottle and then applied glossy varnish to give it it a shiny finish. I rounded the edges a bit and mounted it to the front of my 4x4 using 3D foam tape. I felt like the page needed a bit more texture so I added an orange organza ribbon to the top. That was better!! I added some hand lettering and it was done! On the back, I watercoloured the whole thing - the background in yellow and orange, the hill in browns and the wizard in purple. He is a bit strange looking but I like him. I have very little experience in digital drawing. Once it was dry, I sprayed it with hair spray to seal the surface so I could add my magical zentangle. I used a fine tip sharpie for the zentangle and just kept adding until I thought it was finished. There are a few hearts in there because it is Love Potion after all!!! Super happy with the result of my experimenting!!!
This little chunky book page will be off to my partner next week!!!
Therese
Monday, August 17, 2015
Thank you cards with die cut greetings
I made a few thank you cards for my card bucket. I started with the left one - cut out the word using a set of small alphabet framelits from a decorative paper I created using a mouldable foam stamp and some cedar branches. I love the colours - Kaleidacolour - Creole Spice rainbow pad!! I added two layers - dark green and then light green. I used a leafy embossing folder and manually embossed the outside edges of a navy blue card and then mounted my focal element to the center. On the center one I used a very similar technique but added texture to my card front using green ink on a harlequin background stamp instead of an embossing folder. Again, hand decorated paper cut with alphabet framelits, layered onto dark green and then light green and mounted to my green card front. For my last one I got a little carried away which happens to me - I don't like to make two cards exactly the same. I used the same decorative paper as the first one, layered it onto navy and then purple. I found these two scallop circles in my stash, cut them both in half and mounted them on my card front and then mounted my focal element with the greeting over that. I like the halo of scallops!!
My card stash is very low so I am need to start making a few every week to build it back up so I will have cards on hand.
Therese
Labels:
A2,
cards,
die cuts,
embossing,
embossing folder,
framelits,
hand decorated paper,
scallop punchies,
stamping,
thank you
Thursday, August 13, 2015
Another set of card that reuse a card
After making these two cards, I was digging through a container on my desk and found this small card which I had also received in a swap package a while back. I thought it would also be quite appropriate for making cards. I used the front on the left hand side card. I layered it onto purple, added some gold details with a gel pen and mounted a layered punchie greeting to the lower right hand corner. All these elements were mounted to a red card front. Love the beautiful travel theme!!
For the second card on the right hand side I used the back of the card. It had information on the back so I needed to find a way to cover up the writing. I found this colour printed punchie greeting that was the right colour and also perfectly hid the writing. I added a red embossed layer behind the decorative layer, added a green ribbon and mounted this piece to a green card front. I mounted the greeting punchie over the ribbon using 3D foam tape. One will be added to my stash and the other is off to my other monthly card exchange partner.
Therese
Cards created with reused card front and back
I received a small card in one of my swaps a while back and thought it would do very nicely for a layer on a card so I set it aside. I made two cards with it!!
The front with the butterfly I layered onto purple and then onto a blue green card front. I punched a large oval in the front layer and added a small oval punchie colour printed greeting into the opening!!! Done!!
For the other card I used the back which was simply printed with little butterflies. I layered it onto a light aqua layer, added a layered watercoloured image of a fish and a punched coloured printed greeting over two ribbons. Very happy with how this one turned out as well.
It is fun to use free crafting supplies and make use of something that most would simply throw out or recycle. I will be sending one of this off to my partner for my monthly card exchange.
Therese
The front with the butterfly I layered onto purple and then onto a blue green card front. I punched a large oval in the front layer and added a small oval punchie colour printed greeting into the opening!!! Done!!
For the other card I used the back which was simply printed with little butterflies. I layered it onto a light aqua layer, added a layered watercoloured image of a fish and a punched coloured printed greeting over two ribbons. Very happy with how this one turned out as well.
It is fun to use free crafting supplies and make use of something that most would simply throw out or recycle. I will be sending one of this off to my partner for my monthly card exchange.
Therese
Birthday cards with balloon stickers
I bought a sheet of balloon stickers when my granddaughter was visiting so I could make cards while we were crafting. She is a very independent and capable crafter so she usually does her own thing during crafting time though we do discuss all sorts of things as well as craft.
I am just getting them finished this week.
I will be passing them to my daughter who is often in need of last minute kids birthday cards.
It was fun to pull the colours for my card and the layers from the balloons and just do whatever I wanted. Generally, I prepared the main element - white cardstock, balloon sticker and a stamped greeting first and then decided what else I was going to do.
As you can see, I added ribbon, punchies, glitter glue, a bit of watercolour, embossed layers and layers trimmed with decorative scissors.
Lots of fun!!! It is amazing how many cards can be made with one sheet of stickers. I have run the course of this inspirational tool and have a few leftover which I will be sending to grandchildren to create with.
Therese
Monday, August 10, 2015
Bottle cap pin cushion
My needles have been living with my straight pins and today I decided to give them a new home. I created this little bottle cap pin cushion for them. I started with a yellow lid from a salad dressing bottle and cut a circle three times the width out of stretchy blue fabric. I handstitched all the way round the edge of the circle and created a little cup which I filled with fiberfill. Once it was full enough I tied off my ends. I dug through my button collection and found this beautiful white rose button which I sewed into the middle of my little ball tugging it nice and tight before I tied off my threads. I stuffed the little ball into the bottle cap and I was done! I new home for my needles!! The straight pins will live in the red one and the needles in the blue one!!
Therese
Therese
Tuesday, August 04, 2015
Small sheets of handmade paper
While my grand daughter was visiting we made handmade paper. We started with the blue the first day and made pink the next. We had prepped all the pulp the first day so we were able to add to our vat as we went. You can see that we made a variety of hues by added more coloured pulp as well as different colours by adding pink or blue to make several shades of purple. We also added coloured snippets at several junctures in the process. It was fun and very nice to be making handmade paper again!!
Therese
Therese
Thursday, July 30, 2015
Butterfly Fabric Postcard
I am working on catching up my swaps!! Here is the fabric postcard I created for my One for One July exchange on Trading Fabric Post Cards group. I just discovered this website as well which explains a bit about the group and how it works.
I have really been enjoying making these postcards. For this one, I started with some dyed silk which my friend Kate showed us how to do years ago when I lived out east! It is a fun and easy process and I love the soft watercolour look that I achieved in this piece. It was just the right size for my postcard so I cut a piece of batting and stitched them together using teal, light pink and dark pink thread in wavy lines across the length of it. Dug through my stash of little scraps looking for something that worked with the colours and chose these ones. They were donated to me by my sister after she finished making herself a lovely bag for carting her quilting supplies. I used a butterfly die (SX) to cut the solid shape out of the lighter fabric and the outline out of the darker fabric. I stitched the light coloured butterfly down first and then overlaid the dark wings and body which I also stitched into place using dark pink thread. I did add a bit of watercolour to the body to give it a bit of definition before I stitched it down. I added antenna using dark brown thread and the flight path was executed with light yellow thread in a couching stitch. I added some yellow sequins and red Ebeads to the wings for a bit of texture and embellishment. I fused some interfacing to the back to give it more body and added another layer of fusible webbing before laying my white back over my front and stitching the outer edge leaving a gap so I could turn it over. Once it was turned inside out, I stitched closed the gap and pressed it neatly which activated the extra layer of fusible web securing my backing to the rest of the postcard. I added a row of stitching all they way around the edge in dark pink and I was done!! Added my details to the back and it is ready to be mailed off as soon as I get my partners information.
Therese
I have really been enjoying making these postcards. For this one, I started with some dyed silk which my friend Kate showed us how to do years ago when I lived out east! It is a fun and easy process and I love the soft watercolour look that I achieved in this piece. It was just the right size for my postcard so I cut a piece of batting and stitched them together using teal, light pink and dark pink thread in wavy lines across the length of it. Dug through my stash of little scraps looking for something that worked with the colours and chose these ones. They were donated to me by my sister after she finished making herself a lovely bag for carting her quilting supplies. I used a butterfly die (SX) to cut the solid shape out of the lighter fabric and the outline out of the darker fabric. I stitched the light coloured butterfly down first and then overlaid the dark wings and body which I also stitched into place using dark pink thread. I did add a bit of watercolour to the body to give it a bit of definition before I stitched it down. I added antenna using dark brown thread and the flight path was executed with light yellow thread in a couching stitch. I added some yellow sequins and red Ebeads to the wings for a bit of texture and embellishment. I fused some interfacing to the back to give it more body and added another layer of fusible webbing before laying my white back over my front and stitching the outer edge leaving a gap so I could turn it over. Once it was turned inside out, I stitched closed the gap and pressed it neatly which activated the extra layer of fusible web securing my backing to the rest of the postcard. I added a row of stitching all they way around the edge in dark pink and I was done!! Added my details to the back and it is ready to be mailed off as soon as I get my partners information.
Therese
Monday, July 27, 2015
Victorian postcard with fabric paper
Another Victorian postcard for a different swap on the same group!! I decided to use the image that I did not use for the last postcard for this one instead. I watercoloured it, cut it into an oval (Nestibilities) then cut another one just a bit larger from green cardstock and layered them over each other. While I was digging through my stash for some sort of trim to go across my postcard I ran across some brown fabric piping and decided it would very nicely frame my image so I applied double sided tape to the back of the layered image and applied my brown piping all the way around. I love the way it turned out!! Neat and clean yet with a bit of texture!! I did find the dark brown trim in the same bucket which is what I went looking for in the first place. I ironed this folded trim flat and applied a length of washi tape to the center of it then laid it on my 4" x 6" piece of fabric paper and stitched it into place. For this set of postcards we need to raise our letters so I decided to use these monogram brads for my "E". They were originally silver so I applied colour to them using my Sharpie markers which was just what they needed for this project. I installed the brads in the fabric paper layer and then adhered it with double sided tape to a plain cardstock backer to finish off my postcard. It still needed a "bit of something" so I added stitching around the edge. That was better!! I used hot glue to adhere my large 3D element to the front of the postcard!! Done!!!
It is off to my partner!!
Therese
Saturday, July 25, 2015
Distressed Victorian postcard
I created this postcard for a swap on one of my groups. We were each sent this image of a woman and given free rein to create with it!! The digital image was provided as well for those who wanted to print off a few copies for experimenting with before they started their project. I downloaded the image and sized it for my postcard then printed it on copy paper. I used packing tape to make a transfer which I applied to a music sheet that had been very lightly washed with watercolour.
Packing tape transfers are very easy - you need a laser printed image, clear packing tape and water. Trim your image close to the printing, lay a piece of packing tape over the image and burnish well. Next, soak the tape/image in water. Once the paper is softened put the transfer on a hard surface and rub off the paper which leaves the toner adhered to the packing tape. FUN and easy!! You can check this link for a tutorial.
Back to the project, I used markers to add colour to the back of the image (sticky side of the tape), trimmed the top and bottom of the transfer then applied it to the music sheet making sure there were no marks on her face. I burnished it well then ripped the paper on all four sides. I layered it this piece onto a piece of coordinating hand decorated paper and then onto black cardstock. Next, I created my background. I started with a 4" x 6" piece of scrap cardstock to which I glued torn scraps of embossed silver foil left over from a long ago project. Once the glue was dry, I applied colour using sharpie markers in purple, blue and black. I scribbled colour in a small area and rubbed lightly it to smooth out the marks. This process removed a bit of colour but I like the look - a bit distressed. I added the blue and purple first and then did the black a little more aggressively. I like the way the black remained in the texture of the foil. After I was done, I went back in and added more colour where I thought it needed a bit more. Very happy with the resulting background!! I adhered my layered image on the top portion using double sided tape and added a length of black lace below it gluing the ends to the back. I added double sided tape below the lace where I was putting the flowers and then added the flowers using large glue dots. I cut another piece of 4" x 6" cardstock and glued it to the back to nicely finish off my postcard. Really happy with how this project turned out. It will be off to my partner this week.
Therese
Packing tape transfers are very easy - you need a laser printed image, clear packing tape and water. Trim your image close to the printing, lay a piece of packing tape over the image and burnish well. Next, soak the tape/image in water. Once the paper is softened put the transfer on a hard surface and rub off the paper which leaves the toner adhered to the packing tape. FUN and easy!! You can check this link for a tutorial.
Back to the project, I used markers to add colour to the back of the image (sticky side of the tape), trimmed the top and bottom of the transfer then applied it to the music sheet making sure there were no marks on her face. I burnished it well then ripped the paper on all four sides. I layered it this piece onto a piece of coordinating hand decorated paper and then onto black cardstock. Next, I created my background. I started with a 4" x 6" piece of scrap cardstock to which I glued torn scraps of embossed silver foil left over from a long ago project. Once the glue was dry, I applied colour using sharpie markers in purple, blue and black. I scribbled colour in a small area and rubbed lightly it to smooth out the marks. This process removed a bit of colour but I like the look - a bit distressed. I added the blue and purple first and then did the black a little more aggressively. I like the way the black remained in the texture of the foil. After I was done, I went back in and added more colour where I thought it needed a bit more. Very happy with the resulting background!! I adhered my layered image on the top portion using double sided tape and added a length of black lace below it gluing the ends to the back. I added double sided tape below the lace where I was putting the flowers and then added the flowers using large glue dots. I cut another piece of 4" x 6" cardstock and glued it to the back to nicely finish off my postcard. Really happy with how this project turned out. It will be off to my partner this week.
Therese
Monday, July 20, 2015
4x4 chunky book page - golden strength
Started on this swap page a few days ago and finished it off this morning. I am really happy with how it turned out.
I started by gluing silver foil (chocolate = arts supplies) to both sides of a 4" x 4" cardstock substrate leaving wrinkles and texture. I scribbled some brown and maroon Sharpie marker over the surfaces and then added butterscotch alcohol inks and blended them. Really like the highlights in the gold!!! After a bit of internet research I downloaded both of the images and printed them on transparency. I love the strength quote -great affirmations. The other is a universal image for strength.
I trimmed the images and found that when placed over the gold foil the reflections were a bit distracting in my quote so I added a strip of handmade washi tape across the back which really helped to highlight the word Strength. I played with my elements until I was happy with their placement, added three short pieces of ribbon at the top right of my front and stitched down the right hand side which secured all the pieces in place. I added double sided tape at the bottom edges of both transparencies and then added another thin strip of washi tape to each side. To finish securing the back I added double sided tape below the printing so it would not show. For the front I found these three foil wine bottle seals in my stash, trimmed them nicely and added them using large glue dots over my transparency which I had secured with double sided tape. It is fun to play!!! My swap will be on its way to my partner today!!
Gardening has taken more time in the last few weeks because it was so hot and no rain. We finally have had two good rains!! Catching up on swaps in the next few days before having a visit with grandchildren.
Therese
I started by gluing silver foil (chocolate = arts supplies) to both sides of a 4" x 4" cardstock substrate leaving wrinkles and texture. I scribbled some brown and maroon Sharpie marker over the surfaces and then added butterscotch alcohol inks and blended them. Really like the highlights in the gold!!! After a bit of internet research I downloaded both of the images and printed them on transparency. I love the strength quote -great affirmations. The other is a universal image for strength.
I trimmed the images and found that when placed over the gold foil the reflections were a bit distracting in my quote so I added a strip of handmade washi tape across the back which really helped to highlight the word Strength. I played with my elements until I was happy with their placement, added three short pieces of ribbon at the top right of my front and stitched down the right hand side which secured all the pieces in place. I added double sided tape at the bottom edges of both transparencies and then added another thin strip of washi tape to each side. To finish securing the back I added double sided tape below the printing so it would not show. For the front I found these three foil wine bottle seals in my stash, trimmed them nicely and added them using large glue dots over my transparency which I had secured with double sided tape. It is fun to play!!! My swap will be on its way to my partner today!!
Gardening has taken more time in the last few weeks because it was so hot and no rain. We finally have had two good rains!! Catching up on swaps in the next few days before having a visit with grandchildren.
Therese
Friday, July 17, 2015
Mixed Media fabric wall hanging with a quote
I have finally finished my wall hanging. It has taken longer than I expected but there were several times in the creative process that I had to wait for inspiration to come. That is as it should be!!
I started by sewing blue, pink and patterned fabric scraps together to create a panel in a bit of a log cabin style layout. Next, I played with a variety of elements to see how and what I would use to create my piece. I eventually decided to add my quote to a non running fabric (Windex wipes) using a fine tip Sharpie. I printed rhw quote onto paper and was able to see it well enough thriough the fabric to trace it. I trimmed the edges of the fabric, stitched it to my panel and then used the overcast stitch with black embroidery thread to secure a larger fiber over the machine stitching. Two squares seemed quite jarring - they were pretty much too light for the rest of the piece so I watercoloured them in blue, masked them off and added stippling in navy ink. That toned them down considerably. I started auditioning trims and eventually chose the two pieces of cotton eyelet lace and the pink fabric trim. The pink was not quite the right colour so I added a red acrylic paint colour wash. That was better. I sewed on all the trim using white thread in my sewing machine. To add yet more texture I added some white hand stitching over the pink trim adding pink and white glass seed beads as I went. That worked out very well. Knowing that I wanted to add some floral elements I auditioned some silk flowers and really liked these blue ones. I added blue flower sequins to their centers, some silk leaves in behind and added a tiny yellow seed bead to the center as I stitched them into 3D embellishments. Next I played with placement of my flowers until I was happy with the layout. Two of the smaller ones were used to disguise the two squares that had been toned down as they still contrasted too much with the rest of the piece. That worked out well. Before sewing on my flowers I played around with how I would finish off the edges of my hanging. I finally decided to lay the front face down on the back and stitched around the edge leaving a gap to turn the whole thing inside out. I did remember to add two white bias tape loop hangers to the top before I stitched it up. Very happy with how that worked out!! I stitched up the gap, pressed everything very well and added a row of machine stitching all the way around the edge which stabilized it very nicely. As I was getting ready to add my flowers I decided that the quote needed to have some flowers on it. I dug through my stamps and found this doubled ended flower stamp (SU). I coloured the areas with markers, huffed on it and stamped them in place - one on the left and the other on the right. To add texture, I added french knots to the flower centers. Very happy with that!! Next, I thought maybe the back and the front needed to be attached more closely than only on the edges so I added hand stitching (not all the way through) to all the pieces generally adding thread in the same colour as the fabric was printed so that the only effect I created was texture on the fabric. I added pink french knots to the little roses on the fabric on the left hand side. I like the way that turned out! Finally it was time to sew on my flowers!! I stitched them on by hand using yellow embroidery thread. The result did not please me as much as I had hoped it would. It still needed a bit of something!!! I auditioned a wide variety of options and finally settled on leafy green cardstock die cuts. I watercoloured them with yet more green, dried them and moved them around my flower until I was happy with the layout. I took a photo with my camera to use as reference before I stitched them around my flowers. That was much better!!!
Here is a photo of the first one I made where I used much more of a collage technique.
Here is the back of my wall hanging. It features hand painted fabric which I made myself. I started with a piece of white cotton to which I applied several colour washes of acrylic paint in pink and blue. Once dry, I added a layer of batting which I stitched into place using blue thread in a diagonal grid pattern. I added white dots to each space using acrylic paint and a little round foamie dot. I added four blue loops at every other intersection and pink french knots in between. I had made it large enough so I could just fold over the edge and stitch it in place had I decided to finish it off that way.
I am happy with my wall hanging!!!! I will be writing my credits on white cotton, stitching it to the back then packaging it up and it will be off to my swap partner on Monday!!
Therese
I started by sewing blue, pink and patterned fabric scraps together to create a panel in a bit of a log cabin style layout. Next, I played with a variety of elements to see how and what I would use to create my piece. I eventually decided to add my quote to a non running fabric (Windex wipes) using a fine tip Sharpie. I printed rhw quote onto paper and was able to see it well enough thriough the fabric to trace it. I trimmed the edges of the fabric, stitched it to my panel and then used the overcast stitch with black embroidery thread to secure a larger fiber over the machine stitching. Two squares seemed quite jarring - they were pretty much too light for the rest of the piece so I watercoloured them in blue, masked them off and added stippling in navy ink. That toned them down considerably. I started auditioning trims and eventually chose the two pieces of cotton eyelet lace and the pink fabric trim. The pink was not quite the right colour so I added a red acrylic paint colour wash. That was better. I sewed on all the trim using white thread in my sewing machine. To add yet more texture I added some white hand stitching over the pink trim adding pink and white glass seed beads as I went. That worked out very well. Knowing that I wanted to add some floral elements I auditioned some silk flowers and really liked these blue ones. I added blue flower sequins to their centers, some silk leaves in behind and added a tiny yellow seed bead to the center as I stitched them into 3D embellishments. Next I played with placement of my flowers until I was happy with the layout. Two of the smaller ones were used to disguise the two squares that had been toned down as they still contrasted too much with the rest of the piece. That worked out well. Before sewing on my flowers I played around with how I would finish off the edges of my hanging. I finally decided to lay the front face down on the back and stitched around the edge leaving a gap to turn the whole thing inside out. I did remember to add two white bias tape loop hangers to the top before I stitched it up. Very happy with how that worked out!! I stitched up the gap, pressed everything very well and added a row of machine stitching all the way around the edge which stabilized it very nicely. As I was getting ready to add my flowers I decided that the quote needed to have some flowers on it. I dug through my stamps and found this doubled ended flower stamp (SU). I coloured the areas with markers, huffed on it and stamped them in place - one on the left and the other on the right. To add texture, I added french knots to the flower centers. Very happy with that!! Next, I thought maybe the back and the front needed to be attached more closely than only on the edges so I added hand stitching (not all the way through) to all the pieces generally adding thread in the same colour as the fabric was printed so that the only effect I created was texture on the fabric. I added pink french knots to the little roses on the fabric on the left hand side. I like the way that turned out! Finally it was time to sew on my flowers!! I stitched them on by hand using yellow embroidery thread. The result did not please me as much as I had hoped it would. It still needed a bit of something!!! I auditioned a wide variety of options and finally settled on leafy green cardstock die cuts. I watercoloured them with yet more green, dried them and moved them around my flower until I was happy with the layout. I took a photo with my camera to use as reference before I stitched them around my flowers. That was much better!!!
Here is a photo of the first one I made where I used much more of a collage technique.
Here is the back of my wall hanging. It features hand painted fabric which I made myself. I started with a piece of white cotton to which I applied several colour washes of acrylic paint in pink and blue. Once dry, I added a layer of batting which I stitched into place using blue thread in a diagonal grid pattern. I added white dots to each space using acrylic paint and a little round foamie dot. I added four blue loops at every other intersection and pink french knots in between. I had made it large enough so I could just fold over the edge and stitch it in place had I decided to finish it off that way.
I am happy with my wall hanging!!!! I will be writing my credits on white cotton, stitching it to the back then packaging it up and it will be off to my swap partner on Monday!!
Therese
Subscribe to:
Posts (Atom)