Saturday, March 28, 2020

Slow Stitching - Tree #10

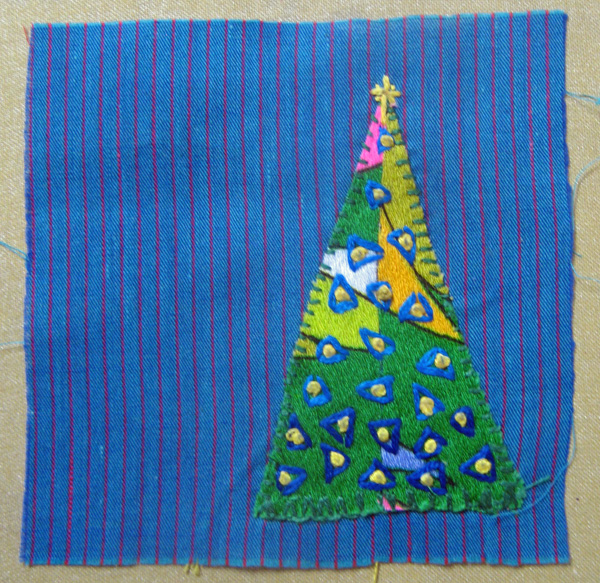
With a bit more time on my hands because were are choosing to stay home to avoid contact with Covid 19 and all of our outside activities and commitments have been cancelled I have spent more time stitching on my little trees than the bit of time I usually commit to in the morning.  So I have finished another one!!  This is my tenth one!!  I did blanket stitch around the edge of this one in light green crochet thread and couched a heavyweight red thread with orange floss over all.  I really enjoyed the  ability to shape the red thread any way I wanted so I will be doing this technique again!!  I added french knots in blue afterwards to punch up the colour a bit and add some interest and texture. I add the star in yellow using small stab stitches.   Therese

Friday, March 27, 2020

Birthday card featuring a cute little cat, a font greeting and some fiber

I am still making cards for my stash!!  This one features a cute little cat (CLKER) which I usually colour orange but today I thought I would change it up and coloured it gray!  I like it!!  I used some red fiber and a large needled and gave him a scarf!!  I simply poked two holes on each side of his neck and inserted the fiber using the needle.  It adds some colour and texture to this little guy.  After watercolouring him, I used my tracing wheel to add a row of paper piercing to all the edges.  I mounted the cat to a piece of red cardstock and trimmed it to an even margin.  I adhered this layer to a speckled navy card and then added a row of paper piercing to each side of the focal image with my pattern tracing wheel.  I like the echo of the paper piercing - works well.     Therese

Slow Stitching - Tree #9


Here is my ninth tree for my slow stitching project!!  I started with a modified blanket stitch on the bottom edge and could not get it done consistently so I switched to just regular stab stitched for the rest.  I created blue rectangles over all of the tree and then added yellow french knots in the middle of all of them.  I added the star at the top using small stab stitches which seems to work out the best.  I remember to put them one on the right to help balance the collection!!     Therese

Thursday, March 26, 2020

Thank you card featuring a framed floral collage, a stamped greeting and some embossed elements

For this card I used a framed floral collage which I downloaded from Pixabay.  Once trimmed from the sheet of white cardstock, I distressed its edges and stamped the little greeting in black.  The greeting is from Taylored Expressions.  It was a freebie when I order my Bethlehem and Nativity dies last year.  It stamps very nicely!!!  I found a coordinating pink card and added gray randomly cut scraps which I embossed with coordinating embossing folders and then sponged with a bit of black ink to highlight the design.  I mounted the scraps to my pink card and then added the floral image.  Thinking it still needed a bit of something I added some faux stitching with a sharpie all the way around the edge.  That was better!!!!!!!          Therese

Wednesday, March 25, 2020

Any occasion card featuring a beautiful red poppy with several layers and some ribbon

I found this image in my stash and thought it would make a perfect all occasion card!!  It is from Calico Collage.  After trimming, I layered it onto black cardstock and then added a silver metallic layer behind it.  I added two pieces of ribbon to a red card front - one black satin overlaid over a white gros-grain one.  Their ends are flagged and the other are adhered to the inside of my card using double sided tape.  It will work wonderfully as a birthday, sympathy or thinking of you card!! 

Therese

Tuesday, March 24, 2020

"You are awesome" card featuring a unicorn, an embossed background, ribbon and some clear glitter


This card features another unicorn image from Pixabay.  I love his magical body!!  I sized it, added one of the greetings I created with fonts and then printed it on white cardstock. After trimming out the image I added clear glitter with a gel pen to the stars on its rump and added a border all the way around the edge.  I added three little pieces of flagged ribbon securing them with double sided tape on the back of the image.  I found this weathered brown cardstock in my stash and decided it would work with this little unicorn.  I embossed it with a swirly background (D"vine Swirl - CB) and mounted it to a light aqua card.  I mounted my unicorn image over the embossed background using 3D foam tape to finish off my card.             Therese

Slow Stitching - Tree #8

Here is my eighth little square in my Slow Stitching project!!  I made chain stitches all the way around and then filled in with running stitches in  coordinating thread all through the middle section.  Added the little star using yellow thread.  I laid them all out and I see that most of them are lefties so I will have to make a few righties to balance out the collection.              Therese

Monday, March 23, 2020

Slow Stitching - tree #7

Here is the tree I have been working on for a few days.  I used fern stitching in green to anchor the tree to the background and generally to contain the edges from fraying.  It was fun to be able to make the stitch curve and have motion though the tree is not big enough to really highlight that ability.  I might try again on a different one knowing how easy it is to get a curvy line with this stitch.  The stitches could also be executed a bit smaller which would allow more options for moving a line.  I will consider as well drawing a line or following the black lines in the fabric for a guide.  This star worked out better though I am using the same technique of building it using single running stitches. 

Therese

Sunday, March 22, 2020

Christmas card featuring a reused card front featuring a white dove with an olive branch

This one was quick and easy!! I trimmed the dove image from a used card to 4" x 5.25", ran the pattern tracing wheel on all four edges and adhered it to a red card front.  I like reusing beautiful cards and giving them one more life!! 


Therese

" You are Awesome" card featuring a cute little unicorn, a custom font greeting, some ribbon and a sanded white core background

I was creating card components this week and I managed to create two different "You are Awesome" greetings by combining fonts.  This one features a font with open lettering which for this card I coloured in with a light pink and then added clear glitter using a gel pen.  I am really happy with both of my greetings and I will be making more using these fonts.  The unicorn was downloaded from Pixabay.  I sized the image, added the fun greeting and colour printed it onto white cardstock.  Once trimmed from the letter sized sheet, I coloured the open letters and added a border of clear glitter.  I created an embossed and sanded background using three different scraps of white core card stock.  I embossed them with three different polka dot backgrounds, sanded them and mounted them to a lavendar card front.  I added coordinating ribbon to my unicorn image before mounting it to my card using 3D foam tape.  I love that he is winking!!!

Therese

Saturday, March 21, 2020

Christmas card featuring a handmade tag, decorative paper and ribbon

This card was part of my day of making cards.  I have had this tag with my Christmas ornaments because it was made by a friend out east for our yearly Gift Tag Exchange.  Unfortunately, I have had to cull ornaments from by boxes as the Christmas trees are getting smaller so I decided that I would feature it on a card instead.  I combined it with this very neutral scrapbook paper which I was gifted with a while back.  The pattern is in the paper and works very well to highlight the tag.  I trimmed the paper to size, adhered it to a red card front and then added the handmade tag which features a snowbank, birch trees and a little cardinal - all die cuts.  I had to shorten the ribbon a little so it would fit on the card.  It brings back good memories of all of us making cards together in those days!!

Therese

"You are awesome" card featuring a colour printed cute little bear, rhinestones and thread

I so love this little bear and his balloon!!  It is an image from LaPetiteFemme on Pixabay!  I added the "You are awesome" font greeting I created then colour printed it onto white cardstock, trimmed it out of the letter sized sheet and mounted it to piece of black cardstock.  When trimming,  I left a large margin on the right hand side, punched the edge with the scallop border punch (SU), added clear rhinestones to each scallop and then added white cording between them and the image.  I mounted this large element to a red card front.    Therese

Friday, March 20, 2020

Slow Stitching - tree #6

I have one more finished!!!  I did have a bit of free time a couple of days ago and worked on it several times over the course of one day a few minutes at a time.  This is another tree comprised of two fused halves which I am liking a lot better.  I did a row of verticals and three rows of horizontal running stitches in green at the bottom and decided to repeat the pattern adding one more row of running stitch with each different colour.  I managed to add dark pink, purple, green and orange which brought me to the top.  My yellow star is looking a little mangled.  I made it the same as the others but somehow that is how it worked out.  To finish it off I added white french knots over the whole of it.   I am liking coming up with different patterns and thought up a few more overnight to use on my next trees.  I am enjoying the stitching.  They don't take quite as long as the larger squares but are a little less creative in that they are all trees in the same colour scheme.  Will change that up next time around.   Therese

Thursday, March 19, 2020

"You are Awesome" card featuring a kitty digital background, a font greeting and some ribbon and stitching

I am making cards for my stash and started with this one!! I played for a while this week with creating some digital stamps for cardmaking.  This one was created using a cat image from a background I downloaded from Pixabay  After some manipulation I made copies, sized them a bit differently and then copied six rows to make a full background of kittens.  I moved one of them up a bit so it was very noticeable so I would be able to colour it later.  I created the greeting from some fonts and added it to my background.  It was printed on white cardstock and trimmed from the letter sized sheet.  After watercolouring the cute little cat, I added three little ribbon snippets in coordinating colours at the top and used my sewing machine to add brown stitching all the way around.  I mounted this large image to a layer of orange to coordinate with the little cat and then mounted this layer to a brown card.  I will probably redo the background in order to more randomly distribute the cats but I am very happy with how this card turned out!!             Therese

Wednesday, March 18, 2020

Slow Stitching - tree #5

I found another square in my pile that had not been blogged!!  This one is one that was stitched before I fused the halves together hence the white stitches holding the halves together and to the background.  This little tree was stitched with stab stitches in thread colours that matched the fabric colour.  The black lines had somewhat receded so I stitched them full of french knots which really made them stand out.  I added two rows of alternating running stitch which created a solid line around the perimeter of the tree to help balance the dark lines of french knots. 

Therese

Sunday, March 15, 2020

Slow Stitching - tree #4

This is my fourth tree square for my Slow Stitching project.  This one features a tree made of two halves.  I took the time to add fusible webbing to the back of all the trees I had left that were halves.  It was a bit tricky to get the two halves close enough to not have a gap and then to get them not to move when I applied the webbing.  They worked out quite well.  It sure is easier to do the stitching when they are whole trees!!  For this one, I made horizontal stitches in orange and then vertical stitches in between in yellow.  I added a yellow star using 6 short stitches which works a bit better.  I added some purple "ornaments" using satin stitch which I had never done before.  I like the way they turned out!!!!        Therese

Another flannel quilt featuring blues and reds with a plaid backing


I finished another little quilt today.  It measures 39" x 51 1/2" and features a variety of flannel rectangles which were precut when I acquired them to about 4" x 5.5".  I had quite a few plaid ones so I laid them out first and filled in with the animals ones.  I did have to cut a few extra and then stitch together scraps to make up the last few I needed.  I had to do some swapping as well to ensure that none of the same fabric touched each other or were too close in the same line.  As I was stitching the top together I noticed that there are a few places where I missed ones that were touching or in the same line but that is the way it goes.  I offset the lines which met that if the rectangles were not exactly the same size it would not be glaringly obvious.  It did mean that I had to add some scraps to every second row to ensure they would be long enough to square off.  Once I had the top assembled I washed it as it seemed to me that some had not been washed and I preferred to deal with the shrinkage before it was quilted.  I only shrank 1/2" on width and 1" on the length.  Not too bad.  When I squared it for finishing I had one row that was too short but fortunately one of the scraps which I had cut off was just big enough to fill in the space so I undid a bit of the two seams, stitched on the scrap and redid the two seams.  Perfect!  I had to trim off less than 1/8"!!  I used piece of cotton as the batting and added a plaid backing.  Once I had very thoroughly pinned my sandwich, I stitched in the ditch on all the seams between the columns.  I used the backing to bind the quilt by trimming it about 1.5" larger than the front and folding it over twice and stitching it to the front.  I pressed everything and pinned it very carefully as well.  I stitched all the way around and into the corners as well to ensure they stayed nice and neat.       Worked out really well!!    
Therese

Friday, March 13, 2020

Birthday card featuring plovers in the sand, trimmed ribbon, decorative paper and a layered font greeting


I am back at making cards for family this week!!  The plover image is from CLKER.  I laser printed it onto white cardstock and using masks I sponged the horizon line, the mountains in the background and added some brown for the sand in the foreground.  I watercoloured their bodies a little after the sponging and added eyes with a white gel pen.  I layered the image and the little font greeting with with black.  I cut a tan card to fit in my large envelope, added a layer of decorative paper cut from a larger sheet and then added a purple ribbon which I trimmed with a wavy edges cutter.  I mounted the plovers with 3D foam tape and the greeting with one side 3D foam tape and the other just double sided where it overlaps the image.  To finish it off I added a decorative border using a black permanent marker on the background.  Love how it worked out!!            Therese

Wednesday, March 11, 2020

Christmas cards featuring glittery pine cone backgrounds (gift wrap), colour printed digital image of a cardinal, ribbon and layered greetings


Another set of Christmas cards for my stash!!  I trimmed the glittery pinecone backgrounds from a large piece of gift wrap that came off of one our gifts this past season.  I was able to trim about 15 or so 4" x 5.25" pieces.  I used six to create these cards.  These cards feature red card bases, the glittery green and white pinecone gift wrap, colour printed image of a cardinal, wide black satin ribbon and layered greetings.  The top set has stamped Merry Christmas greetings in red that are punched with a small oval punch (SU).  All of them are layered onto a larger oval punchie (SU).  Two are layered onto a scalloped oval punchie (SU) as well.  I have pierced the scallops on the large oval  punchies and added faux stitching/dots on the large ovals.  All are mounted with 3D foam tape as are the cardinal images.  

This set has laser printed greetings layered onto red cardstock.   All are sponged a bit on the edges.  I trimmed the middle one with scallop decorative scissors and paper pierced the scallops.  The last one has three little clear rhinestones on the end of the greeting.  
I am happy to be on track for getting my Christmas cards done by the end of the year!!!!  
I will have more cards with this pinecone paper as a background.  Will be inventing a different sketch with different elements!!        Therese

Thursday, March 05, 2020

Slow Stitching - tree #3

I have finished another tree in my Slow Stitching project!!  For this one I used black floss and did back stitch on on the black lines in the tree and then filled all the spaces with small seed stitches. Seed stitches are really like running stitches - in and out - but placed randomly instead of a line.  My star looks better this time!  I added several stitches from the points to the mid points which has helped a lot but it is still not really great.  I will keep practicing!!  I added three yellow daisies created with chain stitches which helps the design!!          Therese