Wednesday, April 01, 2020

All occasion card featuring a dragonfly, some pearly and clear dimensional paint and a little gold cording

 For this all occasion card I started with a dragonfly digital image from CLKER which I laser printed onto white cardstock and trimmed out of the letter sized sheet.  I watercoloured the sky and then the dragonfly using pearly paint so it would shimmer.  I tied the tiny gold to the right of the image and then layered it onto a green/gold metallic paper.  I left a bit of a border on the bottom which I trimmed with wavy scissors.  I paper pierced the wavy edge and then added a line of scoring above it using my Score tool.  I mounted my focal element to the front of a speckled navy card. I added clear dimensional paint to the wings of the dragonfly and left it to dry overnight.  It has turned out wonderfully!!         Therese


Tuesday, March 31, 2020

Another small flannel quilt


I have finished up one of the flannel quilt tops I made up this past weekend!!  I filled it with layer of cotton fabric and backed it with a cotton/polyester floral fabric in coordinating pastel colours.  Really happy with how it worked out.  It measures 36" x 46.5" and is fairly light in weight because of the lightweight batting and backing.  I stitched up and down the columns beginning in the middle and moving to the edges rotating the quilt as I went to keep the quilt evenly quilted and not pulling in one direction because of the quilting seams.  I did a self binding by leaving about 1.5" of the backing fabric all the way around the quilt and then double folding it and stitching it down.  I used white thread to sew the top together and it worked very well for the quilting and binding seams as well.  I have added it to the little bright coloured one I made a while back.             Therese

All occasion card featuring a butterfly, sanded background and ribbon

Love how this one turned out!  I printed the butterfly digital from CLKER onto white cardstock and trimmed it out of the letter sized sheet.  I created the background by taping four pieces of cardstock with white/coloured cores together, embossing them with a swirly embossing folder (SX) and then sanding to reveal the texture.  I added a rainbow organza ribbon with a tiny white one overlaid and adhered their ends to the inside of the card using double sided tape.  I mounted it to a green card front. I watercoloured the laser printed butterfly in colours that coordinated with the background.  I distressed the edges, layered it with a gold/green metallic paper and then mounted it to my card front using 3D foam tape.           Therese

Monday, March 30, 2020

All occasion card featuring a beautiful butterfly, an embossed background and an embellished border

For this card I started with the butterfly image which I downloaded from Pixabay.  Once trimmed from the letter sized sheet of white cardstock I distressed its edges and then added a line of paper piercing using my pattern tracing wheel.  To highlight the yellow in the wings I layered it onto a light yellow piece of cardstock leaving a bit extra on the bottom for embellishing.  I punched it with the scallop border punch (SU), punched 1/16" holes in each one and then added two lines of embossing using my scoring tool  I really like all the texture on this piece.  I embossed a weathered brown cardstock with a swirly background, added a small strip of aqua over it and mounted this large element to an aqua card.  I mounted the large butterfly element over the strip using 3D foam tape to finish off my card.  Love the colours of this one!!  Appropriate for sympathy, get well, thinking of you or just as a note card to a friend!             Therese

Crumb quilting and two small flannel quilt tops

I have been working on cutting and piecing my flannel scraps and managed in the last couple of weeks to create two small quilt tops.  I originally had a top that was too long for its width so I removed one bright column and trimmed what I had left to 45.5" which gave me a top 36" x 45.5".  I trimmed the edge of my leftover and used scraps to fill in a couple of columns. I needed to add some length so I created a panel of crumb quilting with some of my pastel scraps - totally fun!!  I still needed some width so I stitched together three bright pieces - orange, bright stripes and aqua.  I stitched this strip to my original piece and then added my panel of crumb quilting.  Next, I added the bright strip which I originally removed to the top and bottom.  This gave me a quilt top 36" x 44".  So, I now have two small quilt tops which need batting and backers which I will work on next weekend.  I really enjoyed creating the crumb quilting panel and it was satisfying to use up even the little scraps!!      Therese


Sunday, March 29, 2020

Birthday card featuring a loon, a torn background, washi tape and a layered greeting

For this card I started with the loon image (CLKER) which I laser printed on white cardstock and trimmed out of a letter sized sheet.  I watercoloured the water and once it was dry I masked and sponged in a horizon and landscape beyond.  I added a row of paper piercing using my pattern tracing wheel on all four edges.  I tore a piece from the inside of an used bank envelope to create my background.  I glued it in place on my black card and then secured it with this fun washi tape which my son gave me for Christmas!!  The pattern is a subtle background with hashed lines in gray.  I mounted the loon image over the background and added the little layered greeting using 3D foam tape.    Therese

Saturday, March 28, 2020

Slow Stitching - Tree #11

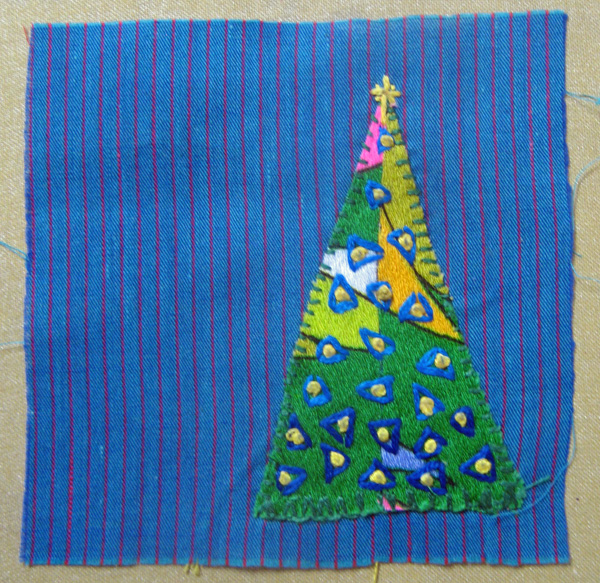
I have finished my eleventh square!! I have added running stitch in horizontal lines and some in a chevron pattern in three different colours.  I am liking this pattern of stitching.  I added my stab stitch star which is working reasonably well.

I have decided to change the scope of this project as I have discovered more and more that the blue precut squares I chose for the backgrounds of these trees are not of a consistent size which will make assembling them into a column for a quilt difficult.  I have been pondering this issue for several days now.  I decided today that I will be stitching these squares to larger squares which I will cut to 6" in a variety of colours which means that I have already stitched enough little trees to make up the column I need for a quilt.  So I dug into my stash and found some squares which are cut larger than 6" which I will use as backgrounds for these squares.  I will be stitching these little squares to them and then they will be assembled into a column for a quilt.  I am not sure how much stitching yet but for sure a row all the way around to secure it to the background.  I am inclined to add a bit more but I am not sure exactly what manner that will be.  Will invent it when I get there!  I feel good about this new direction.  It will make the squares more interesting as the little trees will be framed with colour.  I will be getting started tomorrow! Looking forward to it!!            Therese

Birthday card featuring a puffin, an hand embossed layer and a tiny greeting

For this card I started with this puffin image from CLKER which I laser printed onto white cardstock and trimmed to size.  I watercoloured it, mounted it to a hand embossed orange layer inserting a tiny laser printed font greeting in between before pressing everything down.  I left some an extra border of orange on the right hand side and the bottom which nicely highlights the puffin's beak and feet!!  I adhered this large layered element to a black card front and thinking it still needed something I added dots and dashes around the edges of the image.  That was much better!!

Therese

Slow Stitching - Tree #10

With a bit more time on my hands because were are choosing to stay home to avoid contact with Covid 19 and all of our outside activities and commitments have been cancelled I have spent more time stitching on my little trees than the bit of time I usually commit to in the morning.  So I have finished another one!!  This is my tenth one!!  I did blanket stitch around the edge of this one in light green crochet thread and couched a heavyweight red thread with orange floss over all.  I really enjoyed the  ability to shape the red thread any way I wanted so I will be doing this technique again!!  I added french knots in blue afterwards to punch up the colour a bit and add some interest and texture. I add the star in yellow using small stab stitches.   Therese

Friday, March 27, 2020

Birthday card featuring a cute little cat, a font greeting and some fiber

I am still making cards for my stash!!  This one features a cute little cat (CLKER) which I usually colour orange but today I thought I would change it up and coloured it gray!  I like it!!  I used some red fiber and a large needled and gave him a scarf!!  I simply poked two holes on each side of his neck and inserted the fiber using the needle.  It adds some colour and texture to this little guy.  After watercolouring him, I used my tracing wheel to add a row of paper piercing to all the edges.  I mounted the cat to a piece of red cardstock and trimmed it to an even margin.  I adhered this layer to a speckled navy card and then added a row of paper piercing to each side of the focal image with my pattern tracing wheel.  I like the echo of the paper piercing - works well.     Therese

Slow Stitching - Tree #9


Here is my ninth tree for my slow stitching project!!  I started with a modified blanket stitch on the bottom edge and could not get it done consistently so I switched to just regular stab stitched for the rest.  I created blue rectangles over all of the tree and then added yellow french knots in the middle of all of them.  I added the star at the top using small stab stitches which seems to work out the best.  I remember to put them one on the right to help balance the collection!!     Therese

Thursday, March 26, 2020

Thank you card featuring a framed floral collage, a stamped greeting and some embossed elements

For this card I used a framed floral collage which I downloaded from Pixabay.  Once trimmed from the sheet of white cardstock, I distressed its edges and stamped the little greeting in black.  The greeting is from Taylored Expressions.  It was a freebie when I order my Bethlehem and Nativity dies last year.  It stamps very nicely!!!  I found a coordinating pink card and added gray randomly cut scraps which I embossed with coordinating embossing folders and then sponged with a bit of black ink to highlight the design.  I mounted the scraps to my pink card and then added the floral image.  Thinking it still needed a bit of something I added some faux stitching with a sharpie all the way around the edge.  That was better!!!!!!!          Therese

Wednesday, March 25, 2020

Any occasion card featuring a beautiful red poppy with several layers and some ribbon

I found this image in my stash and thought it would make a perfect all occasion card!!  It is from Calico Collage.  After trimming, I layered it onto black cardstock and then added a silver metallic layer behind it.  I added two pieces of ribbon to a red card front - one black satin overlaid over a white gros-grain one.  Their ends are flagged and the other are adhered to the inside of my card using double sided tape.  It will work wonderfully as a birthday, sympathy or thinking of you card!! 

Therese

Tuesday, March 24, 2020

"You are awesome" card featuring a unicorn, an embossed background, ribbon and some clear glitter


This card features another unicorn image from Pixabay.  I love his magical body!!  I sized it, added one of the greetings I created with fonts and then printed it on white cardstock. After trimming out the image I added clear glitter with a gel pen to the stars on its rump and added a border all the way around the edge.  I added three little pieces of flagged ribbon securing them with double sided tape on the back of the image.  I found this weathered brown cardstock in my stash and decided it would work with this little unicorn.  I embossed it with a swirly background (D"vine Swirl - CB) and mounted it to a light aqua card.  I mounted my unicorn image over the embossed background using 3D foam tape to finish off my card.             Therese

Slow Stitching - Tree #8

Here is my eighth little square in my Slow Stitching project!!  I made chain stitches all the way around and then filled in with running stitches in  coordinating thread all through the middle section.  Added the little star using yellow thread.  I laid them all out and I see that most of them are lefties so I will have to make a few righties to balance out the collection.              Therese

Monday, March 23, 2020

Slow Stitching - tree #7

Here is the tree I have been working on for a few days.  I used fern stitching in green to anchor the tree to the background and generally to contain the edges from fraying.  It was fun to be able to make the stitch curve and have motion though the tree is not big enough to really highlight that ability.  I might try again on a different one knowing how easy it is to get a curvy line with this stitch.  The stitches could also be executed a bit smaller which would allow more options for moving a line.  I will consider as well drawing a line or following the black lines in the fabric for a guide.  This star worked out better though I am using the same technique of building it using single running stitches. 

Therese

Sunday, March 22, 2020

Christmas card featuring a reused card front featuring a white dove with an olive branch

This one was quick and easy!! I trimmed the dove image from a used card to 4" x 5.25", ran the pattern tracing wheel on all four edges and adhered it to a red card front.  I like reusing beautiful cards and giving them one more life!! 


Therese

" You are Awesome" card featuring a cute little unicorn, a custom font greeting, some ribbon and a sanded white core background

I was creating card components this week and I managed to create two different "You are Awesome" greetings by combining fonts.  This one features a font with open lettering which for this card I coloured in with a light pink and then added clear glitter using a gel pen.  I am really happy with both of my greetings and I will be making more using these fonts.  The unicorn was downloaded from Pixabay.  I sized the image, added the fun greeting and colour printed it onto white cardstock.  Once trimmed from the letter sized sheet, I coloured the open letters and added a border of clear glitter.  I created an embossed and sanded background using three different scraps of white core card stock.  I embossed them with three different polka dot backgrounds, sanded them and mounted them to a lavendar card front.  I added coordinating ribbon to my unicorn image before mounting it to my card using 3D foam tape.  I love that he is winking!!!

Therese

Saturday, March 21, 2020

Christmas card featuring a handmade tag, decorative paper and ribbon

This card was part of my day of making cards.  I have had this tag with my Christmas ornaments because it was made by a friend out east for our yearly Gift Tag Exchange.  Unfortunately, I have had to cull ornaments from by boxes as the Christmas trees are getting smaller so I decided that I would feature it on a card instead.  I combined it with this very neutral scrapbook paper which I was gifted with a while back.  The pattern is in the paper and works very well to highlight the tag.  I trimmed the paper to size, adhered it to a red card front and then added the handmade tag which features a snowbank, birch trees and a little cardinal - all die cuts.  I had to shorten the ribbon a little so it would fit on the card.  It brings back good memories of all of us making cards together in those days!!

Therese

"You are awesome" card featuring a colour printed cute little bear, rhinestones and thread

I so love this little bear and his balloon!!  It is an image from LaPetiteFemme on Pixabay!  I added the "You are awesome" font greeting I created then colour printed it onto white cardstock, trimmed it out of the letter sized sheet and mounted it to piece of black cardstock.  When trimming,  I left a large margin on the right hand side, punched the edge with the scallop border punch (SU), added clear rhinestones to each scallop and then added white cording between them and the image.  I mounted this large element to a red card front.    Therese