Thursday, May 20, 2010

Cardmaking - May - corrugated card

The theme for May cardmaking was masculine cards! We all have guys we like to make cards for and we are often challenged to come up with ideas that will be suitable!! I have only a limited number of stamps for guys so I am always challenging myself to come up with new card ideas with them!!
I used four different images on these cards - lighthouse, train, tree and vintage grapes collage. I coordinated the cardstock to work with the different images. Most of the images could be coloured and then were trimmed to fit on the corrugated card!! This element was then layered onto the card front and the trimmed colour printed greeting was stapled on with a bit of ribbon added on the right hand side.
I like the way these cards came together. Not to complicated or fussy - like most guys!!

Therese

Thank you card

A thank you card I created for my friend, Sherry who has been so helpful with the house. I brought her back some cardstock and a cute little stamp so she can get started on her Christmas cards early this year!!

I watercoloured the rose and cut it out. Attached the handmade paper to the card front and then mounted the rose with 3D foam tape. Added a ribbon with a layered coordinating greeting on a ribbon slide!!

You can check out the cardstock I have for sale here:
www.tmalakrsc.blogspot.com

Email me at bmalak at cogeco dot ca if anything there catches your eye!!

Therese

Exchange cards

Created several of these for my card exchanges this month - Canadian Card Exchange and my card club. Stamped the boat image (ink on left - bleach on right) on black and mounted it to a coordinating layer. Cut a 2.75" circle from decorative paper, cut it in half and mounted it on the card front behind my image. Added some paper piercing for more interest and texture.
Got the sketch for this card somewhere on Splitcoast Stampers when I was searching for inspiration for cardmaking this month - masculine cards!!

Therese

Christmas card challenges


I combined Tracy's challenge from last month - using patterned paper as the main element in your card and this month's colour challenge to create these cards. Life has been busy and I have been away for a bit so I did not get to the April challenge at all. It worked quite well to combine the two challenges!!
I chose the cool snowflake paper which had some of the colours from the challenge which are red, cream, kraft and chocolate. I ripped the bottom of this layer, added a knotted ivory ribbon and glued it to the red layer which was embossed with the Sizzix snowflake embossing folder. Stamped the greeting in red on cream and punched them out with the small SU oval. Layered them onto chocolate punchies (large SU oval) and added them to the card front over the ribbon using 3D foam tape!! Made eight to sort of make up for the ones I did not get done last month!!
Very happy with my cards!! I know I will be happy when it is time to send them and they will be ready!!!!

It is not too late to get started!! Join a Christmas card challenge today and be ahead of the game!!

Therese


Collage art - vision board

My vision board!! The girls and I from my book club decided that we would create vision boards for our lives!! It has been a subject that has come up several times over the last few months in the discussion of the last few books we read. The idea that you create your life - draw into it certain things depending on what you think, say and do!!
So we spent an evening envisioning what we would like in our lives - making a few notes and the next time we got together we brought along magazines (from our own supply and some gathered second hand from Freecyle or Kijiji). Armed with scissors we started going through them cutting out anything that we were attracted to and/or represented something we wanted in our life. Early on in our discussion about vision boards I thought I was going to have trouble picking out "stuff" I wanted (has been my pattern) but as we discussed it more and after spending some time thinking about what I "wanted" I realized that what I wanted had less to do with "things" and more to do with relationships and experiences. Cutting out images was such a fun process!! We had magazines from a wide variety of subject matters so we were challenged to think outside the box!! Some in the group gathered only a few images and words and had their vision boards made that night. They were focused and clear about what they wanted!! It took me the better part of two days to create this collage!! I did like the way theirs looked with no white spaces in between their images so I did that on the outside of mine. I laid out my images according to areas of my life - home, DH, family, retirement, etc. I was amazed at how almost all the images that I had grabbed from the magazines found their way to my board and fit in!! Totally fun to cut out words from different places to say what I wanted to!!
So now, to draw these things into my life, I need to spend some time every day focusing my attention on what I want. That gets you thinking about it, puts you in a mind set of talking about what you want and a lot more likely to actually doing something about making it happen. You need to do all three - think, say and do!!
It is really a process of becoming clear about what you want.
This is poster board size so I am going to print off some smaller ones that I can have around to remind me of what I want in my best life.
There is no wrong way to make a vision board and you can make a new one anytime you like!! I totally enjoyed the process and will certainly be doing it again. Maybe a smaller one that deals with only one area of my life!! Created on 8.5 x 11 cardstock they could easily be stored in page protectors in a binder and would be easily availabe for review!!
Try it!! It is for sure that your thinking will get you a life - why not choose it more consciously!!

Therese

KN - Handmade paper card gift sets

More handmade paper card gift sets!!! I made up a few more of these gift sets for the store because it opened the weekend before Mother's Day and these would be perfect for any Mom!! These have been featured here on my blog several times. They are totally fun to make and love the way they feature handmade paper so nicely!!

Therese

KN - Sticky note books

These are always great for little gifts for almost anyone!! I created them using decorative cardstock, added a button and some fiber for the closure. They fit right into a yarn store!! Brought a whole bunch in a wide variety of colours and designs to suit everyone!!

Therese

KN - Artsy notebooks

Cyndi mentioned that knitters are always keeping notes about their knitting projects - where they are in the process, new projects, changes they are making to patterns, etc so I made up these artsy notebooks to make keeping their notes more fun! These feature hand decorated papers I made myself!! Several are paste papers - the others are created with acrylic and fabric paints. I added glitter to the spines of some of them for a little bling and fabric tape corners on the fronts to protect the corners.

You can check out my products at Knitting Nimrod Collective!!

Therese

KN - Handmade paper cards

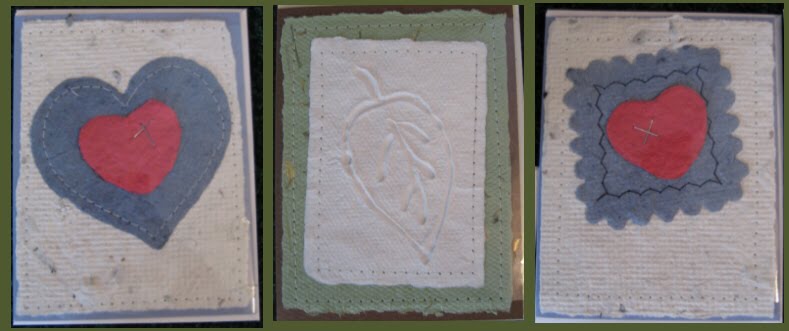
I created these cards for a new venue - Elacyn Designs - a new store contained in the Knitting Nimrod Collective yarn store - a very cool place with LOTS of very cool fibers!!
These feature handmade paper shapes which are sewn to handmade paper sheets sewn to the cardstock fronts!! The hearts have been stapled to the shape before sewing. The middle one features a leaf paper cast done in white handmade paper! I love sewing handmade paper and am planning to do more of it!! I brought a selection of cards which featured handmade paper which you have seen previously on my blog.

The next few posts will feature product I made for the store!!

Therese

Friday, April 30, 2010

Handmade Paper Card Holder

The card holder features a full sheet (8.5"x11") of handmade paper and is secured on both sides with ribbon!! The front flap of the paper was reinforced with fabric tape, three holes were punched with a Cropadile and ribbon was woven and tied to create an enclosure for the cards!! The top flap is simply folded over the cards and a ribbon holds it closed and gives a great look for presenting as a gift.
It was great fun to coordinate all the pieces to the handmade paper to make a great package!! Nice to feature so many items that were reused or recycled for these Earth Day cards all the while still making beautiful cards that are elegantly packaged.

Therese

Handmade Paper cards and holder #2

These cards also feature the same handmade paper!! The one on the left features a thermally embossed flower which the students coloured with chalks once their cards were finished. It was layered onto colour cardstock and features a flower embellishment. I created the embellishment using two Cuttlebug die cuts - the solid one from coloured vellum and the outline cut from metallic chipboard. They were layered onto each other, highlighted with a sequin then attached to the card front with a coordinating brad.
The right hand card features an embossed metal heart which was die cut from a heavy foil pie plate. The students embossed their hearts as they wished using a pencil and a newspaper pad. Once embossed, it was mounted using 3Dfoam tape on a double layer of cardstock which was previously glued to the card front. The ribbon features a pop can tab as a buckle which was a great accent with the embossed metal heart.

Therese

Handmade paper cards and holder

Here are the details from the Earth Day cards and holder I posted earlier. This was a fun class with a group of students from several different ages groups. Several in the class were really keen and just got going with the instruction sheet and did a great job. I think all the students enjoyed the class and were happy with the final results - four cards and a presentation holder!
All the cards feature handmade paper on the card fronts. All the embellishments and trims were coordinated to the handmade paper for the best presentation should the students choose to use it as a gift.
The top card features three chipboard hearts which started their lives as packaging! I covered the box board with scrapbook paper and then cut the hearts using the smallest Sizzlet heart die. These were layered onto neutral cardstock and then onto a strip of cardstock that was bordered punch to add some style. The little ribbon on the left hand side added just enough texture to make the whole design work.
The lower card has an embossed layer of cardstock over a neutral strip. The flower was created using a dryer sheet and I added coordinating scallop circles for the center - all attached to the card front with a brad.

Therese

Cardmaking - April - candles

Candles are perfect for birthdays!! These cards feature "candles" - scraps of cardstock and scrapbook papers about an inch wide. I embossed the cardstock to add texture and trimmed the tops to more closely simulate candles. Used heart punchies for the flames - added some colour to make them more dimensional!! Drew in the wicks above the candles with a fine tip Sharpie before I added the flames using 3Dfoam tape. The greeting is printed on vellum which I tore on both sides and added with two brads.
A few ideas for using what you have!!

Therese

Cardmaking - April - Gate fold

These were fun to make!! Featuring a gatefold and a central image they can be made for any occasion!! I used the largest circle on the Sizzix circle die (SU) to cut the white circles and then stamped a variety of images on them in black Memories so they could be coloured in any manner, even watercolour. Added a layer of silver foil - my reuse item - foil seal from yogurt - which I cut with my circle cutter. The scallop circle is a leftover from a Christmas card a while back which I embellished with a push pin but some used a white gel pen instead! Used a variety of scrapbook paper for the backgrounds. I created the background paper for the card on the right. The scrapbook paper was quite monochromatic so I added some script and pink flowers! Zipped it up perfectly!! Thrifty Tip: Consider adding some stamping to any paper that is not really speaking to you - it is a great way to use up with you have in your stash.

Therese

Cardmaking - April - Butterflies

These cards feature butterflies which were stamped and black embossed on calendar pages!! You can easily reuse calendar, junk mail or magazine pages by stamping bold images in areas of overall colour/texture or where a change in colour would be appropriate for your image. The white butterfly was stamped on a snowy road and the blue one on the water of an ocean scene.
They were neatly cut out and traced on the back with a black Sharpie to remove the white line of the paper. Neatly layered onto black cardstock and arranged as desired above the greeting which is printed on the card front and revealed by ripping the embossed layer. I added some dots with a white gel pen. Some in the class chose to cover up the greeting by not ripping the embossed layer in which case a greeting or accent could easily be added later.

Therese

Cardmaking - April - Handmade paper

Just getting to posting my cards from last week's cardmaking!! In support of Earth Day I incorporated some "reduce, reuse, recycle" techniques to my cards!!
These ones feature several earth friendly items - recycled handmade paper, reused coloured images and dryer sheets!! The handmade paper I made myself using printed bond paper and other additives - paper confetti and dried flowers!! It is such fun to make handmade paper with your scraps. The coloured images are cut from commercial cards! I usually save any cards I receive and reuse them to make cards for donation to a local not for profit. In this case, I scoured the boxful and cut out images that were the right size for use with this sketch. I really like the way these turned out. I added a little flower I created using a USED dryer sheet!! They are really easy to make! Sort of invented them by compiling flower ideas from several different places over the last few months. Thrifty Tip: Cut a rectangle of USED dryer sheet and fold in half and then in half again, joining the fold to the two ends. Round the four corners with scissors and unfold. Gather the rectangle in the center somewhat accordion style and tie off tightly with string or crochet thread. Now just spread the "petals" all the way around the middle and you have yourself a flower!!
These cards feature a quarter sheet of handmade paper with torn edges layered on the card front, trimmed images over a coordinating cardstock rectangle - both with distressed edges and a flower with a sequin attached to the card front with a brad.
These would make perfect cards for Mother's Day!! Coming up in a just over a week or so!!

Therese

Monday, April 19, 2010

Card for a special guy!!

He is a special guy and I am fortunate to have him in my life!! Made this card for my DH birthday yesterday. He loves music so I used sheet music as the background paper. I had originally thought this would be a portrait card so the music now reads a bit funny now that it is a landscape card but I did not have the time to redo the background paper. I used a resist technique - embossed the large harelquin pattern (SU) on the paper and added walnut ink over that. Added some script in dark brown. It was a little stark so I added some brown ink on the back which added colour to the diamonds and evened things out a bit but maybe too much. It work reasonably well so I kept it. Added a strip punched with border punch (SU) and added a dark strip over it and punched the bird and branch (SU) from decorative paper and cardstock. Added a round greeting in brown tied to one of the loops on the border!! Happy with the results of this card.
We had a good day! Great cake made by Sherry - carrot cake with cream cheese icing - his favorite. Great moist cake!! Needless to say it is almost all gone!! Went out for brunch with a friend and had a relaxing day. First time to cut the grass this year!! I think it is early!! It was a beautiful sun shining day!!
Be sure to celebrate with your family and friends those special times in your lives and not to get so caught up in the details and special touches that you miss the big picture!!

Have a great day to you all!!

Therese


Thursday, April 15, 2010

Card for a special child!!

My granddaughter will be three very soon so I made her a special card. She wants a dinosaur theme for her birthday so I incorporated dinosaurs in her card!! I added some watercolour wash at the top of the card to simulate sky and added a bit of green as I went lower to simulate jungle. Added some ripped layers of green cardstock to create a horizon and added some jaggedly cut dark green at the very bottom for grass. I cut the tree tops free hand and added embossed tree trunks!! A bit of watercolour on the trees to add dimension as well as some scoring to allow them to fold a bit. I used 3D foam tape underneath to help them look 3D. Added the dinosaur crossing sign (internet) which I laser printed and added with 3D foam tape. The inside has two pop ups - a dinosaur and the greeting with a bit of free form cut grass. The background is a laser printed scene which I found on the internet.
A bit of a change up for me but I like the way it turned out. It is already headed her way!!!

Therese

Tuesday, April 06, 2010

Exchange Cards

Canadian Card Exchange has a new blog!! You can check out the challenge and get other info about the exchange there!!
I created a few cards last week and will be sending out two of them for the exchange.
#1 features a fiber flower layered over a brown strip of cardstock punched on both sides with an eyelet border punch (SU) which is overlaid with lace. The card front has been embossed at the top with my new floral screen embossing folder (CB) and stamped at the bottom with script background stamp(SU)!! Thrifty Tip: Fiber flower is created using used dryer sheets!! You take a strip about 2.5" x 5" and fold into four and round the corners to create the "petals". Lay it flat, gather accordion style in the middle and tie with string or crochet thread. Spread the petals around and you have a flower!! Too easy!! I added punchies to the center and attached it to the card using a brad. All kinds of options!!
#2 - D'vineSwirl (CB) embossing on the top, a strip of brown border punched (SU) embellished with faux stitching in white gel pen (SU), a ribbon and a watercoloured heart 3D accent!! The birds (SU) I stamped in brown and watercoloured!! New stamp set from my SU party!!
#3 - SwissDots (CB) embossing on the top, a strip of brown as previous card and a watercoloured flower 3D accent. The little birds are the same as I used in the previous baby card - a new set from my SU party!!

Therese

Baby card

A baby card!! It is always a great thing when babies are born!! I made this card for the new baby in our extended family born to my cousin and his significant other. Everyone is doing well.
These little birds are new to me!! One of the sets I ordered at my SU party in March. I love that there is a mom with her babies and that they are cute but not too much.
Stamped them in brown and watercoloured. Added the greeting in brown. Some brown accents with white gel pen embellishment. Used the Swiss Dot (CB) embossing folder on the card front.
You can see below the brag book I made as a gift.

Therese

Baby Brag Book - gift

For the new baby! Decided on a brag book as a gift. Everyone wants to see photos of the new baby and this little album will be the perfect place to keep them and later it can be given to him to carry around photos of his family.
I used a commercially available photo album and created new covers for it using letter die cuts for his name, some layered stars for an accent and a few stamped stars in brown on the plaid colour printed paper!!
The letters are die cuts from the Bounce Sizzix alphabet set. I cut the shadow in brown and the letter from blue. The blue ones are quite slim and a bit of a challenge to glue in place with traditional adhesives. I have white glue in a fine tipped bottle which used to hold dimensional fabric paint. Worked very well to apply glue just where I wanted it!! THRIFTY TIP: If you have a bottle of paint with a fine tip consider making decorative paper with the paint and using the bottle for glue. I used this one as well for applying glue to an image when we were making glittered Christmas cards last year.
I cut the stars with a Sizzix die - clear (packaging), med blue, dark blue and brown - and attached them with a blue brad. I added stitching with a brown marker.
Kids like to have things of their own. By the time he is two he will want to have things to carry around and this album filled with photos of Dad, Mom, Grandma, uncles, cousins, etc will be a great way for him to stay connected to family.
Therese

Wednesday, March 31, 2010

Gift set of cards - Earth Day

A gift set which includes four hand made cards in a handmade paper envelope with a ribbon closure!! This is a class I will be teaching in April and considering it will be the same week as Earth Day - April 22 - I decided to incorporate a few reuse/recycle ideas. First of all, #1 recycling for a paper crafter - handmade paper created from your scraps!! The holder is a sheet of handmade paper as is the background paper for each card. I made this paper - it includes grass, herbal tea and marigold petals. Card on the right features a hand embossed metal foil heart (pie plate) and a buckle (pop can tab). Second from the left, features a flower (dryer sheet) and the one next to it features chipboard hearts (cereal cardboard) which are covered with scrapbook paper!!
So I challenge you to reuse in your cardmaking! Plastic packaging makes great clear shapes. Cut them with dies or by hand and embellish with Sharpies/alcohol inks or emboss. Foil packaging - yogurt or applesauce - as metallic layering for images or embossed for accents. Foil - pie plates - cut into shapes and embossed make great accents. Fabric - old jeans or sweaters - can be used for layering or die cut for accents!! Great for making flowers too! Chipboard - cereal boxes, etc - layered with scrapbook papers and die cut makes great accents. Paper - photos from magazines or calendars, bright and interesting junk mail, all over printed security envelopes, etc - can be used as accents, for stamping on or layering!! Metal - aluminum can tabs - make great buckles!! Check out cans when recycling - there are a lot of different colours on a wide variety of drinks - beer, energy drinks, soda, etc. Dryer sheets - coloured with paints or inks make great backgrounds or accents. Store bought cards - cut them up to make tags or to use as the main image on a card. Handmade cards - refurbish with a new base card or replace insert for reusing!!
If you have a recycle or reuse idea please share it in a comment!!

Therese

Wednesday, March 24, 2010

Christmas card challenge - gingerbread man

More Christmas cards! I made three that feature a gingerbread man to satisfy the gingerbread theme challenge on my sister's blog.
I am enjoying this process!! I cut the gingerbread man out of sanded brown shrink plastic using the Sizzix die, highlighted his features with white gel pen (SU) and black sharpie before I shrank him. The shrink plastic does not always shrink evenly so the hearts are not perfect but as we all know - none of us have perfect hearts - so I am good with it. I backed the hearts with a small label, filled the holes with dimensional magic and added red holeless beads which made them very nice and sparkly!! I let them dry overnight before putting them on my card. I stamped the top and bottom of my red card with a Christmas script stamp (actually an unmounted SU wheel) using white pigment ink. Punched both sides of a rectangle of brown cardstock using my doily border punch (MS) and added a rectangle of decorative scrapbooking paper which was embellished with brown faux stitching*. Stamped the greeting in red, added a red ribbon tied in a soft double knot and glued on the little gingerbread man with glue dots.
Very happy with my creations and I have three more Christmas cards to add to the stack!!

Therese
* faux stitching: Cut a piece of plastic canvas to use as a guide, lay it over a thick mouse pad and use a push pin to create your holes. Join the holes with a coloured marker!! Fast and easy!!

Tuesday, March 23, 2010

Christmas cards for challenges - snowmen


Created these cards for a couple challenges - Snowman and mostly green at Christmas Cards All Year Round
and snowmen was the theme for Tracy's Christmas Card Challenge #3 on her blog.
I am pretty happy with how they turned out!!! I used a brass stencil and embossed the snowman (do not know manufacturer - gifted to me) on an off white cardstock circle (3"). I added a bit of chalk to highlight the details - nose, hat, etc. I find it works best if you apply the chalk with the stencil in place - less mess. I added faux stitching to the outer edge with a micro tip marker. I layered him onto a scalloped circle (Nestibilities die) cut from green cardstock which had been embellished with clear glittered 3D paint. Coordinates nicely with the glitter on the decorative cardstock I used below him which features numbers and some cool colours - pink being one of them - so I added a pink paper ribbon just below the scalloped border which I punched (SU) on the upper edge. Added two snowflake embellishments. The large one features a micro mini white brad (M), an iridescent confetti snowflake, a fabric snowflake, a diecut snowflake all layered onto some tulle and attached to the front of the card with the brad. The upper one is a fiber snowflake layered over a confetti snowflake, also attached with a micro mini white brad.
I am super happy to be participating in the Christmas challenges because I will have my cards ready for next Christmas when it arrives and it will be the very first year in 20 years or more of cardmaking that MY cards will be ready when I need them!!!!
Thanks to the girls who are willing to make up the challenges and put them out there!!
Therese

Cards as silent auction prizes!

I packaged some cards to donate as silent auction prizes to a high school student who is raising money for a humanitarian trip. It is always a struggle to find a way to present the cards so they can be seen and appreciated without getting them looking ratty because of all the handling they get.
This time I packaged two cards back to back in a cellophane envelope and sealed it. Did up three more for a total of eight cards. I stapled the cello envelopes together and added a header which included contact information which I attached with a piece of ribbon using a bit of a book binding technique. The cards are all visible and the whole thing stands like a book which is better for presentation than having them flat on a table.
I hope they will fetch a reasonable price at their event on Saturday!!
This has, so far, been the best presentation for cards I have been able to come up with that allows the cards to be seen and not get damaged from the handling. Not necessarily "pretty" but effective. Will keep working on "pretty" because that would be a good feature to have as well.

Therese

Tea gifties

I created these little tea gifties for all the people who attended my SU party on Sunday afternoon!! It is always so much fun. I transform my livingroom/diningroom into a stamping studio and invite my friends over to stamp. My SU demo, Catherine always comes up with some great make and takes so we spend the afternoon stamping and being creative!! These little matchboxes were cut using the matchbox Bigz XL die by my daughter last year so I decided to make up the boxes and fill them with tea - we brought some back from London at the end of January - with a little note that they should enjoy a cuppa with a friend! I wrapped them with pink paper twist ribbon.
I hope they will all enjoy the tea!! I am hoping the orders will be in before Easter and we will have our goodies to play over the long weekend!! I would highly recommend hosting a SU party and having some friends over to play!! We had goodies to eat after all that stamping too!!

Therese

Thursday, March 18, 2010

Cardmaking - March - birdie

What a wonderful birdie!! It is a new SU punch!! It cuts the bird, the wing and the branch!! My friend cut me a whole bunch in coordinating papers!! So fun!! I added the circle background (SU) and embossed it with glittered embossing powder to coordinate with the glittered paper. Added the little birdie saying from the SU birdie stamp set and a little piece of ribbon!!

Therese

Cardmaking - March - flowers!!

Flowers in honour of spring!! Spring has come here - we have had warm weather for a month and really no winter to speak of!! My front flower bed has crocuses blooming and daffodils & tulips coming up!!
For the cards I stamped and black embossed the flowers which I watercoloured then cut out leaving a very small white border. These were layered onto black squares with 3D foam tape which makes them pop very nicely!! I layered them onto a strip of white which features black edging - black cardstock cut with my scallop decorative scissors and pricked to add texture. I tied a double knot in my ribbon and layered it under the flowers. Adds a nice touch of colour. Brought a few stamps and a black stamp pad so a greeting could be added for those who were so inclined!!

Therese

Cardmaking - March - scalloped border

More embossing!! Love those embossing folders (CB)! I embossed just the bottom edge of the coloured layer and added a piece of decorative paper to the top. Used the scallop border punch (SU) on one edge of the coloured strip then pricked holes using a push pin and a piece of old mouse pad. Works really well. Added a white embossed strip over that. Glued the ribbon into place and added an embellishment with a glue dot.
The yellow one looks like it could be an Easter card so I brought my "Happy Easter" stamp so anyone who wanted to could add the greeting to the inside of their card. The pink one looks like an anniversary or wedding card with the little silver dove. I like to have variety in my cards - keeps me sane and provides more options for those who participate in cardmaking!!

Therese

Cardmaking - March - embossing

Another great session of cardmaking last night!! It is always great to be spending time creating with like minded people!! Does me good!!
A card that features embossing!! The background is created with the Script embossing folder (CB) which is trimmed to the edge of the embossed design and layered onto coloured cardstock. The central image is dry embossed using a stylus, brass stencil and a light table!! I used chalk to highlight the image. The frame around this rectangle was created by embossing a nestability rectangle. First time doing it and it works wonderfully. You need a silicon mat to emboss with the nesties which pushes the paper into the blank areas. You can do the same with stencils (brass or otherwise) or texture plates!! Layered the image onto another rectangle of colour and added a tied ribbon with a glue dot.

Fun to revisit techniques that I haven't used in a while!! Certainly do like the embossed look and the embossing folders make that so easy!!

Therese

Masculine Cards

Started off creating a card for my card club exchange which needed to feature some of the paper I brought back from London so decided to combine that with the masculine card challenge on Crazy 4 Challenges. Here is what I managed to create!! I decided to make more than one because it is nice to have some on hand.
I used this really nice kraft paper which is printed with black glossy round images! My favorite of the papers I brought back. I embossed in black embossing powder the images I stamped so they would coordinate with the paper. I cut out the images with my circle cutter, added some doodling to the edges with black sharpie and cut black circles to layer them onto. Used eyelets, fiber and printed greetings on a few of them. The others I stamped with bleach on the black to get the warm brown lettering!! Very cool!!
One morning! Five cards using the same supplies but all different!! Success!!!

Therese

Saturday, March 13, 2010

Card with colour and texture

A friend of mine asked if I would create a birthday card for her visually impaired aunt. She recommended bright colours and texture. This is the card I created. It features layered felt flowers with leaves on a textured scallop (CB) with an embossed butterfly and tied double layered ribbon over an embossed (CB) layer mounted to the card front. Lots going on here and I hope it has enough texture to be interesting to her aunt.
It was fun to see how much texture I could incorporate without having the card feel overdone. It was a fine line but I think I managed to keep the card from feeling overdone.
Thermally embossed the inside with Happy Birthday to another tactile dimension to the card.

Always up to for a challenge!!

Therese

Tuesday, March 09, 2010

Chunky Art Book - back cover

Same wax resist paper featured on the front cover which was also enhanced with watercolour once it was applied to the back cover to give it more definition and feature the flower more prominently. No other embellishments necessary!! Added the flower charm with pink and teal fiber!!

And that is my Chunky Art Book!!

I hope you are inspired to create art!! Just get creative and share it us!!

Therese

Chunky Art Book - # 13 - snow scene

Stamped background paper, border punched and watercoloured strip, punchies, watercoloured image and word.

The charm on this page coordinates nicely but its words are quite faint due to using a failing Sharpie to write the words.

Added a little pin pricking to the decorative strip and some dots around the image in both black and white.

Therese

Chunky Art Book - # 12 - quote

Watercolour washed background paper, quote, border punched layered cardstock strip, doodled border and swirls,die cut heart and teal rhinestones.

Lots of doodling on this page in both black and white!!

Therese

Chunky Art Book - # 11 - flower garden

Colour washed background paper in black tones, coloured transparent die cut flower, doodled garden, red scrapbook paper border, red glittered die cut heart and word sticker. Added a doodled border as well. The punchies were added to the coloured die cut flower - one in the front and one in the back, attached with a brad. This gives it a place to put the 3D foam tape to mount it to the page.

Therese

Chunky Art Book - # 10 - embossed heart

Colourwashed background paper, doodled border, border punched strip with stamped images, embossed metal heart and word sticker.
Created the word stickers using the laser printer, word processor, Dymo font and labels. Fun to play with fonts!! This heart was not painted - liked the texture of it just the way it was so it stayed silver. The heart charm is added with red eyelash fiber.

Therese

Chunky Art Book - # 9 - Nature

Finger painted background paper, embossed resist tissue decorative paper, doodled strip, watercoloured stamped flower image (SU) mounted with 3D foam tape and a little coloured word.

The colours on this page worked out so well - I was very happy - not often I use bright orange in anything!! K added some stippled doodles to the flower.

Therese

Monday, March 08, 2010

Chunky Art Book - # 8 - butterfly

Wax resist and watercolour paper for background, embossed strip, punchie flower garden, coloured clear butterfly accent and a colour printed word!! Added a doodled border on this one too!! The transparent coloured butterfly was created in the same art session as the embossed metal ones and coloured with the same paint. A cute butterfly charm for this page. Added details to the flowers with black Sharpie marker. Butterfly mounted with 3D foam tape below its body which was coloured with a large Sharpie marker.

Therese

Chunky Art Book - # 7 - Life

A music sheet stained with walnut ink as background, colour printed images of a window (stash) and door (mine) layered onto black, deckled edged strip, handwritten quote with highlighted letters and 3D punchie embellishment with a tag. I added a doodled border to this page as well.
I have a large collection of door images!!

Therese

Chunky Art Book - # 6 - pouffy flower

Colour washed decorative paper for the background, a pouffy flower with leaves and strips, doodled border, a quote and flower confetti embellishment. The flower charm goes really well with this page. We created these pouffy flowers in one of our art sessions. Eight scallop punchies of colourful tissue paper layered and stapled onto a green cardstock scallop. Starting with the first one - each scallop is tightly scrunched to the middle. Add the leaves (cut from a SU five petal punchie) and fluff the petals - a cute little flower accent. The quote is another of my favorites - one of my own creations!!

Therese

Chunky Art Book - # 5 - leaf

An alcohol ink background paper with doodled trees and birds, layered cardstock strip borders with doodled edges, watercoloured colour printed tag with quote and leaf charm layered on gold and black cardstock mounted with 3Dfoam tape!
The colour printing bled a little with the watercolour but in the end I really liked the effect. I added a bit of blue watercolour to the background paper to help it blend with the quote.
You can see the heart charm better on this page.

Therese

Chunky Art Book - # 4 - glittered heart

A colour washed decorative paper in red tones, a Mary Engelbreit small calendar image with a doodled frame, a black decorative strip border embellished with white gel marker, a doodled accent strip and a red glittered heart mounted to a black square mounted to the page with 3D foam tape. This page features a red heart charm as well.

Therese

Chunky Art Book - # 3 - angels

A colour washed background paper in black tones, a laser printed angel image layered onto red paste paper, embellished strips and a cute little tag with the angel quote and paper ribbon!! I added a doodled border all the way around with a black fine tipped Sharpie. The charm features a quote about art which is one of my favorites and is attached with some loopy fiber!

Therese

Chunky Art Book - # 2 - cultivate compassion

The background paper was one where white paint was added to a colour washed paper. The page features a metal embossed flower with a little red heart lady bug, a strip of layered cardstocks with a heart punchie and an embellished gold embossed quote. The embossed metal sunflower is mounted with 3D foam tape to keep it dimensional. I added dotted swirls with a Sharpie to just finish off the page once all the elements had been adhered.
One of our art sessions was spent creating embossed metal accents. I provided pieces of foil (the weight of pie plates) and they used pencils to emboss a design in the surface using folded newspaper for padding. Once finished, they were painted with "acrylic paint" using q-tips and left to dry over the weekend. I created the "paint" using acrylic finish and stamp pad reinkers - worked very much like those sold for painting suncatchers. I like using quotes and words in my layouts. Some of the students featured quotes on their pages - others used a combination of papers and elements to create their layouts.

Therese

Chunky Art Book - cover

My cover features a flowery decorative paper I created with the wax resist technique using an embossed plastic placemat and watercolour. I enhanced the paper with more watercolour after I glued it to my front cover. It defined the flower and added colour to the center and leaves. I added a simple cardstock ribbon to the front choosing to feature the decorative paper!! The charm I added to the front includes the date for future reference and is tied on with multi colour fiber.

Therese

My Chunky Art Book

I will now share with you my Chunky Art Book!!
I created it as an example for the students. Mine has 7 double sided pages - I reduced theirs to 5 pages. Once I started creating pages I realized they would not have the time to get all the pages done.
I used the same supplies for my book as I had provided the students to keep my creation within the realm of the possibilities that they had available to them. I found the challenge of limited supplies generally required more creativity to produce the sort of layouts I am used to. A very good exercise for me.

Therese

Creating a page

I am sure you can all relate to the little bit of space there is left on your work surface once you start creating! Here I am creating a page for my Chunky Art Book in about 6" square with a table full of "stuff" to choose from!!
It was a very fun project!!
I provided the students with a copius amount of papers, images, accents, embellishments, words and letters to augment the ones they had created in previous classes as they started creating their books. First of all, we glued decorative paper to both sides of the pages being sure not to cover the holes. All the pages were pressed for a weekend to give a nice flat surface. We coloured the spine and edges with black marker to give them a nice finished look. Then, the process of creation began!! Choosing elements, designing a layout, adding, rejecting pieces until both covers seemed finished. Gluing everything into place and making changes on the fly!! A reminder to organize pages and keep them all upright and properly aligned with each other was heeded by most. It took several days for the pages to be finished and even then, last minute items were added to finish them off!! We added the bindings and the Chunky art books were a reality. Once the pages were done we had a session of playing with shrink plastic to make the charms they would be using to decorate the spine of their chunky books!!
They were provided with blanks of Rough and Ready shrink plastic about 1.5"x 2" and reminded that the charms would shrink by about 60% so it was advisable to use most of the rectangle to create the charm. They used Sharpie markers on the smooth side to create their designs and pencil crayons on the rough side to colour them. Some used only coloured pencils to create their charms!! Once punched with a 1/4" hole for attaching, the students enjoyed using the heat guns to shrink their charms and watching "the dance" of the shrink plastic!! I added my charms between the pages on the top rung of my binding using colourful fibers. To help keep that rung of the binding closed so no charms are lost I applied double sided tape between it and the back of the spine. The students added their charms as they wished to their books.
The books are as individual as the students!!

Therese