Sunday, May 23, 2010

Christmas Card Challenge

More Christmas cards!! These ones - I made 6 of them - are for the May challenge - candles on Sylvia's (my sister) blog!! Simple elegance!! I stamped the candle image on black glossy in copper pigment ink and embossed it with copper detail embossing powder. It is very tricky to stamp on glossy with pigment ink and not smear!! I got the hang it after several attempts. I layered the stamped image onto copper foil - very thin - but very nice and reflective. I layered this element onto a black card front which I embossed with a wedding Sizzix embossing folder! Love the richness of the copper and the elegance of the calligraphy in the stamped image next to the embossed swirls!!
Still considering doing the nativity challenge on Sylvia's blog which was the challenge for April.. I have a class on Saturday to prepare for so once that prep is done I will consider working on more Christmas cards!!
It is never too late to get started on your Christmas cards and the challenges might give you a place to start!!

Therese

Thursday, May 20, 2010

Cardmaking - May - Zentangles

Zentangles!! I created a variety of them for the class I taught at the school so I printed up a bunch to use as accents on these cards!! Used pretty much the same layout as these - varied the border punches (5 in all)!!
The right hand side is embossed with the SU dots embossing folder. I love it because it is larger than some of the others and it does the whole card front at once!! Added the black border punched layer that has a little piece of fiber double knotted to it in the middle.

Quick and easy design! We all need some of those!!

Therese

Cardmaking -May - embossed vellum

Embossed vellum!! I am always using Splitcoast Stampers as inspiration when I am cardmaking!! So many cards and wonderful ideas!! I made a little sketch when I was perusing the site - I think I got pretty close to the same look as the one I found there.
Embossed vellum and trimmed it to the edge of the design. Layered that onto coloured cardstock and attached it with with four silver brads. Added the ribbon and attached the ends to the back. Love the way my greeting came together - an oval ribbon slide (CB) with a large oval punchie (SU)!! The large oval punchie fits perfectly into the slots in the ribbon slide to make a wonderful layered greeting!! I colour printed the greetings and just punched them out. Added the layered greeting over the ribbon using 3D foam tape. Had the inspiration to add a punched circle below the bird on the left hand card but thought of it too late to add those to the kits!! I think it would add "a bit of something" to the card.

Therese

Cardmaking - may - Paperclips

Found these cool paperclips in my travels in the last month and had to incorporate them into my cards this month. They are called Regal Owl Paper clips!!
I colour printed the greetings on the white cardstock just far enough apart to place the 1" strip of decorative paper in between. I glued this to my card and trimmed to the card edge. I used a SU word window punchie to create a tab by folding it in half and inserted it on the solid side of the clip and attached it over the decorative paper using a brad. Then threaded ribbon through the other side and glued the ends to the inside of the card.
You might even have some scraps or small strips of decorative paper in your stash to easily create a few of these cards. Use a different paper clip for a different look.

I will use the clips again. Next time, standing up, so you can see the "owl" in them!!

Therese

Cardmaking - May - corrugated card

The theme for May cardmaking was masculine cards! We all have guys we like to make cards for and we are often challenged to come up with ideas that will be suitable!! I have only a limited number of stamps for guys so I am always challenging myself to come up with new card ideas with them!!
I used four different images on these cards - lighthouse, train, tree and vintage grapes collage. I coordinated the cardstock to work with the different images. Most of the images could be coloured and then were trimmed to fit on the corrugated card!! This element was then layered onto the card front and the trimmed colour printed greeting was stapled on with a bit of ribbon added on the right hand side.
I like the way these cards came together. Not to complicated or fussy - like most guys!!

Therese

Thank you card

A thank you card I created for my friend, Sherry who has been so helpful with the house. I brought her back some cardstock and a cute little stamp so she can get started on her Christmas cards early this year!!

I watercoloured the rose and cut it out. Attached the handmade paper to the card front and then mounted the rose with 3D foam tape. Added a ribbon with a layered coordinating greeting on a ribbon slide!!

You can check out the cardstock I have for sale here:
www.tmalakrsc.blogspot.com

Email me at bmalak at cogeco dot ca if anything there catches your eye!!

Therese

Exchange cards

Created several of these for my card exchanges this month - Canadian Card Exchange and my card club. Stamped the boat image (ink on left - bleach on right) on black and mounted it to a coordinating layer. Cut a 2.75" circle from decorative paper, cut it in half and mounted it on the card front behind my image. Added some paper piercing for more interest and texture.
Got the sketch for this card somewhere on Splitcoast Stampers when I was searching for inspiration for cardmaking this month - masculine cards!!

Therese

Christmas card challenges


I combined Tracy's challenge from last month - using patterned paper as the main element in your card and this month's colour challenge to create these cards. Life has been busy and I have been away for a bit so I did not get to the April challenge at all. It worked quite well to combine the two challenges!!
I chose the cool snowflake paper which had some of the colours from the challenge which are red, cream, kraft and chocolate. I ripped the bottom of this layer, added a knotted ivory ribbon and glued it to the red layer which was embossed with the Sizzix snowflake embossing folder. Stamped the greeting in red on cream and punched them out with the small SU oval. Layered them onto chocolate punchies (large SU oval) and added them to the card front over the ribbon using 3D foam tape!! Made eight to sort of make up for the ones I did not get done last month!!
Very happy with my cards!! I know I will be happy when it is time to send them and they will be ready!!!!

It is not too late to get started!! Join a Christmas card challenge today and be ahead of the game!!

Therese


Collage art - vision board

My vision board!! The girls and I from my book club decided that we would create vision boards for our lives!! It has been a subject that has come up several times over the last few months in the discussion of the last few books we read. The idea that you create your life - draw into it certain things depending on what you think, say and do!!
So we spent an evening envisioning what we would like in our lives - making a few notes and the next time we got together we brought along magazines (from our own supply and some gathered second hand from Freecyle or Kijiji). Armed with scissors we started going through them cutting out anything that we were attracted to and/or represented something we wanted in our life. Early on in our discussion about vision boards I thought I was going to have trouble picking out "stuff" I wanted (has been my pattern) but as we discussed it more and after spending some time thinking about what I "wanted" I realized that what I wanted had less to do with "things" and more to do with relationships and experiences. Cutting out images was such a fun process!! We had magazines from a wide variety of subject matters so we were challenged to think outside the box!! Some in the group gathered only a few images and words and had their vision boards made that night. They were focused and clear about what they wanted!! It took me the better part of two days to create this collage!! I did like the way theirs looked with no white spaces in between their images so I did that on the outside of mine. I laid out my images according to areas of my life - home, DH, family, retirement, etc. I was amazed at how almost all the images that I had grabbed from the magazines found their way to my board and fit in!! Totally fun to cut out words from different places to say what I wanted to!!
So now, to draw these things into my life, I need to spend some time every day focusing my attention on what I want. That gets you thinking about it, puts you in a mind set of talking about what you want and a lot more likely to actually doing something about making it happen. You need to do all three - think, say and do!!
It is really a process of becoming clear about what you want.
This is poster board size so I am going to print off some smaller ones that I can have around to remind me of what I want in my best life.
There is no wrong way to make a vision board and you can make a new one anytime you like!! I totally enjoyed the process and will certainly be doing it again. Maybe a smaller one that deals with only one area of my life!! Created on 8.5 x 11 cardstock they could easily be stored in page protectors in a binder and would be easily availabe for review!!
Try it!! It is for sure that your thinking will get you a life - why not choose it more consciously!!

Therese

KN - Handmade paper card gift sets

More handmade paper card gift sets!!! I made up a few more of these gift sets for the store because it opened the weekend before Mother's Day and these would be perfect for any Mom!! These have been featured here on my blog several times. They are totally fun to make and love the way they feature handmade paper so nicely!!

Therese

KN - Sticky note books

These are always great for little gifts for almost anyone!! I created them using decorative cardstock, added a button and some fiber for the closure. They fit right into a yarn store!! Brought a whole bunch in a wide variety of colours and designs to suit everyone!!

Therese

KN - Artsy notebooks

Cyndi mentioned that knitters are always keeping notes about their knitting projects - where they are in the process, new projects, changes they are making to patterns, etc so I made up these artsy notebooks to make keeping their notes more fun! These feature hand decorated papers I made myself!! Several are paste papers - the others are created with acrylic and fabric paints. I added glitter to the spines of some of them for a little bling and fabric tape corners on the fronts to protect the corners.

You can check out my products at Knitting Nimrod Collective!!

Therese

KN - Handmade paper cards

I created these cards for a new venue - Elacyn Designs - a new store contained in the Knitting Nimrod Collective yarn store - a very cool place with LOTS of very cool fibers!!
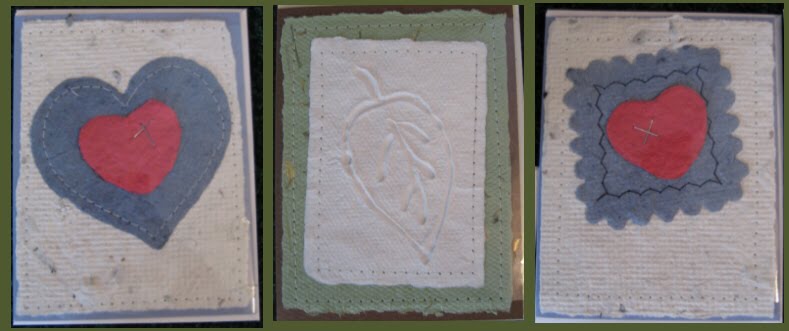
These feature handmade paper shapes which are sewn to handmade paper sheets sewn to the cardstock fronts!! The hearts have been stapled to the shape before sewing. The middle one features a leaf paper cast done in white handmade paper! I love sewing handmade paper and am planning to do more of it!! I brought a selection of cards which featured handmade paper which you have seen previously on my blog.

The next few posts will feature product I made for the store!!

Therese

Friday, April 30, 2010

Handmade Paper Card Holder

The card holder features a full sheet (8.5"x11") of handmade paper and is secured on both sides with ribbon!! The front flap of the paper was reinforced with fabric tape, three holes were punched with a Cropadile and ribbon was woven and tied to create an enclosure for the cards!! The top flap is simply folded over the cards and a ribbon holds it closed and gives a great look for presenting as a gift.
It was great fun to coordinate all the pieces to the handmade paper to make a great package!! Nice to feature so many items that were reused or recycled for these Earth Day cards all the while still making beautiful cards that are elegantly packaged.

Therese

Handmade Paper cards and holder #2

These cards also feature the same handmade paper!! The one on the left features a thermally embossed flower which the students coloured with chalks once their cards were finished. It was layered onto colour cardstock and features a flower embellishment. I created the embellishment using two Cuttlebug die cuts - the solid one from coloured vellum and the outline cut from metallic chipboard. They were layered onto each other, highlighted with a sequin then attached to the card front with a coordinating brad.
The right hand card features an embossed metal heart which was die cut from a heavy foil pie plate. The students embossed their hearts as they wished using a pencil and a newspaper pad. Once embossed, it was mounted using 3Dfoam tape on a double layer of cardstock which was previously glued to the card front. The ribbon features a pop can tab as a buckle which was a great accent with the embossed metal heart.

Therese

Handmade paper cards and holder

Here are the details from the Earth Day cards and holder I posted earlier. This was a fun class with a group of students from several different ages groups. Several in the class were really keen and just got going with the instruction sheet and did a great job. I think all the students enjoyed the class and were happy with the final results - four cards and a presentation holder!
All the cards feature handmade paper on the card fronts. All the embellishments and trims were coordinated to the handmade paper for the best presentation should the students choose to use it as a gift.
The top card features three chipboard hearts which started their lives as packaging! I covered the box board with scrapbook paper and then cut the hearts using the smallest Sizzlet heart die. These were layered onto neutral cardstock and then onto a strip of cardstock that was bordered punch to add some style. The little ribbon on the left hand side added just enough texture to make the whole design work.
The lower card has an embossed layer of cardstock over a neutral strip. The flower was created using a dryer sheet and I added coordinating scallop circles for the center - all attached to the card front with a brad.

Therese

Cardmaking - April - candles

Candles are perfect for birthdays!! These cards feature "candles" - scraps of cardstock and scrapbook papers about an inch wide. I embossed the cardstock to add texture and trimmed the tops to more closely simulate candles. Used heart punchies for the flames - added some colour to make them more dimensional!! Drew in the wicks above the candles with a fine tip Sharpie before I added the flames using 3Dfoam tape. The greeting is printed on vellum which I tore on both sides and added with two brads.
A few ideas for using what you have!!

Therese

Cardmaking - April - Gate fold

These were fun to make!! Featuring a gatefold and a central image they can be made for any occasion!! I used the largest circle on the Sizzix circle die (SU) to cut the white circles and then stamped a variety of images on them in black Memories so they could be coloured in any manner, even watercolour. Added a layer of silver foil - my reuse item - foil seal from yogurt - which I cut with my circle cutter. The scallop circle is a leftover from a Christmas card a while back which I embellished with a push pin but some used a white gel pen instead! Used a variety of scrapbook paper for the backgrounds. I created the background paper for the card on the right. The scrapbook paper was quite monochromatic so I added some script and pink flowers! Zipped it up perfectly!! Thrifty Tip: Consider adding some stamping to any paper that is not really speaking to you - it is a great way to use up with you have in your stash.

Therese

Cardmaking - April - Butterflies

These cards feature butterflies which were stamped and black embossed on calendar pages!! You can easily reuse calendar, junk mail or magazine pages by stamping bold images in areas of overall colour/texture or where a change in colour would be appropriate for your image. The white butterfly was stamped on a snowy road and the blue one on the water of an ocean scene.
They were neatly cut out and traced on the back with a black Sharpie to remove the white line of the paper. Neatly layered onto black cardstock and arranged as desired above the greeting which is printed on the card front and revealed by ripping the embossed layer. I added some dots with a white gel pen. Some in the class chose to cover up the greeting by not ripping the embossed layer in which case a greeting or accent could easily be added later.

Therese

Cardmaking - April - Handmade paper

Just getting to posting my cards from last week's cardmaking!! In support of Earth Day I incorporated some "reduce, reuse, recycle" techniques to my cards!!
These ones feature several earth friendly items - recycled handmade paper, reused coloured images and dryer sheets!! The handmade paper I made myself using printed bond paper and other additives - paper confetti and dried flowers!! It is such fun to make handmade paper with your scraps. The coloured images are cut from commercial cards! I usually save any cards I receive and reuse them to make cards for donation to a local not for profit. In this case, I scoured the boxful and cut out images that were the right size for use with this sketch. I really like the way these turned out. I added a little flower I created using a USED dryer sheet!! They are really easy to make! Sort of invented them by compiling flower ideas from several different places over the last few months. Thrifty Tip: Cut a rectangle of USED dryer sheet and fold in half and then in half again, joining the fold to the two ends. Round the four corners with scissors and unfold. Gather the rectangle in the center somewhat accordion style and tie off tightly with string or crochet thread. Now just spread the "petals" all the way around the middle and you have yourself a flower!!
These cards feature a quarter sheet of handmade paper with torn edges layered on the card front, trimmed images over a coordinating cardstock rectangle - both with distressed edges and a flower with a sequin attached to the card front with a brad.
These would make perfect cards for Mother's Day!! Coming up in a just over a week or so!!

Therese