Sunday, May 08, 2022

Care Bear quilt with a bit of slow stitching

We have been busy with family and so I have decided to have a day of fun and am quilting!!!  I discovered a while back that I have several quilt tops that were sitting in my box that had not been finished with batting and backing.  So that is where I am starting - a little CareBear quilt top (35" x 45.5").  I did the other part of this fabric a while back and this piece has been sitting since then.  I added a thin cotton batting and then a great white and yellow plaid backing to finish off this cute little quilt.  I decided to tie it instead of quilting it by machine to that added a bit of slow stitching to my morning!!  I used yellow crochet thread to tie it which coordinated very nicely.  They are so cute!!  I am glad to have finished this happy little quilt which will bless a little one once it is donated to the Linus Project.  

Therese


Birthday card with a large beautiful cake, fun papers and punched borders

A card for one of my granddaughters!!!  She is growing up and I decided that she needed a card that was a bit more sophisticated this year.  I chose this wonderful cake digital from FLYCLIPART and added a greeting before laser printing it.  I trimmed it out of the sheet, cut the edges with scalloped decorative scissors and the paper pierced each scallop.  I added an embossed frame inside of that using my score tool. I chose a dark pink card, added a harlequin background and then a strip of fun shoe paper with daisy borders in a coordinating pink.  Worked out really well!!!  Therese
 

Saturday, May 07, 2022

All occasion collage cards with corrugated backgrounds and layered collage elements

I made these two cards a few days ago.  I started with two pieces of dark brown corrugated paper - chocolate?? - and assembled a few collage elements from my desk, stash and a box from the shelf marked "Clipart" which had not seen the light of day for quite a while.  I brushed a bit of gesso on the corrugated paper and then added a bit of colour.  Once it was dry I found this paper doily on my desk and added a bit of colour to it as well.  The two ivory embossed strips were also found on my desk.  I dug the two fabric pieces from a scrap bin in my craft room and then I went looking for the paper flowers.  I coloured the turquoise one with watercolour to coordinate with the fabric. I found the collage elements - bird and cage, love/bird, friendship, two girls - in the clipart box.  I have no idea as to the origin of these pieces but they worked really well with my pieces.   I added the strips of ivory, the paper doily, the fabric, the paper flower and then the collage elements before adhering these large elements to my large kraft cards.    Therese


Mother's Day card featuring a layered flower, ribbon and a waxed floral background


 For this card I started with the bright and bold background which I created a while back.  I placed the textured wall paper on a foil covered griddle and drew these fun flowers using wax crayons.  The effect is really wonderful as the wax melts and blends beautifully.  I added a blue pink ribbon to the background before adhering it to my large purple card.  I found the green envelope in my stash and created the flower using the Bloom Beauty (SX) die.  I cut two of the large shapes  - bright pink and wine - and one of each of the two smaller ones - purple and yellow.  I added a sparkly purple brad to hold them all together along with a piece of cardstock.  It was then very easy to insert the cardstock into the envelope and get the flower to stay in place.  I mounted the envelope to my card front with 3D foam tape and then inserted my silver embossed vellum greeting with torn edges just below and adhered with a small piece of double sided tape behind the words over the ribbon.    Therese

Friday, May 06, 2022

Rainbow quilt with crumb squares

This quilt top has been sitting in a box waiting to be combined with its batting and backing for a little bit.  I really enjoy making crumb squares and for this one I made dark and light versions of all six of the rainbow colours.  It makes the little scraps disappear fairly quickly and mostly evenly when you take some out of each bag!!  

My batting is thin cotton and the backing is a medium weight cotton twill in aqua which worked well with the colours in this quilt top.  I used a rainbow thread and a wavy decorative stitch to do the rows of quilting along both edges of the horizontal seams. I have learned to go back and forth instead of always starting on the same side to keep the quilt balanced as it is easy to get things shifting in the direction of your lines of stitching.  

I used a bright and fun striped fabric for the binding with a much smaller version of the same wavy decorative stitch!!  Therese


Mother's day card featuring a large floral basket, ribbon and a layered greeting

Mother's Day is around the corner and I am late getting my cards out!!!!

This one has a fun circle background (SU) to which I added a brown ribbon diagonally before adhering it to my green card front.  I slipped the beautiful floral bouquet image (reused card front) below the ribbon after adding four rows of paper piercing with my pattern tracing wheel.  I added a short piece of coordinating ribbon to the brown one and then added the layered scalloped circle greeting over it.  


Therese


Thursday, May 05, 2022

Mother's day card featuring a foiled leaf die cut, ribbon and a bold waxed background

I used this fun background which I created a while back with textured wallpaper int which I melted wax crayons!  So fun!!  I ran a wavy cutter over the right hand side and added the blue pink ribbon before adhering it to my green card front.  I ran my pattern tracing wheel to the right of the edge to add a row of paper piercing.  I found the green leafy die cut in my stash and added purple foil to the back before layering it onto bright pink.  I added it to my card using 3D foam tape.  I stamped the greeting (SU) onto vellum and silver embossed it.  I tore the edges and used double sided tape to adhere it to the bottom of my leaf element and then added two little purple rhinestones to each side using white glue.  I added a dot of white glue below each of them to adhere the greeting to my card.  Worked very well and pretty much invisible after they were dry!!  Therese
 

Thursday, April 28, 2022

Birthday card featuring a large birthday cake, ribbon and an oval greeting

A special card for a special person!!!  I started with a large black card that fit in an envelope from my stash.  I created the large birthday cake by layering decorative paper strips onto coordinating cardstock and trimming the edge with scalloped decorative scissors.  I glued them to each other, added dots in the scallops using a clear glitter pen then mounted it to the back of the cake plate (Vecteezy) which I had printed and fussy cut.  I found the candle (Beccy's Place) in my stash of images, watercoloured it to coordinate and then adhered it to the back of the cake.  Added a bit of clear glitter to the flame and the yellow stripes.  I added the two strips of ribbon to the left hand side of the background paper before mounting it to the black card.  I watercoloured the greeting (Birds Cards) which was laser printed and punched with a large oval punch (SU).  I mounted it over the ribbon using 3D foam tape and then did the same with the large cake.  Therese
 

Sunday, April 24, 2022

Rainbow Quilt squares with slow stitched cats in the centers


 A set of 12 - 12.5" squares that I made up today uisng my little slow stitched cats in the center.  I decided that a rainbow quilt would use up some of each colour of my scraps and would work reasonably well with my little slow stitched cats.  I will be putting them together in a different configuration but for now they will be spending a bit of time in a box until I can free up some time.  Therese

Fabric stash for $1


 I came home with some more fabric from the Gramma Africa Sale!!  I really did not need any but it has been two years since the last one and I thought maybe just a few little things to support a good cause.  When I arrived one of the volunteers indicated that I could fill a bag for "one dollar" from a designated area of the hall.  The clear bag was as big as a grocery bag so I thought what the heck.  There were not many people there and the majority were wearing masks so I took a little walk around to see what I could find.  I managed to get all of this fabric into my bag.  Many others were not near as ambitious!!  These are cotton leftovers and small scraps which will work well in my quilting.  The black and white at the top right is at least two yards of 60" wide fabric which was stained but Mom's soap got the three little spots out.  All this fabric for a $1.  The five cones of thread was a $1 and the embroidery thread was a $1.  I paid $2 admission and got a great deal.  All the leftovers - there was a LOT!!! - were being picked up by the volunteers for the NEW second hand store in Sylvan Lake so that would be the next place to go shopping for fabric.  I will have to see if I can find out where they are.  Therese

Slow Stitching Project - butterflies are done!!

I have been working slowly and steadily on my butterfly project.  They are die cut (SX) from colourful fabric and stitched to squares of blue fabric.  I did a blanket stitch all the way around to secure the butterflies to the square and then filled them in with running stitch in a variety of configurations and colours.  I added the antennae and bodies in satin stitch with black embroidery thread once I finished stitching the wings.  I gave them each a fun flight path too in black running stitch.  I have several other ideas in my head and I am looking forward to getting started once a bit of free time shows up.  

I am linking to Kathy's Slow Sunday Stitching!!  Check out the wonderful creations of all the other creative people who participate there!!! 

Therese


Sunday, April 17, 2022

Large all occasion card with a coffee and musical theme


 I made this card for DH for his upcoming birthday!!  He loves his coffee and music is one of the things he enjoys most!!  I found the musical frame and the coffee collage on Pixabay and combined them in Corel Draw.  I laser printed it on white cardstock and watercoloured it to coordinate with the background collage I had created.  My background was pieced using scraps of decorative paper which I taped together on the back.  A large piece with the fleurs de lis to which I added a dark strip and then five more small pieces to have it big enough for my large kraft card which I created to fit in one of the large envelopes from my stash.  I added the turquoise strip to the background using two brown brads and flagged the end.  I added the background to my card front and then added the fussy cut and distressed coffee collage over it using 3D foam tape.  Totally had fun!!!  Therese

Thursday, April 14, 2022

Large all occasion card featuring a large heart with a gold embossed script, a tissue paper frill and an embossed strip flanked with lace

Another card for my stash!  This one will be good for an anniversary or Valentines.  I started with a large red card and then trimmed the background (SU) to fit.  I trimmed the red cardstock strip, embossed it with a flourish embossing folder (CB) and then added ivory lace on each side using double sided tape to adhere them to the back.  I adhered the strip to the background paper then tucked the lace ends to the back before adhering it to my card front.  The embossed heart has been in my stash a while so I do not know the maker of the stamp.  I fussy cut around the heart and watercoloured it to coordinate better with the background and the lace.  I thought it needed a bit more texture so I added double sided tape to the back and used as strip of red tissue paper (Christmas cracker crown) to create this very textured border by just folding the tissue paper and adhering it to the tape and just kept going all the way around.  I really like how much texture it added!!  Found the two little heart die cuts in my stash and added them to the large heart using 3D foam tape.  I mounted the large heart to my card using 3D foam tape as well.  Therese
 

Wednesday, April 13, 2022

All occasion card with a fun cup, a colourful background and a flagged strip in coordinating colours

Another large card for my stash!!  This one features a cup from Melonheadz which I laser printed and watercoloured to coordinate with my background.  I added four lines of paper piercing with my pattern tracing wheel before mounting it to a coordinating blue layer which has a border punched edge and an embossed line which I created using my Score tool.  The background is a fun one with a star motif (SU) which I added to a gray/oatmeal card and then I collaged three little strips of cardstock together, flgged the bottom end and added ribbon and three little brads to the top before mounting to my card.  I mounted my large focal image to my card using 3D foam tape.  Therese
 

Tuesday, April 12, 2022

Large all occasion card featuring a cute little bird with a button & lace over an embossed strip with a serenidipity background in greens and blues

After having fun with the little bird from Melonheadz on my last card I decided to make another one.  For this one I started by creating a serendipity background using blue and green scraps of decorative paper.  After it was dry I trimmed it to fit on my large blue card.  I adhered three strips of blue cardstock to each other using regular tape on the back and them embossed them with the script embossing folder (CB).  I glued it to my background and then added a length of lace securing the ends to the back with double sided tape.  After adhereing my background to my card I added a cute little blue die cut button which I found in my stash.  It has been created for a different project - embossed and with a white crochet thread tie.  I watercoloured my little bird to coordinate with my card, added four lines of paper piercing with my pattern tracing wheel, layered it onto green cardstock with a eyelet border punched edge and an embossed line which I added with my score tool.  That was layered onto blue cardstock and then mounted a bit askew on my card front using 3D foam tape.    Therese
 

Monday, April 11, 2022

Large all occasion card featuring a cute little bird, handmade background and film strip filled with little birds


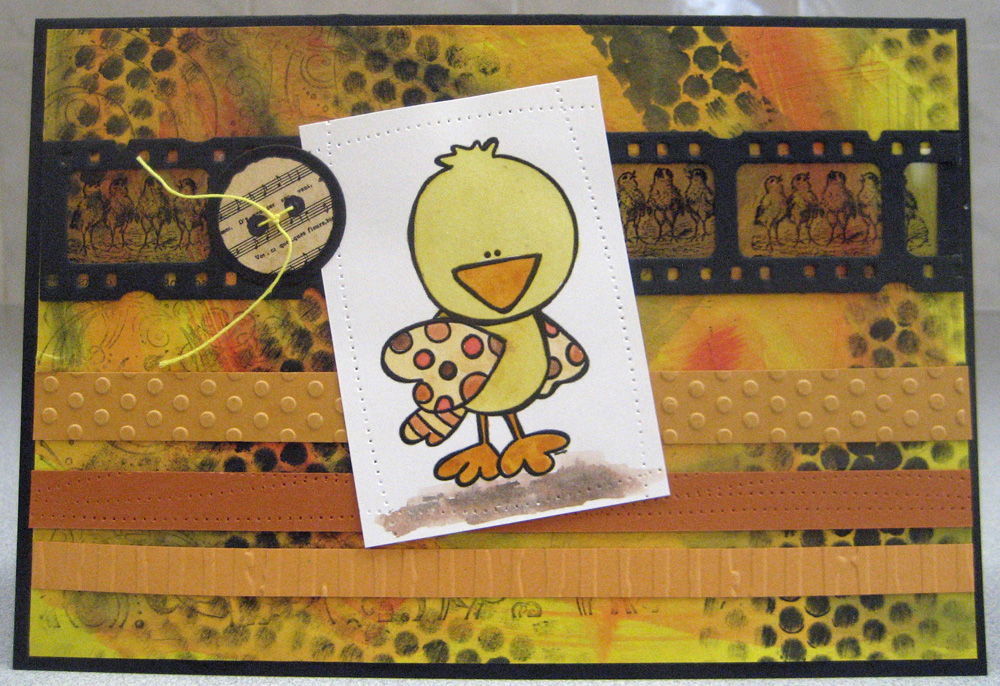
 This little bird is from Melonheadz which is a favorite of mine!!!  I started with a large black card and added the handmade background which I made a while back.  I die cut the film strip (TH - SX) from black cardstock and added some little birds singing their hearts out.  They were printed on transparency for a different project.  I watercoloured the little bird to coordinate and added some rows of paper piercing using my pattern tracing wheel.  After auditioning him on my card I decided I needed a bit more texture on the bottom so I added three strips of embossed cardstock before adding it to my card front using 3D foam tape.  I found this fun musical paper button in my stash so I layered it onto a black circle punchie and tied on yellow crochet thread before adding it with 3D foam tape as well. Therese

Sunday, April 10, 2022

Large birthday card featuring purple flowers and coordinating background papers

 A large birthday card which was another creative stretch for me - several layers of decorative papers.   I started with an aqua card and added a large decorative paper background (SU) and them overlaid it with a different paper from the same collection which I tore in the middle and added another piece on the bottom.  I watercoloured the stamped flowers (Magenta) in purple and mounted them over the second papers using 3D foam tape.  I mounted a strip of coordinating yellow cardstock in between which I had embellished with rows of paper piercing and then added my watercoloured greeting. It is a frame from CLKER to which I added a font greeting before I printed it.   With four images it is quite busy but it works well with the decorative papers and the greeting.  FUN!!! Therese

Saturday, April 09, 2022

Large birthday card featuring little Kawaii cacti and a bright bold background

A fun birthday card!!!  I had accumulated a little collection of Kawaii cacti from Craft Starters so I decided to be really creative and use them all on the same card!!!!  I found this really bright and bold background (Morgue File) which I mounted to a green card.  I watercoloured all the little cacti and then mounted them to coordinating cardstock.  I arranged them on my card front until I was happy with how they looked and then mounted them with 3D foam tape.  I found this round greeting that coordinated, mounted it onto a red circle punchie and added a small dark circle punchie to finish off my greeting.  I mounted it with 3D foam tape.  I add short strips of coordinating cardstock between my images to create a very subtle frame for my collage.  
Therese
 

Friday, April 08, 2022

Large all occasion card featuring flowers in yellow, pink and purple

An all occasion card I created to fit in one of my large envelopes.  I started with a purple card and added the fun green floral paper.  The pitche of daisies is from Beccy's Place.  I laser printed it and watercoloured it to coordinate with my background.  I added some lines of paper pierecing with my pattern tracing tool before adding the piece of yellow decorative paper.  I mounted this focal element to my card using 3D foam tape.    Therese
 

Sunday, April 03, 2022

Christmas cards featuring stars with ribbons over decorative paper backgrounds


I have committed to making cards monthly in order to have what I need by the end of the year so these are the ones I made this week!!!  I started with the green decorative paper and die cut two stars (CB) from two of  them (see bottom) to find out that because I was looking from the front (they have a clear back) I did not allow enough room between them and they cut into each other's spaces.  The paper was affected by the die so I embossed them with a random dot embossing folder which worked well for disguising the texture added by the die cutting.  To stabilize my backgrounds I cut two stars from each of the red polka dot backgrounds so I could insert them into the openings.  I  used packing tape which worked really well as they were secure all the way around.  They seemed a little plain so I die cut some silver stars (SX) to put inside them which helped quite a bit.  I did have to cut the tape at the top of the star to insert the ribbon which I secured to the back using double sided tape.  I tied the bows using the rabbit ears method which works really well for making balanced bows.  I adhered the bows using glue dots.  I mounted these two to red card bases.  For the next two sets I used gold glitter paper and gold gift wrap and was more careful when cutting the stars.  I used red gros grain ribbon on those and mounted them to red cards.  For the last of the green backgrounds I used a moire gold gift wrap to back the star openings and red satin ribbon for the hangers and bows which were mounted to red cards.  Finally  decided to use the green stars from the first set in the red polka dot backgrounds and added embossed silver stars (SU) to the centers of those along with green ribbon for the hangers and the bows before mounting them to pink cards.  I think I like the double star once best!!  I may consider adding some to the others and see if that works better than the plain large stars.  For the moment I am leaving off greetings but I will audition a few of those and see if I find some that work well.  Therese