For our second card, I created card kits which featured digital images from Dearie Dolls. There are many free digital images on the site with something for every occasion!!
I laser printed the images along with font greetings leaving space for a ribbon as I laid them out and then printed them eight to a letter sheet of white cardstock. We watercoloured our images to coordinate with our decorative paper and added a ribbon securing both ends to the back with double sided tape. I distressed the edges of mine - not everyone chose to. Next, we mounted our decorative paper to the coordinating card fronts and then mounted our large image to them using 3D foam tape. I added a little piece of fiber to the kits which we tied to the ribbon for a little more colour and texture.
Therese
Thursday, November 28, 2019
November Cardmaking - Christmas card featuring embossed trees, sanded embossed scroll frames and a fabric snowflake embellishments
I had a few ladies over last night to make Christmas cards. It was a wonderful evening - we enjoyed Christmas music as we created.
Our first card featured an embossed tree and greeting in the center of a white core piece of cardstock in a variety of colours. We embossed them with a scroll frame embossing folder and then sanded the embossing to reveal the white core. The sanding also gives the paper a lovely soft velvety texture. Next we overlaid a coordinating hand cut oval stencil and sponged a halo around our tree using a coordinating coloured ink. We added snowflakes/stars to the sky using gel pens - white or clear glitter. Finally, we added a little embellishment which was created using a white fabric snowflake layered with a coordinating sequin and held together with a brad. We used a push pin to make a hole along the rim of our halo and inserted the brad to secure it in place. This large layer was then adhered to the front of a coordinating card front.
I have added these turquoise cards which I had made up as card kits for this class but found that the contrast after sanding was not as prominent due to a non white core and that the silver embossing was a bit rough due to the texture of the cardstock. I wanted a more consistent experience for the class so I had set these aside. Therese
Labels:
3D embellishments,
A2,
brads,
cards,
Christmas,
embossing,
embossing folder,
fabric,
handmade,
sanding,
sequins,
snowflakes,
sponging,
stencil,
white core CS
Christmas cards featuring a little truck with a tree, sponged & stamped background and torn snowbanks
A few Christmas cards with these cute little trucks!! I cut these a while back when I visited my sister. It is a stamp and die set (SU) so I stamped and embossed them in black and the die cut them. I made a lot of different colours but my favorites are the red and yellow ones. The four backgrounds are blue scrapbook papers I found in my stash. I cut them to 4" x 5.25" and then sponged several lines of blue using a torn paper strip which makes a mountain range. Next, I sponged a row of green which makes a sort of horizon line. Finally, I stamped a row of pine trees in green. Always so effective!! I embossed all the trees using the Manhattan Flower embossing folder which gave them all really neat texture. I sponged the edges of the lighter coloured ones. The little trucks were all embellished with glitter gel pen on the window, door handle, lights, bumper, running boards and hubcaps. The wheels were coloured black with Sharpies and the fenders were watercoloured to coordinate. For the first one, I added torn snowbanks at the bottom, added my truck using 3D foam tape in the center and double sided tape behind the wheels to give it a bit of dimension. I added the tree the same way in the back of the truck. I added a layered oval greeting (SU - punches) featuring a font greeting and glued this large element to the front of a black card. To finish it off I added some dots of iridescent glitter glue to the sky and let it dry. For the second cards I followed the same procedure (oops! missed the tires - I will fix that) and stamped the greeting on the snow bank instead and left the sky as it was. Glued to a blue card.
This card features a stamped greeting on the snowbank and iridescent sparkles in the sky created with glitter glue.
The fourth card has manually embossed dots in the sky which I sanded to give them their white appearance. I love this effect!!!! On this one the greeting was stamped and embossed with silver embossing powder.
Really happy with these cards!
Therese
Labels:
A2,
cards,
Christmas,
diecuts,
embossing folder,
gel pen,
glitter,
sharpie markers,
sponging,
stamping,
SU - StampinUP,
thermal embossing,
torn paper,
watercolour
Wednesday, November 27, 2019
Slow Stitching - #5 blue in my rainbow set
I finished my blue square of Slow Stitching yesterday. The heart is quite a bit more subtle on this one as it was twisted fabric which I sewed on with green thread and then couched in blue. The crescents were cut from polka dot fabric.
Have really enjoyed this process!!
Therese
Have really enjoyed this process!!
Therese
Christmas card featuring colour printed background paper, a border punched focal element, a little greeting and ribbon flags
For this card I used supplies from my stash. These are from a digital SU set which I colour printed a while back. I trimmed the background paper and mounted it to a red card. I trimmed the little greeting from a full sheet of images and mounted it onto a layered background of red and aqua cardstock. I adhered my image, embossed a line and punched the botttom edge with the Eyelet Border punch (SU). I added double sided tape to the upper right hand corner of my image and added three little pieces of flagged coordinating ribbon. I adhered this focal element to my card front using 3D foam tape and then added the little font greeting punchie to finish off my card. Therese
Tuesday, November 26, 2019
A Christmas card featuring a white snowman paper cast, an sanded embossed background and a snowflake embellishment
For this card I started with the little paper cast of a snowman I found in my stash!! I will have to make more of these as they are so beautiful!! I embossed and sanded a piece of blue white core cardstock which nicely simulated a snowy sky. I adhered my little paper cast to the background and added a layered snowflake with a tiny white brad to the background. I mounted this large element to a white card for finish it off!!
Therese
Therese
Monday, November 25, 2019
Christmas cards featuring large snowflakes layered with smaller ones and greetings

For these two cards I cut one piece of white cardstock 4.25"x 5.5" using a large snowflake die (SU). Having carefully situated the paper on the die I was able to use both pieces - the die cut snowflake and the opening it created in the piece of white cardstock.
The first card features the snowflake die cut which I sponged a bit on the outside edges with blue ink. I added regular tape to the back of the openings on the ends and applied blue glitter from the front which nicely fills them with blingy colour. I dug through my stash of precut snowflakes and found a medium sized one which worked so I sponged its extremities as well. I added a blue snowflake sequin and adhered all of them together using a silver brad. I adhered it to a navy blue flecked card and added a greeting below. The greeting is laser printed, has a flagged end and was glittered all the way around with the same glitter used on the snowflake. I used double sided tape on the ends and a piece of 3D foam tape in the middle and added it to my card for finish it off. Love that navy flecked cardstock as it creates a night sky in a minute!!
For the second card, I used the piece of white cardstock which had the opening in it. I trimmed it to 4" x 5.25" and mounted a very bright orange yellow and pink background which I created using alcohol and ink from leftover in the inkjet cartridges when we changed them out last time. Love the contrast and how well the snowflake opening is highlighted. I layered a pink round sequin, an orange flower sequin, a gold snowflake sequin and a fabric snowflake to create the 3D embellishment for the center which I mounted with a tiny white brad. I found this stamped greeting in my stash, trimmed it to size and sponged its edges. Next, I sponged the edges of the white layer to coordinate with the greeting and mounted this large element to the front of an orange card. Added the greeting below the snowflake using double sided tape. Love this card with its non traditional colour scheme!! Therese
Slow Stitching - #4 purple in my rainbow set
I have just recently completed my fourth little square of Slow Stitching. I have used a new stitch - zig zag coral stitch. The heart was handcut from some hand stamped fabric I had created a while back for a swap project. I worked on this one on three different sessions. I am really enjoying the process.
Therese
Therese
Sunday, November 24, 2019
I made this card for a friend having a birthday soon!!! I used a card kit from my stash and as often happens I was inspired to change it up a bit. I adhered the decorative paper to my green card front and then added the embossed strip with a flagged end even with it on the right hand side. I watercoloured this cute little gift image (Michelle Perkett) which was laser printed. I trimmed the image into a tag shape and added a slot at the top then applied chalk around the edges to soften its edges. I modified the ribbon in the slot to be better suited to the landscape format. I adhered it with double sided tape. I mounted the tag to my card using 3D foam tape. You can check out the others here. Therese
Labels:
A2,
birthday,
cards,
chalks,
decorative paper,
digital image,
embossing folder,
gift wrap,
laser printing,
ribbon,
tag,
watercolour
Cards as a gift made up from card kits
A friend of mine is having a significant birthday in a bit and I made her a few cards. I made these from card kits I have in my stash!! #1 - Embossed and sanded background with a serendipity heart and a bit of fiber. Check out the other ones here.
#2 - a stamped image encased in a folded circle like a cathedral window quilt with a greeting tag. I have included a couple of greetings so she can customize the card. You can check the other ones out here.
#3 - decorative paper with an opening filled with a glittery flower. You can find the other ones here.
#4 - decorative paper, some embossed rectangles and a layered silk flower embellishment. You can find the others here. Therese
Labels:
A2,
all occasion,
card kits,
card sets as gifts,
cards,
Quick and easy
Christmas card featuring a little snowman, a sanded background, some fiber and a layered greeting
For this card I started with a piece of blue white core cardstock which I embossed with the Swiss Dot embossing folder and then sanded. Love the texture it leaves - soft!! I added a length of red fiber wrapped around the layer several times and knotted on the left before adhering this layer to a red card front. The little snowman image (Torico - Birdie Brown) was laser printed and watercoloured before being layered onto a white rectangle and mounted to my card using 3D foam tape over then fiber. The little greeting is layered punchies and also adhered to my card front using 3D foam tape. Therese
Labels:
A2,
cards,
Christmas,
digital image,
fiber,
fun fonts,
laser printing,
layered punched shapes,
snowman,
sponging,
SU - StampinUP,
watercolour
Saturday, November 23, 2019
Christmas card featuring a stamped angel, torn scrapbook paper and a small greeting
This card features three pieces of torn scrapbook paper glued to a dark blue card front. I added a strip of blue cardstock that coordinated with some of the snowflakes. The angel (SU) I found in my stash and watercoloured to coordinate with my paper. I layered it with two different colours of cardstock which I embossed before adding my image. I mounted this element to my card front using 3D foam tape and then added a small punched (Word Window - SU) font greeting which was sponged to coordinate using double sided tape on the left and 3D foam tape on the right.
Therese
Therese
Friday, November 22, 2019
Christmas cards featuring a large JOY greeting, decorative paper and some embellishments

Still making Christmas cards!!
These all feature a JOY greeting that was created using a decorative font and printed in two greens and brown.
For the first one, I cut a piece of decorative paper (gift wrap) and added a length of red seam binding before adhering it to the front of a red card. I watercoloured the JOY in red on the green colour printed word and mounted it over the seam binding. I tied a short piece of the same seam binding to the one on the front above the greeting using a single knot to simulate a bow.
For the second card, I used a piece of colour printed decorative paper (SU) and mounted it to a red card. I watercoloured the JOY in the green word to coordinate, ran my tracing wheel around the edges and mounted it to a coordinating rectangle of cardstock. I added two little green branches (SU - bird punch) adhering them behind the greeting and finished off my card by mounting the JOY over the decorative paper using 3D foam tape.
For my third card, I tore a 4"x 4" piece of scrapbook paper and sponged their edges before mounting them to the front of a dark brown card. I manually embossed the space in between using the Swiss Dot embossing folder. I watercoloured the JOY in my dark brown printed greeting using shimmery blue paint. I layered it with coordinating blue foil which was trimmed with decorative scissors before mounting this element to the front of my card using 3D foam tape. I found the two snowflakes in my stash and layered them with a brown brad. I mounted this with 3D foam tape to finish off my card.
Therese
Labels:
A2,
brads,
cards,
Christmas,
colour printed images,
diecuts,
digital images,
punchies,
seam binding,
tracing wheel,
watercolour
Thursday, November 21, 2019
Cards featuring illustrated panels, ribbon and little font greetings
I am finishing off a few more cards today for my stash. Always handy to have a few cards on hand for when you need them for friends and family going through a rough patch in their lives. These cards feature calendar pages which were trimmed to fit on coordinating card fronts. For the first one, I punched an opening on the top left, tied on a little bit of white fiber and then adhered this large element to a red card front. I added the little laser printed punchie greeting in the opening with double sided tape.
For the second card, I added a length of blue ribbon to my illustrated panel and the adhered it to a coordinating blue card front. I finished it off by tying on a short piece of the same ribbon to the one on the front using a single knot to simulate a bow and added the little laser printed font greeting punchie using 3D foam tape.
For my third card, the trimmed panel was not long enough to cover the whole card front so I adhered it to a yellow layer and adhered it to a black card. I stamped the greeting and then dots above the image and below the greeting to finish off my card. Made the overstamped edge a design feature using a fine tip marker.
Therese

Wednesday, November 20, 2019
Cards featuring crosses with bright backgrounds, a bit of colour and some ribbon
I made a few cards with crosses as I often get requests for them for certain occasions where they are most appropriate. The cross images were downloaded off the internet and printed on white cardstock before being trimmed to size.For the first card, I chose a colour printed background from my stash and then watercoloured the image to coordinate. I layered the background paper onto a red card and added a green ribbon using a slot punch to create a little opening on the spine for the it. I mounted the image onto rust cardstock and then mounted it over the ribbon using 3D foam tape. To finish it off, I simply tied a short piece of the same ribbon to the one on the front using a single knot to simulate a bow.
For the second card, I chose a hand decorated background (white cardstock, watercolour and plastic wrap) and watercoloured the cross image to coordinate. I die cut the cross using oval Nestibilities and then added a black layer and another white layer with I sponged with red ink until it contrasted nicely. I layered the background paper onto a yellow card front and mounted the large oval element over it using double sided tape.
For my third card, I chose a navy card and layered on this blue colour printed background paper from my stash. I trimmed into two pieces which left a gap of navy. I sponged a bit of colour onto the cross image, ran my tracing wheel over all four edges in a wavy pattern and then mounted it to rust cardstock. I added double sided tape to the back of the top right corner and added three little strips of ribbon before mounting this large element to my card front with 3D foam tape. Therese
Tuesday, November 19, 2019
Fun cards featuring magnets and some fun greetings
I created these card kids for my Special Card class in May. I found these magnet at a thrift store and thought they would make great card with a bit of a gift!! It took a bit to come up with some sayings to go with all the magnets. I printed the greetings onto white cardstock leaving enough room above for a ribbon and the magnet. Once trimmed from the sheet I used a corner rounder on all the corners which coordinates very nicely with the magnets. I mounted the magnets with double sided tape so they can be easily removed. I added the ribbon in between the greeting and the magnet and tied another small piece to it to simulate a bow. This layer was mounted to a embossed layer and then to a coordinated card front. Therese
Labels:
A2,
cards,
embossing folder,
gift in a card,
magnets,
ribbon
Slow stitching - #3 is red in my rainbow set
Here is my third square of slow stitching. The heart was actually two pieces so I stitched it down the middle as I was stitching it down to start and then I stitched around the outside edge. I learned a new stitch - open chain stitch. I have tried it before and was not able to understand how to execute it but with my new little book of stitches it was more clear. I did fly stitch on the right hand side of the blue strip though I made the center stitches quite short and they are less connected than in the book. It is a work in progress!!!
Therese
Therese
Monday, November 18, 2019
Exchange cards for my swap partners featuring glossy backgrounds, sequins and large laser printed greetings
I made up card kits for my exchange cards this month! They both feature some bright glossy backgrounds which I made with glossy photo paper and inks. I used a variety of dies to cut pieces for these cards. The large greetings (Desert Diva) were printed on white cardstock and trimmed to size. I embossed them both manually with different embossing folders. I added faux stitching to first one and used my tracing wheel to add some texture to the second one. The elements were assembled and mounted to coordinating cards. I added the sequins using tiny pieces of double sided tape. You can check the others here. They will be on their way tomorrow!! Therese
Labels:
A2,
alcohol ink background,
birthday,
cards,
dies,
digital image,
embossing folder,
faux stitching,
sequins,
tracing wheel
Quick and easy card featuring the Manhattan embossing folder, some ribbon and a small greeting
I made up these card kits for my Special Card Class in May. These are quick and easy yet quite a versatile design. I embossed the neutral layer with the Manhattan embossing folder (SU) and added a length of organza ribbon before gluing this layer to a coordinating card front. I trimmed a section off of the green one before adding the ribbon which allowed room to the right for the little Word Window greeting punchie. For the blue card, I simply added the greeting below the ribbon where it was frame with the ends. Therese
Sunday, November 17, 2019
A friendship card featuring strips of decorative paper, an embossed layer and a fun digital greeting
Making up cards for my stash from card kits. These were featured in my March cardmaking class. The fun little greeting is a digital from Desert Diva which I sized and laser printed on white cardstock. I sponged the edges to coordinate with my card elements, distressed them before adhering it to a rectangle of green cardstock. The strips where adhered to the green layer using double sided tape and then the edge was covered with an embossed strip of orange cardstock. I adhered this large layer to a mustard card and then added the greeting using 3D foam tape. The strips were trimmed like banners to finish off the card.
For my second card the horse digital is from Beccy's Place. I layered orange and purple behind my image and added an embossed line and a pierced scalloped edge. I added a little coordinating oval font greeting punchie as well.
Two more to add to my stash! Therese
For my second card the horse digital is from Beccy's Place. I layered orange and purple behind my image and added an embossed line and a pierced scalloped edge. I added a little coordinating oval font greeting punchie as well.
Two more to add to my stash! Therese
Saturday, November 16, 2019
Slow Stitching - first orange square!!
It took me three sessions to finish up the yellow square. It only took me two sessions to finish up my first orange square. This orange fabric has good weight and was easily able to support the elements and stitching I added to it. I started with running stitch through the middle of the strip and added long stitches placed next to each other to anchor the two sides. Next, I did the three little patches using small stitches on their edges and a different colour floss to created the little star/flowers in their centers. I used the fly stitch to secure the edges of my hand cut heart using two different green flosses. First time doing the fly stitch. I think it would have been better had they been a little closer together but I was concentrating on doing them correctly and failed to be really careful about spacing. I will consider adding another set of stitches in between in my next stitching session. To finish off my square I added french knots using yellow floss inside the heart. I am happy with my progress and look forward to finishing my first set of rainbow squares. I will post them as I finish them. Therese
Labels:
fabric,
hand stitching,
project,
slow stitching,
thread
Cards made up from card kits featuring a die cut layer backed with decorative paper, fiber and embossed greetings
I am still making cards for my stash and using card kits from my desk to make the process quick and easy. These cards were featured in my January Cardmaking Class. The top one features a gold embossed Merry Christmas greeting, some die cut hearts and some fun sweater knit paper to back them. I added a length of gold embroidery thread through the opening before adding the paper to cover up the openings. That layer had been over stamped with a script and scroll design. I glued this large layer to a coordinating card front. I added three little gold sequins to finish it off.
The next card features leaf die cuts on the left with the same gold embroidery thread. The third card features a rose pattern die cut opening and a blue fiber tied to the front. I backed this one with hand decorated watercolour paper.
A few more for the stash!!
Therese
A birthday card featuring fun decorative paper, an embossed strip and a tag with image and greeting
A few more cards for my stash from card kits. These card kits were featured in my March Cardmaking class. The bicycle (SU) and greeting were combined in Corel Draw and printed on white cardstock. They were trimmed into rectangles and then the corners were cut to create the tag. I used my slot punch (SU) to cut the slot for the twill tape which was adhered with double side tape. I sponged the outer edges and then added faux stitching with a fine tipped Sharpie marker. I adhered the decorative paper to the kraft card front and added an embossed strip before adding the tag using 3D foam tape.
Therese
Therese
Labels:
A2,
birthday,
cards,
decorative paper,
embossing folder,
faux stitching,
gift wrap,
sponging,
tag,
twill tape
Christmas cards featuring a farm scene with fiber and oval punched font greetings

I am working on yet more Christmas cards!! These ones feature a fairly graphic image of a barn (Pixabay) that is very effective. I printed the digital image on white cardstock and trimmed them to 4" x 5.25".
To the first one I tied on a length of red fiber before adhering this large element to my black card front. I mounted a layered greeting over where the fiber is tied on the front. The greeting features a laser printed font greeting punched with an oval punch (SU) and then layered onto a pewter metallic scalloped oval punchie (SU). I mounted the greeting using 3D foam tape which allows room for the fiber. For the second card, I punched an opening with the oval scallop punch (SU) in the upper left area of the printed panel and tied on a length of red fiber between the opening and the right hand side. After mounting this large element to a black card front I added a font greeting oval punchie in the opening using 3D foam tape. Therese
Friday, November 15, 2019
Slow Stitching - first yellow square
Here is my first square in my Slow Stitching project!! I started with stitching down the strip on the left. I did running stitch in the center to keep in place and added blanket stitch on one side and cross stitches on the other. Next I added the blue square using small stitches all the way around and longer stitches to create a flower in the center. I added the green triangle and did running stitch in both directions on it. The little portion of a pansy on the upper right was stitched down with running and seed stitches. It has been positioned away from the edge to allow a quarter seam allowance when it is incorporated into a project. The other scrap was stitched down with running stitch and finally I created the heart shaped element. I started by drawing a shape using a pencil because I noticed that I am not easily able to make straight lines with my stitching and I did want my heart to look like a heart once I was done. I started by stitching the end of my little fabric strip to my fabric in the dip of my heart. I used green floss to couch my strip onto the line that I had draw which worked quite well. To finish it off I cut my strip and stitched down the end over the end where I started. I think it will be sturdy enough to stay in place. I made a real effort to not pull my stitches too tightly in order to not shrink my fabric square. Once it was ironed it still measured 4" square!!! I have backed this square with some white fabric because the yellow was so thin I was not sure it would be able to carry the weight of the stitching. I am learning as I go!! So far so good!!! Therese
Labels:
fabric,
hand stitching,
project,
scraps,
slow stitching,
thread
Slow stitching - a new project!!
I have decided to start a new hand stitching project and will be modeling it after "slow stitching" which Liz Kettle promotes as stitch meditations. After some health issues she wanted to find a meditation practice she would do every day and developed this process for herself. I have tweaked the process in that I have decided to start with 4" squares in rainbow colours which I hope will yield squares which I can later use in sewing projects. I have cut 5 sets of six squares (yellow, orange, red, purple, blue and green) to begin with using up scraps and finding the colours I needed in my stash. I have decided to use a sort of collage technique on my first set using small scraps to execute a heart theme. I dug through and sorted my small scraps drawer into colours so I could easily pick pieces to coordinate with my coloured squares. I have collected a few scraps for each square and for hand cut hearts. I will be creating hearts by couching a strip of fabric for the others. I have decided to forgo any embellishments in case the squares end up in quilts where they will be handled and washed regularly. If they end up in other sorts of project I will consider adding embellishments once they are part of a project.
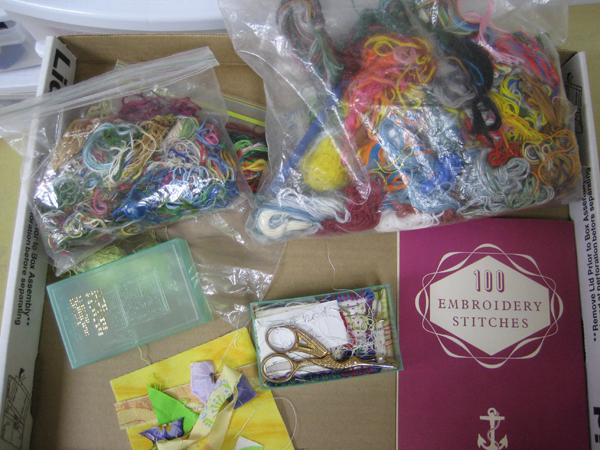
I have collected my stitching supplies in a box lid - thread, needles, pins, scissors and my small book of embroidery stitches. My little book will be a good reference as I am not familiar with many stitches. I will be putting my scraps down with raw edges and would like to use wide stitches to properly secure the raw edges as I am stitching them into place.
I started on Tuesday morning with the yellow square and I will be sharing it in my next post!!
I do enjoy hand stitching and it is very peaceful to do a bit of stitching first thing in the morning!! Therese
Here is my first set of squares ready to go!
I started on Tuesday morning with the yellow square and I will be sharing it in my next post!!
I do enjoy hand stitching and it is very peaceful to do a bit of stitching first thing in the morning!! Therese
Labels:
fabric,
hand stitching,
project,
slow stitching,
thread
A birthday card that features fold over rectangles to create an opening filled with a little flower
This card kit was featured at my Special Card Class in May It features double sided cardstock with the back design being revealed when the middle section corners are folded up. I cut four rectangles and scored the corner and then mounted them to a green card front. It middle element was created by layering an embossed flower shape over a 1.75" circle punchie and finishing it off with a 1/2" circle in the center of the flower. I adhered it in the center. I added the stamped greeting below with 3D foam tape.
Therese
Therese
Labels:
A2,
birthday,
cards,
decorative paper,
die cuts,
embossing folder,
punchies,
stamping
Thursday, November 14, 2019
A little birdie card with a Tim Holtz bird and bird cage with a little tag
These little birdie cards are always handy in that they can cover so many occasions!! I have made these quite a few times using this sketch. Made up these card kits for my May Cardmaking Class. The birdcage and bird & wing (TH) were die cut in different colours. I added a tiny black brad to the bird for his eye and add the beak detail with a marker before watercolouring in some detail. I mounted the bird behind the bird cage and added the embossed wing on the outside. I added the top thread before mounting it to the background paper. I added the little tag to the thread and then glued the thread to the back using double sided tape. I then mounted this large element to a dark brown card front. I added rhinestones into the holes at the bottom which was backed with double sided tape when I adhered the bird cage to the decorative paper. I mounted the tag with 3D foam tape to finish off this card. Another one for the stash!! Therese
Labels:
A2,
birdie,
cards,
decorative paper,
diecuts,
embossing folder,
rhinestones,
stamping,
SX - sizzix,
thread,
Tim Holtz (TH),
watercolour
Wednesday, November 13, 2019
Cards featuring decorative paper, three embossed layers and a floral embellishment
A few more cards for my stash. I made these up from card kits which were also featured in my September cardmaking class. The large decorative papers were glued to the coordinating card fronts and the three pieces of cardstock were embossed with three different embossing folders. I corner rounded some of the corners to provide a little variety in the look of the layers. They were arranged on the card fronts to make a pleasing arrangement and then glued in place. The 3D embellishments were created by layering silk flowers adding punchies/sequins and then held together with a coordinating brad. These were applied to the cards using 3D foam tape. To finish off my cards I added the greetings. Card kits are so quick and easy!! Therese
Subscribe to:
Posts (Atom)