Saturday, August 20, 2022

Plastic bookmarks - paper clip die cuts

I was looking for a way to make some cool bookmarks and after a failed attempt at making a hand stitched one I went looking for other ideas.  I eventually settled on making some from some plastic I have on hand in a great turquoise colour (Ikea lamp) and a paper clip die (SX).  They work really well and simply clip on a page and are stiff enough to hold themselves in place.  They will never wear out or become rough looking so will last a long time.  
A wonderful solution that took only a few minutes and look and work great!!  I can see that this die could be used for making bookmarks with some fun and funky plastic such as covers of notebooks, binder or report covers, etc.  

Therese


Friday, August 19, 2022

A large card featuing an embossed dragonfly on handmade paper, paper pierced vellum and a hand decorated background

This is my last card using the large pieces of hand decorated backgrounds I made a while back which feature sanding and wax resist.   I trimmed the vellum with silver hearts, added some paper piercing with my pattern tracing wheel and then laid it over my background and folded the ends over and secured them with tape.  I mounted this to my large gray card.  I trimmed a scrap of purple cardstock, flagged both ends.added several lines of paper piercing and then two eyelets.  I mounted this over my vellum and then mounted my dragonfly image over it using 3D foam tape.  The dragonfly image is silver embossed onto white tissue paper and encorporated into handmade paper during the process of making the paper.  It is a fun technique and gives the look of them being all one piece.  This one comes from my stash as I have not made handmade paper lately.  Therese


Large card featuring a collage background, a colourful tag with a heart and greeting

Another card for special occasion in my family!!  I started with a red card and added several scraps of the sanded and wax resist backgrounds I made a while back.  I die cut a large red tag and added  scrap of blue inkjet printed background which I spritzed with some water to give it a bit of a mottled effect.  I trimmed it to the size of my tag minus a bit of a margin all the way around.  I found the heart in my stash (Digital Graphic Cafe) already fuzzy cut so I just watercoloured it and added it to the tag using 3D foam tape.  I layered a stamped tag (SU) with scraps of die cut labels and then added paper piercing with my pattern tracing wheel.  
 

Thursday, August 18, 2022

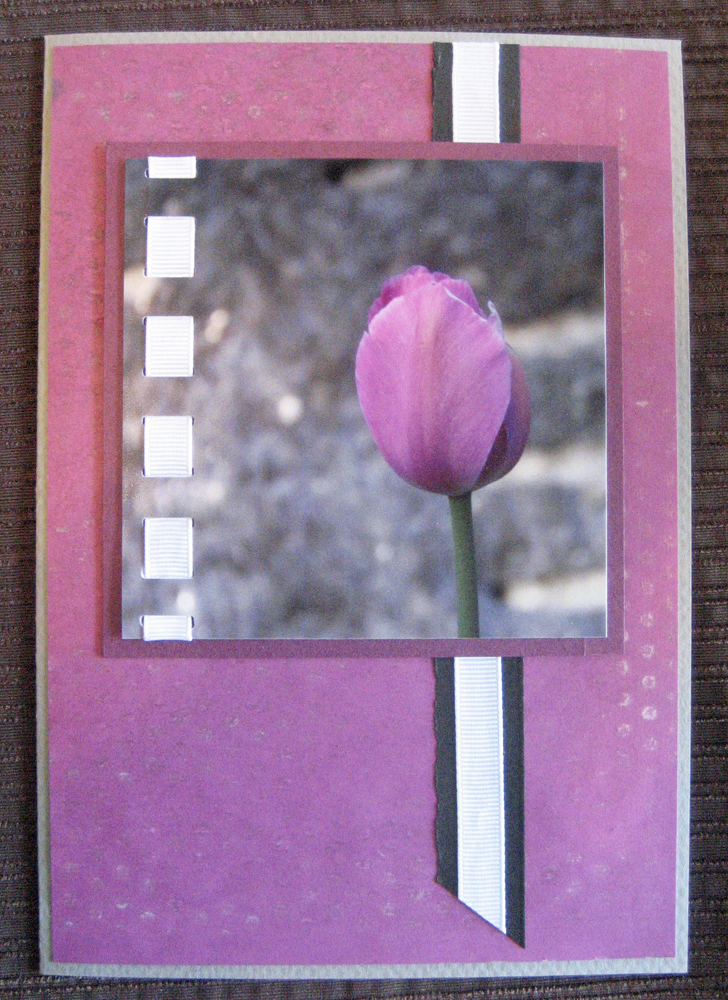
Large card featuring a tulip photo, hand decorated background and white ribbon

I started with a large gray card and added the background which I made a while back.  I used a black strip from my scraps and added a piece of white gros grain ribbon to it.  I added the piece leftover the tulip image (Sylvia).  I punched the left hand edge with my punch and threaded the ribbon through securing the ends on the back using double sided tape.  I layered on a coordinating piece of purple cardstock and then used 3D foam tape to adhere it to my card front.  I love using my sister's photos in my cards!!  This one was trimmed from a calendar page which is always part of my Christmas gift every year.    Therese
 

Wednesday, August 17, 2022

Large card featuring hearts and roses, hand decorate background and a seam binding bow -

I started with a large green card and added four rectangles of hand decorated paper (sanding and wax resist) which I made a while back.  The hearts and roses (Clipartix) were laser printed, trimmed out and then had some lines of paper piercing added with a pattern tracing wheel.  I layered on a soft flocked pink paper and then added a black border to the bottom.  The border's edge was cut with scallop decorative scissors and was embossed with a line using my score tool.  I mounted this large focal element to my card using 3D foam tape and added a pink seam binding bow using a glue dot to finish off my card.  
Therese


Tuesday, August 16, 2022

Large card featuring a cute flower, hand decorated background, a layered strip and flagged seam binding


 Still working through the stack of decorated papers I made a while back.  For this card I started with a dark green card and added the background which had been stamped with flowers, leaves and script.  I created a layered strip using orange scraps and added it to my card front.  The cute flower (Clipartlibrary) was watercoloured to coordinate and then had some paper piercing added using a pattern tracing wheel.  I layered it with a brown layer and added a folded piece of green seam binding using a gold staple.  I mounted the flower to my card using 3D foam tape.  It was fun to use scraps of decorated paper to embellish my card!!  Therese

Monday, August 15, 2022

Large card featuring handmade background paper and a fun little flowers and a bit of lace

This large card features a cute floral image which I printed last week from Clipartix.com.  After trimming the background from the large sheet I stamped it with flowers (pink) and stems (green) (SU).  I added double sided tape to a the back of a black strip and added a strip of white lace to each side.  I mounted this to my background paper and secured the ends of the lace to the back using double sided tape.  I glued my background to my card front and then after adding dots to the border of the image using a fine tipped Sharpie I added it to my card using 3D foam tape.  Therese


Sunday, August 14, 2022

Slow Stitching - visible mending

DH is working on a landscape project in the back yard and in the process we had to use these forearm forklifts to move the blocks which form the two steps of the project.  The block edges were quite sharp in some places and so they made several cuts in the fabric of the forklifts.  I did visible mending to get them back to rights for the next time these come in handy.  Several hours of slow stitching!!!  
I am joining Kathy at Kathy Quilts for her Sunday Slow Stitching.  Always lots of fun projects to check out on Sunday on her site. 
 Therese


Slow Stitching - red apples


I have been working on these for the last two months off and on and managed to finish off the fourth one today!!  I really like how they look!!!  I have two more to finish and then they will be ready to be added to a project - bags or a quilt!!

I am joining Kathy at Kathy Quilts for her Sunday Slow Stitching.  Always lots of fun projects to check out on Sunday on her site. 

I stitched a gray strip of cotton to a piece printed white for each of these.  I drew a pattern by hand and cut it out.  I cut six of them from different red fabrics from my scraps.  I have slow stitched them with running/stab stitches in various colours of red for the first three.  The last on the right/bottom was stitched in yellow along the gold printing on the fabric which gives it a cool look.  I drew the stems in and then stitched them.  I made them all a bit different as I was experimenting with using several different kinds of stitching to fill them in.  The leaves were hand cut and stitched into place next to the stems.  Therese


Packaged fire starters


Here is what they looked like all packaged and ready to go!!
Therese


Banana bags painted to house fire starters

Worked on fire starters this weekend and these are the bags I prepped

to package them in.

I started with bags from bananas, added a an insert to the inside front section to protect the rest of the bag and painted the front with acrylic paint.  I have several that were fairly old and with just bits of paint left in them so it was a good use of what was left in the bottles.  It was a very fun to just paint with no expectation of perfection or any particular look.  They look pretty cool!!  

Therese


More fire starters!!

I worked on fire starters this weekend!!!  It was so fun to play with paper and wax again!!  I made these to give to family when we camp together later this summer!! You can check out the process here.  These papers were mostly leftover from the prayer flag project I worked on a while back where I ironed the waxed flags between two pieces of paper to remove some wax and soften them so they would flap in the breeze.  Therese


Large card with hand decorated background, colour printed floral element and vintage seam binding


 This large card also features some of the hand decorated paper I made a while back.  I trimmed out a piece from the 12 x 12 and added some stamped flowers in pink and leaves in green which worked really well.  It coordinated perfectly with a floral digital (clipartix.com) I printed out last week.  I added a slot (SU) on each side of the floral image and added green vintage seam binding on each side.  I trimmed a piece of yellow cardstock to fit in between folding down the ends into the slots.  I added some decorative cabachons in pink and 2 clear flowers embellishments with glue dots.  I mounted this element to my decorative paper with 3D foam and then mounted the ends to theh back using double sided tape.  To finish it off I added little black dots to the edge of the focal element with a fine tip black Sharpie.  
Theres

Saturday, August 13, 2022

All Occasion card with watercoloured daisies in a jar


 For this large card I created a blue card and added a piece of the decorative paper I made a while back.  I watercoloured the daisies in the jar (clipartimage.com) to coordinate with my card front and then added two decorative side panels (TH).  I added paper piercing to the image with a pattern tracing wheel and used a push pin and mat to add some to the side accents.  I adhered three strips of blue cardstock to each other, paper pierced the middle section and added three eyelets then glued it to my card front.  I mounted the focal accent to my card with 3D foam tape. Another all occasion card ready for sending!!  Therese

Friday, August 12, 2022

Large card with a flourish, butterflies and a fun decorative accent


 I am still working with the fun decorative paper I made a while back.  I mounted a piece of my hand decorated paper to a royal blue card front and added a blue flourish (TH).  I played with it for a while before deciding to add 1.75" circles to highlight three butterflies (SU).  Once decided, I added the circles, glued the flourish in place and added silver dots with a Sharpie.  The area to the right seemed unbalanced so I created an accent piece for it. using decorative paper scraps and eyelets.  I tucked it under the wing of the butterfly which worked well.  Lastly, I added silver dots (Sharpie) around the three other edges of the card.  Have been having fun creating!!  Therese

Wednesday, August 10, 2022

Large card with hand decorated paper (sanding & wax resist), wllderness cabin and fiber


I created a large dark green and added a fun background I made a while back involving sold decorative paper, sanding, wax resist and watercolour.   I added a strip of decorative paper mounted between two strips of dark green cardstock which was paper pierced with a pattern tracing wheel.  After watercolouring I layered the laser printed digital of a cabin in the woods (publicdomainvector.org) with a black decorative piece of paper and then added three pewter eyelets to which I tied fiber - brown jute and black ribbon.  I mounted the image to my card using 3D foam tape.  Has been fun to make large cards again!!
Therese


Monday, August 08, 2022

Large card with decorative paper (sanding and wax resist), flagged strips and a waterfall

For this card, I used the second half of the red sheet and cut a piece which I tore twice to leave a gap with no white edges through which you can see the black card.  I cut two strips - one embossed red and a thin black one - flagged the ends and glued them over the background.  The waterfall (public domain vectors org) was watercoloured and had two torn strips of blue mounted to the back before being mounted to the card front over the gap using 3D foam tape.  

Therese


Sunday, August 07, 2022

Large card featuring a flower with a swirly background, hand decorated background and a border punched layer

I started with a large black card and added a hand decorated background which I made a while back which I cut diagonally to create a bit of interest.  The flower with all its swirls (Clipartix) was watercoloured and then I used my pattern tracing wheel to add four lines of paper piercing to the edges.  I layered it onto a piece of coordinating cardstock which I border punched (SU - Eyelet).  I added an embossed line with my score tool and a line of paper piercing to each side of it to add some texture.  After adhering them to each other I added this large element to my card using 3D foam tape.    Therese
 

Saturday, August 06, 2022

Large card featuring a pink dahlia, a layered strip with eyelets and paper piercing


 I love using my sister's photos when I make cards.  I am fortunate to get a photo calendar from her every year as part of my Christmas gift so I have constant supply!!  I started with a large dark green card and added a hand decorated background (sanding and wax resist) which I made a while back.  I dug through my scraps and put together a layered strip using green, white and pink.  I added three eyelets to the right hand side, flagged the end and mounted it over my background.  The dahlia photo was treated with some paper piercing and mounted to a white cardstock layer before being added to my card front using 3D foam tape.   Therese

Friday, August 05, 2022

Large card with sanded and wax resist decorative paper, vintage seam binding, brads and sunflower


 This is my second card with my fun papers!!  I started with a large green card and added a piece of my orange decorated paper.  I stamped on yellow flowers and green leaves (SU) after it was dry.  I remembered to add my seam binding and brads before gluing it to my card front.  I added layers of decorative papers to my sunflower image ( Wikiclipart @ Clipartix )which was watercoloured.  I mounted it with 3D foam tape over the seam binding and then tied on a small length to simulate a bow!!  Therese

Wednesday, August 03, 2022

Large card featuring wax/sanded decorative paper, a train over some ribbon and flagged strips


 Here is the first card I made with my fun papers.  I started with a large blue green card and added a piece of my hand decorated paper in red from the other day.  I added an embossed strip of red cardstock to the front edge and added some marks to the edge with a black fine tip Sharpie to add interest.    I added three little strips of blue green cardstock which had texture and marks made with the Sharpie.  I decided to add ribbon and therefore captured the ends below to half circle of black cardstock on each side which worked very well.  I added my paper pierced (pattern tracing tool) and layered train image (Clipartix) which has a scalloped edge on the bottom cut with decorative scissors which were also paper pierced.  I added an embossed line which I create with my scoring tool.    I added it to my card using 3D foam tape and then tied on a paper button which was sitting on my desk with a short length of ribbon.  Worked perfectly with my design.  Leaving off a greeting so it will be suitable for a variety of occasions.  Therese

Sanding and wax resist on plain solid coloured paper

Wanting a bit of a challenge and to do something hands on I decided to decorate some of my solid coloured sheets of scrapbook paper to give them a bit of a face lift.  I fount 7 sheets and played with those.  I waxed the first one with clear wax rubbed on the raised half of an embossing folder.  I sanded it next but that was not a good idea - all sorts of wax stuck in the sand paper.  I did it in reverse for the next sheets.  Laid the paper on the embossing folder (raised side) and sanded until I could see the pattern then laid this piece on the raised side of a different embossing folder and then rubbed on the clear wax.  Much better.  I then applied watercolour in a variety of colours which worked really well.  I left them to dry but being bit impatient I ended finishing them off with the heat gun which melted the wax and gave the papers a bit of a different look.  All in all a fun afternoon with some unique papers to play with.  I will be doing this again - maybe on decorated paper next time.   Therese
 

Saturday, July 30, 2022

Large all occasion card with a floral heart and rose paper background


 I am working on card for my family's special occasions.  I started with a brown card which fits in a large envelope from my stash.  I had decided to use this rose paper which came in a paper pack quite a while back and I chose two identical sheets, stacked them to keep the flowers and make a piece that would fit on my card then made a diagonal cut.  Worked really well with the diagonal cut not too distracting.  I added a pink strip backed with a green strip to which I added brushed nickel eyelets and some paper piercing with my pattern tracing wheel to add texture.  The floral heart image (Simon Says) was stamped on another sheet in the pack of the rose papers in black and then die cut.  I layered it onto another more pink section and fussy cut it.  I added some watercolour to help define the flowers and leaves.  Love this stamp set and look forward to using it more often.  Therese

Thursday, July 28, 2022

Slow Stitching - Leather covered thread cutter - tutorial


For the project I am workig on I needed a compact tool which allowed me to cut my thread while I was doing my slow stitching embroidery.  After a bit of brainstorming and a lengthy online research session I came up with this idea.  It is a regular sized single edged razor blade with a leather sheath with a hole in it to allow you to cut your thread by pulling it across the very small part of the blade which is accessible through the hole.  


Here are the supplies I used:  
Leather - 1.5" x 2"
Single edged razor blade
Sharpie marker - any marking tool would work
Awl - a large sharp needle could be used instead
Wood block
Japanese Screw punch
Needle
Heavy duty thread
Not shown - glue


I folded the leather piece in half to 3/4" by 2" and used my awl on my wooden block
to make three evenly spaced hole on each side about 3/16" from each end. 


I threaded my needle with my heavy duty thread and stitched each end and tied the end off at the top. 
For the stitching I started on the top hole from front to back, thorough the second hole from back to front, through the third hole front to back.  Across the bottom fold and through the third hole from the front to the back, through the second hold from back to front and lastly through the top hole from front to back.  That leaves your two ends on opposite sides and then I tied them off with three knots.  


I threaded both ends through my needle and slid it along the seam on the outside and came 
out at the fold which nicely hides the threads between the two layers of leather. 


 I decided to run a bit of glue in the gap and secured both ends with little bull clips until 
the glue dried. 


Once dry, I trimmed off the ends of the threads even with the fold.  


I used the marker to indicate the middle of the fold and used my 
screw punch to make a small hole overlapping the fold of the leather which 
leaves a little gap.   


 I trimmed corners a bit to smooth out the sides of the gap.  You then insert
the blade into the sheath with the sharp edge in first which allows it 
to be accessed through the little hole.  You simply hold your thread
 on one side and pull the length across the blade in the gap to cut your thread. 
Easy peasy!!!  I love that this cutter is so small and effective.  
It will work very well in my new little project.  More to come later!!

Therese

Slow Stitching - Needle Keeper and Threader

I had the inspiration to work on a project that I have been thinking of for some time now.  

I made these needle keepers as part of this project.  These are wooden beads which I trimmed with a 1.4" forstner bit to create a cavity which would hold a small rare earth magnet and a piece of thin wire to make a doubly useful tool.  I drilled the holes centered on the holes in the beads, formed the wire hoops for the threading part and then used Goop glue to hold the pieces together.  The two beads each have an indentation.  I placed some glue in the bottom of one, added the magnet, then the folded wire with the ends to each side then looped them around the magnet.  I added glue to the other bead and pressed them together tightly which had glue coming out of the holes that needed to be wiped away.  I made severn of them.  The bottom one was my first and I used thicker wire which won't accomodate all the needles I might be using so I switched the thinner wire for the subsequent ones.  It is a double duty tool in that it will hold your needle when you are not using it and also help you thread your needle when you change threads.    I have a few more ideas which I will see about doing some R&D on later.  
 

Wednesday, July 27, 2022

Large all occasion card featuring a collaged background and a tag with a globe and rick rack


 For this large card I started with a large brown card which fit in an envelope from my stash.  I cut some pieces and collaged them for my background.  I added a strip of striped paper to a dark brown one and added three little navy eyelets to the right hand side.  I collaged several papers and then die cut the large tag.  I watercoloured the globe (Wikiclipart), added a row of paper piercing on each side before adhering it to my tag with 3D foam tape.  I had embellished my tag with two pieces of blue rick rack and a blue satin ribbon at the top.  I added the tag to my card with double sided tape.  Therese

Sunday, July 24, 2022

Country quilt featuring panels with farm animals

I finished this quilt yesterday.  I had hoped to incorporate the panels with a QAYG by Darlene Michaud which I am very interested in trying out but in the end I could not make it work so I simply pieced the top and backed it with a black fleece blanket which I turned to the front and top stitched into place.  I cut off the extra fleece after I had stitched all the way around.  It is 36" x 47".  I bought the panel pieces as an unfinished project and used the cut up pieces to finish off the panels and then added the top and bottom border which had also been cut out.  I like the bold look!!!

Therese
 

Slow Stitching - triangle trees - final six


 Here are the last six of my little trees!!  I have worked quite a bit this weekend taking the time for slow stitching over other items on the "to do" list.  I have enjoyed this series of little trees and they all have a unique look which will work well into a quilt.  #1 - curved lines in back stitch in a variety of green emboridery thread, l#2 - ine of blue chain stitch with the spaces filled in with seed stiches, #3 - outline in stem stitch with spaces filled with linear running stitch, #4 - pink star stitch on the white polka dots encircled with circles in stem stitch and stab stitched in green on the edges, #5 - edges done in fly stitch and the internal elements highlighted with colour coordinated seed stiches and french knots, #6 - Outer edge done in red blanket stitch which is echoed to the inside in yellow and green and the interior area filled in with french knots in the same colours.  

I am linking this post to Sunday Slow Stitching @ KathyQuilts.  Always lots of inspiration on this blog so take a bit of time to check it out.  
Therese

Monday, July 11, 2022

Slow Stitching - more triangle trees

I have been doing a bit of slow stitching when I have a bit of time.  Last time I posted I had only finished the outside stitching on this tree.  I added some curvy lines using stem stitch in light green embroidery floss and then added little red french knots where it seemed appropriate.  The trunk I stitched with scraps of floss - an outer row of stab stitches and then filled in with different colours.  


For my second one, I used coordinating thread for the stab stitches all the way around and then added wavy lines and circles in red floss.  I added more in green, gold and orange in the middle section.  I added stars in all the circles and secured their centers with a tiny stab stitch.  The truck was finished with yet more small scrappy leftovers.  


It feels good to have a bit of time to stitch.  


Therese