Saturday, April 17, 2021

Birthday card featuring a paper pieced book case background and a stack of books with a cup of coffee


 Still working on family cards for April.  I am sure I have seen this "book on a shelf" technique on line somewhere but could find no instructions on how to put it together so I had to just do it.  I created a large brown card to fit in an envelope from my stash.  I added the strip of orange/floral decorative paper on the left hand side of my card to simulate wall paper.  I added a layer of brown paper bag on the right hand side leaving a small border all the way around which would become the inside of my book shelf.  I trimmed a piece of brown cardstock into 1/4" strips and watercoloured them.  Once they were dry I added them as a frame on the right hand side of my card and then added two pieces in between to simulate shelves.  I trimmed heavy weight paper scraps into "books" varying the height and width until I had what I needed for my three shelves.  After arranging them, I took them one at a time and watercoloured their two front edges and all the sides with black watercolour to give them a bit of age and dimension.  Once dry, I adhered them all in place on the shelves.  I took a photo of my book shelf before I added my focal image.  My focal element features a stack of books with a cup of tea from BBJ (Black Berry Jelly).  It should have been coffee but I only realized that it was tea when I was colouring the tag!!  I watercoloured the image, scored the pages with a bone folder to give them some texture and added a line of paper piercing on all the sides using my pattern tracing wheel.  I stamped the little greeting (StampinUP) in brown and mounted it to my card front using 3D foam tape.  I am very happy with how it turned out!!  Therese

Wednesday, April 14, 2021

Card Exchange cards - All occasion cards featuring butterflies that flit from inside to outside!

I have taken time this week to make my exchange cards for the CCE (Canadian Card Exchange).  I wanted to challenge myself to something different and found a card in my inspiration file that fit the bill perfectly!  
I found it on Splitcoast Stampers and it features a butterfly that is mounted on the inside of the card that also appears on the outside of the card.  The magic is in the slot on the front of the card that allows the butterfly with its wings folded to pass through from the inside to the outside.   FUN!!!!!!!
I started with a large yellow card which fit in a large envelope from my stash.  I adhered the hexagon paper (SU - digital - colour printed) background which I trimmed from a letter sized sheet to my card front.  I created my butterfly by die cutting a blue butterfly using the medium one on the Beautiful Butterfly die (SU/Sizzix).  I stamped a butterfly in the middle (Applalachian Arts) in blue and then highlighted the body and antennae with a black fine tip marker.  I colourwashed the edges and the inside of the stamped butterfly with blue green watercolour.  I embossed it with a script embossing folder (CB). I situated my butterfly on my card front with it wings folded and drew a line where I wanted it to come through the front of my card.  I cut a slot with my exacto knife as tall as my butterfly and then enlarged the opening with another cut. I used my Japanese Screw punch to round the ends nicely.  I adhered a piece of the same paper on the inside of my card so it coordinated with the one on the front.    I added a slim piece of 3D foam tape to the middle of my butterfly, closed my card and positioned it in the slot so the foam tape would adhere to the paper on the inside of my card.   

When its wings are spread it keeps the card closed.  As you fold the wings to each other the butterfly flattens sufficiently to slide through the slot as the card is opened.  It spreads its wings again on the inside of the card. I added a yellow ribbon to my card - across the inside with each end dipping around this piece from the front and back to the front to be tied with a double knot.  I flagged the ends.  I embellished my card front with 8 little yellow flower sequins inside the bottom hexagons. I adhered them with double sided tape.  I added a small piece of white paper on the inside where a message can be written.  The butterfly can be situated  perpendicularly or at a bit of a slant.  It worked out really well and it was fun to make this card!!  

I needed two cards because I have two exchange partners so I made another card using the same technique. For the card below I created the butterfly in the same way as my previous one  - just used a different colour to coordinate with my polka dot background (SU - digital - colour printed).  I chose to make my card in the landscape orientation.  I cut the slot as tall my my butterfly but as I opened it I realized that I could have cut it a bit shorter due to the arc of travel of the front which is shorter near the spine.   It is all good!!  I adhered a piece of the same paper on the inside and added a piece of white bond paper for the greeting.  I tied on a gray ribbon from the slot to the edge and tied a double knot.  I added three turquoise sequins and added yellow rhinestones inside them using tiny drops of white glue.  The 3D foam tape seems to be holding up quite well to the butterfly being folded and passed through the slot several times now.  

I have not been able to located the card which was my inspiration on Splitcoast.  Thanks to the person who posted this technique there a while back.  I realize now that it should have been a bee on the hexagon paper - that would have been more perfect!!  I expect the focal element could be a flower, a book, a doily, a wreath, etc.  Anything symmetrical would work well.  

Challenge yourself you make a card with a technique you have never done before!!  It works your creativity and your brain all at the same time.  Therese


Monday, April 12, 2021

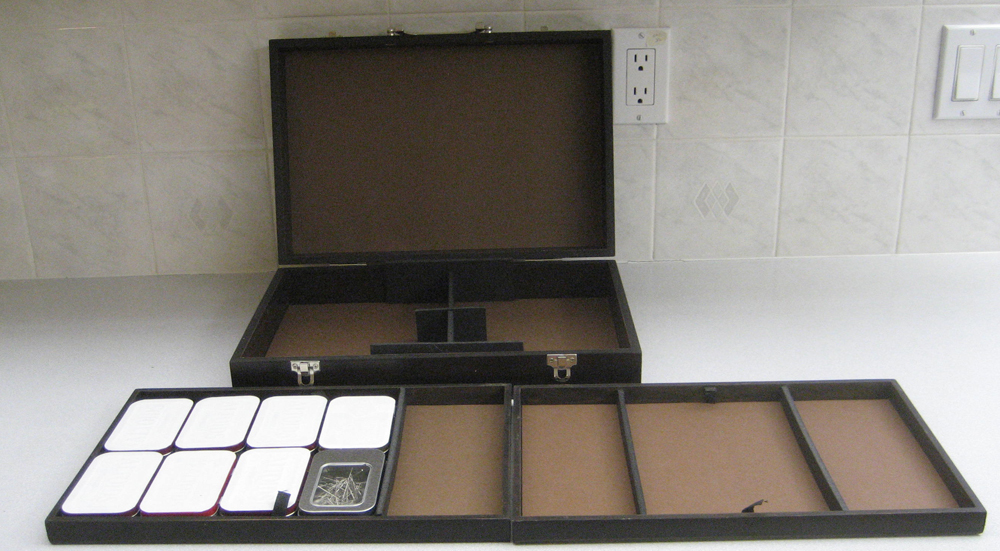
Art case transformed into a sewing box


 I acquired two of these wood art cases this weekend and am converting one of them into a sewing kit.  I removed the inserts and the hardware so the trays are simply stacking inside.  I painted the inside edges of the trays and then added cardstock on the bottom of the two trays and the bottom and lid of the case.  It will now open like a suitcase instead of like a book.


I used black foam core to create dividers and the support for the trays in the bottom of the case.
I added some Altoid tins with labels on them for storing needles, measuring tape, etc.  I added a magnet to the bottom of the silver tin (Making Memories embellishments) and added straight pins.  There is little chance of having pins all over even if you accidentally knock it over.  There is room for scissors, marking pencils, thread, etc.  


I have added a few supplies from my stash - thread, pins, measuring tape, etc.  


The trays simply stack over the supports in the bottom and the lid keeps everything in place once it is closed.  I will be adding a cool little fabric name tag as well.  
Therese

Friday, April 02, 2021

Christmas cards featuring a watercoloured Christmas tree sketch (digital), a pieced background and vintage seam binding


 These are the other four Christmas cards I made for April.  I have committed to making Christmas cards monthly to ensure they will all be ready by November when I want to send them out to family and friends.  So far, so good!!!  The little sketch Christmas tree is a digital from Pixabay.  I sized it, added a distressed font greeting and printed the four of them onto white cardstock.  I watercoloured them, added clear glitter to the garlands and the snowbanks and added a wavy line all they way around to frame the image.  The backgrounds are pieced from a paper with green sleighs and a glittery red one which I adhered to red card fronts.  I added green vintage seam binding over where they join and tied on another short length to simulate a bow.  I added the trees using 3D foam tape to finish off my cards.  It adds a bit of variety to my stash of Christmas cards!!  Therese  

Easter card featuring poppies, a stamped greeting and pink seam binding

For this card I reused a portion of a used card that had these beautiful red/pink poppies on it!  I trimmed by hand around the top of the poppies and then trimmed the remainder of the sides straight with my paper cutter.  I stamped and silver embossed a little Easter greeting ( Stampin UP).  I mounted this piece to a bright green layer and added a length of coordinating pink seam binding to which I had tied another short length.  This nicely simulates a bow without so much bulk.  I mounted this large focal element to a dark pink card.  Pink and green is my favorite colour combination so I really like this card!!!  Therese


Thursday, April 01, 2021

Easter cross card featuring a blue cross over a blue metallic background and a silver gray ribbon


 This cards started with a gray card.  I cut a navy piece of cardstock, added a layer of blue metallic paper with a brocade pattern and added a length of silver gray ribbon to which I had already tied short length with a single knot which nicely simulates a bow.  I adhered this large layer to my card front.  I used my distress tool on the four edges of my image and mounted it to a silver metallic rectangle of cardstock.  I mounted this to my card front using 3D foam tape.  I embellished my cross image in several places with a clear glitter gel pen and then added a small clear rhinestone in the center.  
Therese

Christmas cards featuring a large brown star with glitter, blue holly leaves and a little font greeting


 April Christmas cards are done!!  I made four of these and have another four of a different design which I will blog tomorrow.  I saw a star card on Splitcoast Stampers and thought I would give it a go.  I started with designing a five pointed star I was happy with and sized it to fit on an A2 sized card.  After printing it, I adhered it to cardstock and then cut it out.  I traced it onto the back of the brown paper and then fussy cut them out.  The brown paper had glittered reindeers and these were distracting to the star theme so I took a dark brown Sharpie marker and coloured them.  It really toned them down in colour but did not hinder the ability to see the glitter - very cool!!.  I used my pattern tracing wheel on all their edges to add a paper pierced line all the way around.  I found and trimmed four layers of the background paper which I adhered to dark brown card fronts.  I added the stars using 3D foam.  I hand cut holly leaves from a coordinating blue cardstock and added dimension using watercolour.  I colour washed my greetings after running the pattern tracing wheel on both the top and bottom edges.  I flagged the ends, added a piece of 3D foam tape and positioned the greeting to overlap the star.  I added double sided tape on the other end, added my holly leaves and then adhered it to the star.  They look nothing much like my inspiration card but I am happy with how they turned out!!  Therese

Wednesday, March 31, 2021

Easter cross card featuring a watercoloured background for the cross, bits of ribbon and foiled purple background

I started with a purple card and then adhered a purple foil paper background.  The cross image from my stash was watercoloured with yellow in the middle blending gently into the purple of the edges to give a dramatic effect. Perfect for Easter!!  I added a rhinestone in the middle of the cross, ran a black marker around the edge to give it a bit more definition and then added three little ribbon flags in purple and yellow.  I mounted this focal element to my card front using 3D foam tape.  


Therese
 

Tuesday, March 30, 2021

Easter card featuring a circular cross image, ribbon tied to an embossed strip and a bright yellow and purple background

I love yellow and purple for Easter cards so this background was perfect.  I mounted it to a purple card and added a yellow embossed (Cuttlebug - Swiss Dots)  strip to which I had previously tied a length of yellow satin ribbon.  I found the cross image in my stash and watercoloured it to coordinate with my card.  I die cut (Nestibilities)  a purple scalloped circle, mounted my cross image to it and pierced each scallop with a push pin to add interest and texture.  I mounted this focal element to my card front using 3D foam tape placing it over the yellow strip.  I punched a label (Modern Label Punch - Stampin UP) from the same purple cardstock and added a little laser printed Easter greeting.  Therese
 

Easter card featuring a cute little chick in an eggshell and a floral background

Another Easter card for my stash!!  The little chick in the shell is a digital from Dearie Dolls.  I used Corel Draw to size it and add a font greeting before printing it on vellum.  I watercoloured the image - not the best medium because it buckles the vellum.  It has been a while since I used vellum in this way so I will have remember to use chalk or markers next time.  I layered it onto a white rectangle and attached them with little white brads.  I added the floral background ( colour printed digital) to a yellow card and then mounted my focal element with 3D foam tape.  I love the soft colours!!  
Therese
 

Monday, March 29, 2021

Easter cross card featuring a handmade watercolour background and cross coloured to coordinate

For this Easter card I mounted a bright handmade watercolour background to a green card front.  I watercoloured the laser printed swirly cross image with coordinating colours, mounted it to a rectangle of the same green cardstock and mounted it to my card using 3D foam tape. 


Therese
 

Sunday, March 28, 2021

Easter card featuring a striped background, a bouquet of flowers on vellum and silver cording

Another Easter card for my stash.  I started with a yellow card that coordinated with my muted striped background.  I watercoloured my floral (Beccy's Place) vellum image from the back and added to to a white rectangle once it was dry using some glue very gently applied to the back of the painted areas.  I added a silver cord across two opposite corners and tied a bow.  I add a tidy dot of white glue to ensure the bow did not come loose.  I mounted this focal element to my card using 3D foam tape.  Having now had sometime to think about this card I remember that I have used chalk in the past to colour vellum because water causes it to buckle.     Therese


Saturday, March 27, 2021

Easter card featuring a yellow sunburst, a watercolour background and a cross

I am making a few Easter card to supplement the two I already have on hand.  

I started with an orange card and added a handmade watercolour background which had lots of bright yellows and oranges in it.  The yellow sunburst was given to me by my sister when she heard I was giving a go at making cards with starburst backgrounds.  I adhered it to my card and trimmed the rays to the edge of my card.  I found this cross image in my stash and watercoloured it to coordinate, layered it onto a brown circle (Nestibilities) and mounted in the middle of the sunburst with 3D foam tape.  I adhered the little greeting to a brown label (Modern label punch - Stampin UP) and mounted it to my card using 3D foam tape.  I really love the colours on this one!!

Therese


Friday, March 26, 2021

All occasion card featuring an airplane postage stamp, an embossed label and an aircraft background


My last card for this series of all occasion cards!  I had more than I needed which was good because I was able to pick and choose the best for my friend!
This one started with this beautiful postage stamp with an aircraft on it.  I mounted it on a red rectangle and then worked on a label to highlight it.  I die cut the label (Tim Holtz - Sizzix) from gray cardstock, embossed it with clock faces which are very important in the world of aviation and sponged the edges with dark blue ink.  I created a navy card and mounted an airplane background which I had previously sponged with a few clouds.  I threaded through a navy grosgrain ribbon and adhered the label to my card front with double sided tape.  I mounted my postage stamp over the ribbon using 3D foam tape and secured the ribbon ends to the inside of my card with double sided tape.  It still needed a bit of something so I tied a red and orange ribbon to the navy one using a single knot.  That was better!!! It nicely echoes the colours on the fuselage of the aircraft.  It has been so much fun making these cards and trying new techniques and sketches.  
Therese
 

Thursday, March 25, 2021

All occasion card featuring an embossed butterfly background, black ribbon and a gold butterfly


I have been rustling through my stash looking for interesting paper and embellishments to make all occasion cards with.  I always make wonderful discoveries!!  I found a sheet of this stamped vellum which has little butterflies (Magenta) stamped all over it which are embossed with a black glittery embossing powder.  It was stamped quite a while back.  I trimmed out a background, layered it onto gold metallic paper using very thin lines of white glue behind the lines of the butterflies and then mounted it to a black card front.  I added a piece of black grosgrain ribbon across my card using double sided tape.  I found this gold metallic butterfly in my stash, trimmed a circle of black velvet cardstock (Nestibilities) and adhered my butterfly to it using a gold brad.  I auditioned this element on my card and decided I needed a bit more gold so used gold cording to create a bit of a whimsical frame to my butterfly layer.  I used double sided tape on the back to secure the ribbon as I created my loops.  After I was finished I secured them all with regular tape.  I mounted this focal element to my card using 3D foam tape.       Therese


Wednesday, March 24, 2021

All occasion card featuring a vintage sunflower image, gold photo corners and a coordinating background

For this all occasion card I started with the sunflower image which is laser printed on white cardstock (Pixabay).  Once trimmed out I found this cool geometric background in my stash and mounted my sunflower to it using gold photo corners.  I added a layer of metallic gold paper and then mounted this large element to the front of a green card.  Love the simplicity of this card and how well the elements coordinate!!  Therese

SISTER STASH - Christmas with vintage collage decorative paper and Christmas tags from Graphics Fairy

I made three more cards for my sister's Christmas card stash from the supplies she left here a while back.  These ones feature some beautiful decorative paper with the look of a vintage collage.  I cut out two pieces (8.25" x 5.25") and used the scraps to create the card above.  I created a tan card and added the two scraps trimmed to fit on my card.  I embossed the cut off from the card front with a script embossing folder and fish tailed the end.  I added a shimmery brown vintage seam binding over it tucking the left edge to the back and securing with double sided tape and trimming the other end with a fish tail to coordinate with the strip below.  I add this element to my card over the gap between the papers.   The six  Graphic Fairy tags were in a PDF which I printed on an ivory sheet of cardstock.  I trimmed out all six tags and chose this angel one for my first card.  I added a large brown eyelet to the top with my Crop a Dile and tied in some taupe cording leaving the ends to tangle to the left.  I decided to tuck them behind the 3D foam I put on the back when mounting my tag to the front of my card to keep them in place.  Love how it turned out!!!


For my next two I used dark brown cards.  I added brown grosgrain ribbon to the backgrounds adjusting the placement to leave as many images whole as I could.  I added three eyelets to each of the ribbons and then adhered the backgrounds to the brown card fronts.  I added a large brown eyelet to each tag, added some taupe seam binding using an over hand knot then added the tags to my card fronts using 3D foam tape.  I trimmed the ends diagonally on both.  I decided to not any other greetings as there are some on the tags and papers.   Therese

Tuesday, March 23, 2021

An all occasion card featuring a cute little grapevine wreath, linen and gold ribbon and a burlap bow

Yet another all occasion card!!  For this one I started with a green card front, trimmed out a leafy background to which I added a length of this beautiful linen and gold ribbon which I fishtailed on the bottom.  This ribbon was on a gift I received a few years ago from my daughter  - I just love it!!  I adhered my background to my card.  The little floral grapevine wreath is from Melonheadz and was laser printed on ivory cardstock and trimmed out.  I watercoloured the wreath, ran my pattern tracing wheel on all four sides to create texture and then used my distress tool on the edges as well.  I added a peach layer then adhered this focal element to my card front with 3D foam tape.  I still needed a bit of something so I tied two lengths of burlap threads into a bow and added it to the corner using a glue dot.  It did the trick - just the right colour and lots of texture too.    Therese

SISTER STASH - Christmas card with a paper pieced background, red corrugated paper and a Christmas tree (digital)

This card nicely used up most of the scraps I had left over from making my last two Christmas cards for my sister.  I trimmed them to size and used the corner rounder on opposite corners.  I like that this creates a natural place for my focal element - a cute little tree ( Craft Starters digital).  I laser printed it onto white cardstock, trimmed it out and then watercoloured it to coordinate with my tree paper.  I added a green layer with an even margin and then layered that onto a piece of red corrugated paper which I tore on the top and bottom and cut neatly on the sides.  I mounted this focal element over the intersection of the gaps in my background using 3D foam tape.  This one is finished without a greeting.  Therese


Monday, March 22, 2021

All occasion card featuring a stack of coffe cups with little ribbon flags on a wordy brown background

For this card I laser printed on white cardstock a digital from Beyond the Fringe Crafts - this beautiful stack of coffee cups!!  I used a tiny brush and watercolour to paint all the cups.  They all have such character that bright colours work really well with them.  For some continuity I painted all the handles brown along with the saucer at the bottom. I added a bit of a shadow as well.  I layered it onto a rectangle of red cardstock once it was dry and added some bright ribbon flags on the left hand side.  I created a dark brown card, added this fun wordy flash card background then adhered my focal element over it using 3D foam tape.  Love it!!        Therese
 

SISTER STASH - Christmas card featuring fun tree paper, a wonky little font greeting and a layered die cut tree

This card started with a large red card to which I added a full background of this fun Chirstmas tree paper.  I found this green tree die cut in my stash and added a red triangle in behind which nicely filled in the openings and finished it off with a little yellow star punchie.  I added a strip of green cardstock across the card just above the middle which I textured with my pattern tracing wheel.  I added my little tree over the strip using 3D foam tape.  I found this fun font Merry Christmas in my stash which had been trimmed a little awry so I trimmed it again giving it a wonky look.  Next,  treated three sides with a row of paper piercing with my pattern tracing wheel, tucked the left hand side behind the tree and adhered it into place.  I really love this fun paper.  Very versatile in regards to finding  coordinating colours.   Therese
 

Sunday, March 21, 2021

An all occasion card featuring little heart, a large frame with a little fiber bow

Still working on all occasion cards!!  For this one I started with the little stamped heart - Stampin UP with black Versafine ink on off white cardstock.  I very lightly watercoloured the flowers in the heart with a tiny brush and then added a light blue watercolour wash to the rest of the heart.  I mounted this image behind a large ivory chipboard frame I found in my stash.  I auditioned several papers and found that this one coordinated the best so trimmed out a background and adhered it to a gray card front.  Thinking that it needed a bit of texture I used a needle and threaded through a length of ivory fiber and tied a little bow on the right hand side of the frame.  I did add a tiny dot of white glue so the bow would not undo.  I added 3D foam tape to the back of the frame and adhered it to my embellished card front.  Soft and elegant with a dash of colour!  Perfect!

Therese
 

SISTER STASH - Christmas card with fun tree paper, a die cut tree frame and a Merry Christmas greeting

For these next few cards I have switched gears and found a new sheet of decorative paper!!  This is a fun one with lots of colourful trees in every configuration.  
For this card I started with a large blue card, added a full background of the tree paper leaving a small margin all the way around.  I found this die cut tree piece in my stash and auditioned it over my background and discovered that one of the trees showed up really well in the opening.  I sponged the edges with a bit of blue ink and added it to my card front using 3D foam tape.  The edges seemed to get lost a little in the white background so I added two blue strips which I had already textured with my pattern tracing wheel tucking them just slightly under the top and bottom of my tree layer.  That was better!!!  I rescued the Merry Christmas greeting from my stash, added a row of paper piercing on the bottom edge and adhered it just tucked neatly to the bottom edge of the bottom blue strip.  Another card for my sister from her stash of paper crafting supplies.  Therese


Saturday, March 20, 2021

Three all occasion cards featuring heart embellishments, decorative paper and ribbon


A few more cards that feature the embellishments I made with Liquid Glass.  These hearts (Calico Collage) were colour printed and cut (Circle Scissors Cutter) then had one layer of Liquid Glass embossing powder applied to them which left them with lots of shine and some texture.  
For my first card I layered my heart embellishment onto a brown scalloped circle (Nestibilities).  I created a green card and added my torn vintage paper background.  I watercoloured the white torn edges with a bit of a rust colour so they worked better with my colour scheme.  I added a piece of wide folded apricot coloured ribbon to the back of my embellishment and then adhered this large focal element to my card front over the torn edges.  
 

For my second card, I created a red card front.  I added a length of green vintage seam binding to my floral background, adhered it to my card front and then added my heart embellishment using 3D foam tape.  I finished off the card by tying another piece of the same seam binding to the one on the front with a single knot to simulate a bow.  
For my third, card I added three pieces of folded ribbon to the back of my heart embellishment - two vintage brown silk and the other a deep red satin.  I trimmed out a background from a leafy scrapbook paper,  added a strip of brown cardstock and then a length of brown lace over it adhering the ends to the back with double sided tape.  I adhered this background to my brown card and added the beribboned embellishment over the lace using 3D foam tape.  
I liked the one layer of Liquid Glass with its shine and texture so I did not proceed to creating Cracked Glass with these ones.  
Therese

SISTER STASH - Christmas card with glittery ornaments, fun stars and dots paper, a sanded and embossing strip and a Joy to the World greeting


I started this card with a large red card and then I added a layer of the star and polka dots paper leaving a small margin all the way around.  I added a strip of embossed and sanded light green white core cardstock to a scrap of the ornaments paper then layered this piece onto red cardstock.  Was nice that the two red dots remained visible.  I found another Joy to the World (Desert Diva) in my stash.  I coloured the ornament with coordinating gel pens, rounded the corners and layered it onto red before adding it to my card front using 3D foam tape.  It was fun to find this coordinating paper that coordinated with the ornament ones.  Can certainly appreciate coordinating paper packs more now than before.  Makes short work of finding the perfect paper to go with another one.  Therese

Friday, March 19, 2021

All occasion card featuring a large poppy embellishment, embellished background paper and three little black dots

This is the largest Cracked Glass embellishment I made in my last creative sideline.  I did not crack this one too much because I was afraid that I would lose some pieces from the middle section.  I love how it has wonderful colour and depth.  I started with an A2 black card.  I found this wonderful paper that worked very well with the poppy  but it had too much white in it so I simply applied a yellow colour wash to it and it worked so much better.  I trimmed it to size for my background, tore the bottom edge at an angle and adhered it to my card front.  I adhered my "cracked glass" poppy embellishment (Calico Collage) with double sided tape and then added three little black dots (circle punchies) below it on the right hand side.  Done!!  I love the colours of this card and its simple elegance.  Therese
 

SISTER STASH - Christmas card with glittery ornaments, wavy glittered paper and a small Merry Christmas greeting


For this card I started with a large red card and pieced together a layer made up from the ornaments paper and the wavy glittery paper.  It was fun to be able to use to pieces with the peachy ornaments on them.  I added a very thin strip of red cardstock just below the first star ornaments which I adhered with white glue.  I found this little Merry Christmas in my stash, rounded its corners and mounted it over the red strip using 3D foam tape.    Therese

Thursday, March 18, 2021

All occasion card featuring a collage including a cracked glass floral embellishment, ribbon, a heart charm & a key


I made up a few Cracked Glass embellishments for this series of cards I am making upon the request of my friend for a few to have on hand.  I was ready to get started and could not find my UTEE (Ultra Thick Embossing Enamel).  Needless to say, I was completely distracted and dug through drawers and boxes to no avail.  The next morning, with a clearer head I found Liquid Glass in my box of embossing powders so I just decided to use that and I will resume the search for the UTEE at a later time.  The Liquid Glass worked very well and I was able to finish the few embellishments which I had prepared.  
The rose and book page embellishment is one of my cracked Glass pieces.  I started with a black card front then trimmed a vintage script paper to size for my background and used my distress tool on its edges.  I added a length of black grosgrain across my background tucking the ends to the back and then a folded length to that piece using a tiny brad.  Next, I went looking for collage elements which I could incorporate.  I found an ornate gold heart charm, a little key and several old postage stamps that were in the right colours.  I started by adding the rose embellishment at a bit of an angle and then added the heart charm with a tiny gold brad and the key with another after adding a length of gold cording to it.  I tucked the ends of the gold cord under the heart charm edges to keep them in place. I added the postage stamps randomly where they looked good.  I adhered this large element to my black card front to finish off my card.  Have not made a collage card in quite a while. It was fun to stretch my creative muscles and come up with one that I was happy with.   Therese

SISTER STASH - Christmas card featuring glittery ornaments, a stamped background and a jingle bell greeting

 This card started with a large red card.  I used a long script stamp and silver ink to embellish my card front.  I trimmed out the green panel and added two ornament panels.  I trimmed the right hand side with a scallop border punch (Stampin UP) and then added an embossed line with my score tool.  I added dots of glitter to the scallops using a clear glitter pen.  The little greeting is laser printed on white then punched out.  The jingle bells are from Arthur's Clipart and I created a round font frame for them in Corel Draw.  I coloured the bells and holly with gel pens in coordinating colours and then mounted it to a scalloped circle punchie.  I added this little greeting to my card using 3D foam tape.  Therese

Wednesday, March 17, 2021

Three all occasion cards featuring decorative paper, burlap squares and embellished leather leaves


For these three cards I started with brown cards in slightly different colours to coordinate with the different backgrounds I used. The top one is scrapbooking paper, the bottom left is decorative paper which I stamped with two different maple leaf stamps and the third started as a letter press background (brown ink on ivory cardstock) I printed a while back and was embellished with watercolour, stamping, and embossing before I was happy with it.  The burlap squares were cut from a larger piece and the edges were frayed.  I saved the threads for using on future cards.  In this case, I tied several strands to the leaf stems.   I used a good layer of glue (glue stick) on the back of the burlap to adhere it to my card fronts and pressed them while I was getting my leaves ready.  The leaves were cut a while back from a variety  of leathers I had on hand at the time which is why the colour of the leaves vary.  I wanted to add some texture to them so I used a wood burning iron with a very fine tip to incise the veins into my leather leaves.  I was not sure it would work very well but I am very happy with how they turned out.  I mounted the leaves to the burlap with double sided tape.  Really happy with how these turned out.  
Therese
 

SISTER STASH - Christmas card featuring glittery ornaments and a Merry Christmas greeting (digital)

I am really enjoying making cards with this ornament paper I found in the paper crafting stash my sister left at my house a while back.  I started with a large bright green card and I added a panel of red cardstock to which I had adhered a variety of pieces of the ornament paper.  I cut two strips from the wavy glittery paper, one for each side of the panel.  The little laser printed greeting is a digital from Desert Diva.  She has a large variety of greeting digitals on her site. I rounded the corners, sponged on a little green ink to soften the edges and added single clear rhinestone before mounting it to my card front using 3D foam tape.   Therese


Tuesday, March 16, 2021

Two all occasion cards featuring carved wood panels and some seam binding/fiber embellishments


 I created these two layers when I was experimenting with the Carved Wood Technique. It is a very interesting technique that creates beautiful textured panels which pretty much stand alone for making A2 sized cards.  The panels were trimmed to size then embellished with seam binding and paper cording for the marsh blackbird one and a length of unwrapped kraft paper cord tied with kraft cording combined with a metallic copper cording for the tree one.  Once your backgrounds are ready to go these cards come together fairly quickly by adding coordinating cards and minimal embellishments.   Well worth making a good selection of backgrounds when you have everything out.    Therese

SISTER STASH - Christmas card featuring glittery ornaments, a script background and a layered greeting

 For this card I started with a large green card.  I sorted out the ornaments and glued them to a red panel.  I decided to use a piece of peach decorative paper for my background.  I embellished it with all over stamping using an embossing pad, a long script stamp and clear embossing powder.  I added my background to my card and then adhered the large panel with the ornaments over it.  I found the little round greeting in my stash - a polka dot frame with a font greeting.  I coloured the dots with glittery pens in coordinating colours and then layered it onto a scalloped circle (StampinUP) in the same red cardstock as my panel.  I adhered my greeting in the center, paper pierced each scallop with a push pin and then mounted it to my card front with 3D foam tape at the intersection of the edge of the panel with the gap between the ornaments.  Perfect!!  It was fun to do some stamping and create a custom background for this card.  I found another sheet of ornament paper in my sister's stash so there will be a few more ornament cards.    Therese

Monday, March 15, 2021

All occasion card with a chocolate cupcake with a red cherry on top, a length of shimmery gold ribbon, brads and a red and pink background

The little cupcake on this card was also found on Illustoon.  I really loved the colours on this one and it makes me think of a romantic dinner out so I combined it with a red/pink background paper with hearts (colour printed - Morgue Files) layered onto dark brown cardstock.  I added a length of a wide shimmery gold ribbon near the middle of this layer adhering the ends to the back with double sided tape.  I added three dark brown brads near the right hand edge on the ribbon.  I mounted this layer to the front of a red A2 card.  I added gold shimmer watercolour to the background of the cupcake and bit of brown near the bottom to create a shadow.  I layered the image to a metallic gold rectangle fo cardstock before adhering it to my card front using 3D foam tape.  I love how it worked out and it will work well as an anniversary/Valentine's card OR as a birthday card for a chocolate lover.  Perfect!!  Therese
 

SISTER STASH - Christmas card featuring more ornaments, some HOHO paper and a digital greeting

I started with a large green card that coordinated with my papers.  I added a long strip of red cardstock, then my four ornaments evenly spaced and another red strip on the other side to my green card.  I filled the remainder with some fun HOHO paper which I trimmed to my card edges on all three sides.  I found this little "Joy to the World" greeting from Desert Diva in my stash.  I coloured the ornament with glittery gel pens, used a corner rounder on all four corners and then added a dotted line all the way around the edge using a fine tip black Sharpie.  I added it to my card front using 3D foam tape to finish my card.
Therese


Sunday, March 14, 2021

A birthday card with a pink cupcake, a fashionable decorative paper and bit of coordinating paper cording

Still working on all occasion cards for my friend.  For this one I started a pink cupcake which I found on line at a new site for me - Illustoon.  I like that this one has a candle on it.  I printed the image on white cardstock and trimmed it out.  I added texture by paper piercing all four edges using my pattern tracing wheel and then using my distress tool as well.  I added a bit of blue watercolour to the background to soften it, a bit of brown watercolour to create a shadow on the bottom edge and clear glitter around the flame with a gel pen.  I chose a pink A2 card and added this fun black and pink decorative paper leaving an even border all the way around.  I found some coordinating paper cording in aqua and pink which I added across my card securing the ends to the inside front of my card with double sided tape.  I tied the ends of the pink ones with a knot which included the aqua one.  I raveled the ends of the pink to create a bit more texture.  I added my image to my card front with 3D foam tape to finish off my card.    Therese
 

SISTER STASH - Christmas card featuring glittery ornaments and an embellished font greeting

This card features the same paper as my last card - glittery ornaments with some coordinating wavy paper. 
I started with a large red card and then created a background for it.  I joined the papers in the middle and overlapped where they join with an embellished font greeting.  My greeting was colour printed on white cardstock, trimmed out then the top and bottom were trimmed with scallop decorative scissors.  Each scallop was pierced with a push pin and two embossed lines were added with a score tool.  I added two snowflake looking clear embellishments to finish off the greeting.  This large element was then adhered to my card front.  Therese