Wednesday, October 20, 2010

Quick and easy embossed cards!

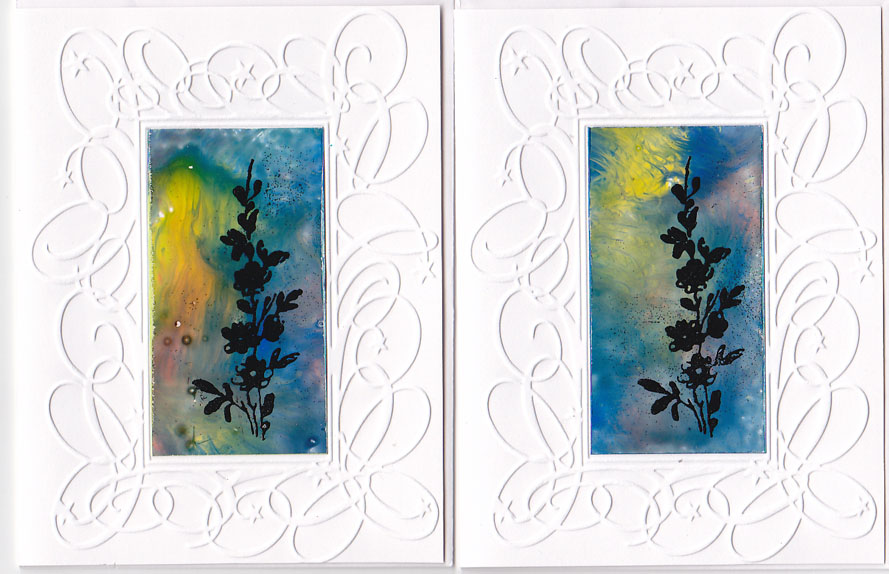
These are quick and easy!! The embossing folder is one that is so versatile, manufactured by Crafts-Too and sold locally at Ecstasy Crafts!! My head is spinning with the options but for tonight's class I just went digging into my stash for colourful papers that would best show off this beautiful swirly frame!! I cut the pieces of decorative paper just the size I needed to fit inside the embossed frame, stamped and/or embossed them in black and glued them in!!! That easy!!
So get creative and see how many ways you can use your embossing folders!!

Therese

Clear embossing powder resist


Another resist technique!! In this case, I used clear embossing powder as the resist. Stamped the image with Versamark on white coated paper and clear embossed. After some experimentation, I went with Distress inks on these backgrounds. I applied the ink in a circular manner with the pads directly to the paper, rubbed it lightly with a dampened paper towel which softened the inks very nicely and somewhat removed the ink from the clear embossed image. I did go back in with a barely damp paper towel and remove yet more ink from the embossing powder. I think classic dye inks might have worked better for this purpose but I was really liking the look of the distressed inks!!


Thrifty Tip: I did spritz the paper towels after I was done and wadded them up to disperse the inks which works so well with the distress inks. Colourful decorative papers to be used another time!!
I layered the birdie images with a white cardstock layer to which I attached, with double sided tape, a little piece of eyelet trim. Finished it off with a colour printed greeting attached with 3D foam taper. I created the greeting in a layout program (Corel Draw) so it could be punched with my large oval punch (SU). It is a great way to create custom greetings and gives you a wide variety of colour options especially useful when you have a limited amount of stamp pads!!

Therese

Glue resist technique

Here is a close up of the decorative paper I created using the glue resist technique described here!! I "printed" with the glue several times on this sheet and the areas blended very well and did not leave obvious edge marks.

So experiment with your embossing folders!! Be sure to scan the paper you create for use in your digital art!

Just another way to use what you already have!!

Therese

Glue resist and tag cards

These cards feature background papers created with a glue resist technique!! Yes, I was on a resist technique kick!! In this case, I used my embossing folders, again, to create the resist. I spread glue onto the "bumps" of my open embossing folder with a brayer (be sure to wash both before the glue dries), laid my mustard gold paper on it and rubbed the back to transfer the glue!! Repeat until your paper is covered. Worked very well!! Once the glue was dry I used washes of acrylic paint to add colour to the paper.

After experimenting with a few options I discovered that the easiest way to remove the colour from the glue was to place a sheet of bond paper over the wet one, rub the back of it and pull it off. If you keep using the same paper to remove the colour from the resist you get a bonus sheet of decorative paper you can use at some other time. It may have been the type of glue (wood glue) I used but I found it difficult to remove the acrylic wash from the resist areas once it was dry. I expect white glue would give better resist results. In the end, I am happy with the grungy look of this paper and it suited my colour scheme very well.
The paper is ripped in the middle to give some interest and texture to the background. I added an embossed tag that features a coloured image and attached the whole thing to the card front using 3D foam tape which adds dimension. I love the rick rack which adds a touch of country to these cards and really works with the colour scheme.

Therese

Wax resist backgrounds

Here is a sampling of the wax resist backgrounds I created for my class!!
I spent a few hours playing with this technique and finally settled on using coated paper as the substrate because it gave a nicely defined resist image. You can certainly use cardstock or even thinner paper for a different look. Experiment with what you have. You can read the instructions for this technique here!
I used clear wax but you could certainly use what you have for a different look - coloured wax crayons would add a very different dimension to the look of this technique.
I am very happy to have found yet another way to use my embossing folders!!

Therese

Wax resist and postage sticker cards

Another successful evening of cardmaking!! Lots of new people and a fairly large group but we managed to get out in good time!!
These cards feature wax resist backgrounds which I created using my embossing folders!! Check out this post for more information on how I did it.
The images are postage stamp stickers made by K&Company which I bought at Michaels when I was there last week. They are all the same size which works well for a class but a variety of designs which I find works well for me in my classes. I like to change up the element and cardstock so everyone willl have
different looking cards.
This is a fairly versatile sketch as the card can be landscape or portrait and the 3D element can also have either orientation which gives several options with the same supplies!!
So, the sticker is mounted on coordinating cardstock and trimmed. The ribbon is attached to the back of the decorative paper and then this element is glued to the card front. I used 3D foam tape to attach the sticker element to the card, overlapping the ribbon, because the decorative paper is a bit waxy!!

Therese