Showing posts with label packing tape. Show all posts

Saturday, July 25, 2015

Distressed Victorian postcard

I created this postcard for a swap on one of my groups. We were each sent this image of a woman and given free rein to create with it!!  The digital image was provided as well for those who wanted to print off a few copies for experimenting with before they started their project.  I downloaded the image and sized it for my postcard then printed it on copy paper.  I used packing tape to make a transfer which I applied to a music sheet that had been very lightly washed with watercolour.
Packing tape transfers are very easy - you need a laser printed image, clear packing tape and water.  Trim your image close to the printing, lay a piece of packing tape over the image and burnish well.  Next, soak the tape/image in water.  Once the paper is softened put the transfer on a hard surface and rub off the paper which leaves the toner adhered to the packing tape. FUN and easy!! You can check this link for a tutorial.
Back to the project, I used markers to add colour to the back of the image (sticky side of the tape), trimmed the top and bottom of the transfer then applied it to the music sheet making sure there were no marks on her face.  I burnished it well then ripped the paper on all four sides.  I layered it this piece onto a piece of coordinating hand decorated paper and then onto black cardstock.  Next, I created my background.  I started with a 4" x 6" piece of scrap cardstock to which I glued torn scraps of embossed silver foil left over from a long ago project. Once the glue was dry, I applied colour using sharpie markers in purple, blue and black.  I scribbled colour in a small area and rubbed lightly it to smooth out the marks.  This process removed a bit of colour but I like the look - a bit distressed.  I added the blue and purple first and then did the black a little more aggressively.  I like the way the black remained in the texture of the foil.  After I was done, I went back in and added more colour where I thought it needed a bit more.  Very happy with the resulting background!!  I adhered my layered image on the top portion using double sided tape and added a length of black lace below it gluing the ends to the back.  I added double sided tape below the lace where I was putting the flowers and then added the flowers using large glue dots.  I cut another piece of 4" x 6" cardstock and glued it to the back to nicely finish off my postcard.   Really happy with how this project turned out.  It will be off to my partner this week.

Therese

Thursday, April 23, 2015

Boho bangles - the second time around

Here are the supplies I used for my second bangle - taped zip tie, blue 28 gauge wire, sheer ribbon and some blue, pink and clear beads.  I overlapped the ends of the zip tie before applying the red TUCK tape. This tape is very sticky and is used to seal sheathing.  DH has used it for several other purposes as well.  Two years ago it was to seal the holes in the vinyl siding created by LARGE hailstones.  You can see in the photo that I did not overlap the ends on that one - it really peaks where the tape just folds over.  I redid it and added a short piece of extra zip tie over the gap which works much better.  You will see what I did with that one in the next posting.  I used the same shimmery blue/pink ribbon that I used on the first one, wrapping it all the way around my zip tie armature.  I did not have enough beads left over from the first one so I went looking for more beads.  I found some blue and pink ones that worked well together so I simply added the clear seed beads to create this one.  I alternated the pink and the blue beads and added a clear bead between them.  The first time the pattern worked out perfectly - finishing up exactly where I had started.  Not so lucky with this one so I just finished up with three clear beads.  Worked out fine!!

Therese

Friday, January 09, 2015

Chunky book covers


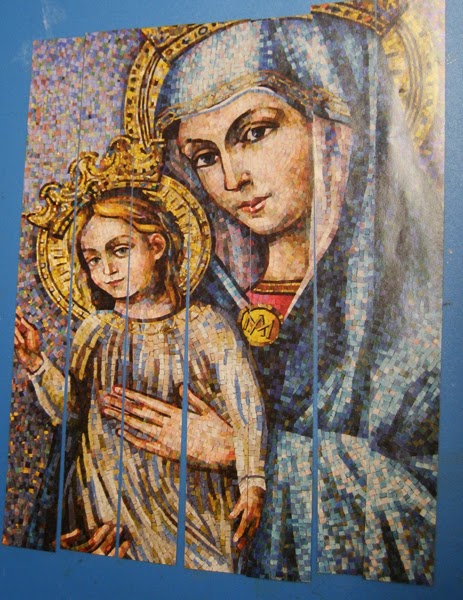
On one of my groups we are going to be having a 4"x 4" fat book page swap every month so for January we have been challenged to make covers for our books!  The theme for the swap is Shades of Colour.  After a bit of "sitting" with the concept I decided to use the following magazine cover to create my book covers. 
I loved this mosaic image as soon as I saw it on the cover of a magazine that arrived before Christmas!!  When it was time for the magazine to be recycled I tore off the cover not sure what I was going to be doing with it.
I cut off the text and cut the remainder into 1" squares.  

I sorted the squares into colour groups  - sixteen blueish ones for the front cover and sixteen  mulit-colour for the back cover.  I glued them to edge to edge onto white cardstock, pressed them under weight and trimmed them to just under a four inch square.
 I cut two 4"x 4" pieces of chipboard and glued my collages to them.  I used decorative packing tape to finish off the edges.


I cut the tape in two, adhered the white edge to the front of my covers and folded the remaining part with the letters to the back creating a nice collage on the inside covers as well.  I am super happy to have created art with this beautiful piece of paper that manages
to maintain the beauty of it without keeping the original context.  I love how you can see eyes, a mouth and fingers on the back without really knowing where they come from.
I will be binding my pages from the swap into the covers using my Zutter Bind it all machine using a large binding which will give me lots of room to add charms, fibers and tags if I wish.
I added ribbon and a 3D embellishment to my cover.  The embellishment is one I created when my grand daughter was visiting this summer. We played with bottle caps and I filled this one with a punchie that says, "Think HAPPY, BE happy".  I glued it to the cavity of a flatten bottle cap, added some clear Dimensional Magic and then inserted the blue iridescent beads all the way around the words and left it to dry.  The colours are a perfect match for my covers.  I used double side tape to adhere my ribbon to the outside and inside of my front cover and tied the ends together at the top.  I used an awl to make holes in my bottle cap and my covers then used coordinating thread to stitch it to my cover over the ribbon.
So the journey begins!!  I am looking forward to the swap and all the interesting pages I will receive this year.  As the cover says, we must think to be happy, nurturing the good that arrives in our lives and being grateful for every blessing is what will bring us happiness.
Enjoy what you love today!!

Therese

Friday, November 28, 2014

Giftie Mingle on By Hand group


These are my little gifties all wrapped and ready to go to my partners for the 2014 Giftie Mingle on the By Hand group.  The contents will be revealed here after Christmas once everyone has received and opened their little gifts.  It is always fun to participate in this mingle.  I have received some wonderful little pieces of art and lovely little gifts from this swap in years past.  
For packaging my little gifts I used a tag die to create an envelope.  I cut a strip of green decorative cardstock to 3 1/8" and folded it in half.  I was sure to place the fold above the bottom of the tag and the two sides within the sides of the tag on the die.  When I ran it through my Big Kick I cut both the front and the back to the crescent tag shape and because the fold did not reach the bottom of the tag my fold stayed intact.  I used alphabet packing tape to seal up both sides, inserted my little gift, added a bit of tissue paper on top and tied closed the envelope with red fiber including my little tag.  I stamped JOY (Quietfire) on the front of the tag in red and the back of the tag reads DAY 8 which is when my little gifts will be opened by all my swap partners.  

Therese

Wednesday, November 19, 2014

Altered glasses case

 I finally refurbished my glasses case this morning!!  It has been a while since I noticed that it was wearing and either needed to be refurbished or replaced.  I am super happy with how it turned out and it will be easier to find in my purse now because it has more contrast!!
 So, this is how it looked before I started.  It had fabric glued to the metal case.  Have to say that it was fairly durable because I bought it used probably 10 years ago.
The covering was fairly easy to peel off.  The inside was a bit corroded but it is in fine shape otherwise.  Mechanism still works properly and is not too complicated.
 I managed to get all the glue off and sanded it down inside and out which removed most of the roughness of the corrosion that had occurred on the inside.  It looked pretty neat as it was but thought it would look more interesting with a bit more attitude!!
 I used fabric tape for the inside.  It took four strips of tape to do the whole inside. I started with the lid and then did the bottom.  The two middle strips overlapped nicely to cover the mechanism.  I trimmed the tape to the edges of the case.
Then I covered the outside with this cool lettered packing tape!!  It took four strips to cover the outside as well.  I did the lid first and then the base with the strips overlapping at the hinge.  I trimmed the packing tape on the inside to leave an even overlap to the inside.
I am super happy with how it turned out.  If and when it wears through or starts looking rough again I will consider removing the tape with a heat gun, spray painting it and creating a little quiltie for the inside.  For today, this project has been time efficient and I really like the look!!

Therese

Friday, February 22, 2013

Envelope for our journals

I let each student pick out a coloured envelope which we reinforced very decoratively with this cool lettered packing tape.  The top of the envelope will be die cut for our binding so reinforcing it was necessary.  The journals will have room for writing a line a day for four years so the elements need to be rugged enough to last for that long.
Envelopes are always handy in any journal for storing any little thing you want to keep - ticket stubs, photos, etc.

Therese