

Sunday, April 30, 2017
Qulited scraps fabric postcard
Saturday, April 29, 2017
Lighthouse tile in an embossed frame

Therese
Thursday, April 27, 2017
Owl doodle sticker focal element on my card!!

I added sparkle gel pen dots on the green label and stamped the pink card front with a handmade dots stamp. I stamped OWL... on a punched label (SU) with green ink and then added little pink dots with a marker.
Therese
Wednesday, April 26, 2017
Guide project - a small composition book with a fabric cover and unique art on the front


The focal element will be what the girls will create at the meeting. I have prepared blanks from ivory fabric backed with Heat and Bond onto which they will create their art. Doodle art is popular and I will walk the girls through the process of creating this art themselves with permanent markers and wax crayons. They will have the latitude of making it their own in the choices they make as we create. Once the art is finished it will be adhered to the front of the journal they have picked out for themselves. They can use it as a Gratitude Journal, to keep track of their homework, as a To Do list or to keep track of their hopes and dreams!!
Therese
Sunday, April 23, 2017
A card from a kit with velllum and handmade paper

This one is off to a special person having a birthday very soon.
Therese
Collage backgrounds for two special cards

I created these backgrounds last week. I started with some watercolour/plastic wrap pieces that I created a while ago and was motivated to add some clear embossing to them. I chose a solid petals background stamp which I stamped in clear ink and embossed with clear embossing powder. It was interesting how the paint was affected by the embossing - seems to have altered the colour below the embossed areas. Next, I added some stamping - a script stamp in a coordinating colour and a little postage cancellation from the same set.
I needed two special cards this week so I used them to create what I needed. For the left hand card, I adhered the background to a red card front, added a fun polka dot ribbon across the front and added a layered round greeting when I tied a short piece to it to simulate a bow. The little greeting started with a round tag (CB), next a 1 1/8" vellum circle and finally a round stamped greeting (SU). I simply included the hanging cord in the single knot of the "bow". The focal element is a laser printed digital image from Melonheadz of a cupcake with a star. I watercoloured the image and then followed that up with shimmery paint for a very elegant finished piece. Once dry, I layered it onto yellow card stock and mounted it over the ribbon using 3D foam tape.
For my second card, I adhered the background to a green card front, added a gros grain ribbon gluing the ends to the inside and then mounted my focal element using 3D foam tape. The fish image is one I got in a swap! I coloured it with shimmery paints and watercolour. I added the background just using my paint brush to add the details. The image was layered onto brown before being mounted to my card. I added a laser printed layered punchie greeting on the lower left.
Therese
Therese
Saturday, April 22, 2017
A fun guy card

Therese
Friday, April 21, 2017
A card from a kit with a few extras

It was fun to add a few more touches to this card from a kit.
Therese
Monday, April 17, 2017
Mother's Day cards reusing calendar photos

Both of these cards feature my sister's photography!! She creates 4" x 6" calendars every year that feature her photos and I always get one for Christmas which sits on my desk all year long. These photos are both from one of her flower ones from several years ago. I trimmed the photos from the calendar pages and mounted them to coordinating cardstock layers which I had embossed with border embossing folders (SU). I used the coordinating border die to cut the bottom edge of the pink one. I could have done the same on the other but I had not left enough room to make that work. I added coordinating ribbon across this layer gluing the ends to the back with double sided tape. I added a little sponged tag greeting on the blue one with a silver brad and tied on a piece of white fiber which I tied in a bow. On the left hand one, I used a punched greeting created using a digital frame (SU) with a font greeting in the center. I punched a circle to fit the circle size and sponged some pink ink into the center after placing the hole over it. I placed the punchie over this area and sponged green ink all the way around the edges. I added some clear rhinestones over the circle then mounted the greeting over the ribbon using 3D foam tape. I glued these large elements to coordinating card fronts. Love how these turned out!!
Therese
Sunday, April 16, 2017
Mother's Day cards created from renovated card fronts

For the top one I trimmed the image using a decorative label (SU) then I trimmed off the sides as they were distracting from the heart image. I used my handmade stamp positioner to stamp a greeting (SU) on the lower right hand side. I added a pink silk ribbon and tied on a short length with a single knot to simulate a bow. I layered this element to the back portion of the card which featured pink stripes. Fortunately it covered a printed panel at the same time. I trimmed that out and layered it to blue cardstock then to an off white cardstock layer before gluing this whole element to a pink card front. I did distress the outer edges of the blue and off white layers with my distress tool (SU). Happy with this card!
The lower left hand card, I trimmed out the framed floral element then cut out two of the embellished corners from the card. They fit perfectly side by side on my pink card front!! I did add a pink ribbon before adhering the floral image in place. I used a laser printed digital image (SU) of a label to which I had added a greeting for my greeting. The printed greeting was h I die cut with the smaller version of the one I used above. I punched a hole that coordinated with the center portion of the greeting and sponged some pink ink in the hole. Next, I covered this area with the punchie and sponged all the way around with ink until I was happy with the colour. I mounted it over the ribbon with 3D foam tape.
The right hand card below had a butterfly with a clipped wing on the right hand side once I had trimmed the floral image to fit my yellow card front. I decided to trim it just a bit more so I could add a dark brown layer in between which highlights the punched border (SU) I had added on the bottom edge. To cover up the butterfly I trimmed a printed greeting with my decorative label punch (SU) and then I punched an orange one to highlight it. I layered them, trimmed the right hand side and then added a little yellow bow using heavy thread which I tied on. Once I glued it in place I glued this layer to the brown one and stitched around the edges avoiding the floral elements which were very close to the edge. To finish off my card I glued this large element to my yellow card front.

My stash is growing and I am loving the cards I made!!
Therese
Saturday, April 15, 2017
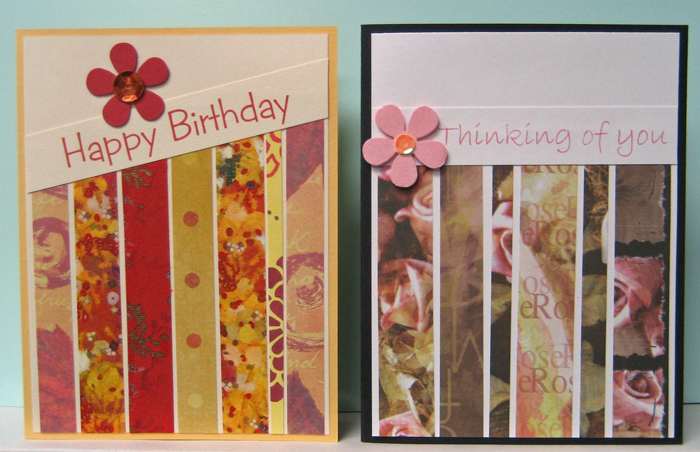
Mother's Day cards from card kits

I made up these two card from card kits that I have on hand from a while back. For both of these, I cut the decorative paper twice - once vertically, once horizontally though I did angle the second one a bit which created a different effect. The pieces are glued to the layer leaving a bit of room between them and all around the edges then it is glued to the coordinating card front. Both of these have layered greetings created from round digital images. The round greeting image is one I found on The Spruce. I added a silk flower and some leaves with a sequin and brad to the one on the left which I had laser printed as is. On the right hand one, I digitally added a little flower digital image from Meljens Designs before laser printing and watercolouring it. I sponged both with a bit of colour before layering them onto coordinating scalloped circles which I cut using Nestibilities. I added dots on the pink one using a silver gel pen. Cards from kits is always very quick because part of the work is already done!! Nice to have a few of those on hand.
Therese
Friday, April 14, 2017
Mother's Day cards created reusing card fronts

Mother's Day is coming and I am preparing a few cards for my stash. I decided to see how many I could make reusing old card front which have been donated to me.
For the first card I trimmed out a floral element then gold embossed a greeting on the lower left, added a pink foil layer and glued this large element to a light blue green card. I added a beautiful pink silk ribbon gluing the ends to the inside of the card and tied on a short length with a single knot to simulate a bow. I slit the spine of my card to insert my ribbon before gluing.
For the right hand card, I pretty much repeated the process. I trimmed the beautiful rose image, silver embossed a greeting, added a silk ribbon with a simulated bow and glued this large element to a coordinating red card front.
For the center card it was a bit more complicated. Once I had trimmed out the floral image there remained some writing on the top right hand side so I created a "patch" that coordinated, layered them and punched both layers at the same time. Next, I positioned my patch in the opening and taped it into place on the back. I added a small silk flower over the area and secured it with a rhinestone brad. Next, I wanted to add a ribbon down the right hand side so I removed the flower/brad and ran the ribbon between the tines of the brad and reassembled the embellishment. I glued the ends of the organza ribbon to the back of the layer and tied on a short length to simulate a bow. Like how that worked out!! I had no greetings that would fit in the open spaces so chose to punch a hole and mount a small sponged greeting to the back instead. I added dots all the way around using a silver gel pen. I glued this large element to a coordinating light blue green card front.
Some times reusing a card front takes more time than creating from scratch but it is nice to be able to reuse those beautiful images.
Therese
Thursday, April 13, 2017
A few more Easter cards


I made up a few more Easter cards for my stash!! These two were created using one used greeting card with beautiful crocuses on it. I cut around the crocuses from the front of the card and layered it on an embossed purple card front and added a layered punchie greeting.
For the second card I used the image on the inside of the card and trimmed it to size. I added a yellow organza ribbon to which I tied a short length with one knot to simulate a bow. I glued this large element to a purple card front. I added a laser printed layered punchie greeting to the lower right.

Therese
Wednesday, April 12, 2017
A couple Mother's Day cards with reused elements

For the one on the left, I started with a pink card front. My next layer was trimmed from a used card. I added half of a white paper doily and covered the edge with a strip sitting on my desk that was trimmed from a used card which I stitched in place with my sewing machine. I added this beautiful collage element tag which was a RAK in a previous swap on a light blue organza ribbon gluing the ends to the back of the layer with double sided tape. I added a couple pieces of tape in behind so it would stay in place. I glued this large element to my card front and finished my card with a round watercoloured circle punchie greeting (Desert Diva). I like the shabby chic look of the vintage image with the lace and ribbon.
For the card on the left I stared with a trimmed layer from a used card which I embossed only on the left hand side avoiding the beautiful gold edge on the bottom. I layered it onto pink and then onto a light pink card. For my focal element I started with a small colour laser printed floral element (Pixabay) to which I digitally added a greeting using a font. I layered it onto green and tore of the bottom. Added a little piece of white fiber which I tied on the front with a double knot and then layered onto pink which I also tore on the bottom. I glued this on my card front on the left hand side to cover writing from the original card. Pretty happy with both of these cards!!
Mother's Day will be here faster than we expect!!
Therese
pab plus a font
desert diva greeting
Tuesday, April 11, 2017
A beautiful thinking of you card that features a butterfly embellishment

Monday, April 10, 2017
A light house birthday card with LOTS of texture

I really love how it worked out!!! Therese
Sunday, April 09, 2017
Watercolour and white embossing resist on watercolour paper

My grand daughter was visiting this week and we spend some time in the craft room. She was working on her own projects so I got started on a technique that I have been wanting to revisit - white embossing resist!! I discovered some small sheets of watercolour paper in my stash a while back and thought they would work very well for this technique which I have been seeing on Splitcoast Stampers lately. I started with a couple of small clear stamps that have not seen much, if any use. I stamped them with Versamark on the small sheets of watercolour paper and embossed them with white embossing powder. I added a greeting (SU) under the floral swirl and embossed it as well. I used regular palette watercolours on the left hand one by simply applying several colours with a very wet paintbrush until I was happy with the look of it. For the second one, I used distress inks applied to a craft sheet, spritzed with water and laid the paper in the puddle. I kept dipping until I was happy with the look!! Once dry, I trimmed the sheets neatly and stitched them to coordinating layers (4" x 5.25") using my sewing machine. Next I layered them onto coordinating card fronts. I finished off the left hand one with star punchies which I painted with pearly acrylic paint and I used colourful sequins on the other one. Very happy with how these turned out and I will be using them for my exchange cards for my partners this month. Therese
Serendipity backgrounds

Tulips for a get well card

Therese
Saturday, April 08, 2017
Be you card featuring a colour washed paper doily

Friday, April 07, 2017
Leather leaf embellishment from reused leather

For this card, I started with the leather leaf and created a background for it from light brown cardstock which I embossed (TH-SX) and colour washed around the edges. I added a small piece of double sided tape to keep it in place and then used my sewing machine to stitch it in place all the while giving it veining detail!! I tied a small piece of twine to the stem. Next, I went looking for a background in my stash and found this piece of paste paper in dark brown which I made years ago which really worked with my leaf. I trimmed a piece and layered it onto green. I glued my leaf embellishment into place then added two brown mini brads - top and bottom. Next, I glued this large element to a black card front and to finish it off I added a colour washed Decorative Label (SU) greeting punchie!! Very happy with how this one turned out and I look forward to more with my little stash of leather embellishements. Therese
Art Quiltie with a locket and key with hidden quotes

I started with the folded fabric points which I found in my fabric stash after I moved a few years ago. I do not recall exactly which project I was working on at the time of their creation but I have a little baggie of them.
I chose 8 of them - 4 blue, 4 red and then found a 4" x 4" precut floral square in a coordinating yellow which I used for the front of my quiltie. I positioned the points around the edge and stitched them in place with a line of machine stitching very close to the outside edge. I thought I was being very careful in laying them out but I see that they are all off a bit at the points which I did not notice until much later in the process. I could not undo at that point so it is how it is. I cut a piece of batting and stitch it to the front by folding back the points and stitching as close to the first seam as I could. On hindsight it might have been better to do that seam first but I did not have that vision before I started. I hand lettered some quotes onto fusible fabric label tape and adhered them below the points. I stitched one of my fabric collage into the center, finished adding the quote in fabric label and stitched on a small locket and key charms. Next, I chose a yellow tiny gingham fabric square (4.5") for the back of my quiltie. I added fusible webbing to the edges, positioned my quiltie to the wrong side, folded the edges over the front and fused them in place. That finished off the edges very neatly. Wanting to add a bit of hand stitching I did blanket stitch all the way around using dark blue crochet thread. Once finished I thought a few beads would be nice as well so I added yellow, red and blue beads (seed & longer ones) all the way around using light weight yellow crochet thread. That finished it off nicely and gives it a handmade look!! It is off to my partner as we speak!! I hope my partner will find the quotes on the inside front below the petals!! A bit of creative fun!!
Thursday, April 06, 2017
Beautiful cross on an Easter card

I colour printed the cross on ivory cardstock and layered it onto a blue green cardstock. I used a blue green card, added a yellow background paper to which I had adhered a lacy die cut and embossed border (SU) which was colour washed with yellow watercolour to tone it down a bit. I glued the background to the card, adhered my focal element and then added a layered laser printed punchie greeting.
I really like that the darker edge of the decorative paper creates the sense of a line in the design and putting the cross askew a bit allowed my greeting to nest into one of the scallops. Perfect!!
Therese
Wednesday, April 05, 2017
Easter lilies in deep colours

Tuesday, April 04, 2017
Easter cards with printed vintage graphics

I used a greeny blue card for the first one and added two squares of brown cardstock just off set a bit from each other. The laser printed vintage image (Graphics Fairy) was layered onto pink and then onto yellow before being adhered to my card front. Love those little blue birds!! For my second card, I used a vintage image from Clipartpal which I laser printed and trimmed. I started with a blue card front and added a green embossed frame die cut (SX) to which I had added two punchie eyelet borders (SU) in brown top and bottom. My image fit perfectly in the center! I added three little ribbon flags to my image before mounting it in the opening of the frame with 3D foam tape - brown, yellow and green which I trimmed with flag ends.
It is good to stretch ourselves creatively, to expand our ideas, to do something out of our comfort zones regularly. That is how new things are invented and fun serendipities come to bless our lives.
Therese
Layered Easter card with a digital greeting

Therese
Monday, April 03, 2017
A beautiful Easter card in blue and green

Happy with this one too! Therese
Sunday, April 02, 2017
All Occasion Stack Class - just strips of paper, a greeting and an embellishment
We had a wonderful time and lots of beautiful cards were created!!!
Therese

All Occasion Stack class - cut and circled

For my next card, I decided to feature decorative paper in hopes of reducing my stash!! Not even dented!!
I cut the decorative paper 3.75" x 5" and made two cuts - one in each direction and when the pieces were glued to the next layer it created a cross as the lower colour showed through. I discovered that once cut the pieces provide a puzzle to be solved before they can be glued in place!! I chose to layer my circle greeting over the intersection of the lines but the creative ones at class chose many more options in both the cutting and the layout of these cards!! The circle greetings were laser printed on white or ivory and punched with a 1.75" circle punch (SU). They were layered onto scalloped circles which were die cut from coordinating cardstock using my Nestibilities. I found most of these round greetings at Netty's cards. She has a really good variety and some for every occasion. The little turtle one is very cute and the floral element were found on line but I do not have a record of where I found them. Therese

Handmade paper and stitching

All Occasion Stack Class - handmade paper

For this set of cards I decided to continue the theme I started with my middle of the week class and feature my own handmade paper.


I created several focal elements - hearts, flowers, leaves and butterflies which were cut from coordinating handmade paper. The flower were embellished die cut centers, the hearts had an extra little heart cut from cardstock, the butteflies had tied cording which created a body and antennae and the leaves had knotted twine as an accent.
I really love handmade paper and am glad that I decided to check out the papers I had in my boxes. I will continue to feature handmade paper on my cards as time goes on!!! Will consider making more this summer when the weather outside is warm and sunny and the sheets can dry outside.
Therese
Easter and birthday card created by reusing a beautiful rose card


These two cards were created using the most beautiful card full of shimmery gold and roses!! I trimmed off the front and turn it over onto the back inside which had the stripes and that worked well for a background. For the first card, I created a focal element using a floral background from Artsy bee on Pixabay combining it with a vintage rose image from Clipartfox and a font greeting which I then printed it onto ivory cardstock. After trimming I layered it onto green. I glued the two layers of my background together, added a pink organza ribbon across the width and layered on my focal element with 3D foam tape. I tied on a short length of ribbon to the one on the card using a single knot to simulate a bow. I layered this large element to a pink card.
For my second card, I created the background with the ribbon in the same manner and glued it to a light pink card. The rose focal element I fussy cut from the front flap of the original card and glued it over the ribbon using 3D foam tape. I sponged the edges of a punchie greeting with green and pink and adhered it just below the focal element over the ribbon with 3D foam tape. Beautiful!!
Therese
Saturday, April 01, 2017
Quick and easy card resusing images from cards - a beautiful little cottage

Therese
Subscribe to:
Posts (Atom)