Showing posts with label beads. Show all posts

Wednesday, November 06, 2019

Christmas card featuring a used card front with some added texture from a tracing wheel

What a cool card front!!  So much texture on this one with all the beads and rhinestones.  There was one little area where the bling had fallen off so I added a bit of white glue and filled in with some green glass beads and a rhinestone coloured red with a Sharpie.  I left it to dry overnight and then finished up the card.  I simply added some lines of paper piercing using my pattern tracing wheel - along the four edges and three wavy ones below the greeting.  Quick and easy!!!   Therese

Thursday, April 04, 2019

Paperclip jewelry


Paper clip jewelry!!  On our trip to the second hand store in the last few days my grand daughter picked up a free crafting book which creates jewelry using paper clips!!  She spent the afternoon yesterday trying several of the techniques and making several items of jewelry for herself!!   Therese

Saturday, February 24, 2018

A penguin card for my youngest grandson!!

The penguin on this card was created by an young girl who is very creative and also loves to make cards.  I attended a meeting with her mother at their home and afterwards she was wanting each of us to take home some of her art.  I picked the penguin especially for my grandson's card.  It is made with Perler beads and was a bit thick so placed it between two layers of parchment paper and pressed it with a very hot iron which melted the beads further and reduced its thickness by half.  He is so cute!!  I decided to make it a removable element on his birthday card so he can add it to his penguin collection though quite a few of the others are stuffies!!  I punched a hole at the top, added a black ribbon hanger and mounted it to a dark gray card using double sided tape.  I glued the hanger to the inside of the card using magic tape so it would be easily removable.  I added a layered greeting to the bottom portion of my card.  A laser printing font greeting, a black strip of paper over a larger piece that has been punched on both sides with a scallop border punch.  I pierced each scallop with a push pin and mounted it to my card front.  I added a small strip of yellow cardstock to the right hand side of my card front and then a little fun heart next to my greeting!!  I am sure he will love the little penguin!!                   Therese

Friday, December 22, 2017

House fabric postcard

I participate in the Birthday Swap on my fabric postcard group and I created this one for my next swap partner.
I have had this house concept in my head for a while now and the paper piecing I did for my last swap encouraged me to give it a try and see how well it would work.
I started with the house rectangle and then found a triangle which would work for the roof.  Next I found some blue pieces that I could use for the sky and the floral greenery fabric for the background landscape around the house.  I found a pieced length of browns for the foreground.  It was a bit short so I added another length of brown brick looking fabric.  I started by stitching the sides (greenery to blue sky) to each other and then I stitched them to the house.  I positioned the roof over the large sky rectangle and stitch it to the house with the sides.  Next, I stitched the brown piece to the pieced one and then stitched this large piece to the bottom of the house rectangle I had just created.  I ironed all my seams and then trimmed the whole thing to 6" x 4".  I added iron fusible webbing to the back of the roof and ironed it into place added hand stitching to it afterwards.  I found a small dark red scrap to use as my front door, added fusible webbing to the back and ironed it into place.  I stitched all the way around using black floss, added a yellow half moon window and hand stitch around it with yellow floss.  I added a small gold sequin with a large french knot to create the doorknob.  I added some hand stitched flowers on either side of the house as well.  I stitched batting to my white backer, layered on my front and then stitched all the way around to attached all the layers to each other.  I created a chain of single crochet stitches using textured dark green yarn and stitched to the each of my postcard using dark green floss in an over hand stitch.   To finish off my postcard I used a small piece of fusible fabric, added my handwritten message using a permanent marker and ironed it into place above the door.  Pretty happy with  how this one worked out!!  Looking forward to trying this design out again with different colours.              Therese

Saturday, November 25, 2017

Fabric postcard that features prairie points, sequins and hand stitching

I created this fabric postcard for the birthday swap on my Trading Fabric Postcards group.  I started by creating the prairie points and worked up my design from there.  I stitched them to the edge of an orange strip, pressed them over and added a line of stitching in white to hold them in place.  I folded and pressed the other side of my orange strip leaving it about 3/4" wide. Next, I created a navy patterned border from a strip of fabric by just folding it in half and pressing.  I laid it on the top edge of  my orange strip and stitched it in place.  Once I had that created I looked for a piece of fabric that would work for a background for my focal element.  I found some green fabric with a bit of floral texture in a darker shade which worked well.  I added a layer of batting and stitched several wavy lines across to secure the two together.  After laying my focal element on the background I decided to add another layer above my strip in dark green.  I cut a strip about 3/4" wide, added fusible webbing to the back and then die cut it with a scalloped Sizzix border die. To finalize my design I positioned my element and then positioned the green strip with the scallops just above it then fused it to my background.  I embellished the scallops with orange sequins with green seed beads - one in each scallop and finally adding some blue stitching in each valley.  Next, I stamped celebrate (SU) three times in dark blue ink across the orange strip.  I applied fusible web to the back of my focal element and fused it below the embellished scallops.  I added a white backer and added yet more lines of wavy stitching in between the ones I had created earlier which tighten the visual texture of the background.  I applied fusible webbing to strips of green fabric to use as my binding and trimmed strips to fit each side.  I lay the strips on the front overlapping about a quarter of an inch and fused it in place.  I flipped the postcard over, folded the remainder of the binding strip to the back and fused it into place.  I repeated the procedure for the three other sides.  Once they were in place, I added two lines of stitching using orange thread to very neatly finish off the binding.  A much different look than the last few I have made but I am as happy with it as the others.  It is off to my partner in hopes that it will arrive before her birthday!!         Therese

Sunday, August 21, 2016

Summer crazy quilted block

I have been working on a crazy quilted block for a swap on one of my groups.  After researching the cost of sending this one and getting one back in return I have decided not to participate in the swap.  It is the same place I was with the felted wool swap earlier this year.  So I have now learned the lesson but I still have most enjoyed the process of making it!!  I started by piecing some scraps onto a cotton substrate.  The finished square was to be 8" x 8" so we needed to allow at least 8.5" or 9" so that when it was sewn up it would finish at 8" square.  We were warned that stitching sometimes takes up some inches as well so I started with 9.5" to make sure mine would be large enough in the end.  I stitched on blue scraps at the top for the sky, green for a prairie horizon line, yellows for a canola field, a deeper blue on the lower right for creating a prairie lake and a gray on the very bottom for the road using my sewing machine to secure them in place.  Some were sewn to each other before stitching them down.  Others were stitched directly in place.  I started my hand stitching by stitching all of the stitch lines in a colour of thread as close to the fabric as possible.  Then I added stitching on the green horizon line to give the feeling of trees.  I did a variety of greens and then added some brown to simulate trunks and branches.  I added a white line of stem stitching to simulate a jet's vapour trail and added a little silver bead at the end to represent the plane.  After a bit I started feeling that I needed to add some machine stitching to keep the layers all
in place.  I realized that the process of adding sewing machine stitching would have been much easier before the addition of any hand stitching.  Lesson learned for next time around.   I added some beads to the tree line and eventually added a couched funky fiber to the bottom of the green to add texture and represent the shrubs that are often present there as well.
I added stitching to all of the open areas.

I added some stitched birds to the sky. I added a stitch bird to the prairie lake. I added beads to my rows of canola field and also to the water texture I added.  I have so much enjoyed travelling this province this summer.  The skies are so blue, the canola fields are so yellow and
the water reflects so perfectly the sky and the waterfowl are always swimming around and looking so at home on them.  I added a fence - brown fence posts and gray barbed wire between the bottom road and the rest of the piece.  This is what summer means to be now that I have moved back to my home province.  


So in the end no one will see my square but that is fine. I plan on making the other three squares in this Seasons series and combining them in a finished work once the year has come and gone.
I know that my square does not have the typical crazy quilt layout but I am happy with how it turned out and look forward to more stitching this year.

Therese

Wednesday, July 20, 2016

Art Quiltie with stamped fabric

On my Fabric Postcard group we are having an art quiltie swap.  There was one in June and I missed it!!!!!  Fortunately, I am blessed to have a member of the group that volunteered to swap one for one with me so I made her this cute little quiltie!!
I started with a square of stamped fabric which I received in a swap a while back.  I love the quote so I cut the fabric piece down to 4" x 4" for the front of my quiltie.  I found and installed my free motion foot for my sewing machine.  It was not working properly so I found a YOUTube video that gave me a visual of the process and a few hints on how to best proceed with free motion stitiching.  Once reinstalled and the adjustments made it was working much better.  I layered my square over a piece of batting and started stitching.  You can see from the photo that my free motion skills are only in the beginner stages but I did manage to go around the petals on the flowers that were stamped on the fabric.  I will keep practicing!!
Next I stitched my backing fabric (4"x 4") to a scrap piece of fabric and used the same technique to embellish the swirls on it.  Next, I found some coordinating pink embroidery floss and added double sequins (iridescent white and fuchsia) to the center of the flowers and secured them in place using a ivory seed bead.  I added three more stitched flowers in the same floss and added fuchsia sequins and ivory beads to their centers. as well.  Then, I laid my front on my back and trimmed them to the same size and added a few more loops of free motion stitching to secure these two piece together.  With that much complete, I changed my foot back to the one for regular stitching and zigzagged all the way around very close to the edge to create a nice neat edge.
I have been playing with the idea of making fabric tape using fusible webbing for a while.   So, today, I decided to play and made some fabric tape to bind the edges of my quiltie.
I positioned a strip of fusible webbing (sold to fix a hem without sewing) on the edge of a coordinating solid, enclosed it in resist paper and ironed it.  The fusible webbing very nicely adhered to the edge of the fabric.  I trimmed away the piece with fusible webbing on it and I had created a length of fabric tape!  I cut a four inch length and positioned it neatly on one side of my quiltie with half the tape on the quiltie and the other half hanging off.
I place resist paper over and above and ironed it in place.  It fused very nicely to the front portion of my quiltie. Next, I turned the quiltie over and ironed the remainder to the back which very neatly bound that side of the quiltie. I cut another 4" strip and positioned it on the opposite side and repeated the steps to bind that edge.
To finish it off, I cut another two strips but made sure they were long enough to cover the strips I had already put in place, trimmed the corners into a point so that the corners would look mitered and adhered them in the same fashion as I had done the other two sides.

You can see how the binding looked in position before I ironed down the final edge to the back of my quiltie.  It worked very well and created some very nice corners on my little quiltie.   I decided to add a row of straight stitching very close to the inside edge and the outside edge of my binding to help secure it and to give the binding some texture and definition!! I am very happy with how well this technique worked and will certainly be using it again when I am making quilties!!
So my quiltie is ready to go and will be off to my partner this week!!

Therese

Thursday, July 09, 2015

Paper bead art charms!

 I am participating in a "3 for 3"personal swap with a member of one of my groups, Art Charms. The theme for this swap was Paper Beads.  I decided to expand on the paper bead idea and came up with three different charms.
For these on the left, I cut silver foil card using the Tattered Flowers (TH SX) die being sure to flip my paper so I could glue them back to back!!  I cut a middle layer out of regular cardstock and trimmed out a sliver so I could insert my double eye pin which I created using silver papers clips which you can see below.  Once the glue was dry I applied alcohol inks to first one side than the other and also did the edges.  I love the look!!!! I created danglies for them using head pins and E beads.
 For these charms, I used chipboard circles which I sliced in half, trimmed out a little section for the head pin and glued them back together!!  I coloured both sides and the edges using Sharpie markers and punched 3/4" circles from decorative paper then glued one to each side.  I love the dynamic look of this alcohol ink paper !!  Used the rest of it on one of  these cards.  I added a black initial on each side and finished them off with matte sealer.
I glued a small piece of decorative paper to a rectangle of regular white paper and rolled these beads on thick wire so that the decorative paper would be on the outside.  Does not require a very big piece to cover the outside of a bead and that is the only place it really shows.  I trimmed them to size, coloured the ends with a Sharpie, inserted my eye pin and created a loop on the other end.  I added little pieces of washi tape to decorate the outside and created coordinating danglies from head pins and E beads.
You can see here that I used pliers to straighten a paper clip, created loops on each end and then cut them in half.  They were plenty long enough to create my art charms.
These were very fun to make!!!!  I am stringing a metal penchant chain to the inside of a frame and will be showcasing my swapped art charms in it!!

Therese

Thursday, April 23, 2015

Boho Bangles - third time's a charm!

Here is my final boho bangle!!! I was very tempted to create my second bracelet exactly like my first except in different colours.  Instead I decided to use fabric strips which is what he uses in the video.  I used a short piece of bias trim I had in my stash in this beautiful orange/yellow plaid.  You cannot even tell it is a plaid!!  I chose large seed beads that coordinated with the lines of thread in the fabric - yellow, turquoise, leaf green and red.  I created clusters instead of an all over pattern.  I doubled up the reds in the middle of the clusters just to change things up a bit.  I also used gold wire on this one because it coordinated the best.  I also added a large turquoise feature between the last two clusters by using a few slightly larger beads and layering dyed shells on both sides of the central turquoise
bead.  I really like the colour combinations in this one!!

The girls on the group have been saying that once you get started making these it is hard to stop!!  Considering that they are so easy to make and require very little supplies there is no reason not to have an armful that coordinate with your summer outfits!!
I am hoping that these will coordinate with my partners summer attire!!
Therese

Boho bangles - the second time around

Here are the supplies I used for my second bangle - taped zip tie, blue 28 gauge wire, sheer ribbon and some blue, pink and clear beads.  I overlapped the ends of the zip tie before applying the red TUCK tape. This tape is very sticky and is used to seal sheathing.  DH has used it for several other purposes as well.  Two years ago it was to seal the holes in the vinyl siding created by LARGE hailstones.  You can see in the photo that I did not overlap the ends on that one - it really peaks where the tape just folds over.  I redid it and added a short piece of extra zip tie over the gap which works much better.  You will see what I did with that one in the next posting.  I used the same shimmery blue/pink ribbon that I used on the first one, wrapping it all the way around my zip tie armature.  I did not have enough beads left over from the first one so I went looking for more beads.  I found some blue and pink ones that worked well together so I simply added the clear seed beads to create this one.  I alternated the pink and the blue beads and added a clear bead between them.  The first time the pattern worked out perfectly - finishing up exactly where I had started.  Not so lucky with this one so I just finished up with three clear beads.  Worked out fine!!

Therese

Boho bangles


Boho Bangles!!
I signed up for this swap because it sounded interesting and was a project I had never tried before!
 I find swaps are a great way to try a "new to me" technique or project.
A link was provided for us to preview the technique - Stackable Bangles by Mark Montano.  After watching the video and perusing the supplies I went looking for zip ties, beads, ribbon and wire!!

I had to modify my zip ties because they were not long enough for the bangles I needed to make for my partner.  We all provided our measurements so our partners could create a bracelet which would fit.  I created my armature by wrapping to each other a zip tie and a hair elastic with heavy weight thread and tied off the ends.  Next, I wrapped the armature with a length of shimmery blue/pink organza ribbon.  Bead were next!!  I found some pink, blue, clear and pearl beads which all looked good together and worked with the ribbon.
 I cut a length of blue 28 gauge wire, created a loop around the armature and secured the wire by twisting the end around body of the wire.  I started wrapping the wire around the armature adding one bead at a time leaving the bead on the outside edge of the bracelet.                        
I chose to repeat a pattern - blue, pearl, pink and clear. These beads were pretty much the same size - some plastic and the others glass seed beads.  I really like the look of this bracelet but found that I had measured too closely and my bracelet was too small once I had wrapped it with ribbon and beads.  So it was not going to be suitable for my partner and sadly is also too small for me so I will have to find a new home for it.
After a bit of reflection I decided to create my armature differently for my next bangle and go with a version much closer to what was suggested in the video.  I found that the elastic on the outside of the zip tie made it difficult to position the beads evenly.  The way of creative discovery is trial and error!!

Therese

Wednesday, January 21, 2015

Art Quiltie for January

I am hosting another art quiltie swap for January!!  You can check out these links for November & December.   I have always loved the look of crazy quilts because of their randomness and their beautiful embroidery so I decided to go for it and made my January quiltie using that technique. I started with my back (on the right) so I could practice and start again if it didn't work out.


I started with a small dark piece and sewed a light one to it.  Pressed them open and trimmed evenly the edge perpendicular to the seam and sewed another piece on that side.  Repeated until I had a piece large enough to trim to 5" x 5". I was pretty happy with it so I chose the fabrics for my front and repeated the same procedure to create another crazy quilted square for the front of my art quiltie. I decided to machine stitch the outside edge so I put them right sides together and stitched almost all the way around leaving one side open so I could turn it over.  Once I had my right sides out, I cut a 4" x 4" of batting, inserted it between the two layers and hand stitched the opening.  Once it was pressed, I ran a line of stitching all the way around to properly anchor the batting to both sides.
Then, I started hand stitching.  I had to download some stitching patterns off the internet to expand my repertoire of options for embroidery stitches.  Once again, I started with the back, stitching in a variety of colourful embroidery floss over all the seams and in some cases adding beads as I went.  I added a few flower sequins as well in a couple of the areas.  It was fun to try new stitches and some didn't turn out quite like I thought they would but still looked good so I left them in place.  Once I had finished the back, I started on the front.  Again, I added stitching to all the seams and a variety of other stitching in the open areas. I added beads here and there as well!!  I wanted to add at least one 3D embellishment so I went digging into my stash to see what I could find that would work. Quite happy with this little metal tag with "dream big.." on it.  I stitched it on with embroidery floss.  I am very happy with how it turned out though having added beads to both sides meant it required additional postage to get to my swap partner.  No problem, it is still a reasonable cost for participating in international swaps. I added my credits using "iron on fabric label" by simply writing on the fabric label with a fine tip Sharpie and sponging on a bit of ink to tone it down before I ironed it onto the back of my quiltie.  Details of the swap I added to a tag which I pinned on.

Therese


Friday, January 09, 2015

Chunky book covers


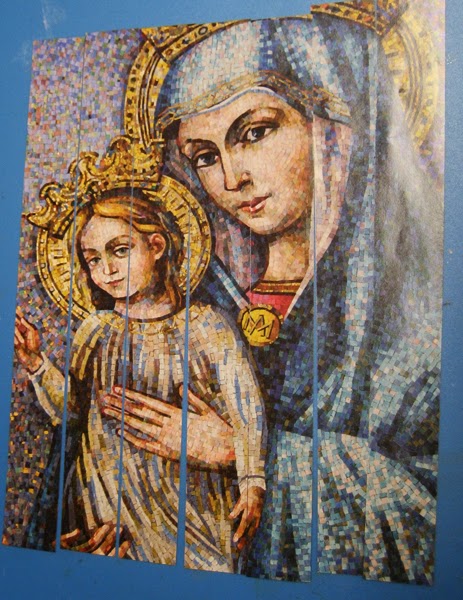
On one of my groups we are going to be having a 4"x 4" fat book page swap every month so for January we have been challenged to make covers for our books!  The theme for the swap is Shades of Colour.  After a bit of "sitting" with the concept I decided to use the following magazine cover to create my book covers. 
I loved this mosaic image as soon as I saw it on the cover of a magazine that arrived before Christmas!!  When it was time for the magazine to be recycled I tore off the cover not sure what I was going to be doing with it.
I cut off the text and cut the remainder into 1" squares.  

I sorted the squares into colour groups  - sixteen blueish ones for the front cover and sixteen  mulit-colour for the back cover.  I glued them to edge to edge onto white cardstock, pressed them under weight and trimmed them to just under a four inch square.
 I cut two 4"x 4" pieces of chipboard and glued my collages to them.  I used decorative packing tape to finish off the edges.


I cut the tape in two, adhered the white edge to the front of my covers and folded the remaining part with the letters to the back creating a nice collage on the inside covers as well.  I am super happy to have created art with this beautiful piece of paper that manages
to maintain the beauty of it without keeping the original context.  I love how you can see eyes, a mouth and fingers on the back without really knowing where they come from.
I will be binding my pages from the swap into the covers using my Zutter Bind it all machine using a large binding which will give me lots of room to add charms, fibers and tags if I wish.
I added ribbon and a 3D embellishment to my cover.  The embellishment is one I created when my grand daughter was visiting this summer. We played with bottle caps and I filled this one with a punchie that says, "Think HAPPY, BE happy".  I glued it to the cavity of a flatten bottle cap, added some clear Dimensional Magic and then inserted the blue iridescent beads all the way around the words and left it to dry.  The colours are a perfect match for my covers.  I used double side tape to adhere my ribbon to the outside and inside of my front cover and tied the ends together at the top.  I used an awl to make holes in my bottle cap and my covers then used coordinating thread to stitch it to my cover over the ribbon.
So the journey begins!!  I am looking forward to the swap and all the interesting pages I will receive this year.  As the cover says, we must think to be happy, nurturing the good that arrives in our lives and being grateful for every blessing is what will bring us happiness.
Enjoy what you love today!!

Therese

Monday, December 29, 2014

Gray and rust felted wool cuff

 I have joined a swap on one of my groups where we are swapping little gifts for Christmas.  I have decided to make cuffs for the participants so needless to say these are only appearing here after they have been opened for Christmas by those who received them.
I started with felted wool scraps that my daughter gave me after she was finished her large projects like table runners and teapot cozies.  I started with gray wool (1 1/2" x 8 1/4") for this one and did buttonhole stitch all the way around using dark gray thread.  I added the rust fiber using my sewing machine in free form arrangement.  I die cut a little row of ovals out of dark red felted wool using a large Sizzix border die.  I pinned it in place over the fiber and sewed my embellishments in place through all the layers.
The little circles are plastic and the others are a combination of gold sequins and black seed beads.  After sewing the embellishments in place I went back adding a stitch between each little oval using the same black thread.  Finally, I added two black beads on the end that combined with the long length of fiber creates an adjustable closure for this cuff.
I am enjoying making cuffs. You can check here, here and here for some I have made recently.  I did several others over the summer unfortunately I did not get photos of those.

Therese

Tuesday, November 11, 2014

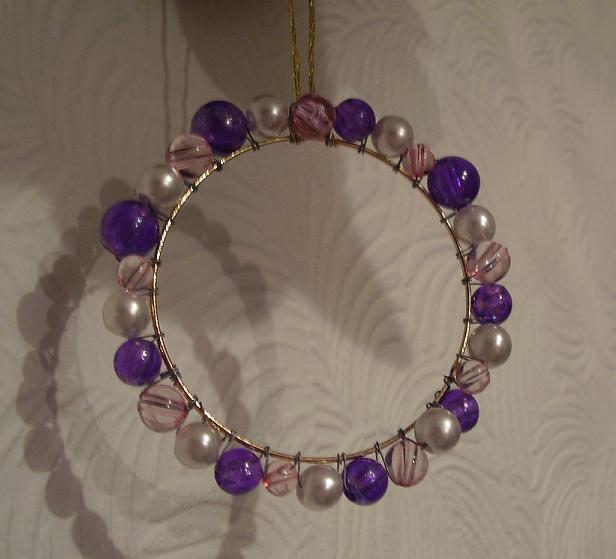
Handmade Wreath Ornament with a Tutorial


I have joined a handmade ornament swap on one of my groups so I went looking for ideas!!  I found an ornament similar to this one that fit my criteria - lightweight, fairly flat for easy mailing and used supplies I had on hand.  I dug out wire, beads and pliers and got started.  I decided to use E-beads because I have lots of them in a variety of colours.  After adding the first row of beads on the outside of the armature - it looked a bit "light"so I added a row on the inside. Better! but it needed a bit of accent colour so I added some different coloured beads to simulate "holly berries".  That was much better.  I added a charm and a bow and declared it done!! Not sure if it will be the one I use but I decided to document the process in case I want to replicate it in the future and no longer have the original!!


Handmade Wire & Bead Wreath Ornament Tutorial
You will need:  (I used)
Wire for the armature    (I used 26 gauge - 4-5 wraps around the jar (36"-40")
Wire for beading    (I used 28 gauge - about 48")
Beads     (Ebeads - 80 of the main colour, 16 or so of accent colour)
A charm       (metal snowflake charm)
A length of chain      (4 links)
A bow      (6" or so to construct a bow)
Thread      (24" or so to sew the bow onto the ornament)
Pliers     (snips and rounded beading pliers) 

Use what you have and adjust where you need to to accommodate the difference in supplies. 


 1.  Make the armature for your ornament.
  I wrapped 26 gauge wire around a jar of UTEE embossing powder 4 or 5 times.  

 Twist the wires to each other and then wrapped them around the loops of wire to secure them to each other.

 2.  Prepare your beads.
I strung my 80 green Ebeads onto a 48" length of 28 gauge wire and made a cluster of loops
at the end to ensure the beads would not fall off and to make it easier to pull through the armature.

 3.  Start adding beads to outside of armature. 
Wrap the end of the 28 gauge wire to the armature where the ends are, a couple of times to secure.
Bring one bead up to above the armature, hold it in place with the hole horizontal, fold the bead wire to the back and pull through the opening in the armature.  Tighten.  

 Repeat 39 more times leaving some room between the beads.  Wrap bead wire around armature to secure.

 3.  Now start adding beads to the inside of the armature by placing the bead horizontally below the armature, holding it in place and bringing the wire up and between the first two beads above the armature.
Bring wire down the back side and up through the opening in the armature.  

 Repeat 39 more times.  Wrap bead wire around the armature to secure.  

 4.  Add contrasting beads onto bead wire.

 Add these beads in between the ones already on the armature using the same technique as above. Start with a couple of wraps, add a bead below, a few more wraps and then add a bead above.  Keep adding beads alternatively until you have added beads randomly all the way around.  Secure your bead wire with a couple wraps around the armature when you are finished.  

 5.  Prepare a charm.  I used a metal snowflake charm and added four links of chain to it to make it hang in the right place on the inside of the ornament.  

6.  Attach charm to ornament.  I used one of the armature wires to create a loop for my charm to hang from.  If your beads are too close together at the top just nudge them gently to the sides.  They will adjust and make some room for you to hang the charm.  
Alternatively, you could use thread to hang your charm by just tying it to the armature hanging at the right height.  

7.  Add the bow.  I constructed a bow from ribbon and then sewed it to the top of the armature using embroidery thread.  
Alternatively, you could tie the ribbon to the wires that are sticking up and make a bow.  
I twisted all the wires together and snipped them even about 1.25 inches above the top of the ornament and used rounded beading pliers to make a loop hanger.  
Alternatively, you could add a jump ring using the wires to secure it and then snip them.  
Once you are finished, shape your ornament to get it nice and round. 

Very happy with my wreath ornament!!   I hope you will find this tutorial useful.  
If you use this tutorial, I would love for you to leave me a comment on this post 
and a link to your project if you have it online somewhere.  

Thanks for joining me!

Therese