Showing posts with label IO - Impression Obsession. Show all posts

Saturday, February 14, 2015

Vintage looking Valentine's card for a special guy


I created this card for my DH for Valentine's!!  I started with a black quarter sheet of cardstock which I trimmed slightly to leave an even border all the way around. I stamped it with a flourish background (IO) and embossed it with red embossing powder.  It worked out great!!  I rubbed on a bit of gold mica powder to add a bit of depth to it and stitched it to the front of a kraft coloured card using black thread.  I added a red layer (ATC from my stash) that had a metal butterfly, some black stamping and a gold shimmer finish over which I mounted a square of serendipity background in reds and golds.  I created my focal element using a laser printed digital image of a heart with leaves (CLKER) which I trimmed and watercoloured.  Once it was dry I added some clear dimensional magic to the heart and berries.  Once that was dry I mounted it to my card using 3D foam tape.  I really like the vintage look in the red, white and black colour scheme!!
Therese

Saturday, January 03, 2015

Tim Holtz January Tag Challenge

Happy New Year!!
Wishing you and yours every blessing in 2015!!

It has been a busy holiday season with not too much creative time but I did manage some crafting today.
On one of my groups we are considering a Tim Holtz monthly tag swap or challenge so I decided to see what I could create in the creative spirit of  Tim Holtz's January Tag!  I was not interested in copying his tag exactly so I decided to do a 4"x 6" postcard instead and liberally substituted what I had for what he used in the way of product and put my own spin on the elements as well.  I made a list before I headed to the craft room - tissue paper, paint, distress stains or spray, words, metal embellishments, glitter and seam binding which was my guide to the products which he used.
Tissue paper - I do have a wonderful piece of TH tissue paper which was gifted to me by my altered cuff swap partner and I set it aside in a "safe" place so I could use it for a project just like this.  Needless, to say today when
I could have used it, it was no where to be found.  I eventually gave up and dug out a piece of sewing pattern tissue and stamped it with a background newspaper stamp (IO) in black permanent ink to create tissue paper for my project. I could have chosen to create more of a collage look by choosing a variety of stamps instead.  I am happy with what I produced.  I did stamp a much larger piece than I needed so I will have some for future projects.
 I started with a 4"x 6" glossy photo paper which I washed with some gray watercolour.  I have a few of these colour palettes which I used previously for classes that I will be using up in my projects this year in a effort of using up what I have.


I applied glue to the whole front of my postcard, laid my piece of tissue over it and burnished it well.  Once it was dry, I trimmed all the way around with my scissors.  I chose a piece of tissue that was not too busy and featured only a few of the original lines on the sewing pattern.


Paint was the next item that Tim Holtz used, so I just added some colour using the watercolour palette I had sitting there - mostly red and oranges.
Next, I went looking for distress stains or sprays.  I had purchased vintage inks from Stampin Up a while back and thought they would do nicely for the spritzing I needed to do next.  I mixed up some mahogany which turned out to not be as red as I had expected and then dried lighter.  I chose Tea Stain (SU) next and found that it just blended into the surface and did not show up at all.  Needing to add a bit of colour I decided to use Charcoal.  That did the trick - it added colour in some very nice splotchy areas along with some nice spattered sections. Just what I needed.  I tend to mix sprays as I need them instead of having some on hand.  I admit that it means that I don't use them as often.  Maybe this year I will use them more often by mixing more than I need and leaving it in the spritzer for next time.
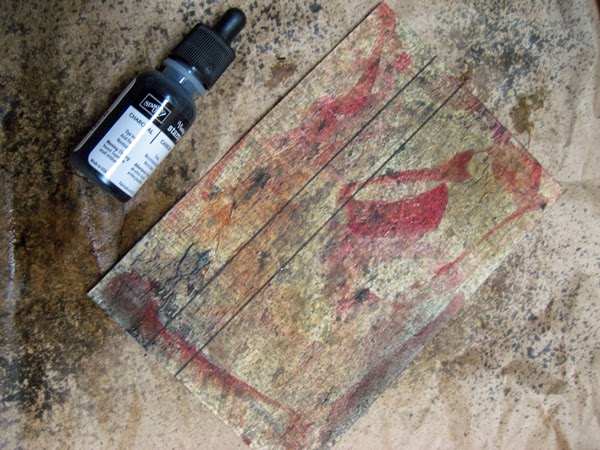


While the sprays were drying, I went looking for the other items I needed.  I found stamped words (SU) in my greetings bucket which I cut apart and trimmed.  I found a chipboard R which will work for one of my postcard swaps - bonus! Found some metal screening and a TH "wonderful" metal tag and decided that my next element should be a "U" which I die cut from shiny silver cardstock using a SU alphabet die.  When I checked the list I still needed glitter
and seam binding so checked my heart bucket and found a red glittered heart and my stash of vintage seam binding and found some coordinating red seam binding which I had dyed for a previous project which was perfect.  I used a permanent black marker on the chipboard "R" - completely covering up the bright pink!!  Perfect!!
Once my postcard was dry I arranged my words, letters, red glitter heart and the metal embellishments.  I decided to tie the seam binding to the R which worked in all of my elements.  Once everything had a home I glued the words in place.  I used three black diamond brads to attach the silver metal screening,  a vintage gold brad to attach the round TH "wonderful" embellishment and three black mini brads to attach my "U".  I tied a short length of the red seam binding to the stem of the "R" using a double knot, attached it with 3D foam tape and tucked the seam binding ends in around the "U".  The glittered red heart was added using double sided tape.  The words seemed too stark so I used the same gray watercolour I had used on the postcard front and added several light washes to tone them down a bit. I also added a bit of black to some of them to better define their edges.
I am very happy with my postcard and having used the "R" I can use it for the postcard swap for the end of the month!!  So, a good use of my crafting time today as I managed to get the TH tag challenge done in the same project as the "R" postcard swap!!

Therese

Saturday, December 27, 2014

Another couple cards with serendipity collage

I have been on a collage kick for the past few days and here are a couple more cards that use a serendipity collage.  I used green and blue for this serendipity and it ended up with some orange in it too which was kind of fun.
I created the collage on 8.5" x 11" scrap paper using a regular glue stick, stamped it with a newspaper column background stamp (IO) using green ink.
For this card, I punched the left hand side with a chevron punch (SU) and backed the holes with navy cardstock.  I added a navy gros grain ribbon and stitched the whole layer to an orange card front using orange thread.  I added a colour printed greeting which I trimmed to look like a tag to the ribbon using orange fiber. I created a bit of a collage on the right hand side using a colour printed light house image (mine) and a green and blue rectangle.  Once the collage was in place I used double sided tape to adhere the greeting in place.  The large white area to the left of the greeting seemed to pop too much so I dug through my used postage stamps and found this one that had the right colouring and size. I glued it in place with double sided tape.  That was much better!!
For this card, I used an ATC from my traded collection which features a beautiful little bird done in glittery transparent embossing paste.  I started by adding navy ribbon to my serendipity collage and then stitched the whole thing to my green card front using red thread.  I added a colour printed greeting to the bottom edge of the ATC and then adhered this element to my card front using double sided tape.
Using ready to go focal elements makes for quick and easy cards!!

Therese

Wednesday, December 24, 2014

Serendipity collage cards

 While I was digging in my scrap bucket for the strips for these cards I found a baggie of scraps I had been saving to make another serendipity collage similar to the one I used here adding in a few more coordinating scraps that were still sitting on my desk.   I used an 8.5" x 11" piece of scrap paper as my base and glued my coordinating scraps which were torn into small pieces randomly onto the surface using a regular glue stick.  Once it was dry, I stamped the final piece using a flourish background (IO) using red ink.  I cut the sheet into quarters and used two of them to make these cards.
For this card, I cut out a square using Nestabilities and stitched the remaining frame to a rust coloured card front using my sewing machine with rust coloured thread.  I trimmed a watercoloured stamped image of a coffee cup to fit perfectly in the opening and glued it into place.  I added a flag ended colour printed greeting just below using 3D foam tape.

For this card, I used a label punch (SU) to punch a hole in the top portion of my quarter sheet collage, inserted a punched colour printed greeting into the aperture and used tape on the back to keep it in place.  I added a row of coordinating ribbon pieces below it placing another piece of ribbon through the middle of them which I sewed in place thereby securing all of them to my collage.  I sewed the collage to a rust card front and added a layered punchie flower over the ribbon accent using double sided tape.

Really liking these collage for giving my cards an unique artsy look!!

Therese


Saturday, December 20, 2014

Scrappy collage and cards


I am always looking for ways to use my scraps so I dug out these 3/4" wide strips from my stash and decided to find a way to use them up.  I cut these for making a patchwork layout  for a journal class a few years ago, then for a log cabin patchwork for a cardmaking class and used a few more for paper beads for another class.  They are sorted by colour so I picked green and pink  - my favorite combination - and glued them end to end then side by side on an 8.5" x 11 scrap of used printer paper which was sitting by the printer.  Once dry, I cut it into quarters and stamped two of them with pink ink and the other two with green ink using a newspaper column background stamp (IO).  I cut one of the green quarters into two and started cardmaking!!

Here is the first card I made.  I cut the 2.75" x 4.25" into four, interchanged the pieces and glued them to a piece of brown cardstock then trimmed it to leave an even border all the way around.  I attached it to my stippled card front by stitching all the way around with my sewing machine using brown thread.  I added a layered flower using a small white brad.  I added a punched (SU) laser printed greeting which I had sponged and stippled with green ink.
For this card I used one of the collages I had stamped with pink.  I cut the quarter into two and used one of the halves for this card.  I cut the 2.75" x 4.25" piece randomly into six pieces, glued them to brown cardstock and then machine stitched all the way around using brown thread. I trimmed the brown cardstock to leave a large border on the bottom to accommodate my laser printed greeting and an even border on the three other edges.  I added my sponged greeting and a coffee cup image which I had punched with a 1.75" circle punch (SU) and layered with pink before I glued the whole piece to a kraft card front.
Two cards ready to go for the new year!!  That leaves me three full quarter sheets of this collage to play with later on and the possibility of creating another six cards with this collage which I created out of scraps!!  I like the artsy and unique look I get when I create these collages for my cards.

Therese

Thursday, December 04, 2014

Another calendar with birdie photos

 I made another birdie calendar with the photos from my second 2014 photo calendar.  Here is the first on I made.  I have enjoyed the calendar all year on my desk and have now given it a new life and it will bless someone else this coming year.  I wanted this one to have a lighter feel so I used blue cardstock (8.5" x 5.5") and stamped it on the top portion with a newspaper text background stamp (IO) using Versamark ink.  Because it darkens the cardstock colour it always coordinates.  It was just as much texture as I was wanting.  I trimmed the blue bird images (4" x 4") off the original photo calendar (4" x 6") and layered them onto 4.25" squares of black paper before I glued them to the top of the calendar pages.  I printed another of the calendars I created for the first one, trimmed them to leave a slim border and glued them below the layered photos.  I added a length of wide white gros grain ribbon in between and added a little flower sequin with a brad on the left hand side.  I added all the flowers before I used double sided tape to affix the right hand side of the flagged ribbon which covers the back of the brad from the other side.  I added a silver bull clip at the top to keep the pages together.  The calendar can now be hung on a pin or nail, attached to any metal surface with a magnet or will stand on its own on the bottom edges of the pages.
 Here are the rest of the pages I created for this calendar.  Again, this is a double sided one  - January to June are on one side and July to December are on the back.

 
I have really enjoyed creating these calendars for gift giving this year.  I have more ideas for next year!!

Therese

Tuesday, November 25, 2014

Tarot card calendar

 Another calendar for the holiday season!  It is a gift you can give anyone!!  Overnight, I remembered I had these wonderful image in my stash so yesterday morning I went searching and was lucky enough to find them straight away!!  They come from a glossy publication that I purchased years ago at a thrift store.  At the time, I thought they were wonderful images and would certainly work into one of my projects somewhere along the way. They are images of very old tarots cards - from a time when they were all hand painted and used by royalty to play a game. I trimmed the images leaving a slim black border.  I cut kraft cardstock to 3.5" x 8.5" (6 of them) and stamped a flourish background (IO) on the top portion using black ink then mounted my image.  I punched a ribbon border (SU) out of black cardstock and mounted it below the stamping using a glue stick.  I adhered my trimmed 2015 calendar page (12 to page from calendarlabs.com) which I sponged lightly around the edges below that using a glue stick.  This is a double sided calendar - January to June are on one side and July to December on the other.  I did the one side first and then when I was doing the back sides I positioned the ribbon borders back to back.  I pierced through a hole on each end so I could align them exactly over each other.  Once they were dry, I pierced all the holes with a push pin over foam and used gold embroidery thread to add stitching to the ribbon border. Love the way it turned out!!!  I created straight stitches on one side and diagonal ones on the other.

Thinking they needed just a bit more texture I added gold coins using large glue dots.

Just enough embellishment!!  Here are all the pages I created!!  I do have a few images left over for another project!!

You can check out the other calendars I have created here and here!

 One uses handmade paper and pressed botanicals and the other, little blue bird collage photos  

reused from a 2014 calendar.  

These are quick and easy!!  You
can use themed paper, printed digital images, printed clipart or old calendar images as 


  your focal elements.  Just work out your cardstock size by laying out your images, calendar pages and any 
other elements you would like to add for texture and interest. 

I hope you are well on your way in preparing for the holiday season!!  
I am very happy with the calendars I have created and am looking forward to getting my Christmas cards out the door!!

Therese

Sunday, November 23, 2014

Pressed botanicals and handmade paper calendar

 Another calendar for this season's gift giving!!  I created this one from handmade paper I made a while back and some pressed botanicals which I pressed many years ago.  I went through my stash of pressed botanicals yesterday.  Quite a few of the flowers have faded losing most of their colour so they will have to go into the compost bin.  The few who are still beautiful will be sorted and stored for another day.
I started by tearing sheets of white handmade paper into twelve 4.25" squares and choosing 12 different pressed botanicals to use - one for each month.  I used thinned Matt Modge Podge to adhere the botanicals to the handmade paper then coated a piece of white tissue paper and laid it "glue side down" over the botanicals applying yet more Modge Podge to the outer surface until everything was nicely sealed.  I left them to dry and then pressed them between parchment paper under weight over night.


I chose cardstock (8.5" x 5.5") that coordinated with my botanicals and stamped them on both sides with a coordinating ink using a flourish background stamp (IO).  I glued my printed calendar pages to the bottom section of each piece of cardstock and applied a strip of double sided tape just about in the center and adhered some small pieces of ribbon to it which creates a fun textured border between the main element and the calendar page.  Once the ribbon pieces were in place I used double sided tape to
hold my handmade paper elements in place and then sewed all the way around to attach them to my cardstock.  These are double sided pages - January to June are on one side and July to December are on the other.
Once they were all finished I wrote the names of the botanicals on the handmade paper elements by hand using a fine tipped Sharpie marker. Really happy with this calendar!  Subtle backgrounds, lots of texture from the handmade paper, flowers and ribbon and a cohesive look overall.  Here is a look at all the pages I created.

 I created a similar calendar last week which you can view here using little birdie collage photos.  I am really loving this format and appreciate that the pages can be held together with a bull clip for easy hanging.  This calendar is somewhat thicker than the last one
 because of the many layers of handmade paper.  I am glad to be using some of my handmade paper as I have quite a stash of it from the last few years.   A person can make many sheets of paper in a day so it doesn't take long that you have more than you can readily use.  I will be

making an effort to include it in more of my creations in the new year.

I hope you are all getting your Christmas cards ready to go and getting around to any Christmas gifts that you make for family and friends.  Thanks to my group swaps I have been exploring some gift giving options for this holiday season.

Therese

Saturday, November 22, 2014

Calendar with collage photos

I created a calendar this afternoon using 4"x 4" photos trimmed from my little bluebird calendar.  The calendar was a Christmas gift from my sister last year.  She creates 4"x 6" photo calendars for sale using her photographs.  She photographed my little 4" x 4" collages last year and created a calendar with them.
I used the originals on a swap calendar last year and thought it would be really cool to reuse these little images and give them another go around in the world.

I started with six half sheets (8.5" x 5.5")  of black cardstock and stamped a flourish background (IO) on the top portion using silver pigment ink on both sides.
 I trimmed the calendar portion off of my 4"x 6" calendar pages which left me with 4"x 4" photo images.


I created these little buttons for my embellishments.  They are a digital image which I laser printed, punched out, sponged on the edges and added white thread through the holes I punched in the center.

I used double sided tape to glue my blue bird collage images over the stamped backgrounds and used glue stick to adhere my printed calendar pages. The pages were created in Word Perfect inserting numbers into a table.  January to June are on one side and July to December are on the backs.  I wrapped white thread around the calendar between the two pieces and tied the ends off on the left.  I covered that with one of my little buttons using a large glue dot.  On the back, I simply tied a piece of the same thread on the left hand side to simulate a knot and added my button the same way.


 Here are all of the calendar pages I created.

They can be held together with a bull clip at the top and hung on a nail OR stuck to a magnet on any metal surface.

They could also be punched with a small hole punch in the top center and hung on a pin OR strung on a ribbon or cording and hung almost anywhere.
I am in the process of producing several calendars - a couple for swaps I have joined and several as gifts for the holiday season.  I have not yet decided which calendar will go where!!

Therese