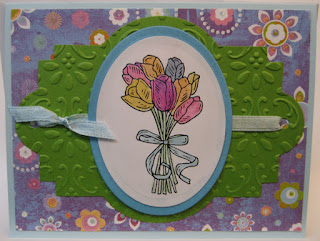
For our third card I decided to use yet another label (SX) and layered on oval images!! For these cards we started by gluing our decorative paper to our card fronts. We then coloured our images and layered them onto an oval of cardstock (Nestibilities) in a colour that coordinated with our backgrounds. We punched holes on the two ends our our embossed label die cuts and inserted the ends of our ribbon and held them in place on the back with double sided tape. The short section we trimmed off was tied using a single knot to the piece we had just added to our labels to simulate a bow.
Once the labels were glued to our card fronts we added our oval focal elements overlapping the ribbon using 3D foam tape.
The tulips are from WP clipart and the little snowman is from Torico - Birdie Brown. I have started making at least a few Christmas card kits for each class which allows those who have enough of everything else to make a Christmas one for later this year.
I will be making up the extras for my Christmas card stash!!
Therese
Friday, April 01, 2016
March Cardmaking - little flower embellishments with a bit of bling
For my second card I created some flower embellishments by adding rhinestones to aqua diecut embossed cardstock confetti!! I chose the background paper to work well with the embellishments I had created and added a large double punched border strip over the decorative paper. I did add a ribbon between the embellishments and the layer which is harder to see on the bottom card. I used the SU eyelet punch on the top white one and the eyelet punch from MS on the bottom one. The girls had a good time with their cards! Some decided not to use all of the embellishments on their cards so others decided to use their extras in an all over pattern.
I love teaching for that exact reason - others provided with the very same supplies will always come up with creative ways of using them differently!!
I provided a variety of greetings and layers for adding to the cards.
Therese
I love teaching for that exact reason - others provided with the very same supplies will always come up with creative ways of using them differently!!
I provided a variety of greetings and layers for adding to the cards.
Therese
March Cardmaking - resist decorative paper and fun images

For this month's card making class I started by prepping kits that featured these fun labels cut with the Tim Holtz - Ornamental die. I used decorative paper which I created a while back using ivory cardstock, clear wax and a diamond texture plate. After laying the cardstock over the texture plate I rubbed clear wax over the surface and then applied a green colour wash. Once they were dry, I laid them coloured side down over an absorbent paper surface and used an iron to remove the wax. I then over stamped the resist pattern using a flourish stamp and olive green ink. I found that both ivory and pea green cardstock worked well for my cards. I added some stippling using green ink - a soft green for the ivory and a darker one for the green - around the edges of my card fronts to add a bit of texture. I added the ribbon across the upper portion of the label adhering both ends to the back using double sided tape and then mounted this element to my card fronts. To change things up a bit I chose to colour print my digital images onto ivory cardstock and then cut them out with my circle Nestibilities. Once my images were watercoloured I layered them onto green and used 3D foam tape to adhere them to my card fronts overlapping the ribbon. I tied a short piece of ribbon with a single knot to the length I had already put on to simulate a bow. I punched out the coordinating colour printed greetings, watercoloured their edges a bit and then adhered them below the focal element. The pansy is by Anne's "Cards 4U" and the little birdies are from Birdie Brown's. It is always fun to create fun decorative paper to use in your cardmaking!!
Therese
Subscribe to:
Comments (Atom)


