Sunday, February 28, 2021

SISTER STASH - An all occasion card featuring a feather stamped background, some peacock feather paper and a bright yellow butterfly


 It has been fun to play with someone's stash of paper crafting supplies.  My sister left a few bins with paper crafting supplies here after visiting for a weekend and I agreed to make cards for her with it!!  I have made quite a few and now with a bit of time on my hands I thought I would make an effort to quite a good stash made up for her.  This card started with a large white card to which I added a layered green background made of sturdy tissue paper.  I stamped the one piece with a feather stamp in green and overlapped it over the other one which I stamped with a script stamp in the same green.  I had several pieces of the peacock paper - the last of it  - and decided to trim out three pieces in increasing sizes, then wove a piece of green cardstock between them before gluing them all down onto my background.  I found this coordinating yellow butterfly in my stash! I adhered it to my card front using double sided tape behind the body which leaves the wings free to add depth to my card.  Therese

Saturday, February 27, 2021

SISTER STASH - All occasion card with a gingham/distressed background and a cute bunny with a large turnip

Still working on getting the stash of cards I made for my sister blogged!!  This one started with a large taupe card which will fit in the envelopes she has on hand.  For my background I sandwiched a piece of coordinating gingham paper between two pieces of distressed red paper and adhered them with regular tape on the back.  I trimmed the rabbit from a large sheet of scrap booking paper from my stash.  It was the perfect size to cut with the large scalloped circle (StampinUP).  Once cut I used a round Nestibilities as a guide to add the faux stitching around the edge.  Worked perfectly!!  I added a strip of the distressed paper onto the gingham piece and tucked the scalloped circle behind.  I added three little black punchies to the strip to finish off my card.  
 

Friday, February 26, 2021

SISTER STASH - An all occasion card featuring three balloons and some bright paper

I have been working on being creative with the cards I am making for my sister with the stash of paper crafting supplies she left here a while back.  I have always liked balloons on cards but with only a small punch it limits where I can use them.  For this large card I started with a red card and added the bright striped paper!!  I used my Nestibilities to cut three circles which I wanted to turn into balloons.  After die cutting the circles I embossed them and sanded the blue one to reveal the white core.  To create the knot in the neck of the balloons I took a scrap of the same cardstocks and cut a strip with a triangle shape at the end which I adhered to the back of the balloons which quite nicely simulated the knots.  Next, I sponged all their edges with coordinating ink and then tied dark gray threads to all the balloons.  I die cut a purple fence to tie them to and tore a piece of green cardstock for the grass.  I adhered the grass and then tucked the fence into it.  I used white glue in a fine tip applicator on the fence.  Worked really well.   I used a large needle to get the strings of the balloons wrapped around the top rail of the fence.  I will certainly be making balloons this way again!!  I like the way they turned out.  Therese
 

Thursday, February 25, 2021

SISTER STASH - Birthday card with bright background paper and four embossed gifts


 For this card I started with a large blue card and added some very bright striped decorative paper using two pieces with the striped going in different directions.  I cut four rectangles from coordinating cardstock and embossed them.  I sanded the blue one because it was white core cardstock to add more texture.  I used a flower die (Cuttlebug) to cut a swirly yellow flower which I used to simulate a bow on the top of the blue gift.  I attached it to the back of the gift with double sided tape and then cut a strip from the same cardstock to create the ribbon on the front.  I did the same for the other three gifts.  After auditioning them for placement I adhered them to the front of my card using 3D foam tape on the yellow and pink one and just glue on the blue and green ones.  The gifts and bright colours make this a great birthday card for a child or any one who is young at heart!!  Another for the card stash I am creating for my sister who left some paper crafting supplies here a few years ago.   Therese

Wednesday, February 24, 2021

SISTER STASH - All occasion card with more cute birds, decorative papers and one special one

For this card I started with a large white card.  I gathered my supplies - the bird panel, an orange background, a green textured layer and some coordinating ribbon.  I cut the bird out of the cute paper and then cut the orange scalloped circle (Nestibilities)to mat it from the orange background before I adhered it to my card. I added the borders to the bird panel and glued this large element over my background.  I adhered the bird to the scalloped circle and decided to trim the corners of the green paper with a corner punch before assembling my focal element.  In the process I decided to add the long strip of aqua paper which was on my desk and then added the green layer.  Wanting a bit of something to off set the strip I added two lengths of this beautiful red ribbon to the back of my bird before adhering it over the green paper.  It was fun to maximize the use of this bird paper.  The few leftover scraps might show up in a collage somewhere down the road.  

Therese

Tuesday, February 23, 2021

SISTER STASH - All occasion Card featuring cute little birds, stitched decorative papers and some maple leaf embellishments

This is one of the most fun papers that I found in the stash of papers that my sister left here a while back.  I have made several cards with it before and I am nearing the end of all this cuteness!  I started with a large white card which fits in the envelopes she has on hand.  I added a large orange layer and then worked on getting the other elements ready.  The borders were on the edges of a 12" x 12" sheet and had been trimmed off in a previous session.  The coordinated nicely. I took several small pieces of the bird paper to create my central element after I had trimmed out my little red bird (Nestiblilities).  I then added the borders on each side.  The borders were embellished with my pattern wheel before being glued down.  I die cut a scalloped circle (Nestibilities) from the same coordinating orange paper.  I adhered it over the birdie strip but it did not pop quite as much as I wanted it to so I added the two little strips of orange which were sitting on my cutting table.  That framed it nicely and was an improvement.  Thinking it still needed something red to coordinate with the glittery red bird I went looking for something in my stash.  I found these bright red maple leaf embellishments which were just the right colour.  I added them to my card using large glue dots.  That was much better!!  Therese
 

Monday, February 22, 2021

SISTER STASH - All occasion card featuring a cute flower (digital), a band of sanded & embossed cardstock and decorative paper

Another card for my sister's stash!!  This one started with a large red card to fit in her envelopes.  I added two pieces of this colourful polka dot paper and then a strip of embossed and sanded cardstock to cover the gap in between.  The flower was colour printed on white cardstock, trimmed out and then the edges distressed.  I matted it with this dark red textured paper and trimmed the bottom edge with a scallop border punch (StampinUP) and finally added an embossed line using my score tool.  I mounted this large focal element to my card front using 3D foam tape and then finished it off by adding clear rhinestones to each of the scallops in the border.  

Therese
 

Sunday, February 21, 2021

SISTER STASH - All occasion card with beautiful strawberry paper and a great cupcake with a strawberry on top

I really loved this strawberry paper when I found it in my sister's stash of paper crafting supplies she left here a few years ago.  I have been making cards for her here and there but recently decided to make a more serious effort to make her a stash of cards.  
I chose a dark green cardstock for the large card I created to fit in the large envelopes she has on hand.  I trimmed a couple pieces from the paper which nicely featured the strawberries and mounted them to the top and bottom of my card. I trimmed a piece of coordinating textured paper, trimmed the top and bottom edges with scallop decorative scissors and then used a push pin to pierce each scallop.  I adhered this piece to overlap the strawberry ones.  I added a strip of texture white cardstock with a fish tail end.  I added watercolour around the cupcake to just soften the background from stark white as I colour printed this digital image of a cupcake (CLKER) on white cardstock.  To add a bit more texture I ran my pattern tracing wheel along all four edges.  I layered the cupcake image onto dark green cardstock and then mounted it to my card front using 3D foam tape.  Love this one!!
Therese

Saturday, February 20, 2021

SISTER STASH - All occasion card with an airplane, eyelets and blue green duplex paper

Still getting the cards I made for my sister blogged here.  She left some paper crafting supplies here a while back after I agreed to make some cards for her with them.  It was good to get quite a few made!!  
This one features a colour printed image of an airplane which I down loaded off of CLKER.  I chose this blue green paper to go with my image and because it was double sided I trimmed out the middle section and flipped it and put the pieces back together with regular tape.  Wanting to add a bit more interest I used a zigzag stamp (Hero Arts) and dark blue ink to stamp on the line where the papers join.  I really like how it looks and will have to keep that process in mind.  I have several other "stitch" stamps which would be effective is other situations.  I adhered the decorative paper to a coordinating blue card and used a scrap to mat my image.  I added pewter eyelets in the corners and then mounted this focal element to my card using 3D foam tape.  To finish off my card I added a border around my background using a clear glitter pen.  
Therese


Friday, February 19, 2021

A birthday card featuring a cute camping image (digital), a font greeting and a punchie button


 This card is for my other grandson whose birthday is a few days earlier though they will be celebrating together at home this year due to restrictions.   I created a green card to fit in an envelope from my stash.  I added a green and taupe decorative paper (gift wrap) leaving a small border.  The camping image is one I downloaded from Pixabay and laser printed onto white cardstock.  I trimmed it out with a circle die (Nestibilities - Classic Circles) then watercoloured it lightly - a bit of blue in the sky and green for the trees and hills.  The tent and the fire were already coloured.  I trimmed another circle as mat for my image from a coordinating taupe cardstock, adhered them together and mounted this focal element to the left on my card front.  I trimmed out the font greeting, colourwashed it and added it to the lower edge.  I found a green punched button (Sweetly Scrapped) in my stash which coordinated very nicely.  I added brown thread to it and mounted it between my focal element and my greeting.  
Both of these cards will soon be on their way to arrive in time!!         Therese

All occasion card shaker card with a floral theme in yellow's and gray's

My friend is having surgery next week so I made her this card to cheer her up.  

I started with a large envelope from my stash and created a gray card to fit inside then added a layer of this elegant floral paper. 

After deciding to make it a shaker card I went looking for the packaging from my rolls of double sided tape which I have recently saved for this purpose.  I have four of them.  I took one and trimmed all the way around the central depression which is a trough that the roll of tape sits in when packaged.  I die cut a large label out of textured yellow  cardstock  (Tim Holtz Sizzix. Ornamental) and backed it with a strip of gray cardstock which I embossed with the Cuttle Bug Swiss Dots embossing folder. I used my Classic Round Nestibiities to cut an opening that would accommodate the shaker I was creating.  I applied double sided tape on the edges of my plastic shaker piece and adhered it into the opening from the back.  That looked good!!  I decided to back it with a piece of clear plastic which I cut from packaging using a larger round Nestibilities.  I filled the depression with little glass beads and flowers in silver and yellow.  Once I thought I had enough in there I added double sided tape all the way around and attached the large clear plastic circle which nicely sealed all the little fun bits inside.  I decided that I needed to add a flower under the shaker so there would be something interesting to see when the elements were all sitting on the bottom of the shaker.  I die cut, embossed and layered a flower in grays and yellows which I glued to my card front once I had positioned my shaker.  With my flower in place I adhered my shaker element to my card.  I added faux stitching to the yellow layer along with a few rhinestones to finish my card.  

 You can see below the packaging I used to create my shaker and how I cut it.
Therese


SISTER STASH - All occasion card with a piece background, a cute cupcake with a cherry on top and some bling

I am really enjoying revisiting these cards as I blog them. I created them a while back with supplies which my sister left here a few years ago after I promised to make cards for her with them.  I have made several batches for her and thought it was time to make a few more.  I did organize them all by colour this time when I had everything laid out so it will be a little easier to find coordinating papers and cardstock when I made the next set!!  For this card, I started with a deep red card (85" x 5.5") that will fit in her large envelopes.  I had one piece which I trimmed to fit on the card and had a strip from which I punched the circles using a 3/4" circle punch.  Worked really well and I really like the look of them.  I added a strip of texture red paper with fish tail ends over the large piece and then added my layered cupcake image.  The cupcake image was colour printed.  It is a digital image I downloaded from CLKER.  I layered it onto a coordinating green cardstock and punched the bottom edge with a daisy border punch (Martha Stewart).  I adhered it to my card front over the red strip and then added clear rhinestones to the middle of each little daisy to finish off my card.  Therese
 

Thursday, February 18, 2021

A camping themed birthday card including a cute little tent, some watercolour and some layered papers

Our oldest grandson is having a birthday soon and he & his brother will be celebrating together with a camping theme.  I found some excellent images on Pixabay and this is one of them.  I laser printed it on white cardstock and watercoloured it.  I traced a spool for the sun with a pencil before I started colouring.  I did it first and let dry a bit before I did the rest - the sky, trees in the background, grass and a bit of brown in the foreground for a road.  I added a layer of gray brown and black decorative paper and used black watercolour to connect the two with common elements.  I created a brown card to fit in an envelope from my stash.  I added a brown decorative paper and then my large camping site image.  I added a torn distressed paper on the bottom and trimmed it to the edge of the card on both sides.  The greeting is a laser printed font which I colour washed to coordinate and added to the lower section along with a paper punched button to which I had added brown thread.  Happy with how it all came together!!
Therese
 

SISTER STASH - All occasion card with a paper pieced background, a cute cupcake (digital) and some eyelets and paper piercing

Another card I made for my sister from the stash of paper crafting supplies she left at my house a few years ago!!  I have enjoyed the process!!!  I started this card with a large red card (8.5" x 5.5") which will fit in her envelopes.  I added a paper pieced background using two coordinating background papers by simply cutting three strips and then cutting them randomly across so the cuts did not line up.  I used a colour printed cupcake image (digital) which I downloaded from CLKER. I layered it onto a deep red textured paper and added red and white eyelets.  Have not used those in quite a while.  They always add interest and texture.   I trimmed the bottom edge long and then punched it with the scallop border punch (StampinUP).  I backed it with a white one just off setting the scallops a bit for a fun effect.  I added three embossed lines using my score tool and it was ready to be applied to the front of my card using 3D foam tape.  This would work well for a birthday or a sweet thank you!!            Therese
 

Wednesday, February 17, 2021

SISTER STASH - All occasion card featuring a vintage car, some red corrugated paper and black brads and ribbon


 Having a lot of fun playing with the stash of cardstock and papers which my sister left here a while back and I am using to make cards for her.  She prefers cards without greetings which are more versatile because they can suit more than one occasion.  For this one I started with a large black card (8.5" x 5.5 ") which will fit in her envelopes and added this speckled background which very well suited this vintage card image.  The vintage car is one I downloaded from CLKER, laser printed and then embellished with watercolour to simulate a parking lot, grass, shrubs and sky.  I added clear glitter to the headlights, bumper and hubcaps.  I ran a thick black marker around the edges once it was dry which helped define them and added a bit of a vintage look to it.  I tore the piece of red corrugated paper on the top and bottom and trimmed it neatly on the two sides.  I added a length of thin black ribbon and secured the ends to the back with doubled sided tape.  I tied a short piece to it using a single knot which nicely simulates a bow.  I positioned the car image over the red corrugated and attached it with four black brads.  I adhered this large focal image to my card front and put it under weight to dry.  Another fun card that can be used for a variety of occasions!!    Therese  

Tuesday, February 16, 2021

SISTER STASH - All occasion card featuring bold stripes/plaid decorative paper, brown grosgrain ribbon and a blue plane


 This is my third card from my sister's stash of supplies.  It has been really fun to find fun papers, coordinating cardstock and make a card with them.  For this card, I colour printed a little plane (digital from CLKER) and then added clouds by sponging around a torn shape with blue ink.  They look much better than I expected ( have saved that little piece for next time) and the colour laser resists the sponging so it does not affect the printed image.  I ran my tracing wheel all on four sides and mounted it to a scrap of blue from the stash.  I left it with a bit on the bottom which I trimmed with pinking shears which no longer cut fabric and then embossed a line using my score tool.  I chose this double sided paper in blues and greens for my background.  I trimmed the middle section out and flipped it over to the blue plaid side and reattached it with regular tape on the back.  I used a zigzag stitch stamp (Hero Arts) and dark blue ink to stamp over the joints which worked beautifully.  I mounted my background to a medium blue card (8.5" x 5.5") which will fit in her envelopes.  I added a length of wide brown grosgrain ribbon which I fish tailed on one end and adhered with double sided tape on the other.  I secured the fish tail end with a bit of double sided tape as well and added a bit of glue in between.  I added my layered airplane image using 3D foam tape.    Therese

Christmas cards for February - Peace cn Earth with a variety of colours and decorative papers and embossed ornaments

I have committed to making my Christmas cards monthly this year.  These are the six I made for the month of February.  I found the gold embossed Peace on Earth (Prairie Rubber Stamps) images in my stash of Christmas images so I have to think I had a plan at the time I put them there but maybe not.  I could simply have been making good use of scraps.  Either way, I went ahead and chose some coordinating decorative papers - poinsettia, plaid, brown holly and large stars are all commercial decorative papers.  The red/green on is a digital from Stampin UP which I colour printed a while back.  I tore top and bottom edges off each of the stamped greetings and ran my tracing wheel on both straight edges.  I mounted my trimmed decorative papers to coordinating card fronts and then added the large greetings.  I wanted to add a bit of an embellishment so I cut six little ornaments (Sizzix - long Love Peace Joy sizzlet die) in a coordinating colour for each one.  Next, I dug through my embossing folders and found little elements which I could use to add a focal element to my ornaments.  After embossing them all with images from different folders, I used an embossing pen and just coloured the raised areas and embossed them with gold embossing powder.  I tied six little bows from some gold thread and glued them to the top of the ornaments with a tiny drop of white glue.  Once they were dry, I added them to my cards using 3D foam tape.  

So glad to have another set of cards to add to my Christmas card box!!  Therese


Monday, February 15, 2021

SISTER STASH - All occasion card featuring a red berries photo, an embossed metallic layer and red ribbon

Making cards for my sister who left a stash of supplies at my house a while back has begun.  
This card (8.5" x 5.5") started with a red card to fit in the large envelopes in my sister's stash.  I cut the photo of the red berries (4" x 4") from a calendar which I received from my other sister, Sylvia for Christmas a few years ago.  I have saved all the pages from my previous calendars from her to use in my card making.  I found this beautiful metallic copper heavy weight cardstock which worked perfectly with the photo and then the gray (SU) which went very well on the red card.  I tore the edge of the piece I trimmed for my background - I like the white line that reflects the white in the photo.  I trimmed the copper metallic to leave enough below the image to trim decoratively and place a bow.  I trimmed the bottom edge with one edge of a Tim Holtz Styled label by carefully aligning it and being careful with how I positioned my partial cutting plate (parts of broken plates).  I embossed it with the CuttleBug Swiss Dots embossing folder and sanded it a bit to highlight the core which I thought was black but was white.  I used a black pad to cut back the white a bit.  I mounted my photo onto this layer and then adhered it to my card front over my background paper.  I tied a bow using Martha Stewart seam binding and adhered it to my card below the photo using a large glue dot.  This could easily be a Christmas card or a sympathy card.  I love the colour combination of red, gray and copper!!
Therese
 

Sunday, February 14, 2021

SISTER STASH - All occasion card featuring a square photo of a dragonfly, ribbon and fibrous decorative paper

I have started making cards for my sister.  She came a while back and stayed a few days when her son was playing soccer locally and brought along some cardmaking/scrapbooking supplies which we made use of while she was here.  We visited more than we crafted so there were lots of supplies left after the weekend.  She left them here with the understanding that I would make her some cards from the lot.  I have over the last few years made quite a few for her but not so much in the last year.  I have decided to get started again.  I had a productive weekend and will be blogging what I have made over the next few weeks.  She has a stash of large envelopes so I have been making 8.5" x 5.5" cards to fit in her envelopes.  
This card started with a large green card.  I found this wonderfully textured paper which coordinated nicely and had already been ripped across the bottom so I simply trimmed the top and the side to get a layer for my card.  I added a brown grosgrain ribbon to this layer using a copper eyelet.  I backed the area of the paper behind the ribbon with a piece of cardstock so the eyelet would not pull through before adhering this layer to the front of my card.  I added a bit of double sided tape near the fish tail end of the ribbon and a bit of glue in between.  The photo on this card was part of a calendar which my sister, Sylvia, gave me for Christmas a few years ago.  I always save the pages in order to reuse the photos.  There is so much more real estate on a large card to accommodating a layered 4" x 4" photo.  It is much tighter on A2 cards.  I trimmed the dragonfly photo from the calendar page and matted it with burgundy paper.  I mounted this focal element to my card front using 3D foam tape and put the card to press overnight. 
Therese


Saturday, February 13, 2021

Upgraded sewing desk with a sewing machine lift


 For my Christmas gift to myself I bought a sewing machine lift for my little sewing desk.  I had already consulted with DH about the feasibility of putting one in and was given the go ahead.  It did require quite a few modifications and additions to get it in but it is wonderful to use.  The back had to be replaced with a larger more substantial piece of material and the front top had to be rebuilt into a full top which is what was needed with the raising of the sewing machine perpendicularly instead of the swinging storage that was in place before.  DH agreed to do the renovations to my desk as my Christmas present and I am most pleased.  The whole desk has been refurbished and cleaned up - new handles on the drawers and door/support, new base for the sewing machine with formica that matches the sewing machine, the new back now nicely painted the same colour as the other pieces.  I can now use my sewing machine flat with the top of my desk when I am free arm sewing.  DH built a wonderful insert so I can use my sewing machine for flat sewing as well.  Love the hearts!!  I am very happy to have been able to upgrade this little desk.  It fits perfectly in my space and I expect will be able to move to any other space when it will be necessary.    Therese 

Valentine card with LOTS of hearts and some ribbon


Having finally figured out the heart card I have been admiring for so long I have made my Valentine's card for DH using this format.  I chose scraps of cardstock that coordinated including one with musical notes - one of his favorite things is music.  I punched hearts from them and cut two in half to get my four halves.  I played with them until I was happy with the layout.  I chose one of the glittery red ones to be the special one.  I found a piece of aqua polka dot paper which I used as the base for my hearts.  I glued them into place, trimmed my paper and then put it under weight while it dried.  I decided not to add any machine stitching to this one - I liked it just as it was!!.  I had seen this heart embellishment on Splitcoast Stampers  and I really liked it so I used it on my card.  I die cut a white scalloped heart (Stamping UP) and mounted my red heart punchie (StampinUP) over it and added a pewter eyelet using my Cropadile.  It has been quite a while since both of those have seen daylight!!  I added three lengths of fiber to my heart layer - two gray with a smaller white one in between leaving them a bit loose knowing that I was going to tie them together and making sure that they lined up with where I was going to adhere my special heart.  I glued this large layer to my red card front which fits in a large envelope from my stash.  I used a short piece of gray fiber and threaded it through the eyelet on my heart, around the three fibers on my card and back through the front of the eyelet and tied it off with a double knot.  I mounted my heart in its place with 3D foam tape then trimmed the ends of my gray heart fiber to finish off my card.  I am very happy with how it worked out and I am looking forward to our at home celebration this weekend!           Therese
 

Friday, February 12, 2021

Another all occasion heart card featuring hearts punched from hand decorated paper, machine stitching and an embossed heart


 This is the second card I made with the bunch of hearts I punched from a sheet of hand decorated paper I made.  It started as a sheet where I tried out all the colours of a new set of pens using a very loose handwriting, a bit of colour added after another project and I added yet more watercolour in a variety of colours to get it bright enough to make the hearts for my two cards.  This is my second card and after having reverse engineered one I found on line I knew that I would need 14 hearts and 4 half hearts.  I did leave one space blank in the third row to put my special heart.  I chose a piece of purple light weight cardstock and glued down my hearts in close proximity to each other and then added the half hearts.  I put it under weight while it dried and then added machine stitching with purple thread tying off the ends on the back and securing them with regular tape.  For my special heart I punched one (SU) from silver metallic cardstock, embossed it with a flourish embossing folder (CB) and added a blue scalloped heart die cut (SU) in behind.  I mounted it in the open space using 3D foam tape.  The stitching on this one was more pronounced and I like it more subtle like on my first card.  I trimmed the purple and mounted it to a light aqua card which fit in an envelope from my stash.  Will do for a "much love","lots of hugs" card or an anniversary card.  It is going into my stash.  Therese 

Thursday, February 11, 2021

All occasion card featuring LOTS of hearts punched from hand decorated paper and one special one


 I have been wanting to make a card full of hearts like this one for quite a while.  I finally reverse engineered one I found on line to find that I needed fourteen full hearts and four halves.  I decided to use a sheet of white cardstock from my stash that I had already started altering with watercolour for my hearts.  I added several layers of watercolour in several colours to what was already there - a few marks and some very loose handwriting which I did when I bought a new set of pens and was testing the colours.  After it was dry I cut it into 1.75" strips which is what I needed for my heart punch (SU).  I alternated the direction of punching to make the most use of the strip.  I managed to punch a few halves as well from the scraps.  I chose these thirteen hearts and started gluing them down on a layer of light weight green cardstock without really knowing how wide I would need.  I glued down all the full hearts leaving a gap where the gold heart would be positioned and then added the half hearts.  I set that to press then added the machine stitching after they were dry.  I tied the threads on the back and secured them with a small piece of regular tape at each end.  I punched the gold heart and then added the scalloped die cut (SU) one behind it.  I originally had cut it from white which seemed too stark so I watercoloured the edge green instead.  It was better but I would have preferred a deeper colour but that is what I had in my watercolours.  I adhered them to each other and mounted them in the opening I had left open.  I trimmed the green layer and then mounted this large layer to a yellow card which fit in an envelope from my stash. Glad to have finally made one of these.  I have enough hearts from my piece of decorative paper to make another so I am off to make that happen.   Therese

Wednesday, February 10, 2021

STASH SERIES - All occasion card with a fun multicoloured chevron background, blue tags with glittery butterfly cut outs, ribbon and a large butterfly


 This is the sixth and last card in my STASH SERIES!!! Some of the elements for all of the six cards were created at the same time which saves time because all the tools were already out!!  
For this card I started with a large blue card front and added this fun chevron background (colour printed digital).  I dug five blue scraps from my stash and punched butterflies (Martha Stewart) out of them before embossing them with different embossing folders.  Next, I reinserted the butteflies into different tags to provide some contrast and texture.  These ones got a bit of extra sparkle because they had opening in their wings where the tape I used to secure them on the back was visible so I simply applied some beautiful glitter and rubbed it on.  It stuck to the tape which both added another dimension to them and made the tape non sticky!!  I rearranged the tags until I was happy and adhere them to each other using regular tape.  I added a white satin ribbon and tied on a short piece to simulate a bow.  After tucking the ends to the back of the tag element I adhered the whole to my card front.  I used a Sizzix butterfly die to cut my focal element  I used a hand decorated paper for the smaller butterfly and both vellum and white paper for the large butterfly.  This butterfly requires that you fold your paper and lay it on the edge of the die and it cuts both wings at once.  I have both a vellum and paper layer because in the end I found there was not enough contrast with the vellum alone.  I embossed the vellum butterfly, adhered the coloured one to it with double sided tape only in the middle where the body would be.  I tied silver cord with a double knot in the middle which created both a body and the two antennae in one process.  I adhered the white paper one to the back using double sided tape in the center.  I adhered the butterfly to my card front using another piece of double sided tape in the center nicely overlapping my ribbon.  The bit of sparkle from the glitter really adds appeal to this card!!  So happy to have had the chance to try making cards this way and I think I will probably do another series some time in the future using a different sketch!!!  So many possibilities!!            Therese

Tuesday, February 09, 2021

STASH SERIES - All occasion card featuring a floral background, a set of tags with floral die cuts, gray seam binding and a large layered flower


 This is my fifth card in my STASH SERIES!!  I am fond of this colour combination which I why I chose to add this beautiful floral background to the large gray card I created.  I dug six scraps of yellow cardstock from my stash, die cut little flowers from them and embossed them.  I reinserted the flowers in the opening in different tags and secured them with regular tape creating texture and contrast.   I arranged my tags, adhered them to each other using regular tape and added gray seam binding tucking the ends to the back before adhering this large element to my card front which fit just nicely on my card.  I tied on a short piece of the same seam binding to the one on the front using a single knot which nicely simulates a bow.  I used a Sizzix flower die to cut all the pieces for my floral focal element.  I cut two from gray cardstock and the other two from yellow using a bright one for the smallest one which is the center.  I adhere them all to each other after embossing them with the D'vine Swirl embossing folder from Cuttlebug.  I hand cut two large leaves, embossed them with script (Cuttlebug) and adhered them to the back of my flower.  I attached my flower to my card using double sided tape.  I really love how this one turned out!!!!!!!!    Therese 

Fun fire starter kits


 I made this batch of waxed papers today in order to send them along to the grand kids as an activity for their birthdays.  The boys have a camping theme so I thought it would be fun to send them kits for making up fire starters!!  I made up instructions and made an envelope for each one of them.  I will be sending the boys theirs for their upcoming birthdays and the girls will get theirs for their birthdays as they arrive this year.  You can see that I made up two of them to make sure they would work well with the supplies I chose this time around.  I used good one side bond paper from our scrap paper pile and simply applied wax crayons to the clean side.  Very little shows through so it makes the fire starters beautiful as well as practical.  I chose to used staples on the ends instead of stitching which makes it very easy for the kids to make themselves and filled them with only crushed newspaper instead of including shredded paper too which will make less of a mess.  I used a half sheet - 8.5" x 5.5" for each one.  You can see more info on this post:  Fire Starters.  If you want more info on how I waxed my papers you can find that here:  Wax crayon backgrounds.  I am glad to have this ready to send very shortly so they will arrive for their birthdays.  

Therese

Monday, February 08, 2021

STASH SERIES - All occasion card with a music sheet background, brown tags with heart cut outs, gold ribbon and a lacy heart


 Number four of my STASH SERIES!!  All the cards, backgrounds and tags were created at one time in order to save time and get all the elements made up when the tools were out.  
For this card I created a large brown card and added a music sheet background (colour printed digital).  I did embellish the background a little with watercolour because it was leaning more to the grays and I was wanting to add brown elements.  The watercolour only absorbed on the highlights of the image where the toner was thin which gave a wonderful effect.  Just enough brown to do what I needed it to with my other elements. I dug five scraps from my stash and die cut hearts from all of them.  I embossed the tags, reinserted the hearts into the openings of different tags to create texture and contrast.  I played with my tags until I had an arrangement I liked but discovered that they were wider than my cards so when I adhered them to each other with regular tape I overlapped them just a little to make sure that this element would fit on my card front.  I added a gold ribbon, tucked the ends to the back and then adhered this element to my card.  I die cut the lacy heart from both brown and metallic gold and used the gold heart in the brown lacy frame to create my focal element.  Because they nest, I used bits of tape on the back to keep my heart in the opening.  I adhered the heart using double sided tape to my card overlapping the ribbon.  It still needed a "bit of something" so I tied on a length of brown crochet thread and tied a double knot.  That was better!!  Therese

Sunday, February 07, 2021

STASH SERIES - All occasion card featuring decorative paper, star tags and a large gold embossed star


 This is my third card in my STASH SERIES which I started last week.  The six cards, backgrounds, punched and embossed tags were created in a bit of an assembly line which really saved some time as the tools were all out and got used for all of the cards.  
For this card I created a large red card front and added this beautiful fleur de lis background paper (colour printed digital).  I dug five scraps of red cardstock from my stash and die cut stars from them (Sizzix - red with four stars).  I embossed all the tags and then reinserted the stars in different tags to provide texture.  In this case, there was very little contrast because the reds were very close to each other in colour and value.  I rearranged my finished tags until I was happy with them and adhered them to each other using regular tape which is also what I used to secure the die cut stars in the openings.   I added a thin gold ribbon, tucking the ends to the back before adhering this large element to my card front.  I cut the a red star using the largest star on the Sizzix die, embossed it with script and then embossed it with gold embossing powder.  Lots of texture and a real nice metallic finish!!  I adhere it to a piece of brown cardstock and used a  ruler and exacto knife to trim it leaving a bit of a border all the way around.  I mounted my star to my card front using double sided tape and I was done!!  These cards are much nicer on their second look after pressing!!       Therese

Saturday, February 06, 2021

STASH SERIES - All occasion card featuring decorative paper, leafy tags, ribbon and two layered leaves


 This card is part of a series of cards I made for my stash.  I did the first steps - large cards, backgrounds, punched and embossed tag elements in a bit of an assembly line for all the cards - six in all.  It was time saving to make them this way as all the tools were used for each step for each card.  Not my usual way of making cards but I am very happy with how they all turned out. 
For this card I started with a large green card and added a leafy background (colour printed digital).  I dug five scraps of green cardtock from my stash and punched leaves from all of them.  I embossed all the tags and then reinserted the leaf punchies into the openings of a different tag which provided contrast in both texture and colour.  I used regular tape to secure them in place.  I played with the tags  until I was happy and adhered them to each other using regular tape.  I added a length of wide brown grosgrain ribbon tucking the ends to the back before adhering this large element to my card front.  For my focal element I die cut a large maple leaf (SIZZIX) from green white core cardstock, embossed it with a tree embossing folder and sanded it.  I used watercolour to highlight the sanded areas and then added a bit of yellow using a stamp pad.  I found the small leaf in my stash and thought it would make a beautiful accent for my large leaf.  It is a punchie which I embossed, watercoloured and thermally embossed in gold after it was dry.  I layered the little leaf on over the bigger one and then tied their stems together using brown crochet thread.  This large element was adhered to the front of my card over the ribbon using 3D foam tape.        Therese

Friday, February 05, 2021

STASH SERIES - All occasion card featuring decorative paper, embossed tags and a large layered flower


 In an effort to have cards in my stash I decided to make a series of cards all featuring decorative paper backgrounds, little embossed tags with embedded punchies and a large focal element.  I started with six pieces of cardstock in a variety of colours, chose decorative paper backgrounds, strips for my tags along with a punch/die and started the cards.  
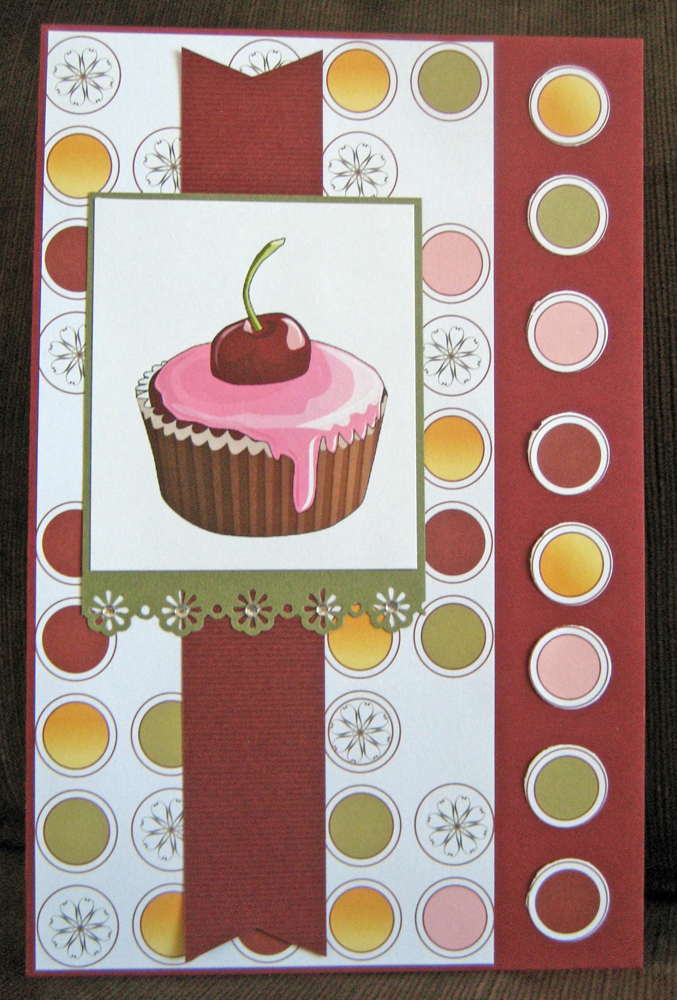
For this card I started with a large white card and adhered this fun floral paper in peach and aqua (colour printed digital image).  I chose five pink scraps from my stash, punched each of them with a six petal flower punch and then embossed the tags with a variety of embossing folders.  I filled the holes in each tag with a punched flower from one of the other scraps to create some contrast.  I adhered them from the back using regular tape.  The next step was to arrange them into a large element to put on my background.  I moved them around a bit until I was happy and used regular tape on the back to attach them to each other.  
I did all six of my cards to this level before moving on and adding a large coordinating accent.  
For this card, I created a large flower using a Sizzix flower die.  I cut two large ones  - one in dark pink and the other in white, then a smaller one from a medium pink colour.  I layered them and adhered them in the middle and then cut a yellow circle for the center.  After playing with the elements a bit I decided where the tag element would go and adhered it to my card front over the background.  Once I added my flower I found it needed something to keep it from blending too much with my tags and background.  I added a length of wide white gros grain ribbon with fish tail ends which I simply adhered to my card using double sided tape.  That was much better!!  Once I was ready to glue on my flower I decided it needed some leaves so I die cut two of these leafy sprigs (SU) from green cardstock and adhered them to the back of my flower before adhering this large element over the ribbon on my card.  The green leaves really helped to define the flower as well. 
Doing all the pieces for all the cards at the same time meant that I did all the punching, then all the embossing and then all the assembly of the tags at the same time which really saved some time.  I have very rarely had the time to make cards in this manner before.  I am usually running to get done what I need with a much tighter timeline so end up with one at a time. 
I really enjoyed the process and am very happy with how much character my cards have even if they were made to a certain level in an assembly line.  
Watch this space for the other cards I made as I get them posted!!
Therese

Large all occasion cards featuring blue and aqua decorative paper, sanded white core cardstock, foil and little birds

My last set of cards for donation which are very similar to my last two in that they use the deep aqua paper and the light yellow textured paper.  Both cards are landscape and the first on has the deep aqua pieced instead of whole like the other one.  I trimmed the yellow layer on the bottom one just to add some interest.  The small rectangles of aqua white core cardstock were embossed (top D'vine swirl - CB and the bottom brocade one - CB) and sanded.  I rounded the corner on the top one.  I punched the foil and used the circle punchie on the first one and the one with the opening on the second one.  Created my birds with the SU bird punch - yellow cardstock with watercolour for the bird and aqua for the wings.  The eye added with a black marker and the beaks with a yellow gel pen which I embellished with a lead pencil to add a bit more definition.  The branches for these two were also cut using the TH - Branch Tree using green cardstock scraps which were then watercoloured, adhered and trimmed to the edges.  These focal elements were added to my cards using 3D foam tape. 

Really happy with my little stack of cards.  I am sure they will be welcomed by the staff at the church and will go on to bless others as the need arises!!               Therese
 

Thursday, February 04, 2021

Large all occasion cards featuring decorative paper, sanded white core cardstock, foil and little birds

Still making cards for donation and for this set I used the same deep aqua and yellow as the last set.  The deep aqua are 4" x 4" with the yellow layers being larger.  I created white cards to fit in some large envelopes from my stash.  The foil layer on the first was punched with a 1.75" circle punch (SU) and the punchie used on the second card.  I embossed both pieces of aqua white core cardstock (distressed lines - CB on the first, D'vine Swirl - CB on the second) and sanded them.  I rounded the corners on the first one.  I rounded the corner on the foil layer as well before mounting it on my card along with the aqua piece.  The little birds were created using punched pieces from a bird punch from Stampin UP.  I punched the birds from yellow cardstock and watercoloured them, added eyes with a black marker and the beaks with a yellow gel pen which I embellished with a lead pencil to give them a bit more definition.  I punched the wings from teal cardstock scraps and embossed them before adhering them to the birds.  The punch includes a branch with leaves but it seemed too flimsy so I used Tim Holtz - Branch Tree die (SIZZIX) and cut a couple branches using green scraps of cardstock and watercoloured them before adhering to my layers and them trimming them to the edge.  I adhered my birds to the foil with double sided tape and then used 3D foam tape to adhere these focal elements to my card fronts.   I really enjoying making up these little birds and they were just the right size for these cards.  Therese
 

Wednesday, February 03, 2021

An all occasion card featuring a letter collaged tag, a paper pieced background and some ribbon

This is my second card for my card exchange this month.  I started with a brown envelope and created a kraft card to fit inside.  I dug out my brown and green paper scraps and created a paper pieced background trimming pieces as I went.  In my green paper scraps I found this tag so I decided to use it as the base for my letter collage.  I chose green and brown letters from my stash adhering the larger ones on first and then adding smaller ones after.  I added two pieces of white tissue paper to this one as well to help tie the collage together. I chose a brown leaf die cut as its focal element which I watercoloured, embossed and then highlighted with a bit of ink.  Once it was dry I added it to my tag.  I punched a hole at the top and added piece of beige ribbon trimming the ends diagonally.  I mounted my tag to the front of my card using 3D foam tape.  Very happy with how different all of these cards look having been created with a very similar technique.           Therese
 

All occasion card featuring a paper pieced background, a letter collage and a die cut circle embellishment

Loving this technique so I have decided to make my exchange cards for February using it!!  For this one I used letters for my collage.  I dug out a large red envelope and created a black card to fit inside.  I used red paper scraps from my stash to create a paper pieced background.  Next, I found a gray scrap on which I created the collage for my focal element using letter punchies and die cut from my stash.  For this one I chose mainly red, black and white ones.  Again, I used large, medium and smaller letters.  I added some white tissue paper strips to tone down the contrast a bit. To finish it off I used a large letter S which started life as a chipboard letter and had been stripped of its beautiful outer layer.  I coloured it with watercolour crayon, washed it out a bit and added some red watercolour until I was happy with it.  Next, I sealed it with a layer of white glue.  When it was dry I mounted my collage to a dark gray layer.  As I was auditioning it on my card front I wanted to a "bit of something" to add some texture and interest so I layered two  red circle die cuts, die cut a star from the middle and then cut it in half.  I mounted each half to the top and bottom of my collage on opposite edges.  I added two little punchie circles next to them.  That was better!  I adhered this large focal element to my card and finished it off by adding faux stitching to the edges of the half circles with a black marker.    Therese
 

Tuesday, February 02, 2021

Large all occasion cards featuring decorative paper, borders, sanded white core cardstock, foil and a layered flower


 I am still working on large cards for donation and using paper donated to me by my sister who is in serious paper destashing mode.   You can check out another set of cards here & here.  For these I used a deep aqua paper with yellow floral accents and a very lightly textured yellow one.  I added the dark aqua first and then the yellow borders.  On the left hand one I used the eyelet border punch on both edges (SU) and I used my pattern tracing wheel on the small strip on my second one.  I used large rectangles of the light aqua white core cardstock on both and embossed the first with a distressed lines embossing folder (CB) and the second with the D'vine Swirl embossing folder (CB) and I rounded the corners on it as well.  I added short pieces of coordinating ribbon to the foil layer on the first card and rounded the corners on the one on my second card. The flowers were created using a large red Sizzix die that has four different layers.  I embossed all the layers once they were cut and then layered and glued them together.  Once I had added them to the foil layer with double sided tape they still needed a "bit of something" so I dug through my leaf punchies stash and found these that worked really well and that was certainly better!!!  Fun to change up the orientation!!          Therese

Monday, February 01, 2021

Birthday card featuring a star collage, a paper pieced background, a stamped greeting and some ribbon

I am having fun with this collage technique!!  For this card I started with a white card which I created to fit a large envelope from my stash.  I dug out my yellow/orange paper scraps and paper pieced a background onto my card front using a few pieces and trimming as needed.  I chose a mottled orange piece and created a star collage on it for my focal element.  I embossed the large star die cuts and glue them in place and then added some medium, small and tiny stars.   Once it was dry I adhered it to my card front over my background using 3D foam tape and went looking for a greeting.  I found this stamped one which worked well.  It has been stamped on a scrap a while back and I thought it would be fun to give it an asymmetrical outline so I just trimmed each side with my trimmer and then added some paper piercing using my pattern tracing wheel.  I added two little blue ribbon ends to the back and then mounted to my card with 3D foam tape.  Love it!!  
Therese
 

Large all occasion cards featuring decorative paper, sanded coral white core cardstock, foil punchies and butterflies

This is my next set of cards for donation.  They use the same papers as my last set and pretty much the same techniques and layout.  

For the top card, I used two strips of the green polka dot paper for the top and bottom of my large white card.  I added a 4" x 4" square of brown floral paper that coordinates with the green one and rounded the corners.   I corner rounded the rectangle of coral white core cardstock, embossed it with a floral embossing folder (CB), layered on a 1.75" foil circle punchie which I punched out when I made the last set and added a green stamped butterfly (SU) with tan thread tied on to create the body and antennae.  

For the bottom card I used similar techniques and supplies.  The white core cardstock was embossed with a letter embossing folder and I used a coordinating butterfly from my stash.  I changed the format from right to left.  

This process makes the cards all coordinating without any of them being identical.  They go together a little faster when you don't have to rethink your pieces or the layout.   Therese