

Monday, January 31, 2022
Anniversary card with hexagons and a layered heart embellishment
Thursday, January 27, 2022
All occasion card with a photo of a bee embellished with glittery butterflies

It has been much fun!!!
Therese
January Card Club - hexagons over decorative paper backgrounds with flowers and leaves

OOPS!!!!! I see that I snuck one of the #2 cards into this photo!! See this post for details!!
These cards started with the hexagons cut from a variety of papers and then the coordinating backgrounds and cards were chosen. The embellishments were then created to enhance the cards. The flower embellishments were created by layering silk flowers and adding a sequin then a brad to hold them together. The leaf was punched, embossed (TH) and then gold embossed to reveal the texture. I tied on a little cording on the stem for yet more texture. These embellishements were added to our card using 3D foam tape. Therese
January Card Club - layered decorative paper backgrounds with fun images on scalloped circles

Therese

January Card Club - little birds on a branch

It has been two years since I hosted Card Club and last night I had girls over for a creative evening of fun!!! We followed all the public health protocols and it was so nice to be together and making cards.
Card #1 - these fun cards started with coordinating elements - a decorative background, a wavy label (SX) and a large oval. The branch is actually a tree die cut (TH) trimmed to the single branch that spans the width of the oval. The little birds were punched (SU), sponged on their edges and eyes and beaks added with a fine tip black marker. The wings were embossed and glued on. The birds were added to the layered card fronts using 3D foam tape. The final touch was a little tulle embellishment which I created by folding a small piece of tulle (1.75" x 3" or so) into an accordion and then tying it off in the middle with crochet thread. We applied them with glue dots to the right hand side of the branch. Lots of fun papers and textures on these very versatile cards!! Therese
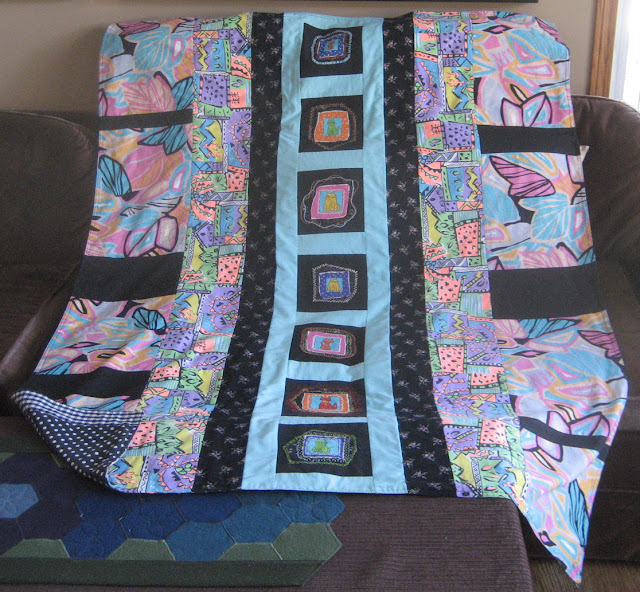
Orange and black quilt


Thank you cards with hand decorated paper backgrounds and fun greetings

I made these two little thank you cards for my grand children who gave us handmade gifts for Christmas!!! Always appreciate handmade!!
I cut two cards to fit in small envelopes in brown and black. I added hand decorated papers from my stash and then some greetings. The thank you is a laser printed font greeting. I tore the edges, added lines of paper piercing and used two eyelets to attach it to the paper before mounting it to the brown card. The other one is a laser printed digital greeting that was die cut and then watercoloured to coordinate with the background. I layered it over a coordinating circle before mounting it to my card using 3D foam tape.
Therese
Wednesday, January 26, 2022
All occasion card with blue sweet peas and a butterfly

Tuesday, January 25, 2022
All occasion card with lots of blues in the flower photo and the background

Monday, January 24, 2022
All occasion card with a photo of a flower and an embossed embellishment

This card started with a moss green card. I trimmed the background, added a strip of floral tissue paper and then overlaid an embossed embellishment. The embellishment was created by adhering three strips of coordinating cardstock with regular tape, embossing it and then adding three eyelets before flagging the ends. With all these elements mounted to my card I added four rows of paper piercing to the photo and added it to my card using 3D foam tape. My favorite colour combo!! Therese
Sunday, January 23, 2022
All occasion card featuring a beautiful pasque flower

Saturday, January 22, 2022
All occasion card with a cute duckling photo

Got to love baby photos!! Here is one of a fuzzy duckling!! I added a row of paper piercing to all four sides of the 4" x 4" photo and then layered it with gray cardstock. I created a large light blue card and then added this great hand decorated background ( watercolour and blue glitter glue) to which I had already attached a strip of vellum overlaid with a strip of green fiber flagged with a short strip secured with a brad. I added faux stitching to the outer border of the background and mounted the layered photo with 3D foam tape. Therese
Friday, January 21, 2022
All occasion card featuring a beautiful white flower photo

Thursday, January 20, 2022
All occasion card with a beautiful moth photo

I started with a large brown card and a green envelope. I ran my pattern tracing wheel on all four sides of the moth photo to add some texture. Next, I added embossed brackets to each side of my image, added eyelets and fiber to those. I added this large element to my trimmed background using 3D foam tape and used double sided tape to secure the fiber ends to the back before mounting it to my card front.
Therese
Wednesday, January 19, 2022
All occasion card with a blue jay photo, a paper pierced background and ribbon embellishments

I started with a large navy blue card. I created a layered background with coordinating papers. I used a border punch on the bottom of the green one as well having added many lines of paper piercing. I added a strip of navy cardstock to finish it off. I added little coordinating ribbon flags to my image and mounted it to my card using 3D foam tape. As a final touch I added faux stitching with a black marker to the edges of the blue jay photo. Therese
Tuesday, January 18, 2022
All occasion card with a cute duckling photo, a hand made background and eyelets and vellum embellishments

Monday, January 17, 2022
All occasion card with a sunflower photo, a paper strip with eyelets and a small butterfly

Sunday, January 16, 2022
All occasion card with a 4" x4" photo, a decorative paper background and a strip embellished with eyelets and ribbon

I have been making more cards with photos which I have trimmed off photo calendars my sister has give me as Christmas gifts over the last few years. The photos are wonderful and I am so glad to give them another life!! I started with a large purple card that fit inside a large envelope from my stash. I trimmed a decorative paper background that coordinated with my photo. I adhered several purple strips of cardstock to each other, added a short piece of green ribbon and adhered it to my backgound. Once in place I added three little eyelets on the left hand side before adhering this large element to my card front. I ran my pattern tracing wheel on all four sides of my photo (4" x4 ") and then adhered it to my card front using 3D foam tape. Therese
Saturday, January 15, 2022
All occasion cards with small photos, decorative paper backgrounds and various embellishments


Friday, January 14, 2022
Large all occasion cards featuring small floral photos, fiber and


Here are a couple more cards I have made using the small photos I trimmed from the index cards I received with the photo calendars my sister has given me.
As on my last card, I have chosen photos with similar colours to compile the group of four for these cards. I layered the photos onto coordinating square (1.75"). I created large cards and them trimmed a 2" strip of coordinating cardstock onto which I have adhered my little matted photos. I both cases this left a bit of a gap which I have embellished. On the red card I added a little metal embellishment which I adhered with double sided tape and then tied on both ends using coordinating fiber. On the yellow card I added five little eyelets and then ran some yellow fiber through the two outside one which I tied to my card front once I had added my background paper. I added a strip of red and overlaid with green which I embossed with the Subtle textured embossing folder (SU) before mounting to my card front over the decorative paper I had adhered. I mounted my strips to my card fronts using 3D foam tape. For the yellow card, I used a small hole punch to create an opening in the spine through which I ran the fiber and then brought the end back to the front and tied it off leaving the ends free. I am really happy with these cards and they are off to my Card Exchange partners in today's mail. You can check out the other cards I have made with these small photos - here and here. Therese
Thursday, January 13, 2022
Large birthday card featuring small flower photos, embossed vellum and a small greeting

Wednesday, January 12, 2022
Small all occasion cards featuring tiny photos on embossed layers with lengths of fiber tied below

I have made these all occasion cards using little photos trimmed out of the indexes which come with the photo calendars I get from my sister every year for Christmas!! She prints all twelve of the photos along with her information on a 4" x 6" photo and includes it in the calendar packages she gives me. I have been saving them in hopes of find a good way to use them. They trimmed out at 1.25" square so I decided to make some small cards with them. In order to stream line the creative process I decided to use the same sketch for all of them. I started with a small white card for all of them which fit nicely in envelopes from my stash. Next, I trimmed some of the same cardstock into 1.75" strips and tore them apart at about 2.5". I embossed them all with the Scripty 3D embossing folder (SU). I glued a little photo to the top of the strip and then tied a coordinating piece of fiber below it. Then I dug through my scraps of decorative paper to find backgrounds for my cards. Once I had them matched up I glued the backgrounds to my card fronts and then added the little focal elements with 3D foam tape. These ones all have floral elements in a variety of colours. I have a little stash of these little photos on my desk so there will be a few more show up in the next while. Therese


Sunday, January 09, 2022
Slow Stitching - more cats

I have been checking Kathy Quilts regularly over the last few months. She features Slow Stitching Sunday where people add the links to what they are slow stitching at the moment. It is so interesting to see what others are slow stitching. I am a new quilter though I have siblings and a Mom who have been quilting for many years. I have been making quilts which I have been donating to Linus Project and have made quilts for my grand children in the past year. I am an even more recent slow stitcher so it is fun to check out others' projects!! I am linking to Kathy's slow Stitching Sunday. Therese

New pincushion from a large wooden spool


I have finally removed the pincushion from my current sewing machine which I made for my last sewing machine because it is in the way when I use my lift and I am finding pins on the carpet. It took a bit of a brainstorming session to come up with this design. I have two thread pins on my sewing machine which generally are not in use because I am using cones with a handmade thread holder so I decided to make a pincushion which I can store on one of the spool pins. I chose a tall wooden spool with a deep recess and filled it with batting. I found this scrap of fabric in my stash which had batting attached and created a sleeve with it. It took a bit to get the sleeve over the edge of the spool (pliers were required) but it snugged up very nicely once it was in place over the spool. It provides just the space I need for putting pins in when I am doing general sewing and it is nicely out of the way otherwise.
Therese
Birthday card featuring a chickadee and a sanded embossed background

A birthday card for my brother whose birthday is in early January!! I managed to get this done before leaving for our "Christmas" with family this season.
I started with a large taupe card base that fit in an envelope from my stash. I used a piece of white core cardstock which I cut to size, embossed with letters, sanded it and then added a bit of black with a Versfine stamp pad. I adhered the back ground to my card and then worked on my focal element. I used a chickadee photo from one of my sister's photo calendars ( I get one every year for Christmas) and love reusing them in my cards!!! I ran my pattern tracing wheel on all four edges of the 4" x4" photo to add some texture with lines of paper piercing. I added three little silver eyelets as well which adds interest. Still thinking it needed something I added four little flagged strips on the right hand side and then mounted it to my card using 3D foam tape. I sponged the laser printed oval greeting with a bit of ivory ink and then mounted it to a black scalloped oval punchie (SU) and mounted it over the photo using 3D foam tape on the left hand side. First card of the year and mailed on time!!! It is a good start for 2022.
Therese
Monday, January 03, 2022
Birthday card with flowers and swirls

Therese
Subscribe to:
Posts (Atom)