Tuesday, September 04, 2007

More pages!!

Upper left - vintage men! This image is the back of a playing card. Available on my MMM site - follow the link in my signature. I cut out the money from scrapbooking paper and punched the motif I glued to a green disc from a $1 sticker sheet. The 1/2" SU punch was just the right size to punch it out. Works perfectly on the disc. I stamped several different images on the black background with my White Moolight Brilliance pad. It does not show up well on the scan. There is also a strip of fiber glass screening which I coloured with my green Memories pad under the left hand side of the image and under the disc embellishment. The Friends is a sticker I created by laser printing on labels with the Dymo font.

Upper right - Children's theme. I used a piece of decorative "faux leather" paper at the top of this page. Added the image to the bottom and then cut a scrap strip from a $1 store sticker page as a bridge between the two - worked very well. Added a few flourishes and "share" and I was done!

Lower left - Cut out the image and layered it onto a piece of scrapbook paper which I stamped with my SU harlequim background in White Brilliance. Subtle - exactly what I wanted. Added the B which I created using my new Doodle Block Sizzix alphabet set I got at Michaels on clearance on Saturday!! Yeah what at deal!! Works very nicely in my Cuttlebug!! Added the rest of the quote in marker. Had to redo it several times as the marker was resisting a bit on the Brilliance ink. Added my Dymo sticker and was done!

Lower right - children theme! This was my first one. Stippled and stamped on the scrapbook paper and then layered the trimmed image over that. Just love this little girl. She can be in charge!! I stamped the B with an outline alphabet on a page of text and embossed it. Then cut it out and watercoloured it. Stamped "in charge" on the image and added the rest of the quote in brown Sharpie.

So those are the pages I created over the weekend!! They are ready to be mailed today and one of the extra ones is going out as a RAK!!

Have really enjoyed the creative process!! Thanks to those who are ahead of me in this process for sharing their ideas, images and techniques! There is much wonderful inspiration out there!!

Happy September to all!!

Therese in Trenton
Mixed Media Market
http://groups.yahoo.com/group/mixedmediamarket/
More pages!! I did make a few extra!

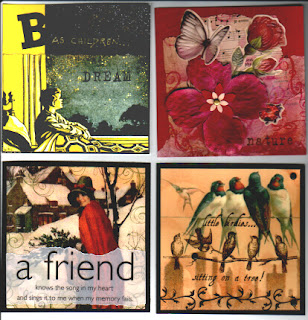
Upper left - children's theme. The saying is "Be as children". I cut out a letter from a magazine for the B and hand lettered the rest with a gold gel pen. The colour printed image is trimmed with a yellow strip of cardstock in behind to line up with the curtains in the image. I stamped "DREAM" with my Rummage magnetic stamp set. Added some stars in the upper part with my SU stipple stamp. Sure is a handy little stamp for so many situations.

Upper right - nature theme. Another collage with very similar elements as the rose one below. Added the lady bug sticker because it just needed "something"!

Lower left - quotation theme. Just found that the image and the quote worked well together and did not need much more. I added a few stamped flourishes around the edges of the image!! Done!!

Lower right - birds theme! Discovered I do not have too many bird images or stamps!! The wording, the birds on the branch and the flourishes are all printed on a transparency! I was careful to place the third brad not too close to the left hand side so they would not intefere with binding. I am not sure what I will use to bind my pages and I am hoping that others will share their techniques. Some of the pages I have already received have elements very near the left edge which would be damaged if I used my Ceralox binding machine!

Therese
My 4x4 vintage mingle pages are done!! I had 10 pages to make and was really hoping to get them all done on the weekend and I put the finishing touches on the last page this morning after pressing it over night!!

It has been a lot of fun to work with themes and to find images and supplies to collage. The 4x4 format is very reasonable to work with - allows enough room to be creative yet no so much that it is overwhelming!

The red one on the upper left is for a nature theme. I used part of an old music sheet, dyed paper napkin, paper rose, stickers, a stamped image and a brad. Did some layering, stamping, stippling and distressing. It came out well. Left some unembellished space on the left for binding.

The black one the upper right I did for a travel theme. I did a lot of scouring of my image CDs and the internet to find images for these pages. It is a bit time consuming but you find so many cool images. I used a $1 store sticker, some of my decorative paper, fleur de lis transparency I created, laser printed words using a Dymo font, and some hand embellishing with markers to put this one all together!!
Lower left - open theme - I used this angelic child image which I printed on a transparency. I had to back it with cardstock to avoid seeing the business part of the silver photo corners. The bottom border is a transparency I created as well. The heart and the motif are both stickers. I did a bit of stippling before laying on all the elements and purposely left the little bird on the left visible.
Lower right - vintage ladies theme! The image is colour printed and cut out. I stippled the scapbook paper and stamped it as well. Added some lace on the right and some flower accents. The button and fiber - just because it needed "something"! I do really enjoy the process of creating. Sitting with a layout for a while, rearranging the elements until they look "right", hunting until you find the embellishment that "works"!! It certainly does help to have a stash of papers, images, stencils, stamps, inks, embellishments!! And low and behold, sometimes you even discover you "need" a few more things!!

Therese