Monday, March 28, 2016

Paper Beads that can be customized

I have been wanting some slim beads for adding to my projects so I decided to make some paper ones that would fit the bill.  As I was prepping for this project I had white 24 lb paper scraps sitting around from another project that my grand daughter was working on so I decided that it might be best to use those scraps to create the beads which would allow me embellish them later to coordinate with my projects!  I used a piece of wire to wrap my beads around so that the hole would be a good size and I used short pieces of paper (2" x 3/4")  to make the beads not too bulky.  I just applied a layer of glue to one side of the paper leaving some space at one end to start the bead wrapping.  I made sure that the far end was well glued down to the rest of the bead as I finished it off.  I am happy with these!!  I will be able to embellish them with paint, markers or decorative paper depending on what works for my project.  I will likely give them a final coat of clear sealer before I use them.
I Love Paper Beads has a few paper bead making resources so you can check them out if you have never made paper beads before.
Will let you know where these end up as time goes on!!

Therese

Wednesday, March 09, 2016

A birdie fabric postcard!!

I worked on this fabric postcard for one of the girls on the Birthday list yesterday and managed to get it finished this morning.  I needs to be on its way to arrive in time for her birthday!!!  I stitched together three pieces of fabric - a blue tone, a green tone and a brown tone to simulate a landscape.  I added some batting, a white backing and then stitched a grid over the whole of it in white thread.  I have seen some of these little birds on line both in the fabric and paper world so I thought I would try to make one.  The body is just over half a circle in dark blue and I added a double wing in red and orange.  The tail feathers are red swiss dot and the beak, a triangle of yellow.  I added fusible webbing to the back of all the pieces and layered them as I went. Orange wing to red wing, then the wing to the bird, then the beak and the tail feathers where they needed to be and then the bird to the postcard front.  Once they were in position I used black thread and a small zigzag to stitch them into place.  I added two legs using the same zigzag stitch.  I used straight stitch for the beak and added a yellow sequin with a black bead for its eye.  Love the way it turned out!  I added some polyester trim in dark brown around the edge which very nicely framed the whole thing!!  It is off to my partner in today's mail!!

Therese

Tuesday, March 08, 2016

Crazy Quilted Felted Wool Mat


I finished my felted wool mat today!!!  It has taken more than a week to get all the stitching done and the backing stitched on.  It is approximately 12" square.  Due the the unstable nature of my substrate and the tension of my stitching it has shrunk some since I stitched on all the pieces.  You can check it out here. Unfortunately, it is now a bit smaller than the requirements of the swap but not sufficiently to be unacceptable so it will be headed to the swap hostess later today.  UPDATE:  Mailing is prohibitive so have dropped out of the swap and will be keeping my wool mat for the time being.  
It was recommended by the swap hostess to use larger thread due to the loft of the felted wool so I dug through my threads and culled the larger ones into my stitching basket.  I also collected my seed and Ebeads boxes along with a bag full of sequins to use as embellishments.  Along the way I decided to incorporate a flower and leaf  and butterfly die cut as well.  I started by adding stitching to all of the butt joints starting by doing the five edges of the center piece and then continuing to follow the sequence in which the pieces were stitched onto the substrate.  I wanted to expand my stitch vocabulary so I consulted my stitch book - Stitch - step by step - Maggi Gordon and Ellie Vance regularly.  I would pick a colour of thread, find a stitch and do one joint.  I just kept going trying new stitches and sometimes inventing some because I did not remember how to do them correctly.  This process took several days.  Generally, I would remove the basting stitches as I went along.  There were only a few sections on the edges where I left the basting because the pieces needed more support.  
Once all the joints had been stitched down to the substrate I started adding the decorative stitching and embellishments to the surface.  I started by adding french knots in yellow in the center section to create a reasonably level area that could be used to display a decorative object or candle.  I then added stitching and embellishments to the surrounding pieces and so on until the whole surface had  been decorated.  Again, I removed the basting stitches as I went. 
I took several close up shots of the details of the stitching and little bits I have added.  I used seed beads in the center of my sequins to keep them in place and used coordinating thread to keep it as invisible as possible.  I created flowers and added several butterflies - a sequin, a die cut and a plastic embellishment.   I cut a square of black fabric for the backing, turned over the edges and used the blanket stitch to tie them together.  Now, that I take another look, it would seem that I have done that stitch backwards as well. I believe the line should be on the outside of the piece!!  It was a totally fun experience and I hope my swap partner will enjoy using this wool mat!!  I am looking forward to the one I will receive in return.    Therese


Friday, March 04, 2016

Women & lacy embossed metal on colour printed backgrounds

A couple more cards with these cool colour printed backgrounds on book pages!!  You can click here to see the other ones I created for guys!
I decided to feature yet more embossed metal on these cards so this time I cut a strip from a metal foil pan and used a scallop Thinlits die (SU) to cut the edge and the coordinating embossing folder (SU) to emboss the design.  I went through my stash of images and found these stamped images of 1930 women and they worked perfectly with the strong background and the lacy border.  
I mounted the backgrounds to the blue card fronts - I left the bottom one whole and cut the top one into four pieces before I glued it into place.  Once I started working with my pieces I decided that the lacy border was a bit too bright so coloured the whole surface with a black permanent marker and then sanded it.  I like the way the recesses are darker and the embossed areas have a bit of a satin finish from the sanding. I used an eyelet punch (SU) to create a subtle blue border and mounted that to the back of my metal border.  I sponged the cardstock edge just a bit to tone it down and then trimmed it to fit on my cards.  I added vintage gray seam binding to both elements and used double sided tape to adhere them to the fronts of my cards.  I softly watercoloured the edges of my images after I cut them into circles with my Nestibilities.  I cut larger circles from black cardstock and mounted my images to them.  I adhered the images to my cards using 3D foam tape.  I added a layered laser printed greeting to the portrait card.  I also tied a short length of seam binding to each of the ones on my cards to simulate a bow!  I will be printing more backgrounds onto book pages!!  It is a great way to reuse your art in your creations!!  I suppose it would be possible to print onto dictionary pages, music sheets, maps or even gift wrap!!!  Oh, the possibilities!!
You can check out my embossed metal tutorial by clicking on the featured post or by clicking the TUTORIALS tab just below my header!!  If you give it a try, come back and leave a comment with a link to your creation!!!  Would love to see what others are doing!!

Therese

Thursday, March 03, 2016

A few masculine cards with colour printed background on book page

I made a few cards today.  I was looking to create some different backgrounds so I did some internet research on creating backgrounds and was inspired to print some of my scanned backgrounds onto book pages.  I dug through my stash of books for collage and found a text book of Latin Prose which I got free on a boulevard a few years ago.  The pages are 5" x  8" which I thought was close enough to half a page to work in the printer.  I searched some several older folders of my scanned backgrounds to find something to print on the pages.  I created this one by brushing Citrasolv onto a colourful page from a National Geographic magazine and letting all of the colours blend.  A very cool technique!! I opened the scan in Corel Draw and sized it onto a half page so it would print on 5" x 8" and ran the book page through my colour laser.  I love how it worked out!!  I printed several sheets while I was at it so I have a few extra!!  I would highly recommend to all of you to scan or photograph your creations for reuse in future projects!!

So here are the three cards I created today!! This one features the top of one of the printed backgrounds.  I trimmed the background to fit on a black layer (4" x 5.25").  I cut a circular hole in the black cardstock layer, layered the decorative paper over the black, turned it over and traced the opening on the back of the decorative paper and used the next size Nestibilities to cut a larger hole in it.  I glued the decorative paper to the black layer which created a frame around the edge and a black frame around the circular opening as well.  I tied a short piece of gray seam binding to the right hand side of the opening using a double knot.  I backed the hole with a scrap of decorative paper which coordinated in colour and had some gold as well.  I fussy cut my coloured train image (Class Act) and used 3D foam tape to adhere it in the hole.  I cut a flagged end on my greeting, layered it in black and adhered it below the image with double sided tape then glued this element to a light blue card front.
 For this card I made two cuts on each side of my decorative paper which gave me nine pieces. I layered them onto my blue card front and adhered them in place.  I watercoloured this boat image (CLKER), layered it onto teal and trimmed the left hand side with decorative scissors piercing the edge to add texture.  I created my greeting by adding a watercoloured laser printed greeting to a blue tag.  I punched a slot at the top of the tag so I could thread my gray vintage seam binding through it.  I adhered the ends of the seam binding to the inside of my card using double sided tape.  Note in the photo you can see that I used my slot punch to create an opening on the spine of my card to insert my seam binding.  I love multi purposes for tools!!  I adhered my image to my card front above the seam binding, positioned my greeting and adhered it with 3D foam tape and then tied a short piece of seam binding to the length to simulate a bow!!  Love the look of the background on this card.
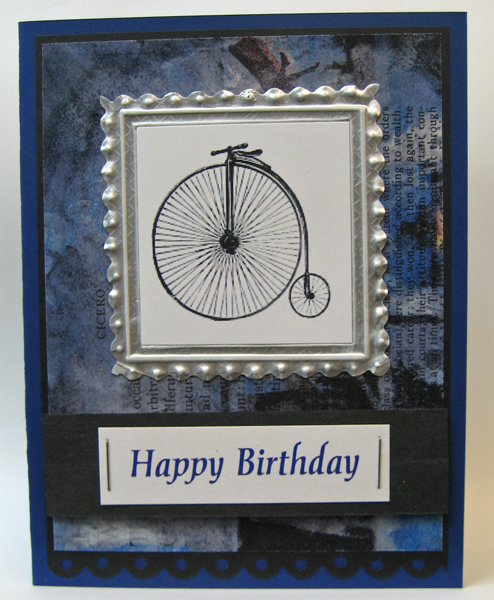
For this card I adhered this little bicycle image onto metal foil and trimmed a border all the way around using scallop decorative scissors.  I embossed a frame right next to the image and then another next to it and then used my pencil to emboss dots in all the scallops!!  I love how it came out. You can check out my Featured Post to check out my Embossed Metal Tutorial or follow this link or Click the Tutorial Link on my header.  I layered my decorative paper onto black and then onto a medium blue card front.  I adhered my image with its embossed metal frame to the top portion using double sided tape.  I layered my laser printed greeting over a strip of black paper and used staples to secure it in place.  I used 3D foam tape to adhere this element to my card front.
Had a fun day of cardmaking!!

Therese