Monday, December 09, 2024

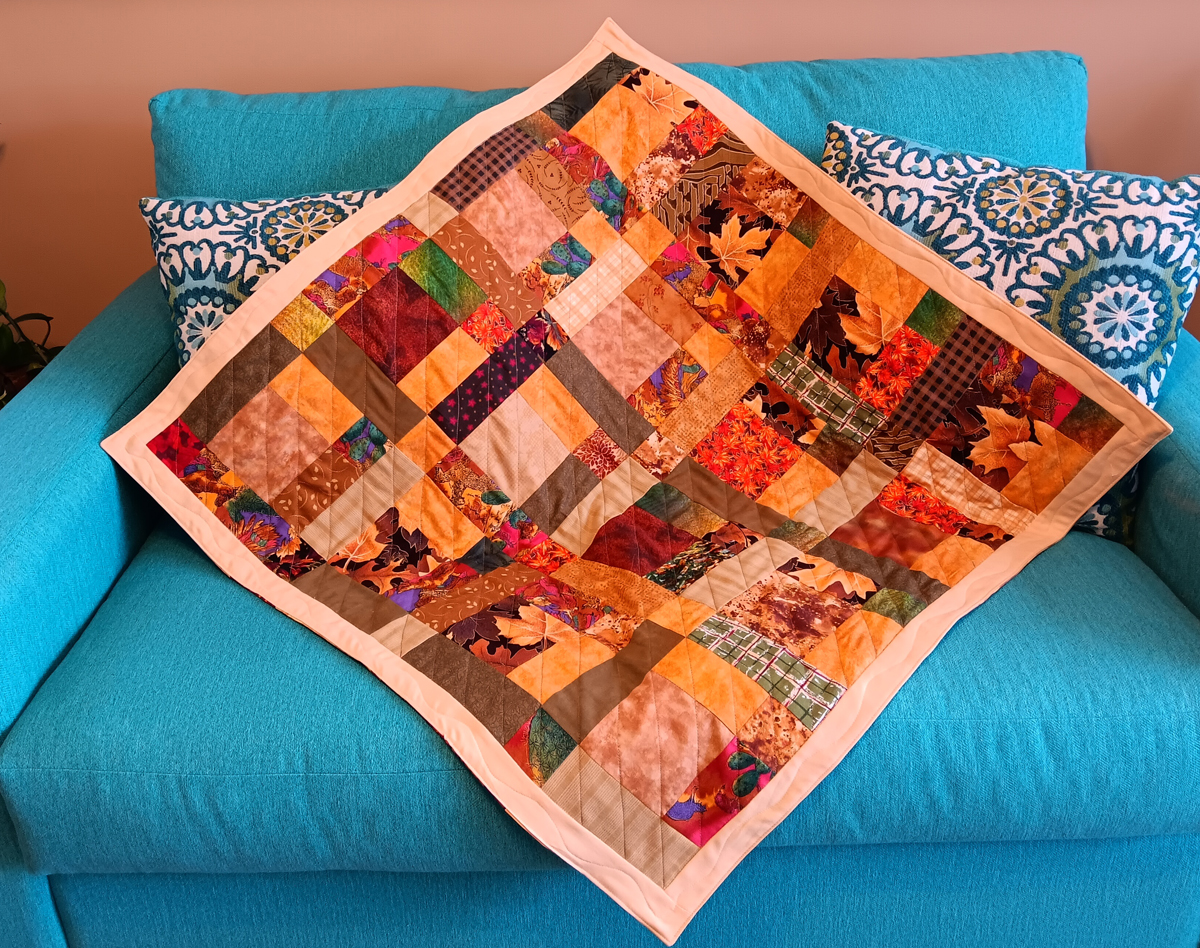
Quilting - small quilt in autumn colours from left over pieces

I found a variety of pieces of coordinating fabrics in my stash that were easily stitched up into some squares with a few additions where needed.  I started with the large square and added the little square and the two rectangles on the sides.  Wanting the squares to be larger I added another set of pieces - one small square and two larger rectangles.  I dug through my stash to find all I needed to finish off 16 squares.  I laid them out and then stitched them together.  I added a light yellow border all the way around to frame it which worked very well.  Not something I have done before!!  

For the back I went looking in my backer stash to see if I could find something big enough.  I found a piece that was perfect in colour but too small in one direction so I added a piece that I had worked on earlier from scraps from the same stash I used for the front.  Beautiful fall coloured fabric!!  This is from a bag of quilter scraps I bought from my sister which she purchased from a quilter who was liquidating scraps from her quilting room.  Win - Win!!  Needing just a bit more width I kept looking through my boxes until I found this red piece that was just the width and length I needed.  I trimmed the yellow piece into three uneven pieces and stitched in the other two pieces to make the backer.  I added a piece of corduroy as a batting.  I laid them in order and stitched all the way around leaving a gap to turn it inside out.  I stitched all the way around to seal the opening and established a stable edge.  Wanting to experiment with more quilting lines I decided to add diagonal lines of stitching starting from one corner to the other adding guidelines where the distance was longer to try to keep my lines as straight as possible.  Not too bad for my first try!!  I can see the advantage of using a technique (pen, marker, chalk, etc) to draw a line where you need it then cover it with stitching.  

It was a fun project and could be used as a playmat, small quilt or even a table topper!!  I will add it to the finished items bucket for now.  

Therese


Wednesday, December 04, 2024

Sewing - potholders with a plummy colour scheme in a chevron design


 For this set I used Christmas fabric scraps that had more of a plum/purple colour scheme and I found enough to make a set of two.  I dug into my stash of purple cottons to find something for the backing.  This was the closest match  - I do not have a large supply of purple fabrics!!!  Again, three layers of flannel for the batting and I bound by wrapping the backing to the front and stitching it down.  A little different but still works for the holidays!!  Therese

Tuesday, December 03, 2024

Sewing - Christmas potholders made up from fabric strips in a chevron design


 These potholders have been such fun to make.  Playing in the stash of Christmas cottons to find just what I need for the next strip!!  Red and green with a funky backing fabric cut from a printed vest that I acquired along the way and had no idea what I would use it for came in handy for these.  BONUS: there are a set of moose on the back of these pair.  I just added some quilting lines along the chevron pattern to keep all the layers together.  Therese


Monday, December 02, 2024

Sewing - potholders and chocolate make a small Christmas gift

I volunteered to run a little Christmas activity at one of my groups at our December social meeting.  I will be printing a small Christmas crossword puzzle and we will be putting the ladies into groups of two and these little pyramids are the prizes for whoever gets it correct the fastest.  
They are constructed from Christmas potholders and house three little Lindor chocolates!!!  
I simply used a large needle and some cotton cording and made a stitch between two opposite corners and then brought up the other two corners and added another stitch.  I tightened the cording and arranged the corners nicely then tied a bow in the cording.  Two gifts in one and very little packaging!! Therese


Saturday, November 30, 2024

Sewing - potholders pieced from scraps of Christmas fabric in a chevron design


 Another set of Christmas potholders for our family Christmas get together!!  It has been fun playing with fabric scraps and making up these chevron designs.  Three layers of flannel and then I start with the small triangle on the bottom and add strips to each side until I get to the other side.  I have bound these with the backing and included a flat hanger which makes it easily used as a trivet!!  The back is part of a green Christmas vest pattern that I had no idea how I would use the fabric and it worked perfectly here!!  Therese

Friday, November 29, 2024

Sewing - Christmas potholders using scrappy strips in a chevron pattern

I am working on more potholders!!  This set I will be using to package two little gifts for a social meeting I am going to on Monday.  

I cut three layers of flannel for batting and then added the little triangle in the middle one one side and added strips using the sew and flip method.  I used strips of Christmas fabrics in red and green.  It was very fun to play with Christmas fabric scraps.  I used a red and green plaid fabric for the backing and added the hanger using the little triangle in the corner to secure them like I have on these ones.  I like that the hanger then lays flat so it is more elegant when  you use it as a trivet.  I added several rows of quilting lines following the chevron pattern using red thread.  They are very festive looking and will make great packaging for the gifts.  

Therese


Thursday, November 28, 2024

November Card Club - Card #3 - die cut doves, ribbon and layered oval greeting over beautiful backgrounds


 For our last card we made these elegant Peace On Earth cards.  After positioning our elements we adhered our ribbon to decorative backgrounds using double sided tape on the back to hold our ends in place.  We adhered our backgrounds to our cards and added our dove die cut using double sided tape in the solid areas.  Then we layered our greetings - laser printed Peace on Earth punched out with a smaller oval punch and then layered onto a larger scalloped oval punchie.  These were added to our cards using 3D foam tape.   With snow outside, we enjoyed Christmas music and the ambience of the fireplace while we created beautiful cards for our friends and family.  Hope the postal strike is resolved soon so we can send cards to our family and friends who are far away!!!  Wishing you all a wonderful holiday season!!  Therese

November Card Club - Card #2 - large embossed layer with metallic stars


 This was a quick and easy card design which I worked out when I was making card kits for my friend.  It is a quick and easy card that has sparkle.  I had embossed the layers when I creating kits so I only had to make a few more for this class.  I punched little stars from silver and gold metallic paper and we simply glued them in place once we had adhered our backgrounds to our card fronts.  We used the fine tip white glue applicator to put a little dot of glue on the stars in the design and then covered them with the coordinating sized star punchie.  Not complicated but very effective!!!  Therese

November Card Club - Card #1 - Christmas cards featuring watercolour and glitter


 This was our first card for our November cardmaking session!!  With Christmas as our theme it was fun to create a watercolour image decorated with glitter.  We started by drawing an outline - an ornament (circle) or a tree (triangle).  We watercoloured them to coordinate with our backgrounds.  Once dry, we added decorations using white glue in a fine tip applicator sparingly.  We sprinkled them with gold glitter and set them aside to dry.  After adhering our background papers to our card fronts we moved on with our other cards and finished these at the end of our session.  I had prepared the watercolour paper (2.5" x 4") by gold embossing the greeting near the bottom using a guide so they would be even with the edge.  Once the glue and glitter was dry (some were not quite dry because the glue had been applied too generously) we embellished them with paper piercing using a pattern tracing wheel, a star or hanger and then added them to our card fronts using 3D foam tape.  I love how they turned out!!!!  Therese

Slow Stitching - all six of the little campers

Here is the complete set of six little campers that I have been slow stitching to secure the edges of the collage pieces to my backgrounds. They are all really bright and I am looking forward to adding them to some future projects - either bags or a quilt.  

Therese

Tuesday, November 19, 2024

Sewing - potholders with on point square created using flying geese blocks

Another set of potholders for Christmas!!  These are not technically "Christmas potholders" but the colours certainly would lend themselves to that theme!!  I made this set from 4 large flying geese blocks which I created using one 8 3/4" square of the patterned fabric and four 4 5/8" squares of the red fabric.  I stitched two FG blocks together down the middle twice to create two blocks with on point squares.  The trimmings were just the right size for making the hanging loops.  I used a mostly red fabric for the backs and added little squares cut from those scraps to secure the loops.  Worked out perfectly!!  I used several layers of flannel for the inside and bound them by folding the backing to the the front and stitching all the way around.  I added quilting lines in the triangles in red thread and then a box with diagonals in brown thread in the center on point square.  I see on this front potholder it is hard to see where the seam is on the front - the line closest to where the diagonal lines meet in the center is where the seam goes up and down.  I really like how they turned out.  It would be fun to make a quilt with on point squares created using this technique.    Therese


Birthday card featuring washi tape, printed greeting and fun folded ribbon flags


 A birthday card for one of my grandsons!!  I started with a large red card, added layers of washi tape trimmed to the edges except the white one which I added to a piece of white cardstock before adhering it into place.  The foiled gold feathers was not adhesive so I added double sided tape on each end which worked well.  The birthday greeting is laser printed, layered on red with some fun folded ribbon flags on the left hand side which are secured with double sided tape.  I added the greeting with 3D foam tape.  All of my grandson have grown so much this year!!!  Therese

Sunday, November 17, 2024

Sewing - a fun bag using a substrate fabric covered with strips in a quilt as go manner


I created a new bag for my donation to Morning Star - an organization that supports women.  They are always looking for bags!!  I started with a rectangle of the inside fabric (16" x 32") of heavier weight cotton and simply stitched strips of coordinating poly fabrics to the surface.  These were scraps that I had set aside to sew together into a long strip when I went to the Quilting Retreat earlier this year.  It was a project that I did not get to but was stilled stored in a ziplock bag in my Project box. 
  I just sewed strips 16" long and added them to this substrate in a quilt as you sew manner until it was completed covered.  I stitched the two side seams and pressed them open.  I stitched triangles 1.5" deep and 3" wide" on the two bottom corners to create a boxed bottom.  I pressed the triangles up the side and then cut a strip to cover them (17" or so x 2" wide) and pressed both sides in.  I sewed theses strips over the seams and the triangles - one on each side - to nicely finish off the inside.  I cut and sewed two strips together to make handles (24" or so) and then used another piece to finish off the top of my bag.  Lastly, I stitched the two handles to each side of my bag about 5" apart and double stitched them with X to reinforce them.  A totally fun project!!  Therese


Saturday, November 16, 2024

Sewing - potholders for Christmas featuring the hourglass block and blue fabrics


For this set I used the floral fabric with pansies - Mom's favorite flower  - and some blue fabrics.  I created two blocks, added terry cloth/flannel batting and used the pinstripe fabric for the backs.  Again, I used this new technique for adding the hanger.  You can check out my first set here.  Therese


Friday, November 15, 2024

Sewing - potholders for Christmas using scraps in an hour glass block pattern


 For this set of hour glass potholders I used a subdued floral and a coordinating mottled fabric.  I backed them with a coordinating solid, the same terry cloth/flannel batting and added quilting lines in each triangles.  You can check out my first set here.   I don't usually choose such a light colour for the back of my potholders but this matched so well.  Therese

Thursday, November 14, 2024

Sewing - potholder for Christmas which feature an hourglass quilt square


 I am trying to learn different quilt square designs and for these ones I found the hourglass pattern.  It is a beginner one that uses two squares laid good side facing and you mark from one corner to the other and then a quarter inch to each side and then stitch down both sides of the center.  You cut from corner to corner - the ones that are not marked which gives you two large triangles.  Now cut each of these in half  - down the center on the marked lines.  This gives you four triangles.  The triangles can then be laid over each other with opposite colours touching and stitched on the long side.  You stitch both sets and then stitch these large triangles back together and you get two hour glass blocks.  You need two squares 1.5" bigger than you want them to be finished.  
Perfect for making a set of potholders!!!  I used a red fabric with widely spaced florals for the back and the same toweling/flannel batting.  Again, the same technique for adding the hanger.  You can check my first set here.  

Wednesday, November 13, 2024

Sewing - Christmas potholders for Christmas


For this set of potholders I used poinsettia triangles again and added a green strip and hanger and backed this set with green fabric with the same batting as last time.  I added a decorative wavy stitch to the strip and large triangles to each of the sides.  Therese


Tuesday, November 12, 2024

Christmas cards featuring round layered tags, ribbon and decorative paper backgrounds

I made up these cards using the few extra round greetings I had on hand after finishing the kits for my friend.  I added the backgrounds to my coordinating cards and then assembled the tags.  The were manipulated digitally to remove the background and then sized so they could be laser printed and then die cut using my round Nestibilities.  That worked out well and then I layered these onto red scalloped circles which I coordinated to my backgrounds.  I added little coordinating ribbon flags and then mounted them to my cards fronts using 3D foam tape.  It worked out well for me - another four cards for my Christmas cards stash!!  
Therese


Christmas cards featuring sanded embossed shimmer cardstock and a layered stamped greeting

These two cards came out of an attempt to make up some card kits for a friend and was another one that did not pan out for her due to the complexity of cutting out the frame.  I started with white card fronts and embossed quarter sheets of shimmer cardstock with a new to me embossing folder that features holly.  I sanded the embossing to reveal the white core.  I embossed two pieces of green scrap cardstock with just the frame and trimmed it close to the embossed edge.  It nests perfectly over the one on the background and that works really well.  Unfortunately,  was not as impressed with the contrast between the papers.  To improve the look I stamped joy and a star on the green frame and then embossed them.  It was better and then I decided to emboss the edge as well.  Just gently ran the gold stamp pad over the raised edge just enough to get the embossing powder to stick.  That worked very well and framed the greeting very nicely.  It still needed something!!!! I decided to watercolour the inside of the frame with blue green watercolour and that helped a lot!!  I am not sure if it is perfect but it is good enough to make these up into cards for this year!!  Will have to maybe worked with different colours  next time!! Therese


Christmas cards featuring embossed greetings embellished with snowflakes


 I was making up Christmas cards kits for a friend of mine and came up with this design!!  It ended up being too fiddly for making up for her but I did put together the two extras I had made up with the Christmas Greeting embossing folders I have in my collection.  I embossed red shimmer cardstock which has a white core.  I did not like the crackled look that comes with that process so I decided to simply watercolour the front with red which coloured the white cardstock that was showing through and that was much better.  I added little snowflakes to my embossed layers.  For the one on the left I added fiber snowflakes to the embossed ones in the design which I attached with tiny black brads.  I tried white ones and it was not as punchy as I wanted them and the black ones work much better.  For the one on the right I added little flower punchies that fall out when I punch one of my MS border punches. I save the little flowers and have used them quite a few times on my cards to represent small snowflakes.  So I used three of them here on this card to cover little embossed snowflakes.  It still needed a bit of something so I added a green satin ribbon with a short length tied to it to simulate a bow.  Worked really well!!  So two more cards to add to my Christmas card stash which has been very neglected this year!!  Therese