Showing posts sorted by relevance for query slow stitching'. Sort by date Show all posts

Sunday, January 09, 2022

Slow Stitching - more cats

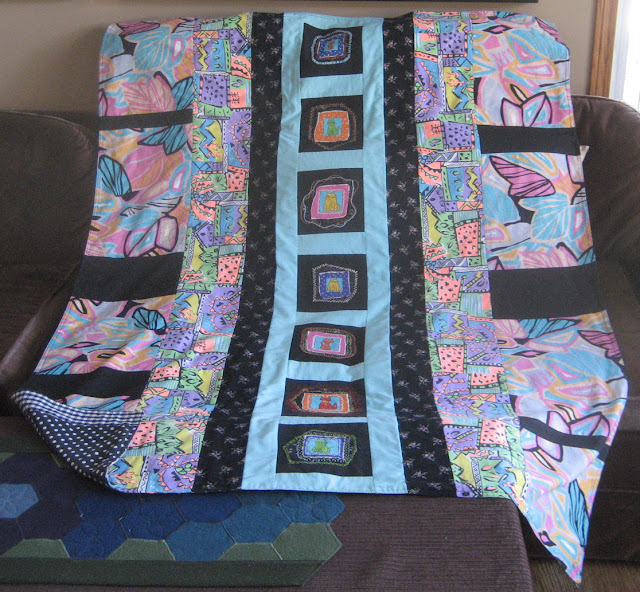
I am currently slow stitching cats!!  Actually, I am slow stitching borders around the cats in order to secure their edges to the black squares (6.5")  I have already machine stitched them to the squares with one line of black stitching to keep them all organizedbecause I cut over 80 of them and had them all sorted to make two quilts.  Not sure that is going to happen as my plan has changed since I started the project.  I cut the cats from a piece of fabric I got from my daughter and thought they would be great focal elements for my quilts.  I have been incorporating all of my slow stitching projects into quilts which has been really fun!!  I have done leaves, houses, trees, etc.  So I continue with the cats and will be doing some later today.  You can see below the lastest quilt I made last week which has incorporated some of the cat squares.  

I have been checking Kathy Quilts regularly over the last few months.  She features Slow Stitching Sunday where people add the links to what they are slow stitching at the moment.  It is so interesting to see what others are slow stitching.  I am a new quilter though I have siblings and a Mom who have been quilting for many years. I have been making quilts which I have been donating to Linus Project and have made quilts for my grand children in the past year.  I am an even more recent slow stitcher so it is fun to check out others' projects!!  I am linking to Kathy's slow Stitching Sunday.     Therese


Wednesday, April 29, 2020

Slow Stitching - sky, trees and ground fabric collage for my houses


I have been working on my fabric collage which will be the background onto which I will be hand stitching my little houses.  I did some research on fabric collages in hopes of finding a way to finish the edges of my fabric pieces in order for them to be solid and secure so this base would be strong enough to hold the houses once this piece is incorporated into a quilt.  I did not want to use fusible webbing because generally it creates stiffness and would make the handstitching of the houses more difficult.  I found this video tutorial called Edge Colouring Applique from Fourth and Sixth Designs which is a technique they developed to finish off their applique designs for their Full Bloom Block of Month quilt in 2014.  It was exactly what I was looking for!!!!!  I started with my brown strip.  I simply used this method to join my scraps to each other.  I had trouble with my tension when I used reverse and so it is a little wonky but I did not want to start over so I have decided to use as it is.  Its wonkiness will add to the texture of the background.  I did the green layer next and this time I chose to stitch all my scraps to each other using a single line of  straight stitch before I used this technique to "colour" the edges of my scraps.  This worked better.  I also changed sewing machines and used my Bernina 830 which worked much better.  The tension was good in both forward and reverse and gave me a good result with this technique.  I am really happy with how the green layer worked out.  As you can see the blue layer is a single piece of fabric which perfectly simulated a sky which is what I was looking for!!!! 

Check the images below for a close up of the stitching which I used to secure the edges of my pieces.  I simply laid my scraps over each other and the back and forth stitching of the technique securely attaches them to each other and also blends in the line of straight stitching I used to create the green collage.  This technique is a bit like free motion stitching and requires developing a rhythm to get it to go well.  Free motion stitching is also a technique they recommend for this "edge colouring" but I was not ready for a steep learning curve so I used this one that uses regular straight stitch instead. 


 Here is a portion of the finished piece with the three layers of the fabric collage attached in the same way as the scraps pieces were attached for the brown and green strips.  The blue is the sky, the green is the landscape/horizon line and the brown strip is the dirt/road in the foreground.  I expect this will not be used literally in that the houses will likely overlap all three layers.  They have yet to be invented.  That is work for another day. 
The first photo below is the finished fabric collage and then the bottom one has the bottom edge straightened in that it would be best to have the houses all sitting straight to the edge of the collage and perpendicular to it as well.  I would prefer not to have my houses looking like their are off kilter. 

So I will be working up pieces of houses next and will get back to slow stitching when they are ready to go.  I will be doing slow stitching in the day or evening for the summer to allow me to get a morning walk in every day.  Therese


Thursday, May 07, 2020

Slow Stitching - my first house is finished


I have finished slow stitching my first house in my new Slow Stitching project!!  I have changed my daily routine in order to add a daily walk outside so slow stitching has moved to the evening but I don't always get to it so this project may take a little longer than I expected but it is summer time and there are other tasks that will need to be a priority.  No problem, this is a relaxing activity and I will do it as often as I can. 
I pinned the house body - a 5" square - and then added the windows and the door which I cut from scraps.  I used a 7" hoop to stabilize the area and then started stitching.  I did the perimeter of the house body with three rows of running stitch using a light yellow floss.  I stitched the windows in place using running stitch and dark brown floss.  I went around twice filling in the spaces on my first row on my second go around.  I like how that works!!  I added some bright yellow running stitches on the corners of all the panes to create a highlight.  I stitched the door using purple floss and then added a half round window and a door handle in light yellow floss.  I removed the hoop, pinned the roof in place and then flipped the top edge and put the chimney in place and stitching it down with several rows of running stitch in dark brown.  I replaced the roof and stitched it into place using dark maroon floss using three rows of running stitch all the way around.  I added some small black stab stitches in each little black line in the roof to give it a bit of texture.  Pretty happy with how it worked out!!  I am hoping to give all my little houses their own unique look so we shall see what the next one will look like.  I will consider adding foliage and flowers in between and possibly in front of the houses once they are all stitched in place.  We shall see!!          Therese

Friday, October 22, 2021

Large leaf quilt - Slow stitching


I fnished another quilt (46" x 72")!!  It took the better part of a full day but it is done!!  Two more to go before I can move on to a new project.  I used a soft green for the backing as well as the binding for this one and added a flannel batting.  I did have to redo a few things along the way but eventually the binding went together very well and I am very pleased with how it worked out.  I used solid strips in between the pieces strips which worked really well when I was piecing the top.  Much less streching than if the strips are all pieced.  The large slow stitched leaves really stand out again the blue background.  I am really enjoying making quilts that incorporate my slow stitching.  It makes very unique quilts with a personal touch.  It was nice to have coordinating fabric scraps to put together for this top.  I have committed to finishing the quilt tops I have finished before starting a new project.  I am still slow stitching cat squares.  I have a LOT of them and I just recently trimmed black squares for all of them and stitched cats down which now leaves only the slow stitching to finish them.  I expect there will be a few quilts that will incorporate the cats in various manners.  Therese 

Wednesday, January 10, 2024

Slow Stitching - floral squares for a pink and green quilt

I worked on this slow stitching project over the holiday season.  I have been collecting pink and green fabrics - some florals - for making a quilt for our spare bed.  After checking out my collection I realized that I had some warm tones and some cooler tones which might not work so well together.  I want to include some of my Mom's embroider into the quilt so I needed warm tones.  I set those aside and then dug into my stash for more warm florals, pinks and greens.  I was in need of a new slow stitch project so I decided to embellish some of the squares in my quilt with some slow stitched flowers.  I cut 6.5" squares out of a very light green fabric and then trimmed out rough circles about 4" round from a pink fabric.  I did tea dye the fabric to tone it down just a bit and make it overall a little warmer.  Worked really well!!!  After getting my 23 flowers ready I trimmed 1" circles from a golden yellow fabric to create the flower centers.  I pinned them to the squares and the machine stitched the flowers to the squares.  Makes it easier when you are stitching to keep the layers together and flat.  I will be covering the machine stitching with hand stitching.  

Below you can see my first one!!  I used 2 ply embroidery thread in a coordinating pink and added a long row of chain stitches that ran from the outside to just under the edge of the yellow center.  I did add a light pencil mark to keep me on track.  After I finished the flower I decided to add some leaves which I drew with pencil and then embroidered with stem stitch.  I used Derwent Inktense watercolours to colour in the leaves.  These watercolours become permanent on fabric once they are heat set!!  What a wonderful tool to accent and embellish hand stitching.  As you can see from the photos this involves raw edge applique which I think will give the quilt a really home spun look which is just what I wanted!!!  

The quilt will be for a queen sized bed and will be put together with a QAYG technique with 12" squares which will also leave some raw edges which will echo the raw edges on the floral squares.  It will take a while to get it done but for now I will work on the hand stitching on these squares.  

Therese


Saturday, July 13, 2024

Slow Stitching - a slow stitching project for my daughter in law - a floral fabric collage


 When my daughter in law was here a few weeks ago she asked if I could put together a hand stitching project for her.  She had been looking at a Needle Pulling Thread magazine and liked one of the examples of a fiber artist that had translated some of her photos into fabric collages.  I made two for her and she can choose to make the first using the sample from the magazine which I printed for her and the second one she can make her own and maybe replicate a flower that is growing in her yard.  I added two purples for the flowers and several greens for leaves and greenery.  I added a full black layer for the collage which will give lots of contrast.  I add batting bigger than needed and a green backer which will be big enough to wrap to the front and finish off the piece.  They should finish about 6" x 9" or so.  I sent along some embroidery threads as well.  She has made other stitching projects so will have needles on hand.  I look forward to seeing her creative work!!  Slow stitching is good for the soul!!! 

Friday, October 29, 2021

Slow Stitching - mending a sweater


I did some slow stitching this week to mend a sweater.  The patches on this sweater have raw edges and simple line of stitching to keep them in place.  With some wear and washing the raw edges are pulling away from the stitching so I used some dark mending wool to stitch two rows all the way around the edges of the patches in hopes that will keep them from raveling.  Slow stitching is relaxing regardles of the project.  Therese
 

Friday, September 26, 2025

Slow Stitching - a set of potholders with slow stitched circles

We were going camping last week and I needed a new slow stitching project as I had finished up the little birds the previous week.  I choose some coordinating fabrics and decided to do circles!!  I worked out the size I would need for the circles for the 7" potholders I will be making.  I decided to use the circle and the hole I cut to get the circle so there will two views of these to make a set.  After cutting the circles I cut out a backer for the circles and the stitched the circle to the backer with my sewing machine to keep them in the proper alignment and ensure I don't misplace any.  I started this set with a running stitch which follows the sewing  machine stitching line in the colours of the two other circles - so blue and yellow will be used on the brown circle.  I did a double whipped stitch on the running stitch to get this cool looking stitched line.  It was really easy to do.  I got the idea from my sister, Sylvia, who is following K3N Cloth Tales on her 2025 year long slow stitching project.  Katherine was talking about this technique in one of her videos and after Sylvia description I was able to stitch this line.  I will have to check and see if this ones is similar to Katherine's.  It is a start on this four piece project  - two sets of potholders!!!  Therese


Sunday, July 07, 2024

Slow stitching - card holders - upcycled CDs, scraps of cute fabric and buttons

I have made a few more playing card holders for a friend.  She really liked the hummingbird one I made for her last week and thought a few more would be good!!!  She requested more hummingbirds and I managed after some piecing to make one more.  She wanted ladybugs and sunflowers and I had enough scraps to make them up.  These take two 6.5" circles of fabric (they can be different), two 6.25" thin batting, two buttons and strong thread.  They are really a slow stitching so I will be making a few more this week.  You can see the others I made here.   

I am linking to Kathy's Quilts for Slow Sunday Stitching.  Always lots of inspiration there from the wonderful makers that come and share what they are slow stitching. 

Therese


Tuesday, August 24, 2021

Slow Stitching - Houses quilt top

I have finally finished the quilt top around my Slow Stitching - Houses.  I had set aside the fabric for this quilt top a while back and was pleased to find that when I took out the little pile of fabric it made sense.  I had quite a few strips of fabric - 42" in there and also quite a few that needed to be pieced.  I started by stitching together all the strips that needed stitching including the two with little strips, the long strips, the blue blocks and the triangles.  Once I had the strips finished I worked on the layout.  I framed the houses with six strips of the same fabrics above and below.  I really like how the sky pops against the black strip.  I was fortunate to have enough long strips to be able to place one in between all of the stitched strips.  The stitching of the strips went well and I was very happy to have everything line up reasonably.  I did add two strips to either side of my houses to make sure I did not lose too much when I did the binding.  After the stitching I trimmed it to size - 41.5" x 64".  I will be adding a batting, backing and binding for finish it off.  The fabric for this quilt all came from a grab bag of fabric I purchased from a quilter who was liquidating her scraps.  I sorted them all by colour which allowed me to choose all similar colours for this quilt top.  Some of the stiching had already been done - the little strips were stitched four together and the larger strips were two together and a longer piece which I cut into three and added other strips in between.  It is so nice to have this slow stitched piece in a quilt top.  

Therese

Friday, November 15, 2019

Slow stitching - a new project!!

 I have decided to start a new hand stitching project and will be modeling it after "slow stitching" which Liz Kettle promotes as stitch meditations.  After some health issues she wanted to find a meditation practice she would do every day and developed this process for herself.  I have tweaked the process in that I have decided to start with 4" squares in rainbow colours which I hope will yield squares which I can later use in sewing projects. I have cut 5 sets of six squares (yellow, orange, red, purple, blue and green) to begin with using up scraps and finding the colours I needed in my stash.  I have decided to use a sort of collage technique on my first set using small scraps to execute a heart theme.  I dug through and sorted my small scraps drawer into colours so I could easily pick pieces to coordinate with my coloured squares.  I have collected a few scraps for each square and for hand cut hearts.  I will be creating hearts by couching a strip of fabric for the others.  I have decided to forgo any embellishments in case the squares end up in quilts where they will be handled and washed regularly.  If they end up in other sorts of project I will consider adding embellishments once they are part of a project. 


Here is my first set of squares ready to go!  

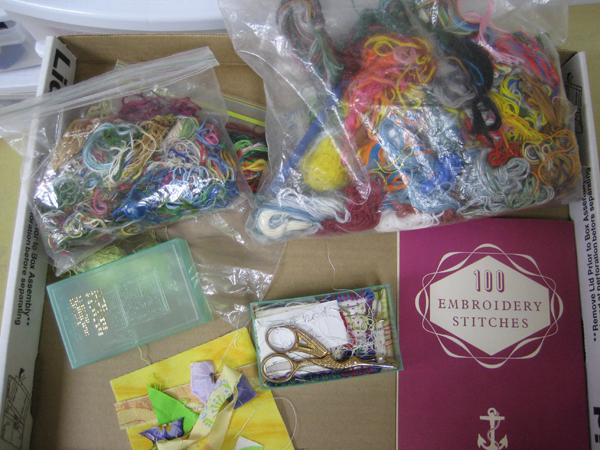
I have collected my stitching supplies in a box lid - thread, needles, pins, scissors and my small book of embroidery stitches.  My little book will be a good reference as I am not familiar with many stitches.  I will be putting my scraps down with raw edges and would like to use wide stitches to properly secure the raw edges as I am stitching them into place.
I started on Tuesday morning with the yellow square and I will be sharing it in my next post!!
I do enjoy hand stitching and it is very peaceful to do a bit of stitching first thing in the morning!!  Therese

Sunday, November 05, 2023

Slow Stitching - finished up the cute folk art bird from Chloe Redfern


 I have finally finished my little folk art bird stitching project.  I started it in September and it has travelled around with me on several outings and I have worked on it at home as well.  I downloaded the PDF from Chloe Redfern.  I chose to stitch it with the colours she recommended and love how it turned out though I found it quite busy because I reduced the pattern in size to suit my project.  Next, time I will reduce the amount of details I transfer to my fabric and will consider doing it in variegated floss which will mean much less starting and ending which would be less distracting as a slow stitching project.  You can see that the transferred lines have all disappeared after having washed it by hand with which was what I was expecting.  I used the gray marker from the small Ultra Clean Crayola marker set I bought in early September. I am very happy to have a washable marker for my stitching projects!!  The price cannot be beat and you can use the marker closest to the colour of your stitching if you like.  I will now have to find the other squares I cut out at the beginning of this project and the markers which have been misplaced before I can move on with a few more of these cute little birds!!  
I am linking to Kathy's Quilts blog for Slow Sunday Stitching.  Check out the other
interesting projects that this creative group is working on.  
Therese

Friday, October 29, 2021

Slow Stitching - mending a coat lining


Yet more slow stitching that was really mending.  DH loves this winter coat and uses it all winter when he is working outside or in his workshop.  You can see from the photo below that the lining has worn through in several places and he wondered if there was anything that could be done to extend the life of his coat.  I decided to patch the areas that were affected with some slow stitching.  It would have been very impractical to do it any other way but relatively simple to add a patch and hand stitch it into place.  I used some brown polyester fabric and cut patches that would cover the affected areas then stitched them into place with orange polyester sewing thread (doubled).  This will definitely save this coat for a few more years.  
This is similar to the Japanese process called Boro Mending where Sashiko stitching is used to add patches to clothing.  The process of repeated mending takes on an artistic asthetic which can be very beautiful.    Therese


Saturday, February 15, 2020

Slow Stitching - snippet roll is finished


I finished my snippet roll yesterday!!!!!!!!  It has taken a while and I have found the process a bit restricting in that I had to undo if I failed to follow the stitching pattern as I would not end up where I needed to begin the next square and I wanted the back to look as good as the front so I did some undoing several times!!  It is about 130 inches long so will certain serve as a wonderful ribbon for securing a creative gift somewhere along the way.   I had hoped to make one more of these but because of the need to keep to the pattern I did not find this process as fulfilling as I had hoped so I will be moving onto a different process for my next slow stitching project.  I have been working on another idea for a bit now and did a prototype this past week and it will also not be a good slow stitching project for me it requires too much precision to get a good result so that has been put on the back burner for now.  
Therese

Friday, November 15, 2019

Slow Stitching - first yellow square

Here is my first square in my Slow Stitching project!!  I started with stitching down the strip on the left.  I did running stitch in the center to keep in place and added blanket stitch on one side and cross stitches on the other.  Next I added the blue square using small stitches all the way around and longer stitches to create a flower in the center.  I added the green triangle and did running stitch in both directions on it.  The little portion of a pansy on the upper right was stitched down with running and seed stitches.  It has been positioned away from the edge to allow a quarter seam allowance when it is incorporated into a project.  The other scrap was stitched down with running stitch and finally I created the heart shaped element.  I started by drawing a shape using a pencil because I noticed that I am not easily able to make straight lines with my stitching and I did want my heart to look like a heart once I was done.  I started by stitching the end of my little fabric strip to my fabric in the dip of my heart.  I used green floss to couch my strip onto the line that I had draw which worked quite well.  To finish it off I cut my strip and stitched down the end over the end where I started.  I think it will be sturdy enough to stay in place.  I made a real effort to not pull my stitches too tightly in order to not shrink my fabric square.  Once it was ironed it still measured 4" square!!!  I have backed this square with some white fabric because the yellow was so thin I was not sure it would be able to carry the weight of the stitching.  I am learning as I go!!  So far so good!!!  Therese

Monday, January 18, 2021

Slow Stitching - large leaf hand stitching project is finished


 I have finally finished all the leaves on my large leaf border hand stitching project!!!!!  I have enjoyed this slow stitching project (44" x 9") but dealing with a large piece and defined directions of stitching has meant having to flip it back and forth as I went across each section of every leaf.  I will be working on a small project next though I have yet to invent it so it may take a bit of time to sort it out.  I have been pondering the concept of combining crumb squares with a central square.  In that regard it would be easy to incorporate hand stitching into the square.  I will work out something and let you know when I get started.  
Here are my leaves one at a time!!


Sunday, June 12, 2022

Slow Stitching - Triangle trees

I have managed to work on my slow stitching while we travelled back home last week.  We went and visited Mom and my sisster.  Dad passed away in mid May (92 - quietly in his sleep) and Mom is doing well.  I brought plants for her raised bed at the lodge and she has had very good visits with several people recently.  I have had these cut and ready for quite a while and I have been taking them with me but sometimes not inclined to stitch in the car.  The weather has been beautiful and sometimes I really just enjoy the scenery with an occassional nod to the inside of my eyelids.  These are quick and easy and I have been just adding whatever sort of stitching feels right at the time.  Usually single stitches or blanket stitch to stabilize the edges and whatever works for the inside sometimes coordinating with the pattern of the fabric!!  

I am linking up to Kathy's Slow Sunday Stitching.  There is always some beautiful projects and interesting stitching there so go and check it out!!

Therese


Sunday, November 06, 2022

Slow Stitching - a crocheted custom cover for a USB charging cord

I took on this slow stitching project for one of my grandson's birthday.  Needless to say that charging cords are always in demand with so many devices and with them all looking very much the same it is hard to tell if it is "your" cord or not and they disappear regularly from anywhere in the house to where they are most in need.  So for his birthday I crocheted a cover for a regular black charging cord using variegated thread which his Mom gave me a while back because it was too thick for her use.  It worked perfectly for this project.  I tied the cording to one end and then incorporated the end inside the single crochets as I began the cover in the cyan colour.  I progress through aquamarine, yellow and finished off with orange which I tied off and used a needle to thread the end into the stitching!! Everyone will know which cord is his!!!  


I am posting this project to Kathy's Quilts - Slow Sunday Stitching.  There is always so much eye candy there so take a break and check out the stitching projects!!           Therese


Sunday, May 21, 2023

Slow Stitching - handmade cards embellished with hand stitched elements


A few cards created with some beautiful fabric that found while sorting for the Gramma Africa Link fabric sale.  I trimmed out a few embroidered elements for hand stitching to the same interfacing I have been using for my other little pieces of stitching.  The fabric is very lustrous and it was easy to stitch to the interfacing.   I mounted the elements to embossed dark brown layered and then mounted them to ivory cards.  I have several yet to finish - they will show up here in time.  


Here are the cards I made up with the hand stitched pieces I showed you a while back.  I simply used double sided tape to secure my little pieces of hand stitched art to coordinating card fronts.  I have really enjoyed making these up and I will be bringing some to our next Gramma Africa Link event - our Everything Rhubarb tea in June.    

I am linking to Kathy's Quilts.  She hosts Slow Sunday Stitching every week and I will be linking these to her post for today.   I did do more slow stitching today which I hope I will be able to link up next week.  Always great inspiration on her blog!!  Go and check them out!!  Therese


Sunday, January 22, 2023

Slow Stitching - handstitched and machine stitched journal covers

 
The hand stitching on these little quilts has been done for quite a while now. To create them I trimmed a backer then trimmed out a front and batting that were just a bit smaller than the backer.  I simply folded the backer to the front and hand stitched the edge to finish the little quilt.  You can see my original stash of them here.  The next few batches are here and here.  Here you can see the journal cover I made for myself to keep track of our trailer journeys with all the hand stitching finished. Here you can see the first steps of getting it constructed.  Today I dug out the baggie of little quilts and thought I would get a journal cover made up with them.  To my surprise I was able to complete four journal covers.  I have the layout in the top photo and then the finished journal cover to the left.  The other three journal covers are below with the layout first and the finished journal cover below it.  These will be donated to fundraisers coming up later this year so I will be spending some time slow stitching each little quilt with coordinating embroidery thread.  They are a little wonky but I was happy to get them done!!  
I am connecting with the stitchers at Kathy's Quilts - Slow Sunday Stitching.  Head on over and see what these very creative stitchers are up to!!!  Always inspirational!!  Therese