Tuesday, July 07, 2015

Birthday cards with hand decorated paper backgrounds


I needed some cards for my monthly card exchange so I decided to use hand decorated background papers for them and to keep it simple I also used the same sketch.
For the left hand card, I used a background I created using inks in blue, yellow and pink.  I watercoloured a laser printed floral digital image (Anji Antics) using similar colours.  I added navy ribbon to the trimmed background paper gluing the ends to the back and adhered it to a blue card front.  I added a layered laser printed greeting over the ribbon that features a pink back layer and a greeting sponged with orange-yellow.
For the middle card, I used a double embossed back ground that I created by painting a colour printed piece of yellow cardstock with dark red acrylic paint, embossing it and sanding the raised areas. After flattening the cardstock I ran it through a different embossing folder and sanded it again.  Gives a very textured background which I love.  I used a digital cup image from Anji Antics which I printed and watercoloured and used ribbon and a layered greeting like in the last card.
The right hand card features an acrylic paint/saran wrap background which is so easy to do and always creates great backgrounds.  I added a gardening image from Beccy's Place  which I printed and watercoloured.  I added ribbon and a greeting like on the other two cards.
So two of the cards are off to my exchange partners and the other has been added to my stash!!

Therese

Saturday, July 04, 2015

Art Charms - houses & hearts


Art charms for two special people!!  On my Art Charms group the moderator is putting together a gift for daughters of a former member and I decided to participate.  We were to create house or heart charms so I decided to make two of each.  
The base of the heart charms is wooden heart shapes. I painted them red, stamped them in black using the heart stamp I used for this card and then embossed them several times with clear embossing powder.  I drilled a hole and added a jump ring. Changed it up a bit for the house charms.  I cut two wood shapes from thin strips of scrap wood for each charm using my exacto knife and sanded them so they would fit together nicely.  I laid an eye pin on one of them and hit it gently with a hammer to indent the wood so they would glue up nicely.  I used multi purpose glue and clamped them with bull clips until they were dry.  I covered one in printed tissue paper (came wrapped around a bottle) using the same glue as before.  Once it was dry, I sponged the edges with brown and then black ink.  I added a silver heart using a glue dot.  Thinking it needed a bit of anchoring I cut down a flat head pin so I could use it like a nail to attach the heart.  I coloured the head with a black sharpie.  I wrote HOME on the front and "a house with heart" on the back.  For the other house charm, I used an alcohol ink background and trimmed two pieces to fit the back and the front.  I coloured the edges of the wood charm using a black Sharpie and then glued my little rectangles in place.  I added a dimensional silver heart charm on this one and also used a cut down head pin as a nail to finish it off.  Used the same technique for adding the words.  
These are headed to the moderator in the next couple of days.  It was really fun creating these.  I have heard from a few in the group that they display their charms on a chain in their craft space.  What a good idea!!  My last swap partner put lobster claws on her charms so they could easily be attached and removed.  I thought that was a really good idea.  I need to source them out here for my next swap.  

Therese

Tuesday, June 30, 2015

Butterfly felted wool postcard

My newest fabric postcard!!  I am loving it!!  I created it for a swap on one of my groups, Trading Fabric Post Cards!!  I started with the beginnings of a cuff from a few months back when I created this one.  I had started with a strip of green wool felt and had begun adding beads to the outside of the felted wool butterfly die cut.  In the end, the process was taking longer than I expected and I ended up changing directions completely so this has been sitting around with thread and beads waiting to find a new life.  So, to give it a new life as a postcard, I finished off the beading and added some stitching in three different colours of embroidery thread inside the butterfly.  I added some black seed beads to form its body and I fashioned a pair of wire antenna which I also stitched on.  I was very happy with that.  To convert the cuff to a postcard I had to cut off about 2" of the length and add an inch to the width.  I rummaged through my felted wool scraps and found some warm green that coordinated very well so I cut a couple of half inch strips - one for each side and used purple embroidery thread and the sheaf stitch to bind them together.  I am enjoying learning new stitches from my "Stitch Step by Step" book which I acquired on my winter vacation.  I wanted to repeat the bright green colour so I added single stitches between the sheaf stitches.  I used white embroidery thread to add the flight path using a plain running stitch.  I created a backer for the postcard using white cotton, pinned it to the front and attached them together using blanket stitch which I executed with turquoise embroidery thread.  This was working out very well.  To integrate the front and the back I added machine stitching with white thread in the bobbin and coordinating green thread on top.  I like the way that worked out!! I took a needle and hid all of my thread ends inside the structure of the postcard.  I felt it still needed a "bit of something" on the right hand side so I dug through my sequins and found three different colours in three differetn sizes.  The medium one was originally gold but I modified it with a green Sharpie and now it is exactly the right colour!!  Gotta love it!!  I stitched them into place using green thread and added black seed beads in their centers.  I will be prepping it for mailing and send it off as soon as I receive the name of my swap partner!!

Therese

Friday, June 26, 2015

Anniversary Card

I created this card for my DH for our anniversary!
I started with a small dictionary page and tore the edges to distress it a bit more than the fading that had already taken place.  I stamped the heart in black pigment ink on the page and embossed with black embossing powder.  I watercoloured the inside of the heart in red and then added some shimmery red paint over it to give it just a bit more texture.  I painted the outside of the heart with shimmery brown paint.  Once dry, I glued the page to the front of a brown card and added a black strip to the left hand side which I had painted with the same red shimmery paint.  I added round punchies in black over it, again, to add texture.  I watercoloured a fussy cut greeting and mounted it below the heart using 3D foam tape.  Thinking it needed "a bit of something" I added some stamped flourishes (QF) in red on the outside edges and used my stipple stamp with black ink as well.  That was better!!

Therese

Wednesday, June 24, 2015

Cards with die cut layers and full backgrounds

Have been pondering making cards with this technique for a while and after a discussion this weekend with my sister, I thought I would give it a try!!
I found some backgrounds in my stash - two alcohol inks on glossy and two all over watercolours.  I colour printed greetings that coordinated with the colours of my backgrounds onto white cardstock and trimmed them down to quarter sheets.  Next, I wanted to die cut holes in them which would allow my backgrounds to show through.
Cutting the holes is more difficult when the shapes are combined on one die which is the case with all of these images (SX and SU).   I cut the lower heart first and was unsuccessful at getting only the one die cut which I why I had to add another heart to it.  It is covering the extra cut.
For the others, I cut as much as I could using a small cutting pad (part of a broken cutting plate) and finished off the cut by hitting a cutting plate with a hammer to apply pressure only where I wanted to cut.  This worked reasonably well.
If the dies had been individual ones or framelits this would not have been an issue and the process would have been much neater and faster.  After cutting the openings I embossed the layers using several embossing folders and trimmed them down to fit over the backgrounds leaving a bit showing all the way around.  I used double sided tape to adhere them to the backgrounds and then glued these elements to coordinating card fronts.  I am pretty happy with the results though I will consider acquiring more individual dies for this technique to make it more time efficient.
A few more cards to add to my stash!
Therese

Sunday, June 21, 2015

Thank you cards

 I made these cards for my nephew's fiancee who is having a bridal shower this weekend!!  Their colours are teal and black so I went looking for some paper that would be appropriate.  I found these - backgrounds that were already cut from some beautiful paper I bought in London in 2010!!  Perfect!!  I decided to pair them with white card fronts to keep the colour scheme simple. I created banners by punching "Thanks" into strips of white cardstock, flagging the ends with my chevron punch (SU) and backing the letters with a strip of black paper which I allowed to extend beyond the flagged edge.  I trimmed the black ends by hand and added faux stitching to the other end using a fine tip Sharpie marker.    As you can see I positioned the greetings in several different places and changed up the orientation of some of the cards as well.  Love how well these turned out!
A bride can never have too many thank you cards and these will be appropriate for any reason if they are not used for the shower or wedding.


Made a whole stack of them and they are packaged ready to go!!

Therese

Friday, June 19, 2015

Two serendipity cards

I made a couple of cards this morning for a couple of people who are hurting.
I found a couple of pieces of serendipity paper in my stash, trimmed them to fit on my kraft card fronts with a small border, added a length of ribbon and glued them in place.  I stamped my greetings in brown on two off white rectangles, stippled them in brown and added a bit of watercolour on the edges.  Once dry, I mounted them to red rectangles and adhered them to my card fronts using 3D foam tape.  I added a short length of ribbon to each by simply tying a single knot to the longer piece.  I love serendipity paper! I looks great and makes cards fast and easy!!

Therese

Tuesday, June 16, 2015

Copper art charms


Here are the three art charms I created for my 3 for 3 personal art charm swap!!  You can see here the pendant that I created as I was experimenting with this charm making process.  I started by using pliers and cutters to create the shapes I wanted for my charms. I wanted them to be different so it took a little doodling to come with shapes that would work.  I made sure not to make them too big - the art charms need to be about 1.5" long.  Once I had my shapes created, I took them outside, placed them on a heavy metal plate and beat them with a hammer until they were flattened enough.  To add texture I beat them strategically with a hammer with a textured head.  Love the look!!!  Because these charms needed to be completely metal I went looking into my metal stash for something that I could use to embellish them.  Luckily, I found these three little  metal word tags!!  Perfectly sized!!  I used the thread like copper wire to attach them to my charms!!  I also tied together a couple of places on two of the charms which needed to be secured.  
I am super happy with how these turned out and I am really looking forward to seeing what my partner sends back to me.  I have made a few extra which I have added to my collection.  

Therese

Monday, June 15, 2015

One Sheet Wonder - 6x6 makes 4 cards for Father's Day

I needed four Father's Day cards so I decided to create them One Sheet Wonder style!!  I found this tree decorative paper which came out of the same pad as these cards and these cards which I thought would work quite well.  I cut the sheet in half and trimmed one 6" x 6" sheet from the one half and used it to make my four cards.  I trimmed the 6" x 6" into four pieces of 2" x 4" - the cutting template is below.   In the end I decided to trim my 2" x 4" pieces in two (1' x 4") and backed
 them with tiny strips of two different greens - one on each long edge. I cut two different sheets of blue cardstock to create my four card fronts and stamped them all with a leafy background (ANM) in light green.  I downloaded four leaves from CLKER, cleaned them up in Photo Elements and printed them onto white cardstock.  After trimming them to 2" x 3.5" I watercoloured them to coordinate with my decorative paper.  I found four laser printed Father's Day greetings in my stash, punched them with out my oval punch (SU) and then layered them onto coordinating scallop oval punchies (SU). To assemble my cards I started by gluing down my layered decorative paper rectangles onto my stamped card fronts.  Because the paper is directional I had one set that went vertical instead of horizontal which changed up the sketch a bit and added variety to my cards. Next, I added my watercoloured images using 3D foam tape and then added the layered greetings using double sided tape.  Very happy with the variety of sketches I came up for the four cards I made.  After they were all assembled I thought they still needed "a bit of something" so I added a bit of stippling on the images.  That was better!!  So my cards are finished!  Some will be mailed off tomorrow and I will deliver the others in person on the weekend.

Therese

***********************************************************************

OSW #4 - 6x6 June 2015

Supplies for making four cards
1 - 6" x 6" of decorative paper
2 - 8.5" x 11" cut in two - four card fronts
      in coordinating colours
2 - 2" x 4" scraps of coordinating cardstock
      in two different colours
4 - 2" x 3.5" images on neutral cardstock
     stamped or printed
4 - oval punched laser printed greetings
     neutral cardstock
4 - scalloped oval punchies
     coordinating cardstock
Glue
3D foam tape (optional)

Cut decorative paper according to the diagram.
Cut large sheets of cardstock in half and fold to make card four fronts.  Prepare images as you wish.  Layer greetings.  Assemble cards as described or as you wish.

***********************************************************************


Chunky book page - Purple & Grace

In the last few days I have managed to finish my 4" x 4" chunky book page with the themes of purple and grace.    I statred with an embossed white cardstock square which I overlaid with the purple gauzy fabric with swirls.  I used double sided tape on the back to keep it in place. I back this with a 4" square of purple cardstock.  I stamped a vellum overlay using two different rubber stamp alphabets.  Grace was stamped in purple and embossed with Pastel embossing powder.  It is a bit of a grungy font but the embossing powder softened its look. I used my Making Memories magnetic alphabet stamps to finish the quote and added a bit of stippling in purple ink.  I trimmed the sides of the vellum to just cover the page and the two ends so I could fold them over the top and bottom.  I added some short ribbon flags in several colours between the vellum and the page on the right hand side and then stitched them all into place using purple thread in my sewing machine.  I went very slowly as the sandwich was quite thick.  I added a little plastic butterfly charm using a large glue dot and added my credits to the back.  Love the look of grace!!
It is off to my partner in tomorrow's mail.

Therese

"V" themed postcard

On one of my groups we have been exchanging postcards to spell our name, so this month's letter is V.  I found this versal letter V in a font and enlarged it enough to fit on a 4" x 6" digital rectangle of colour.  I added the words at the bottom and then colour printed it on white cardstock.  I then watercoloured all the elements - the dots - yellow, the leaves -  green, the flowers  - red and orange and the letter V  - a light blue.  Once everything was dry I added clear dimensional paint to the V. I added a postcard backer and it is ready to go to my partner!!
I like working digitally every once in a while.  It always changes up the look of my creations!!

Therese

Thursday, June 11, 2015

OSW with 4" x 4" squares - feminine cards

These are the cards that I made with the other sheet of decorative paper. Check here for the cards I made with the first sheet.
I cut the 8" x 8' sheet into 4" squares then trimmed them at 2.5" which left 1.5" pieces.  I chose a coordinating red for my card fronts and dug through my red scraps and found some coordinating 7/8" maroon strips to use as an accent.
I trimmed 1.75" white strips on both sides using decorative scissors or border punches (SU) and went looking for greetings and images.  I found two rectangular images that already had greetings (Black Berry Jelly) and two round images (CLKER - tea and TORICO - hearts) which I combined with punched greetings.  I watercoloured my images and layered them onto red.  I glued my decorative paper to the card fronts leaving a gap in between. I layered the maroon strips onto the white ones and trimmed them to fit over the gap and glued them into place.  I added dots using a marker on the large scallop border and pierced the small scallop border using a push pin.  I added my layered images using 3D foam tape and positioned the punched greetings next to the scalloped circle images.  I varied the orientation of the cards and greeting/images to make the cards different.
So those two sheets of decorative paper made eight cards!!  A few more to add to may stash!

Therese

OSW with 4" x 4" squares - masculine cards

 I received two sheets of 8" x 8" decorative paper in one of my swaps this past week and so I decided to see how many cards I could make with them.  I started with this plaid sheet.  I cut it into four 4" squares then started designing my cards.  I found these round stamped images in my stash and they colour coordinated very well so I cut red layers for them using my circle dies (Spellbinders).  The train, loon and lighthouse are from Class Act .
The coffee cup is from Sugar Loaf.   I found some kraft cardstock that worked and made four card fronts.  I distressed the edges of the images then sponged all the way around them and the squares of decorative paper with black ink.  I used my stipple stamp (SU) on the card fronts to add a bit of texture.  I colour washed the fussy cut laser printed banner greetings (CLKER) to coordinate.   I added black seam binding to each card in a different way and tied a short piece to the length on three of them. I added faux stitching to one of the cards using a fine tip Sharpie marker.  By changing the image, the greeting, the orientation and the sketch for each card I managed to make four different ones with the same supplies.  These are all somewhat masculine cards which will go into my stash.

Therese

Monday, June 08, 2015

A bright Art Quiltie for June

For my June art quiltie exchange I decided I would try a quilting technique that I have heard my Mom and sisters discuss - the faux Cathedral window.  I did a bit of searching on line to see how it was done and then headed to my craft room. I found this bright and linear print in my stash of 4"x 4"squares and thought it would be very appropriate for this technique.  I chose a solid yellow for my backer and after a bit of designing in Corel Draw I established that I needed a 5.75" circle to encompass the 4" square.  I checked the plates and bowls in the kitchen until I found one that was the right size and traced around it in pencil and cut it out the circle by hand.  Next, I added a piece of batting to my square, pinned to the middle of my yellow circle and stitched all the black lines in the design using black thread for the top and yellow in the bobbin.  I like that it made the design a bit puffy!!  Next, I folded what was left of the circle on the four sides over the square and pressed them down.  I stitched all the way around the edge and then stitched the rounded pieces into place over the square.  Thinking it needed a "bit of something" I decided to doodle inside the space I had created with the stitching using a permanent fine tip Sharpie marker.  That looked better!!  Wanting to add a bit of beading to my quiltie I decided to add black seed beads to each space I had doodled. That looked better!!  The inner section needed a bit of a focal point so I added three black sequins stitched on with black thread and black seed beads.  That was much better!!  Finished!!  It will be off to my partner later this week.

Therese

Saturday, June 06, 2015

Beaded copper pendant

I created this pendant in the process of playing with ideas for making metal art charms.  I am participating in a 3 for 3 personal art charm swap on one of my groups. For this group, art charms need to be created rather than simply assembled so I went on line looking for inspiration for metal art charms.  And for this swap, they also need to be all metal.  I found a couple of ideas that I thought were worth pursing then headed to the craft room.
I started with very thick copper wire and formed the heart using my pliers, etc.  I am not a jewelery maker so it took some time to get it looking acceptable.  Once I was happy with it, I took it outside, placed it on a heavy metal plate and mashed it with a hammer until it was flattened to my liking.  Next, I hit it with a hammer with a textured head which really helped make it look handcrafted.  DH did not mind my borrowing of his tools!!  It turned out exactly like I wanted it too!!  Next, I used thread like copper wire and added seed beads.  I also used the wire to cinch up the middle and to add the jump ring.  Once I was done and admiring my work - it looked pretty cool! I realized the charms were supposed to be all metal!!  In the end this one is really too big to be a charm so it has graduated to being a pendant and I have repeated the process with smaller shapes for creating the art charms for the swap which I will be posting later.
This was a totally fun process and yielded some very unique looking pieces.

Therese

Thursday, June 04, 2015

May Flowers Fabric Postcard

I joined a fabric postcard One for One Swap and here is what I created for my partner!!  I have never made a fabric postcard before so after watching a few online tutorials I just got started.  I created the front of my postcard by piecing two small pieces of the dark blue fabric and trimming it to 4"' x 6". I added a substrate to the back and added several lines of decorative stitching to attach them to each  other.  I die cut a red felt flower (TH), two green heavy cotton leaves (TH) and a yellow fleece center (SX).  I arranged them on my postcard and once I was happy with the layout I started pinning and stitching - first the leaves, then the flower and finally the center.  I added yellow seed beads to the center along with french knots in several different colours of yellow embroidery floss.  I stamped "May Flowers" on fabric label tape using blue ink, then watercoloured them so they coordinated with my flower and ironed them to the front once they were dry.  I cut a 5" x 7" white cotton back, stamped it with soft yellow flowers and added a bit of blue stippling around the edges.  I added "postcard" and a line down the middle with a fine tip Sharpie marker.  I cut a piece of fusible webbing to 4" x 6", sandwiched it between the front and my backer and ironed them together.  I folded the edges over and stitched them down using red thread.  I am happy with my first fabric postcard!! I may have to re-evaluate once I receive the one my partner sends but for now mine will be heading to my partner in tomorrow's mail.

Therese

Wednesday, June 03, 2015

One Sheet Wonder for 12 x 12 to make 6 cards

 Needed a few cards for the next few weeks and decided to work on another One Sheet Wonder.  In this case, I have decided to work with a piece of  12" x 12" decorative paper and to make six cards with it.  I have cut my paper into six pieces that measure 4" x 5.25" which will give each card a full background.  I have cut three sheets of green coordinating cardstock in half to give me six card fronts and trimmed some purple scraps into strips  - one for each card.
 I created the greeting using a couple of fonts in two different colours in Corel Draw.  I laid them out for a half sheet (4.25" x 11"),  printed them on white cardstock and trimmed them to 1 7/8" x 2 7/8" using my cutter.  I cut six layers (2 1/8" x 3 1/8") for them from coordinating blue cardstock.
To assemble my cards I started by gluing my decorative papers to the card fronts.  I trimmed both long edges of my strips using scallop decorative scissors and then used
a pushpin to pierce each scallop.  I glued my greetings to their blue layers and then played with laying them out on my card fronts.  I was aiming at leaving as many flowers showing as possible.
As you can see there are lots of lay out possibilities.  You can use either portrait or landscape for the card fronts, the accent strips and the greetings!!!  So none of the cards are exactly alike.  I have also created one of the greetings to be a sympathy one but of course those could have also been all different and all the cards would have been unique.  Really enjoying this process and I am sure you will find this a quick way to make up six cards!!  Enjoy!!

Therese

*********************************************************************************
OSW 12x12 June 2015

Supplies for making six cards:
1 - 12" x 12" Decorative paper
3 - 8.5" x 11" coordinating cardstock (cards)
1 - 8.5" x 5.5" coordinating cardstock
                        (2 1/8" x 3 1/8" layers)
1 - 8.5"x 5.5"  coordinating cardstock (.75 strips)
6 - 1 7/8" x 2 7/8" greetings on neutral cardstock

-Follow this cutting diagram to cut your decorative paper into six.
- Cut large cardstock in half to make six cards.
- Greetings can be stamped or printed.
- Cut one smaller cardstock into 6 pieces of (2 1/8" x 3 1/8" to create the layers.
- Cut other smaller cardstock (or scraps)  into .75 strips.

*********************************************************************************


Thursday, May 28, 2015

One Sheet Wonder #2 for a 6x6 to make 4 cards


My second set of cards using my OSW template for using a 6" x 6"piece of decorative paper to make four cards.  I used a piece of birdie decorative paper from the same collection as my last set so the colours were very similar.
Here is my first set.


I used digital images and greetings which I colour printed onto white cardstock and then trimmed to 2"x 3".  The tree is from an unknown source, the little birdie parade is from Torico, the cupcake is from WhenTheScrapHitsTheFun and the flowers with BEST WISHES is from BlackBerry Jelly.   I really enjoyed challenging myself to use the same template, cut the pieces differently and combine them with images instead.  Really different looking cards but the same supplies used.  It was also interesting this time to use paper that was directional - all the birds needed to be standing up.  I started by cutting my 1.75" x 2.75" layers of coordinating cardstock in half diagonally and layering them -  two pieces each -  behind my watercoloured images.

#1   I cut the my 4.5"x 1.5" piece of decorative paper in half  and used some of my .75 inch strips to layer the two pieces on two sides.  I just butted the strips where they met and trimmed them off. Make sure to do opposite corners if you have directional paper.  I stipple stamped (SU) my blue card front and mounted each of my decorative pieces to opposite corners.  I mounted my image overlapping both of them using 3D foam tape.
#2   I cut my 3" x 4.5" piece in two lengthwise and layered a .75 strip of coordinating cardstock between them, offset them and taped them to each other using regular tape.  I cut two little squares from the decorative paper and mounted them to two opposite corners behind the decorative paper and then glued this element to my blue stippled card front.  I mounted my image overlapping both of them using 3D foam tape.
#3  I cut my 1.5" x 4.5" piece of decorative paper in half diagonally.  I cut a strip of .75 coordinating cardstock strip to 4.25" and cut it diagonally.  I mounted the cardstock triangles to the back of the decorative paper triangles leaving a margin on the corners.  I glued these to opposite corners of my yellow stippled card front.  I mounted my image overlapping both of them using 3D foam tape.
#4  I border punched (could have used decorative scissors instead) a strip of my coordinating cardstock with an eyelet punch (MS) and adhered it to the left hand edge of my yellow stippled card front.  I glued my 6" x 1.5" piece of decorative paper next to in and trimmed off the excess.  I mounted my image overlapping both its right hand edge using 3D foam tape.

I specifically chose to make different occasion cards this time to highlight the flexibility of the OSW design process.  Again, this process is perfect for making four cards quickly with minimal supplies and makes a perfect set of cards for gift giving.

Therese

*********************************************************************************
OSW#2 6x6 May 2015

Supplies for making 4 cards:
6" x 6" decorative paper
2 - 8.5" x 11" coordinating cardstock
1 - 8.5" x 5.5" different coordinating cardstock
4 - 2" x 3" images on neutral cardstock
Glue
3D foam tape (optional)

- Follow this cutting diagram to get your decorative pieces ready.
- Cut both large cardstock in two to make 4 cards
- Images/greetings can be stamped or colour printed
- Cut smaller cardstock into four 1.75" x 2.75" pieces for layering and the rest will be trimmed into .75 strips for accents.

Tuesday, May 26, 2015

One Sheet Wonder - 6" x 6" template makes four cards

My sister was visiting last week and she has been working on One Sheet Wonder cards. She is working on ones for a 6" x 6" piece of decorative paper.  She has developed one or two which create 3 cards and was currently working on one that creates four cards. I decide to challenge myself and see what I could design.

Here is what I came up with.  I am happy with the results of this effort.  Below is the template I used to cut my decorative paper, the supply list for four cards and the instructions on cutting the rest of the supplies for creating the cards.
Wanting to add a bit of interest to my card fronts I stamped them with a background stamp (SU -Worn) in coordinating ink before I started assembling my cards.  I colour printed my greetings (SU) on white cardstock,  cut them apart to be 2" x 3" and layered them to their layers.  Each card gets one half inch strip of accent cardstock.  The layouts are quite easy and can be modified as you wish.

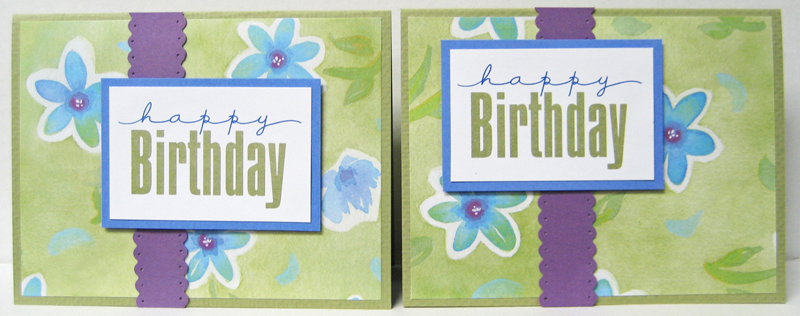
#1 - glued the three 1.5" decorative pieces across the bottom of my stamped green card front, added two short pieces of .5" red accent strips just above them and used 3D foam tape to adhere my greeting over them.
#2 - Glued my two pieces of decorative paper (3" x 1.5") to diagonally opposite corners of my brown stamped card front, added two short strips of .5 red accent cardstock across the middle and added my layered greeting over them using 3D foam tape.
#3 - Glued my 3" x 4.5 inch piece of decorative paper to my stamped green card front, added two short pieces of .5 red accent cardstock to the top and bottom and adhered my layered greeting overlapping it using 3D foam tape.
#4 - Glued a long strip of .5" red accent cardstock to the left hand side of my stamped brown card front, glued my 1.5" x 4.5" piece of decorative paper next to it and adhered my layered greeting over it using 3D foam tape.

All of my greetings were HAPPY BIRTHDAY but of course you could print or stamp whatever greetings suit you when you are preparing your cards.  Consider as well that all of the pieces do not need to be cut up.  You could leave the long side whole and just trim off the half inch instead of cutting it in half like I did.  The same with the last 1.5" x 4.5" piece - you could use it whole or cut it differently which can also be said for any of the other pieces.  I think I will play with the pieces the next time I work with this template and see what I can come up with.  You can also consider adding images instead of large greetings to change up the look.

One Sheet Wonders are great for getting cards made fast!!  They are also wonderful for making cards for gifts because the four cards coordinate and look pretty as a set.  So for both reasons it is worth considering using a One Sheet Wonder template for your next cardmaking session.   Have fun!!

Therese
******************************************************************************
OSW 6x6 May 2015

Supplies for making 4 cards:
6" x 6" decorative paper
2 - 8.5" x 11" coordinating cardstock
1 - 8.5" x 5.5" different coordinating cardstock
4 - 2" x 3" greetings on neutral cardstock
Glue
3Dfoam tape (optional)

- Follow this cutting diagram to get your decorative pieces ready.
- Cut both large cardstock in two to make 4 cards
- Greetings can be stamped or colour printed
- Cut smaller cardstock into four 2.25" x 3.25" pieces for layering and the rest will be trimmed into .5 strips.


*******************************************************************************

Tuesday, May 19, 2015

Art Quiltie - felt flowers and a little butterfly charm

Another month and therefore another Art Quiltie exchange!!  I am loving making these and have been getting back some really great quilties!!
I started with some floral fabric paper I made a while back.  I die cut two leaves (TH) from green cotton fabric, a flower (TH) from red felt and a center (SX) from yellow felt.  I watercoloured the leaves so they would coordinate more closely with my paper, dried them and then stitched them to my 4"  x 4" piece of fabric paper using green thread in my sewing machine.  I positioned my red flower over the leaves and stitched it into place using red thread.  I added the yellow center, stitched it into place with yellow and added some french knots by hand using yellow embroidery thread.  I cut a piece of yellow fabric for the back and stitched it to my batting using straight lines in a plaid design and then stitched the front and back together using a wide zig zag stitch using yellow thread.  It was my first time trying this on art quilties and I expect I could have had my stitches just a bit tighter but I am happy with how it looks.  On final examination I thought it needed a bit of a 3D embellishment so I stitched on a small butterfly charm!!

Therese