My SU party has been submitted and I thank all of my friends for coming!! Product should be here by the end of next week!! Yeah!! The spring mini has arrived and I am wondering what the new catalog schedule will be for this coming year!! Something to look forward to!
Just a hint I wanted to share with you that Catherine mentioned at Jayne's party. The stamp pads that have a little liner in them like the StazOn and the Brilliance can be modified so that the liner comes off with the cover - just add a large glue dot or some double sided foam tape to the inside of the lid and place on the pad. The next time you remove the cover, the liner will come with it. Works so well!!
A few new UMs arrived this week so I am off to play in my craft room and hopefully get a few cards made.
Have a creative day!!
Therese

Thursday, February 22, 2007
 The background on this card was created using the granite spray paint that was popular some years back. The can was destined for the garbage so I took it outside along with some large sheets of paper and a large piece of cardboard. I just sprayed until the can was empty. Made 5-6 large sheets of this wonderfully textured black, white and gray paper.
 Really love the old world look of this image and thought it worked well with the background. Stamped in with black StazOn which gives a very strong black colour. Added some simple fiber and a "fossil". I made these fossils the other day with some recyclable plastic, my heat gun and some rubber stamps!! It was fun!! I have a whole bunch because it was so much fun trying different stamps to get different textures!! Will have to list them on my MMM site - http://groups.yahoo.com/group/mixedmediamarket/!!

Just love making "paste paper"!! You make paste (wall paper or cornstarch), add some colour (watercolour, ink, acyrlic paint, etc) and then spread it on your dampened paper. The paper needs to have a good wet strength for this project. In this case, I used white Kraft gift wrap I bought at Michaels. It worked very well. I usually make a day of it when get started making paste paper and just play as long as the paste lasts. I have created my own tools for working in the paste - mostly cut from plastic milk jugs. I like the flexibility of the plastic and the more organic lines they create.
I have now acquired the 1 3/8" SU punch so I can make double layered tags using it in combination with the 1 1/4" SU punch. Just love the ease of making these now. I added a punched shape to the tags - hearts, stars, dragonflies, leaves and daisies and made them in a variety of cardstock colours. Added a little fiber and had a quick and easy card!!

Created this polished stone background this summer when my sister was visiting and thought the colours would work well with this image. Stamped the image with black StazOn. The victorian corner punch worked well with it as well. I thought the card front needed a bit of ornamentation so I stamped it with a coordinating colour and the SU heart background (retired). Great card for the women in my life!!

This card features "faux leather" paper which I made yesterday. You apply acrylic paint and glazes (Glaze Vernis by Delta) in layers until you have full coverage and nice rich colour. Once dry it has the soft lustre of leather. I started with brown paper and made brown, green and burgundy.
The little bird image is a used postage stamp. I collect all of the interesting stamps that arrive on our mail and use them in my art when I can. I like the way this one turned out. Very simple and easy!!
 Led a cardmaking class last night featuring handpainted backgrounds. I really like making these acrylic paint backgrounds - I just slosh on paint until I am happy with it. I usually start with leftover paint from my palette after a project and water it down to make a wash and apply it to a sheet of paper or several depending on how much paint I have. The next time I am painting I add more colour washes and repeat the process until I like the look of it. I designed and colour printed the round tag and punched it out. I really like the colour of this one.
I found this layout in a magazine - Joy of Cardmaking. Lots of really good card making ideas.
Monday, February 19, 2007

Pop UP Card

Hey! I had my SU party yesterday!! It was great fun to have some of my friends over and do a make and take. I have a fabulous demonstrator who is professional and personable all at the same time. We did this great little pop up card! So cute!! We will be closing the party by Wednesday to allow a few who were not able to finish up their orders on Sunday!! I got the dragonfly Level II hostess set I wanted so I am a happy camper!!
Have a creative day!
Therese
Therese
Mixed Media Market - http://groups.yahoo.com/group/mixedmediamarket/
Tuesday, February 13, 2007
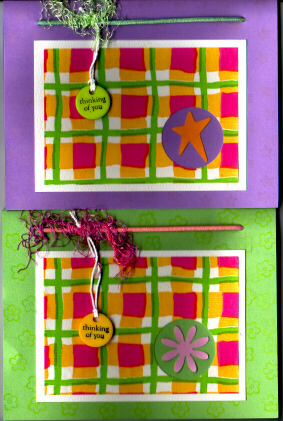 These are for a card exchange I participate in monthly. I stretched myself and used bright colours. I started with a piece of checkered tissue paper that I received in a swap a long time ago. Was able to find cardstock that matched pretty close but found that the tissue paper looked better when layered on white so I added a white cardstock layer. I used my SU 1.25" punch to punch a hole in the lower right corner and punched some coordinating shapes to go inside. I stamped all around the card front before I layered on the tissue paper/CS piece. I cut hair elastics that were the right colours for the top and tied on a little plastic tag which I stamped with StazOn ink. Added a little fiber to give it just a little softness. Very happy with my little stretch!!
Be creative!!
Therese

My submission for an Art Lottery!! On this group, anyone can submit art for the lottery to the hostess and at the end of the month she puts all the names in a hat and picks one to receive all the fun items that have arrived!! She also picks a second name to receive the art submitted by the winner. I like the fact that there are no rules or themes and I can pick the format. I usually include a few goodies with my submission. This time I have included some slide mounts and transparencies so the person who receives it can play a little. I embossed the gold coloured lead (from a wine bottle) with my D'vine Swirl embossing folder. I just love that design!! Have managed to emboss cardstock with it by using my rolling pin. I have to spritz the cardstock before I put it in the folder but it does work pretty well. I laser printed the transparencies using images I have downloaded from the internet. Just did a bit of collage as a background. I cut the slide mounts from bristol vellum using a Sizzix machine. I have them for sale on my MMM site - follow the link below.
Mixed Media Market
http://groups.yahoo.com/group/mixedmediamarket/
I have found this past year that I have been doing more mingles than swaps. I like spending more time on one piece of art and generally the cost of mailing them is less as well.
Therese
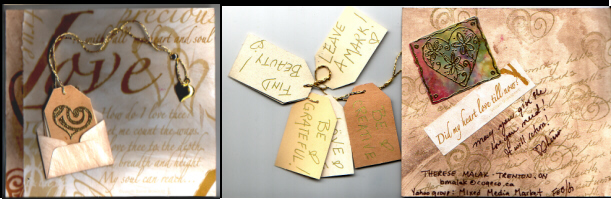 This is a fat book page I created today for a mingle. These are really fun. The mingle has been running monthly for a year so we have 12 pages for our book. The far left is the front of the page and the right is the back of the page. The tags in the middle fit into the envelope on the front and are strung together. The background paper is gift wrap I bought at Michaels. Very awesome!! I gave it a wash of burnt sienna and did the back of the page as well. The heart on the back is gold EP on alcohol ink background. The mingle is ongoing and we are expanding the theme to include more than holidays to give some variety.
 Therese
Sunday, February 11, 2007
 This is an interactive birthday card!! It is a little accordion book that is held closed by an elastic. I put a little heart shaker on the front and on each of the pages I put a title about favorite things: food, friends, games, etc and made a little envelope to hold "important" things. I like to make kids cards that are a little more than just a card. Hopefully it will be written in, enjoyed and saved for a while. We all need to remember what our favorite things were when we were kids.
 Therese
 Three more cards to add to my stash!!Will be needing some masculine cards so worked up the one with the watch. There is a gold ribbon that matches the veining in the background paper that runs the length of the card but I was not able to get it to show up when I scanned it.
The roses are just tissue paper which I only glued at the top. Gave a very nice effect with the ribbon. I would have liked to have added a charm on the knot but did not find a rose one in my stash.
Just a quick and easy thank you card - nice to have a good supply of those on hand.
Therese
Sunday, February 04, 2007
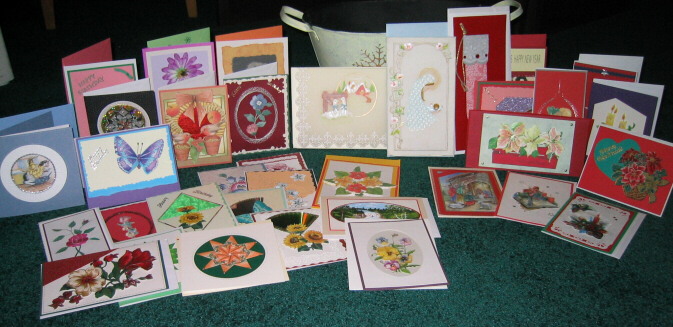
This is a group of over 30 handmade cards that I have refurbished in the last three days. They were given to me at my cardmaking class by someone who has been collecting greeting cards for a long while and did not want them to go to waste by just recycling them. Beautiful very detailed work - pergamano, tea bag folding, paper tole, original acrylics, etc. I will be donating these card to a local group that does outreach and is always in need of cards. This is what I do with all the handmade cards I receive through swaps and exchanges. There are so many places that would appreciate the donation of handmade cards - seniors homes, not for profit organizations, churches, etc. When I refurbish the cards I remove any writing or personal message - some times it means just replacing the insert other times I need to cut off the card front and remount it onto new cardstock. With a new envelope they are ready to go!!
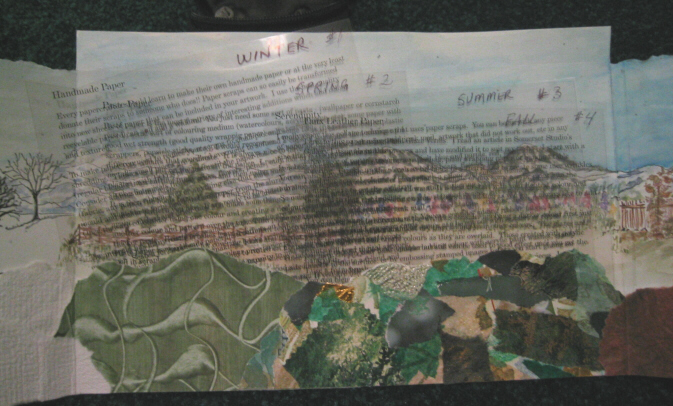


Here is my contribution to another journal in the project!! I have created a folder which features a strip of each kind of paper and inside I stamped and watercoloured a scene that features the four seasons and used some of each kind of paper to create a "pocket" at the bottom of the folder. I have printed each technique's basic information and instructions on a tranparency and cut them apart and labeled them according to the season that paper is featured in. Lots of fun!! Only one more journal for me to work in and this project will be complete!!


 Have been busy with some technique art journals this week. This is a round robin project started over a year ago. I have created layouts in all the journals that present four different techniques - handmade paper, serendipity, paste paper and faux leather!! It has been fun to come up with different ways to present these different papers! Here I stamped and gold embossed a gate on each kind of paper and added the description and basic instructions in a folded sort of booklet underneath. Added hearts and some inspirational quotes to finish off the layout!! I have truly enjoyed this project because of the diversity of art that has been presented in all the journals that went by and on all the pages of my journal!!
Subscribe to:
Comments (Atom)