

Sunday, April 09, 2017
Serendipity backgrounds

Tulips for a get well card

Therese
Saturday, April 08, 2017
Be you card featuring a colour washed paper doily

Friday, April 07, 2017
Leather leaf embellishment from reused leather

For this card, I started with the leather leaf and created a background for it from light brown cardstock which I embossed (TH-SX) and colour washed around the edges. I added a small piece of double sided tape to keep it in place and then used my sewing machine to stitch it in place all the while giving it veining detail!! I tied a small piece of twine to the stem. Next, I went looking for a background in my stash and found this piece of paste paper in dark brown which I made years ago which really worked with my leaf. I trimmed a piece and layered it onto green. I glued my leaf embellishment into place then added two brown mini brads - top and bottom. Next, I glued this large element to a black card front and to finish it off I added a colour washed Decorative Label (SU) greeting punchie!! Very happy with how this one turned out and I look forward to more with my little stash of leather embellishements. Therese
Art Quiltie with a locket and key with hidden quotes

I started with the folded fabric points which I found in my fabric stash after I moved a few years ago. I do not recall exactly which project I was working on at the time of their creation but I have a little baggie of them.
I chose 8 of them - 4 blue, 4 red and then found a 4" x 4" precut floral square in a coordinating yellow which I used for the front of my quiltie. I positioned the points around the edge and stitched them in place with a line of machine stitching very close to the outside edge. I thought I was being very careful in laying them out but I see that they are all off a bit at the points which I did not notice until much later in the process. I could not undo at that point so it is how it is. I cut a piece of batting and stitch it to the front by folding back the points and stitching as close to the first seam as I could. On hindsight it might have been better to do that seam first but I did not have that vision before I started. I hand lettered some quotes onto fusible fabric label tape and adhered them below the points. I stitched one of my fabric collage into the center, finished adding the quote in fabric label and stitched on a small locket and key charms. Next, I chose a yellow tiny gingham fabric square (4.5") for the back of my quiltie. I added fusible webbing to the edges, positioned my quiltie to the wrong side, folded the edges over the front and fused them in place. That finished off the edges very neatly. Wanting to add a bit of hand stitching I did blanket stitch all the way around using dark blue crochet thread. Once finished I thought a few beads would be nice as well so I added yellow, red and blue beads (seed & longer ones) all the way around using light weight yellow crochet thread. That finished it off nicely and gives it a handmade look!! It is off to my partner as we speak!! I hope my partner will find the quotes on the inside front below the petals!! A bit of creative fun!!
Thursday, April 06, 2017
Beautiful cross on an Easter card

I colour printed the cross on ivory cardstock and layered it onto a blue green cardstock. I used a blue green card, added a yellow background paper to which I had adhered a lacy die cut and embossed border (SU) which was colour washed with yellow watercolour to tone it down a bit. I glued the background to the card, adhered my focal element and then added a layered laser printed punchie greeting.
I really like that the darker edge of the decorative paper creates the sense of a line in the design and putting the cross askew a bit allowed my greeting to nest into one of the scallops. Perfect!!
Therese
Wednesday, April 05, 2017
Easter lilies in deep colours

Tuesday, April 04, 2017
Easter cards with printed vintage graphics

I used a greeny blue card for the first one and added two squares of brown cardstock just off set a bit from each other. The laser printed vintage image (Graphics Fairy) was layered onto pink and then onto yellow before being adhered to my card front. Love those little blue birds!! For my second card, I used a vintage image from Clipartpal which I laser printed and trimmed. I started with a blue card front and added a green embossed frame die cut (SX) to which I had added two punchie eyelet borders (SU) in brown top and bottom. My image fit perfectly in the center! I added three little ribbon flags to my image before mounting it in the opening of the frame with 3D foam tape - brown, yellow and green which I trimmed with flag ends.
It is good to stretch ourselves creatively, to expand our ideas, to do something out of our comfort zones regularly. That is how new things are invented and fun serendipities come to bless our lives.
Therese
Layered Easter card with a digital greeting

Therese
Monday, April 03, 2017
A beautiful Easter card in blue and green

Happy with this one too! Therese
Sunday, April 02, 2017
All Occasion Stack Class - just strips of paper, a greeting and an embellishment
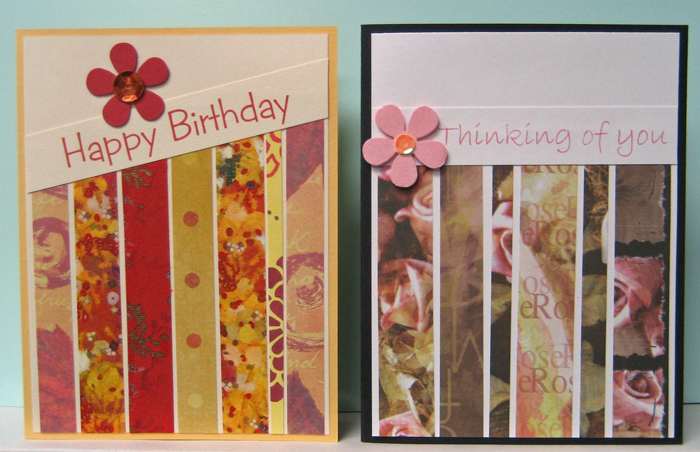
We had a wonderful time and lots of beautiful cards were created!!!
Therese

All Occasion Stack class - cut and circled

For my next card, I decided to feature decorative paper in hopes of reducing my stash!! Not even dented!!
I cut the decorative paper 3.75" x 5" and made two cuts - one in each direction and when the pieces were glued to the next layer it created a cross as the lower colour showed through. I discovered that once cut the pieces provide a puzzle to be solved before they can be glued in place!! I chose to layer my circle greeting over the intersection of the lines but the creative ones at class chose many more options in both the cutting and the layout of these cards!! The circle greetings were laser printed on white or ivory and punched with a 1.75" circle punch (SU). They were layered onto scalloped circles which were die cut from coordinating cardstock using my Nestibilities. I found most of these round greetings at Netty's cards. She has a really good variety and some for every occasion. The little turtle one is very cute and the floral element were found on line but I do not have a record of where I found them. Therese

Handmade paper and stitching

All Occasion Stack Class - handmade paper

For this set of cards I decided to continue the theme I started with my middle of the week class and feature my own handmade paper.


I created several focal elements - hearts, flowers, leaves and butterflies which were cut from coordinating handmade paper. The flower were embellished die cut centers, the hearts had an extra little heart cut from cardstock, the butteflies had tied cording which created a body and antennae and the leaves had knotted twine as an accent.
I really love handmade paper and am glad that I decided to check out the papers I had in my boxes. I will continue to feature handmade paper on my cards as time goes on!!! Will consider making more this summer when the weather outside is warm and sunny and the sheets can dry outside.
Therese
Easter and birthday card created by reusing a beautiful rose card


These two cards were created using the most beautiful card full of shimmery gold and roses!! I trimmed off the front and turn it over onto the back inside which had the stripes and that worked well for a background. For the first card, I created a focal element using a floral background from Artsy bee on Pixabay combining it with a vintage rose image from Clipartfox and a font greeting which I then printed it onto ivory cardstock. After trimming I layered it onto green. I glued the two layers of my background together, added a pink organza ribbon across the width and layered on my focal element with 3D foam tape. I tied on a short length of ribbon to the one on the card using a single knot to simulate a bow. I layered this large element to a pink card.
For my second card, I created the background with the ribbon in the same manner and glued it to a light pink card. The rose focal element I fussy cut from the front flap of the original card and glued it over the ribbon using 3D foam tape. I sponged the edges of a punchie greeting with green and pink and adhered it just below the focal element over the ribbon with 3D foam tape. Beautiful!!
Therese
Saturday, April 01, 2017
Quick and easy card resusing images from cards - a beautiful little cottage

Therese
Friday, March 31, 2017
Easter card with a beautiful iris collage element

Cardmaking - March - feature little birdie sticky notes

These cards feature birdie stick notes my sister shared with me. She is always looking for cool things to use on her cards and so she gave me a few for my birthday a while back. You can see here another card I made recently with one. I started these cards by choosing background paper which I adhered to coordinating cards. I die cut some grass (SX) which I glued to the bottom of the card. I embellished the stick note birds with a black brad eye, a hand cut yellow beak and a paisley punchie wing!! For the first card I placed the bird on a branch (TH Tree SX) which was created using a strip of brown cardstock die cut with the TH Tree die. The branch was then pruned of odd and stubby pieces. The greeting is stamped (SU) and layered twice onto coordinating circles of cardstock and mounted to the card using 3D foam tape. For the second card I drew the bird some legs and feet using a fine tipped permanent marker. Very happy with how this any occasion cards worked out!!
Cardmaking - March - more handmade paper combined with vellum images


More handmade paper on these cards!!
In this case I took small sheets of seed paper which were smallish for the front of a card and ripped them into strips and collaged them together to make a larger piece which I trimmed to size before running the sewing machine around the edge to make a mechanical connection to hold them all together. I glued this background to the front of a coordinating card. I laser printed images with greetings on vellum and used two halves of an embossed label (SU) to attach them to my handmade paper background by apply double sided tape to the back of the pieces and overlapping the edge of the vellum when I adhered them to the card front. I coloured the back of the image with chalk which gives the image a some muted look. The flower bouquet image is digital from Beccy's Place, the flower wreath is a digital from Melonheadz, and the little girl image is from Heather Ellis which I believe I downloaded from Paper Crafts Magazine quite a while back.
Therese
Cardmaking - March - handmade paper, flowers and ribbon

We got together again this week and made cards!! It is always great to have your friends over for a visit and do something creative while you are catching up!!!
This was our first card of the evening!! I decided to see if I could include my own handmade paper into a card for this month!! I dug out the couple of boxes and was quickly convinced that it would be easy enough to feature handmade paper on a card. I had forgotten how many beautiful papers I had created over the years!!
I tore the papers to size and found coordinating card fronts. I added a ribbon - after I glued my handmade paper to my card on the first one ( was a little distracted ) and to the handmade paper layer in the case of the green one. I had to make sure that I positioned it low enough so I could center my focal element over it. For the red card, I die cut a flower (SX TH Tattered Flowers) from red cardstock, embossed it with Swiss Dots (CB) and added a circle punchie cut from decorative paper. I glued it over the ribbon and added a layered punchie greeting (SU) on the lower right. I had a small piece of ribbon left over so I tied it to the length on the front with one knot to simulate a bow.
For the green card, I cut a poinsettia (Spellbinders) from three different red cardstock and embossed them before gluing them to each other. I added a small yellow circle in the center. I cut a few green "leaves" using the largest poinsettia die which I added around the edges after I glued my assembled flower to my card front. I added a layered punchie greeting to the lower right.
I have not made any Christmas cards yet this month so I can now count ONE towards my goal of making six for this month!!
Therese
Subscribe to:
Posts (Atom)