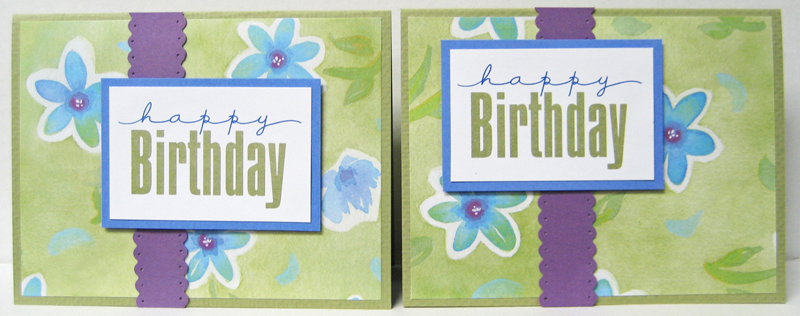
Needed a few cards for the next few weeks and decided to work on another One Sheet Wonder. In this case, I have decided to work with a piece of 12" x 12" decorative paper and to make six cards with it. I have cut my paper into six pieces that measure 4" x 5.25" which will give each card a full background. I have cut three sheets of green coordinating cardstock in half to give me six card fronts and trimmed some purple scraps into strips - one for each card.
I created the greeting using a couple of fonts in two different colours in Corel Draw. I laid them out for a half sheet (4.25" x 11"), printed them on white cardstock and trimmed them to 1 7/8" x 2 7/8" using my cutter. I cut six layers (2 1/8" x 3 1/8") for them from coordinating blue cardstock.
To assemble my cards I started by gluing my decorative papers to the card fronts. I trimmed both long edges of my strips using scallop decorative scissors and then used
a pushpin to pierce each scallop. I glued my greetings to their blue layers and then played with laying them out on my card fronts. I was aiming at leaving as many flowers showing as possible.
As you can see there are lots of lay out possibilities. You can use either portrait or landscape for the card fronts, the accent strips and the greetings!!! So none of the cards are exactly alike. I have also created one of the greetings to be a sympathy one but of course those could have also been all different and all the cards would have been unique. Really enjoying this process and I am sure you will find this a quick way to make up six cards!! Enjoy!!
Therese
*********************************************************************************
OSW 12x12 June 2015
Supplies for making six cards:
1 - 12" x 12" Decorative paper
3 - 8.5" x 11" coordinating cardstock (cards)
1 - 8.5" x 5.5" coordinating cardstock
(2 1/8" x 3 1/8" layers)
1 - 8.5"x 5.5" coordinating cardstock (.75 strips)
6 - 1 7/8" x 2 7/8" greetings on neutral cardstock
-Follow this cutting diagram to cut your decorative paper into six.
- Cut large cardstock in half to make six cards.
- Greetings can be stamped or printed.
- Cut one smaller cardstock into 6 pieces of (2 1/8" x 3 1/8" to create the layers.
- Cut other smaller cardstock (or scraps) into .75 strips.
*********************************************************************************
Wednesday, June 03, 2015
Thursday, May 28, 2015
One Sheet Wonder #2 for a 6x6 to make 4 cards

My second set of cards using my OSW template for using a 6" x 6"piece of decorative paper to make four cards. I used a piece of birdie decorative paper from the same collection as my last set so the colours were very similar.
Here is my first set.

I used digital images and greetings which I colour printed onto white cardstock and then trimmed to 2"x 3". The tree is from an unknown source, the little birdie parade is from Torico, the cupcake is from WhenTheScrapHitsTheFun and the flowers with BEST WISHES is from BlackBerry Jelly. I really enjoyed challenging myself to use the same template, cut the pieces differently and combine them with images instead. Really different looking cards but the same supplies used. It was also interesting this time to use paper that was directional - all the birds needed to be standing up. I started by cutting my 1.75" x 2.75" layers of coordinating cardstock in half diagonally and layering them - two pieces each - behind my watercoloured images.
#1 I cut the my 4.5"x 1.5" piece of decorative paper in half and used some of my .75 inch strips to layer the two pieces on two sides. I just butted the strips where they met and trimmed them off. Make sure to do opposite corners if you have directional paper. I stipple stamped (SU) my blue card front and mounted each of my decorative pieces to opposite corners. I mounted my image overlapping both of them using 3D foam tape.
#2 I cut my 3" x 4.5" piece in two lengthwise and layered a .75 strip of coordinating cardstock between them, offset them and taped them to each other using regular tape. I cut two little squares from the decorative paper and mounted them to two opposite corners behind the decorative paper and then glued this element to my blue stippled card front. I mounted my image overlapping both of them using 3D foam tape.
#3 I cut my 1.5" x 4.5" piece of decorative paper in half diagonally. I cut a strip of .75 coordinating cardstock strip to 4.25" and cut it diagonally. I mounted the cardstock triangles to the back of the decorative paper triangles leaving a margin on the corners. I glued these to opposite corners of my yellow stippled card front. I mounted my image overlapping both of them using 3D foam tape.
#4 I border punched (could have used decorative scissors instead) a strip of my coordinating cardstock with an eyelet punch (MS) and adhered it to the left hand edge of my yellow stippled card front. I glued my 6" x 1.5" piece of decorative paper next to in and trimmed off the excess. I mounted my image overlapping both its right hand edge using 3D foam tape.
I specifically chose to make different occasion cards this time to highlight the flexibility of the OSW design process. Again, this process is perfect for making four cards quickly with minimal supplies and makes a perfect set of cards for gift giving.
Therese
*********************************************************************************
OSW#2 6x6 May 2015
Supplies for making 4 cards:
6" x 6" decorative paper
2 - 8.5" x 11" coordinating cardstock
1 - 8.5" x 5.5" different coordinating cardstock
4 - 2" x 3" images on neutral cardstock
Glue
3D foam tape (optional)
- Follow this cutting diagram to get your decorative pieces ready.
- Cut both large cardstock in two to make 4 cards
- Images/greetings can be stamped or colour printed
- Cut smaller cardstock into four 1.75" x 2.75" pieces for layering and the rest will be trimmed into .75 strips for accents.
Tuesday, May 26, 2015
One Sheet Wonder - 6" x 6" template makes four cards
My sister was visiting last week and she has been working on One Sheet Wonder cards. She is working on ones for a 6" x 6" piece of decorative paper. She has developed one or two which create 3 cards and was currently working on one that creates four cards. I decide to challenge myself and see what I could design.
Here is what I came up with. I am happy with the results of this effort. Below is the template I used to cut my decorative paper, the supply list for four cards and the instructions on cutting the rest of the supplies for creating the cards. Wanting to add a bit of interest to my card fronts I stamped them with a background stamp (SU -Worn) in coordinating ink before I started assembling my cards. I colour printed my greetings (SU) on white cardstock, cut them apart to be 2" x 3" and layered them to their layers. Each card gets one half inch strip of accent cardstock. The layouts are quite easy and can be modified as you wish.
#1 - glued the three 1.5" decorative pieces across the bottom of my stamped green card front, added two short pieces of .5" red accent strips just above them and used 3D foam tape to adhere my greeting over them.
#2 - Glued my two pieces of decorative paper (3" x 1.5") to diagonally opposite corners of my brown stamped card front, added two short strips of .5 red accent cardstock across the middle and added my layered greeting over them using 3D foam tape.
#3 - Glued my 3" x 4.5 inch piece of decorative paper to my stamped green card front, added two short pieces of .5 red accent cardstock to the top and bottom and adhered my layered greeting overlapping it using 3D foam tape.
#4 - Glued a long strip of .5" red accent cardstock to the left hand side of my stamped brown card front, glued my 1.5" x 4.5" piece of decorative paper next to it and adhered my layered greeting over it using 3D foam tape.
All of my greetings were HAPPY BIRTHDAY but of course you could print or stamp whatever greetings suit you when you are preparing your cards. Consider as well that all of the pieces do not need to be cut up. You could leave the long side whole and just trim off the half inch instead of cutting it in half like I did. The same with the last 1.5" x 4.5" piece - you could use it whole or cut it differently which can also be said for any of the other pieces. I think I will play with the pieces the next time I work with this template and see what I can come up with. You can also consider adding images instead of large greetings to change up the look.
One Sheet Wonders are great for getting cards made fast!! They are also wonderful for making cards for gifts because the four cards coordinate and look pretty as a set. So for both reasons it is worth considering using a One Sheet Wonder template for your next cardmaking session. Have fun!!
Therese
******************************************************************************
OSW 6x6 May 2015
Supplies for making 4 cards:
6" x 6" decorative paper
2 - 8.5" x 11" coordinating cardstock
1 - 8.5" x 5.5" different coordinating cardstock
4 - 2" x 3" greetings on neutral cardstock
Glue
3Dfoam tape (optional)
- Follow this cutting diagram to get your decorative pieces ready.
- Cut both large cardstock in two to make 4 cards
- Greetings can be stamped or colour printed
- Cut smaller cardstock into four 2.25" x 3.25" pieces for layering and the rest will be trimmed into .5 strips.
*******************************************************************************
Tuesday, May 19, 2015
Art Quiltie - felt flowers and a little butterfly charm
Another month and therefore another Art Quiltie exchange!! I am loving making these and have been getting back some really great quilties!!
I started with some floral fabric paper I made a while back. I die cut two leaves (TH) from green cotton fabric, a flower (TH) from red felt and a center (SX) from yellow felt. I watercoloured the leaves so they would coordinate more closely with my paper, dried them and then stitched them to my 4" x 4" piece of fabric paper using green thread in my sewing machine. I positioned my red flower over the leaves and stitched it into place using red thread. I added the yellow center, stitched it into place with yellow and added some french knots by hand using yellow embroidery thread. I cut a piece of yellow fabric for the back and stitched it to my batting using straight lines in a plaid design and then stitched the front and back together using a wide zig zag stitch using yellow thread. It was my first time trying this on art quilties and I expect I could have had my stitches just a bit tighter but I am happy with how it looks. On final examination I thought it needed a bit of a 3D embellishment so I stitched on a small butterfly charm!!
Therese
I started with some floral fabric paper I made a while back. I die cut two leaves (TH) from green cotton fabric, a flower (TH) from red felt and a center (SX) from yellow felt. I watercoloured the leaves so they would coordinate more closely with my paper, dried them and then stitched them to my 4" x 4" piece of fabric paper using green thread in my sewing machine. I positioned my red flower over the leaves and stitched it into place using red thread. I added the yellow center, stitched it into place with yellow and added some french knots by hand using yellow embroidery thread. I cut a piece of yellow fabric for the back and stitched it to my batting using straight lines in a plaid design and then stitched the front and back together using a wide zig zag stitch using yellow thread. It was my first time trying this on art quilties and I expect I could have had my stitches just a bit tighter but I am happy with how it looks. On final examination I thought it needed a bit of a 3D embellishment so I stitched on a small butterfly charm!!
Therese
Chunky book page - copper wire owl
Joined a chunky book page swap with the theme of Copper and Wisdom. I recently finished this owl card and thought that owl fit the theme and went looking on line for copper owls! Wow! There were a lot of fantastic copper owl designs so I made a few sketches and headed to my craft room!
I decided to use some heavy copper wire for the structure and lighter weight copper wire to tie the pieces together which is how some of the ones I found had been constructed. I chose some black buttons for the eyes and started forming the structure for the owl's head. I folded my wire hard to create the beak and then created a circle on each side to accommodate my buttons and finished off with the ends creating the pointy ears that most of them have. That looked pretty good and the buttons fit inside them nicely.
One of the sketches I had made had a heart shaped body. Being a bit partial to hearts I decided that mine would have a heart body too. I made a hard corner in my wire and then curved the two ends into a heart shape and added a swirl on each end. That would give me a good place to tie him together. Some of the ones I had seen on line had large beads in their bodies but I decided on another heart for the middle of mine. I created the heart the same way I had created the body - just made it a bit smaller and made sure it would fit inside the other one.
Using the light weight wire I started by securing the top of the head on one side, wired in the button for the eye and then wired the bottom of that space so the button would be in the right place. Next, I wired the head piece to the body making sure that my beak was directly over the bottom of the large heart. Wired the beak in place and then moved on to the other side of the body and wired the head to the body on that side. I had to play with it a bit to get the second button to be in the right place in the loop but just a couple more loops was good enough. I then wired the top of the head on that side. Next, I wired the bottom of the body, added the little heart and wired it into the same section. Moved on to the top side of the little heart where they met the body. Looking good!!
After a bit of checking it out, I decided it needed piece that went from ear to ear and completed the top of his head so I wired that piece in. That was much better!!
I added teal sequins in the eye sockets using glue dots and then added smaller copper ones over them. That finished off the eyes nicely. I did have a 4x4 on my work surface as I worked to make sure that I did not create him too large for my page. Once my owl was finished I used a hammer and flattened him out by tapping all the intersections of wire to ensure that my connections were tight and that the wire structures where laying next to each other. I found this watercolour background paper in my stash, trimmed it and stitched it to my 4" x 4" of blue cardstock. I decided to expand on the wisdom theme by stamping "be kind" on the lower left hand side. My handmade stamp positioner ensured that my words were exactly where I wanted them to be. I attached my owl to my page by using large glue dots behind the eyes and ran wire around the middle of the little heart connection through the page several times.
I am super happy with how he worked out!!! He will be off to my partner in tomorrow's mail.
Therese
I decided to use some heavy copper wire for the structure and lighter weight copper wire to tie the pieces together which is how some of the ones I found had been constructed. I chose some black buttons for the eyes and started forming the structure for the owl's head. I folded my wire hard to create the beak and then created a circle on each side to accommodate my buttons and finished off with the ends creating the pointy ears that most of them have. That looked pretty good and the buttons fit inside them nicely.
One of the sketches I had made had a heart shaped body. Being a bit partial to hearts I decided that mine would have a heart body too. I made a hard corner in my wire and then curved the two ends into a heart shape and added a swirl on each end. That would give me a good place to tie him together. Some of the ones I had seen on line had large beads in their bodies but I decided on another heart for the middle of mine. I created the heart the same way I had created the body - just made it a bit smaller and made sure it would fit inside the other one.
Using the light weight wire I started by securing the top of the head on one side, wired in the button for the eye and then wired the bottom of that space so the button would be in the right place. Next, I wired the head piece to the body making sure that my beak was directly over the bottom of the large heart. Wired the beak in place and then moved on to the other side of the body and wired the head to the body on that side. I had to play with it a bit to get the second button to be in the right place in the loop but just a couple more loops was good enough. I then wired the top of the head on that side. Next, I wired the bottom of the body, added the little heart and wired it into the same section. Moved on to the top side of the little heart where they met the body. Looking good!!
After a bit of checking it out, I decided it needed piece that went from ear to ear and completed the top of his head so I wired that piece in. That was much better!!
I added teal sequins in the eye sockets using glue dots and then added smaller copper ones over them. That finished off the eyes nicely. I did have a 4x4 on my work surface as I worked to make sure that I did not create him too large for my page. Once my owl was finished I used a hammer and flattened him out by tapping all the intersections of wire to ensure that my connections were tight and that the wire structures where laying next to each other. I found this watercolour background paper in my stash, trimmed it and stitched it to my 4" x 4" of blue cardstock. I decided to expand on the wisdom theme by stamping "be kind" on the lower left hand side. My handmade stamp positioner ensured that my words were exactly where I wanted them to be. I attached my owl to my page by using large glue dots behind the eyes and ran wire around the middle of the little heart connection through the page several times.
I am super happy with how he worked out!!! He will be off to my partner in tomorrow's mail.
Therese
Labels:
buttons,
Fat book page,
glue dots,
hand decorated paper,
sequins,
stamping,
stamping jig,
stitching,
wire
Thursday, May 14, 2015
Side spring fold card with a wise old owl
I needed to create a spring fold card for one of my swaps so I went looking for some instructions or tutorials. I have made the usual diamond shape before and wondered it there was any other way of making one. I found this tutorial on Splitcoast Stampers for a spring fold on the side of a card so I thought I would give it a go!! I fussy cut this owl which I found in my stash and watercoloured it to coordinate with the decorative paper I had chosen for this card. The scoring is easy but the folding required that I do it as I watched the video so I could get the diamond to stand on end. Once it was folded correctly I burnished all the folds and then opened it up and embossed the front using a diamond patterned embossing folder. Next, I added my decorative paper to the square and another piece with some coordinating cardstock on the inside of the card. I added a short length of coordinating ribbon and then added my owl using 3D foam tape. This card used an 8.5" x 5.5" piece of black cardstock and would fit in a regular envelope. This was a fun twist to the spring fold card!!
Therese
Therese
Labels:
A2,
cards,
decorative paper,
embossing folder,
folding,
fussy cut,
ribbon,
watercolour
Tuesday, May 12, 2015
Fabric paper tulip postcard
A postcard for one of my monthly group exchanges. The theme was "T" and we were encouraged to be creative!!
I chose a piece of fabric paper I created a while back and trimmed off a 4" x 6" piece. I gold embossed a tulip image on white cardstock and watercoloured it. Stamped "ulips" below the image using my Making Memories magnetic stamp set and red ink. Added some ribbon flags on the right hand side and then stitched it to the fabric paper. I added a piece of red rick rack on the left hand side gluing the ends to the back of the fabric paper and then gluing the whole thing to a postcard backer and stitching it all the way around using the same red thread I used for the tulips. To embellish my chipboard T I embossed all the edges with gold embossing powder and then stamped it in red ink with my stipple stamp (SU). I mounted it to the front of my postcard using 3D foam tape. It still needed a bit of something so I added the little green flower which I watercoloured so it would coordinate with my postcard, added a red center, a gold brad and used glue dots to hold it in place over the rick rack.
Love this fun and spring looking layout. It is has been warm here and I am looking forward to getting into my garden this week.
Therese
I chose a piece of fabric paper I created a while back and trimmed off a 4" x 6" piece. I gold embossed a tulip image on white cardstock and watercoloured it. Stamped "ulips" below the image using my Making Memories magnetic stamp set and red ink. Added some ribbon flags on the right hand side and then stitched it to the fabric paper. I added a piece of red rick rack on the left hand side gluing the ends to the back of the fabric paper and then gluing the whole thing to a postcard backer and stitching it all the way around using the same red thread I used for the tulips. To embellish my chipboard T I embossed all the edges with gold embossing powder and then stamped it in red ink with my stipple stamp (SU). I mounted it to the front of my postcard using 3D foam tape. It still needed a bit of something so I added the little green flower which I watercoloured so it would coordinate with my postcard, added a red center, a gold brad and used glue dots to hold it in place over the rick rack.
Love this fun and spring looking layout. It is has been warm here and I am looking forward to getting into my garden this week.
Therese
Sunday, May 10, 2015
Mother's Day cards for my daughters
Both of my daughters are great Mom's!! This year I made their cards using similar materials. I started with the coral ribbon which is beautifully soft and went looking for coordinating decorative paper. I chose these two!! They are very different but still contain the coral colour of the ribbon. I decided to make one portrait and the other landscape to change things up a bit so they would not look too much the same. For the top one, I adhered a strip of ribbon across my layer of decorative cardstock and glued that to my coral card front. I watercoloured my flower image (Cruzines) to coordinate, layered it onto green and adhered it to my card front using 3D foam tape. I stamped my greeting in red on the lower right hand side and added a short length of ribbon tied to the one on the front of my card. Perfect of my oldest daughter!!
For my next card, I added a length of the coral ribbon to my background and adhered the ends to the back using double sided tape. Next, I layered my decorative cardstock over a layer of bright green tissue paper which really helped that colour pop from the background then I glued this element to a pale blue card front. I watercoloured my image to coordinate with my background, layered it onto coral cardstock and then adhered it to my card front using 3D foam tape overlapping the ribbon. I tied gold cording to the ribbon to create a bit of a ruffle and then added a small colour printed tag greeting which I tied to the gold cording using white crochet thread.
We love our girls! Besides being very special people they have blessed our lives with grand children for which we are very grateful!!
Be sure to celebrate Mother's Day with the women who are close to you!!
Therese
For my next card, I added a length of the coral ribbon to my background and adhered the ends to the back using double sided tape. Next, I layered my decorative cardstock over a layer of bright green tissue paper which really helped that colour pop from the background then I glued this element to a pale blue card front. I watercoloured my image to coordinate with my background, layered it onto coral cardstock and then adhered it to my card front using 3D foam tape overlapping the ribbon. I tied gold cording to the ribbon to create a bit of a ruffle and then added a small colour printed tag greeting which I tied to the gold cording using white crochet thread.
We love our girls! Besides being very special people they have blessed our lives with grand children for which we are very grateful!!
Be sure to celebrate Mother's Day with the women who are close to you!!
Therese
Mother's Day card for my Mom
My Mom's favorite colour is blue so I try to use it when I am creating her Mother's Day card. I started with these strips of rice paper napkin which my daughter gave me a long while ago. I love the colour and design with the little bit of gold in it and the lovely scalloped edge. I glued two strips to the pale blue card front using glue stick. I created the central element using a strip of white cardstock which I punched on both long edges using a doily border punch (MS) and next I embossed the center portion using a border embossing folder (SU) which coordinated reasonably well. I glued this element to my card front and trimmed all the papers to the edge of the card. I added a length of narrow navy blue ribbon over the embossing and glued the ends to the inside of the card using double sided tape. I cut a 5/8" strip of white cardstock and embossed the greeting (SU) in gold embossing powder. I used a label framelit (SX) to trim the ends one at a time because I needed the greeting to be longer than the size of the framelit. I like having the flexibility of using my tools more creatively!! I sponged the edges just a bit with blue ink and mounted it over the ribbon using 3D foam tape.
I am grateful for everything that my Mom taught me as I was growing up and how she continues to share as we grow older together.
Therese
I am grateful for everything that my Mom taught me as I was growing up and how she continues to share as we grow older together.
Therese
Saturday, May 09, 2015
Anniversary cards using heart frame die cuts
I had a few spare heart frame die cuts (SX) sitting on my desk from creating these wedding cards so I played around with them to create these anniversary cards. I used a teal and white decorative paper on the top one and dark blue embossed cardstock for the bottom one. I stamped the greetings on vellum and embossed them - silver embossing on the top one and white with clear embossing on the bottom one. I used the frame to make a line on the vellum and then cut out the vellum to just fit behind the frame. I attached it to the die cut using small pieces of double sided tape.
I added pink cardstock behind the hearts on the top one and used markers to colour the vellum from the back on the bottom one. I tied on a short length of pink seam binding to the frame on the top card and used a silver organza ribbon on the bottom card. I added the backgrounds to my card fronts and then added my focal elements using 3D foam tape.
Therese
I added pink cardstock behind the hearts on the top one and used markers to colour the vellum from the back on the bottom one. I tied on a short length of pink seam binding to the frame on the top card and used a silver organza ribbon on the bottom card. I added the backgrounds to my card fronts and then added my focal elements using 3D foam tape.
Therese
Labels:
A2 cards,
anniversary,
cards,
die cuts,
embossing folder,
ribbon,
seam binding,
stamping,
SX - sizzix,
thermal embossing,
vellum
Friday, May 08, 2015
Fabric paper Thank you card
Needed a quick card for a friend who has been babysitting my tomato plants for the last week or so. I used a piece of fabric paper which I used to make this chunky book page and made a while back. I simply cut a piece 4" x 5.25" and stitched it to a yellow card front and added a layered punchie greeting.
I love the texture of fabric paper and am thinking it is time to make more!! I only have a small piece left from this last sheet!! I have been collecting tissue paper and paper napkins which will provide some interesting images to incorporate!!
Therese
I love the texture of fabric paper and am thinking it is time to make more!! I only have a small piece left from this last sheet!! I have been collecting tissue paper and paper napkins which will provide some interesting images to incorporate!!
Therese
Labels:
A2,
cards,
fabric paper,
layered punched shapes,
scallop punchies,
stamping,
thank you
Tuesday, May 05, 2015
Graduation card with musical background paper
I created this card for my niece who is graduating from high school this year. She will be going on to study music in the fall so I chose to create a musical background.
I started with a page from a damaged songbook. It had an unfortunate encounter with flooding and had become unusable. It was donated to me to use for my cardmaking - got to love free supplies!!
I added several watercolour washes to the page in warm colours but mostly greens and browns. Next, I stamped it with stars in dark green distress ink and then stippled (SU) it with brown ink. I cut this label (TH) out of green cardstock and gold embossed my greeting onto it. I used my homemade stamping jig, which I have been using quite a lot lately, to get it properly centered. I added dots around the edges using a gold gel pen. The ribbon was incorporated into my card when I stitched the decorative paper to the card front. I trimmed the ends diagonally and mounted my greeting over it using mini gold brads. Was fun to create this background paper!
Therese
I started with a page from a damaged songbook. It had an unfortunate encounter with flooding and had become unusable. It was donated to me to use for my cardmaking - got to love free supplies!!
I added several watercolour washes to the page in warm colours but mostly greens and browns. Next, I stamped it with stars in dark green distress ink and then stippled (SU) it with brown ink. I cut this label (TH) out of green cardstock and gold embossed my greeting onto it. I used my homemade stamping jig, which I have been using quite a lot lately, to get it properly centered. I added dots around the edges using a gold gel pen. The ribbon was incorporated into my card when I stitched the decorative paper to the card front. I trimmed the ends diagonally and mounted my greeting over it using mini gold brads. Was fun to create this background paper!
Therese
An Art canvas with a life quote
I created this art canvas for a young woman who is graduating from high school in June and attending university away from home.
I gave the deep 8" x 10" canvas a teal acrylic paint colour wash on the front and sides then added a few blue spatters before leaving it to dry. I cut the letters from black art paper using a set of Cookie Cutter alphabet dies and used a piece of low tack masking tape as a line to set them all in place and adhered them with white glue applied using a fine tip bottle. After drying it overnight, I stamped flourishes around the front edge using black Memories ink and a small flower/flourish clear stamp. I had to apply a little support from underneath in a few places to get a full impression. I used my stipple stamp (SU) and the black ink to add a bit of texture within the flourishes and the lettering. I used a black permanent marker to colour the back portion of the sides and used masking tape to ensure a nice straight line.
To seal my canvas I applied a coat of matte Modge Podge to the sides and the front. Once that was dry, I added a length of black cotton lace to the front portion of the sides using a thin piece of double sided tape on the back of the lace to keep it in place and stapling the two ends at top center. This beautiful fabric flower covers the staples. It is held in place with a glue dot and a couple staples in the outer layers to ensure it is secure. I used a black sharpie to colour the staples so they don't show. I added a hanger on the back and signed it. It is ready to go!! Really enjoyed making this canvas!!
Therese
I gave the deep 8" x 10" canvas a teal acrylic paint colour wash on the front and sides then added a few blue spatters before leaving it to dry. I cut the letters from black art paper using a set of Cookie Cutter alphabet dies and used a piece of low tack masking tape as a line to set them all in place and adhered them with white glue applied using a fine tip bottle. After drying it overnight, I stamped flourishes around the front edge using black Memories ink and a small flower/flourish clear stamp. I had to apply a little support from underneath in a few places to get a full impression. I used my stipple stamp (SU) and the black ink to add a bit of texture within the flourishes and the lettering. I used a black permanent marker to colour the back portion of the sides and used masking tape to ensure a nice straight line.
To seal my canvas I applied a coat of matte Modge Podge to the sides and the front. Once that was dry, I added a length of black cotton lace to the front portion of the sides using a thin piece of double sided tape on the back of the lace to keep it in place and stapling the two ends at top center. This beautiful fabric flower covers the staples. It is held in place with a glue dot and a couple staples in the outer layers to ensure it is secure. I used a black sharpie to colour the staples so they don't show. I added a hanger on the back and signed it. It is ready to go!! Really enjoyed making this canvas!! Therese
Labels:
3D embellishments,
acrylic paint,
art canvas,
die cuts,
flourish,
framelits,
lace,
quotes,
sharpie markers,
stamping,
stippling
Monday, May 04, 2015
Another birthday card with the Grimms Fairy Tale art
My youngest grand daughter is having a birthday this week!! I chose some of the same art that I used on her cousin's birthday card - the watercoloured Grimm's Fairy Tales!! This piece was round so I layered it onto white and then onto dark blue (Nestibilities). I stamped the greeting on a yellow layer using dark blue ink, punched the bottom edge with a scallop border punch (SU) and then embossed it using the Swiss Dots embossing folder (CB) avoiding the greeting. I used a hammer to selectively emboss the area around the greeting. I added iridescent glitter glue to the scallops on the yellow layer as well as those on the scallop circle and let them dry. Once dry, I added a length of dark blue vintage seam binding on the right hand side of the yellow layer using double sided tape to secure both ends to the back of the layer. I tied a short piece to the front and trimmed both ends diagonally. The look of a bow without the bulk!! I glued the yellow layer to my dark blue card front and then added my layered focal element above the greeting and over the seam binding. Really turned out well!!
Therese
Therese
Saturday, May 02, 2015
Fun themed "D" postcard
I created this fun postcard for a "D" themed postcard for a swap on one of my groups. We were encouraged to be creative so I played around with a few ideas before I decided to create this card with lots of D words. I have provided a list of the ones I thought of as I went along in an envelope on the back so that the recipient can take up the challenge of guessing them before they dig it out. I used a book page as my base and added a bit of paint and ink. A bit of stamping and drawing, fabric and punchies and finally my nicely decorated letter D.
Had a great time making this postcard and I hope my partner will enjoy the D word challenge!!
Therese
Had a great time making this postcard and I hope my partner will enjoy the D word challenge!!
Therese
Labels:
acrylic paint,
book pages,
dimensional magic,
drawing,
fabric,
machine stitching,
punchies,
stamping,
washi tape
Thursday, April 30, 2015
Sympathy card
Created this card for a family member who has experienced a loss. I will add making a few more to my To Do list because I prefer to have a few on hand.
I started with this wonderful botanical paper I created a while back. I layered it onto a soft white layer which I had embossed with little flowers and added a white ribbon between the two. I glued the ends to the back of the layer and added stitching to the decorative paper. I added a piece of green grosgrain ribbon over the white and layered on my stamped greeting which I also stitched into place. The bottom needed a bit of something so I punched the bottom edge with a decorative border punch (SU). I glued the entire element to a purple card front.
Therese
Labels:
A2,
cards,
decorative paper,
embossing folder,
machine stitching,
pressed botanicals,
ribbon,
stamping,
sympathy
Wednesday, April 29, 2015
Yellow chunky book page
I created this cute little 4" x 4" chunky book page for a swap on one of my groups!! I found this fabric paper in my stash and I thought this large flower was perfect for the yellow and bright theme. I added the butterfly quote which was stamped on transparency and the little butterfly punchies which were given to me by a friend. They were punched from some very bright and shiny paper!! I added an embossed cardstock backer in green and sandwiched several coordinating ribbons in between before I stitched all the pieces together using yellow thread in my sewing machine.
I love making fabric paper and this one worked out so well for this project!!
Therese
Labels:
fabric paper,
Fat book page,
machine stitching,
punchies,
ribbon,
stamping,
transparencies
Monday, April 27, 2015
A little sewing project!
I have been practicing my sewing skills!! I used to do much more sewing when my children were home. I made this little zippered pack for my grand daughter for her birthday. It was fun to add some decorative stitching and work out a way to add a lining. The belt is way too long but I thought more was better in case she decides to wear it over her shoulder instead of around her waist.
Therese
Therese
Sunday, April 26, 2015
Fairy tale art for this birthday card
My oldest granddaughter has a birthday coming up!! My sister gave me a set of postcards a while back and I thought I would see if I could incorporate them into my cardmaking. The art is wonderful - Grimms Fairy Tales - in soft watercolour so I decided not to cover them up too much. I added a gros grain ribbon at the very bottom attaching the ends behind the postcard using double sided tape. Next, I layered the postcard onto a variegated yellow orange tissue paper and then onto a large green card front which I had stippled around the edges using my stipple stamp (SU) with green ink. I sponged the edges of an oval greeting punchie and added it over the ribbon using 3D foam tape.
I am really liking the look of the tissue paper layers I have been using on my cards lately!!
My granddaughter is an budding artist so I am sure she will appreciate the artistic and the fairytale aspects of this card!
Therese
Thursday, April 23, 2015
Boho Bangles - third time's a charm!
Here is my final boho bangle!!! I was very tempted to create my second bracelet exactly like my first except in different colours. Instead I decided to use fabric strips which is what he uses in the video. I used a short piece of bias trim I had in my stash in this beautiful orange/yellow plaid. You cannot even tell it is a plaid!! I chose large seed beads that coordinated with the lines of thread in the fabric - yellow, turquoise, leaf green and red. I created clusters instead of an all over pattern. I doubled up the reds in the middle of the clusters just to change things up a bit. I also used gold wire on this one because it coordinated the best. I also added a large turquoise feature between the last two clusters by using a few slightly larger beads and layering dyed shells on both sides of the central turquoise
bead. I really like the colour combinations in this one!!
The girls on the group have been saying that once you get started making these it is hard to stop!! Considering that they are so easy to make and require very little supplies there is no reason not to have an armful that coordinate with your summer outfits!!
I am hoping that these will coordinate with my partners summer attire!!
Therese
bead. I really like the colour combinations in this one!! The girls on the group have been saying that once you get started making these it is hard to stop!! Considering that they are so easy to make and require very little supplies there is no reason not to have an armful that coordinate with your summer outfits!!
I am hoping that these will coordinate with my partners summer attire!!
Therese
Boho bangles - the second time around
Therese
Boho bangles

Boho Bangles!!
I signed up for this swap because it sounded interesting and was a project I had never tried before!
I find swaps are a great way to try a "new to me" technique or project. A link was provided for us to preview the technique - Stackable Bangles by Mark Montano. After watching the video and perusing the supplies I went looking for zip ties, beads, ribbon and wire!!

I had to modify my zip ties because they were not long enough for the bangles I needed to make for my partner. We all provided our measurements so our partners could create a bracelet which would fit. I created my armature by wrapping to each other a zip tie and a hair elastic with heavy weight thread and tied off the ends. Next, I wrapped the armature with a length of shimmery blue/pink organza ribbon. Bead were next!! I found some pink, blue, clear and pearl beads which all looked good together and worked with the ribbon.I cut a length of blue 28 gauge wire, created a loop around the armature and secured the wire by twisting the end around body of the wire. I started wrapping the wire around the armature adding one bead at a time leaving the bead on the outside edge of the bracelet.
I chose to repeat a pattern - blue, pearl, pink and clear. These beads were pretty much the same size - some plastic and the others glass seed beads. I really like the look of this bracelet but found that I had measured too closely and my bracelet was too small once I had wrapped it with ribbon and beads. So it was not going to be suitable for my partner and sadly is also too small for me so I will have to find a new home for it.
After a bit of reflection I decided to create my armature differently for my next bangle and go with a version much closer to what was suggested in the video. I found that the elastic on the outside of the zip tie made it difficult to position the beads evenly. The way of creative discovery is trial and error!!
Therese
Sunday, April 19, 2015
White on white wedding card
I made a couple of wedding cards today!! I have been inspired by the white on white cards I have been seeing on Splitcoast Stampers and thought I would give it a try. I die cut the oval frame (SX) out of white cardstock and backed it with vellum onto which I had stamped and silver embossed my greeting. I used the die cut as a guide to stamp my greeting by laying it over the sheet of vellum and stamping through the opening. I drew a pencil line around the die cut and then trimmed out the vellum oval using regular scissors. I had to trim a little more in a couple of places but I wanted to make sure that the hearts and spaces were backed with the vellum as well. Once they lined up well I attached the vellum to the back of the die cut using double sided tape. I left both sides free of tape so I could insert lengths of white vintage seam binding between the frame and the vellum on both sides. I cut a white layer and embossed it with the Musical Flourishes embossing folder (CB). Because this is a large card I had to emboss it twice. I was very careful when placing my spacer over the embossing folder to ensure that the pressure was only applied to the design and not to the edge of the embossing folder. The edge will often give you an impression when you put it through your Big Kick and I wanted to avoid that mark. I also wanted to avoid flattening the embossing which I had already done with that edge when I put it through the second time. It was worth being careful because the layer turned out beautiful. I added 3D foam tape to the back of the frame, positioned it on my embossed layer and adhered the ends of my seam binding to the back of it using double sided tape. I layered this large element to a white card front.
I really like white on white for wedding cards and these turned out great. I used a different embossing folder on the other one but otherwise they are identical. That is not usually my style but I wanted to be time efficient and the cards are going in two different families that are provinces apart.
Therese
Labels:
cards,
CB - cuttlebug,
die cuts,
embossing folder,
seam binding,
SX - sizzix,
thermal embossing,
vellum,
wedding
Saturday, April 18, 2015
For a special guy
DH is having a birthday on the weekend!! To be sure that his card was ready on time I decided to work on it today!! I was inspired by a card on Splitcoast Stampers that featured strips of decorative papers so I went looking in my scrap bucket to see if I could find several that coordinated. Fortunately, I did and I also found a little frame left over from these cards that was the right colour to be my accent. I started by punching HAPPY on one strip and then arranging the rest of them til I was happy with the look of them. The strips overlapped just a bit so I glued them to each other to create a full background for my card. Next, I used my homemade stamp positioner to stamp "birthday" on the one below the punched one in brown and embossed it with clear embossing powder. I glued my background to the front of a brown card. I added a strip stamped with a leafy background and glued my little green frame over it. I found a leaf just the right colour in my bucket of leaf punchies. It still needed a bit of something so I added dots to the bottom of each strip of decorative paper with a fine tip Sharpie!! That was better!! My card is ready to go for the weekend!!
Therese
Therese
Labels:
A2,
birthday,
cards,
decorative paper,
die cuts,
masculine,
punches,
punchies,
sharpie markers,
stamping,
thermal embossing
Friday, April 17, 2015
Birthday card with a tissue paper layer
Another card I created last week and am posting today!! The flower image is from Anji's Antics. I laser printed it, trimmed it close and coloured it with watercolours then layered it onto dark purple. I used the same purple cardstock for my card front, added a layer of red tissue paper and then mounted a layer of yellow decorative paper. I mounted my image using 3D foam tape over the paper, added a strip of red cardstock below it and mounted my layered and sponged greeting over it. The greeting is colour printed, punched out (SU), sponged with a bit of purple ink and then backed with a yellow punchie which as been split in the middle to allow it to show at the top and bottom.
I really like the way the tissue paper gave me a soft red colour between the yellow and the purple. I will be using tissue paper as a layer again!! It adds dimension and soft colour!!
Therese
I really like the way the tissue paper gave me a soft red colour between the yellow and the purple. I will be using tissue paper as a layer again!! It adds dimension and soft colour!!
Therese
Pressed botanicals for exchange cards
I needed two cards for my monthly card exchange so went looking for some cool paper to use as a background. I found this botanical paper I used on these cards and thought that would do very well for spring cards!! I created the background paper by sandwiching pressed botanicals between two pieces of white tissue paper using Matte Modge Podge. I love it!!
I cut the background paper to fit a white layer I had trimmed to fit on my purple card fronts. I used a glue stick to adhere them just in the middle and then used my sewing machine with white thread to stitch them together and incorporated a yellow strip of cardstock while I was at it. I glued this decorative layer to my card front and added a punched colour printed greeting (SU) overlapping the strip!!
The botanical paper really needs to be backed with white to highlight the colour and detail of the paper. Only a few more pieces of this paper left but I have scanned it so I can always print off a few sheets but it will not have the same translucency and texture!!
Therese
I cut the background paper to fit a white layer I had trimmed to fit on my purple card fronts. I used a glue stick to adhere them just in the middle and then used my sewing machine with white thread to stitch them together and incorporated a yellow strip of cardstock while I was at it. I glued this decorative layer to my card front and added a punched colour printed greeting (SU) overlapping the strip!!
The botanical paper really needs to be backed with white to highlight the colour and detail of the paper. Only a few more pieces of this paper left but I have scanned it so I can always print off a few sheets but it will not have the same translucency and texture!!
Therese
Art Quiltie - a butterfly for April
Just finished my butterfly art quiltie for our April swap!!

I started with a white on white piece of cotton (4" x 4") and added two layers of die cut fabric. I cut the main butterfly (SX) from some bright fabric backed with heat & bond and the outline from white iron on muslin. The muslin was very bright in contrast to the fabric so I used watercolours (SU) to dye it - blue, purple and pink. I used a black sharpie to colour the body. After removing the release paper from the back of the large butterfly I ironed it to the white fabric and then positioned the lacy wings and the body over it and ironed them into place. Love how it worked out!! Next I added batting and layered both of them over a larger turquoise square of cotton. I double folded the edge of the turquoise over the white and stitched it with a running stitch all the way around with white embroidery floss. I outlined the butterfly with purple floss and added antenna with black floss. To add texture to the white background I used scattered running stitches in white floss and added a few pearly seed beads as I went. Finally, I added two turquoise sequins held in place using pearly seed beads. Love the feel of the textured areas!!
Therese

I started with a white on white piece of cotton (4" x 4") and added two layers of die cut fabric. I cut the main butterfly (SX) from some bright fabric backed with heat & bond and the outline from white iron on muslin. The muslin was very bright in contrast to the fabric so I used watercolours (SU) to dye it - blue, purple and pink. I used a black sharpie to colour the body. After removing the release paper from the back of the large butterfly I ironed it to the white fabric and then positioned the lacy wings and the body over it and ironed them into place. Love how it worked out!! Next I added batting and layered both of them over a larger turquoise square of cotton. I double folded the edge of the turquoise over the white and stitched it with a running stitch all the way around with white embroidery floss. I outlined the butterfly with purple floss and added antenna with black floss. To add texture to the white background I used scattered running stitches in white floss and added a few pearly seed beads as I went. Finally, I added two turquoise sequins held in place using pearly seed beads. Love the feel of the textured areas!!
Therese
Labels:
art quiltie,
die cuts,
fabric,
floss,
hand stitching,
heat and bond,
seed beads,
sequins,
sharpie markers,
watercolour
Wednesday, April 15, 2015
Birthday ATC card
Made this card last week and am just getting it posted today!! I started with the focal image, an ATC from my collection which features a paper napkin layer embossed with clear embossing powder which I layered onto red. I adhered it to a white card front to which I had added a blue layer embossed with the Decorative Dots embossing folder (SU) which I just recently purchased when my sister, Sylvia, hosted an online party. I added a length of yellow gros grain ribbon. I inserted the end on the left hand side through a slit I cut on the spine of the card and used double sided tape to secure both ends to the inside front of the card. I added this greeting which I cut using the smallest Deco Labels framelit (SU) after I laser printed it and then watercoloured it to coordinate with the card. Another one to add to the stash!
Therese
Labels:
A2,
ATC,
birthday,
cards,
die cuts,
embossing folder,
laser printing,
napkins,
ribbon,
thermal embossing,
watercolour
Subscribe to:
Posts (Atom)